A Coreopsis Opportunity

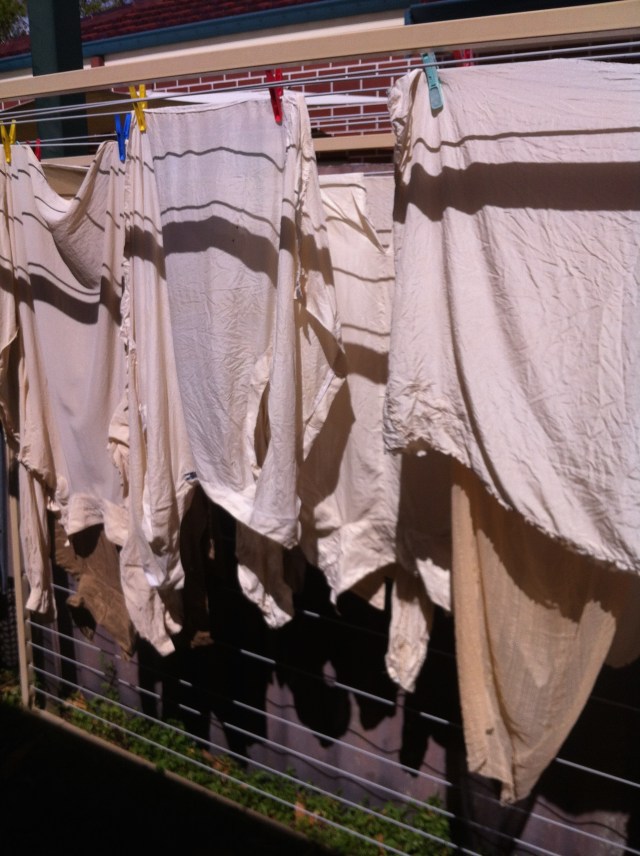
A couple of weekends ago WAFTA (http://www.wafta.com.au) was invited to an Open Garden in Victoria Park here in Western Australia.  The organisers had the foresight to ask us  to complement the beautiful garden beds with demonstrations of how fabric can be enhanced with plants.  Several of us went on both days and had a ball boiling and steaming our fabrics with the materials we had collected (no, NOT from the gorgeous garden!).

Visitors were surprised to see how much colour can be wrangled from plants such as onion skins, Eucalyptus sp. leaves and purple carrots.  I wonder if any will try it themselves?  Probably not. One of the common comments made to me was “I am so looking forward to retirement!”.  I completely understood this; my textile output was quite limited when I worked full-time.  It’s quite limited now, as a matter of fact, but that’s because…[insert excuses here].

I came home from that garden with a small bucket of dried coreopsis flowers that had been boiled up in a pot.

My work coreopsis image

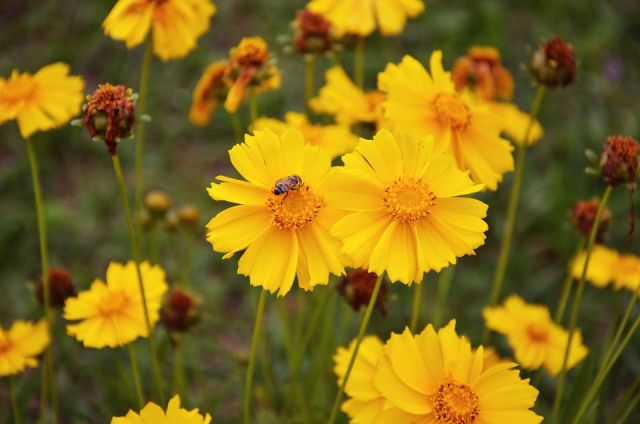
What the coreopsis flowers look like before they are picked and dried. Photo from https://www.thespruce.com/growing-and-using-coreopsis-in-the-flower-garden-1402839

Well, the above was a long-winded introduction to the next short piece.  Yesterday afternoon  I suddenly rose, newly energised,  from the couch after a long dreary  weekend  with a “lurgie”.

I assembled a small bucket of vinegar water, the aforementioned bucket of coreopsis, four torn pieces of silk fabric and assorted plant matter, principally some purple carrot and various species of  Eucalyptus leaves which had been soaking in water for the past two weeks.  Each piece of silk was first soaked briefly in the vinegar solution. I made four parcels of fabric plus plant matter, spraying half of each piece with iron water and folding it over the top of the plant matter like an iron blanket and then tying the bundles tightly together with either string or between tiles.  Two of the bundles had onion skins added to the mix; the remaining two contained purple carrot and eucalyptus only. In addition to the iron present in the sprayed-on iron water, some of the tiles were clamped with what I call “bulldog clips”, which of course contain metal and rust easily after even one use in a dye bath.

After one hour simmering in the coreopsis bath the fabric bundles were left overnight to cool before being unwrapped, dried, then washed an ironed.

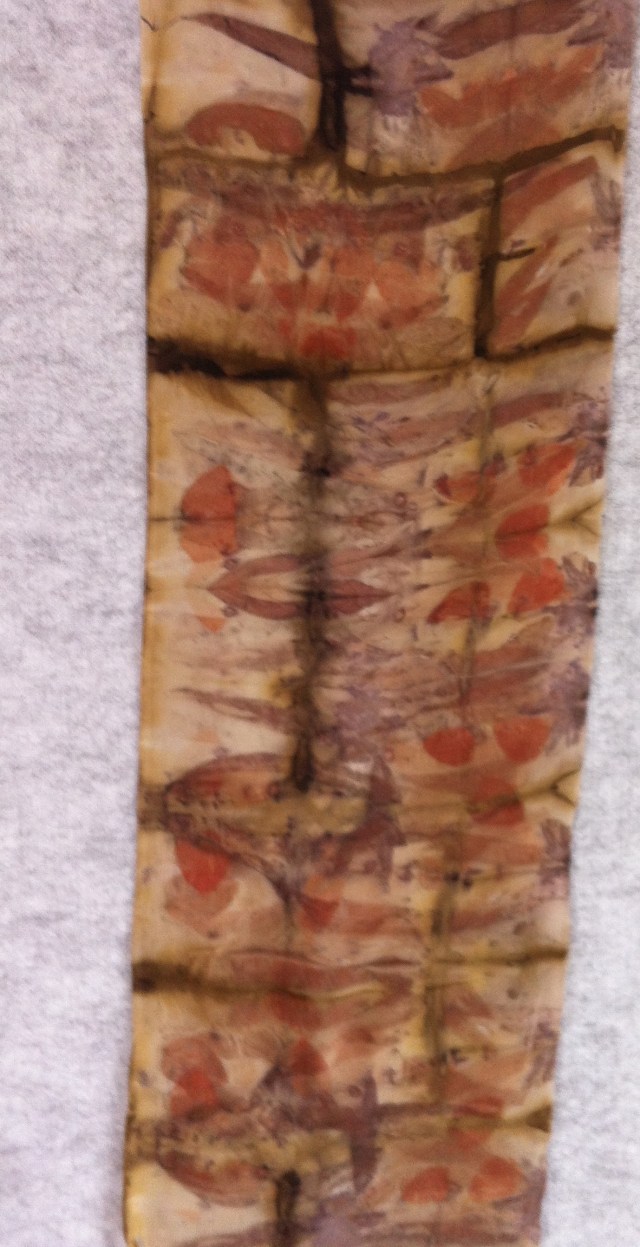
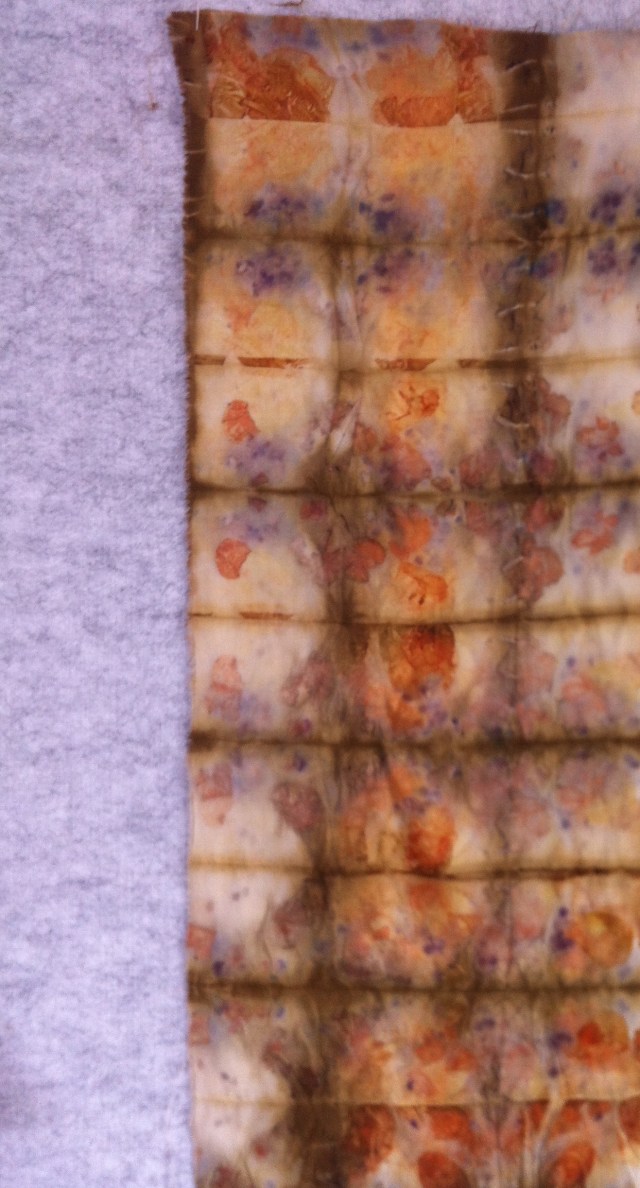
Here are the results:


IMG_6680

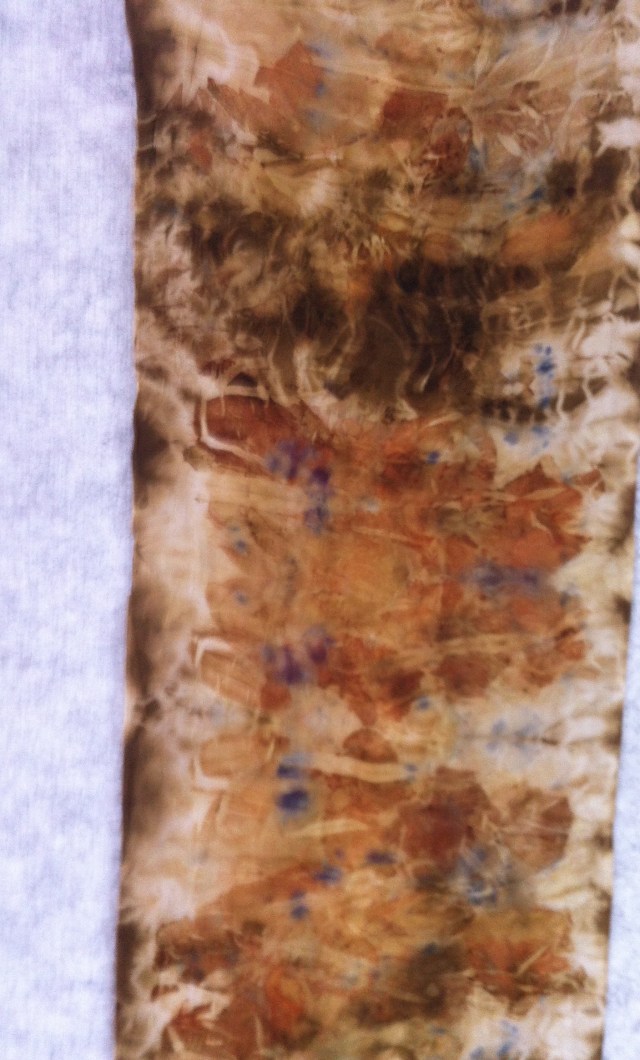
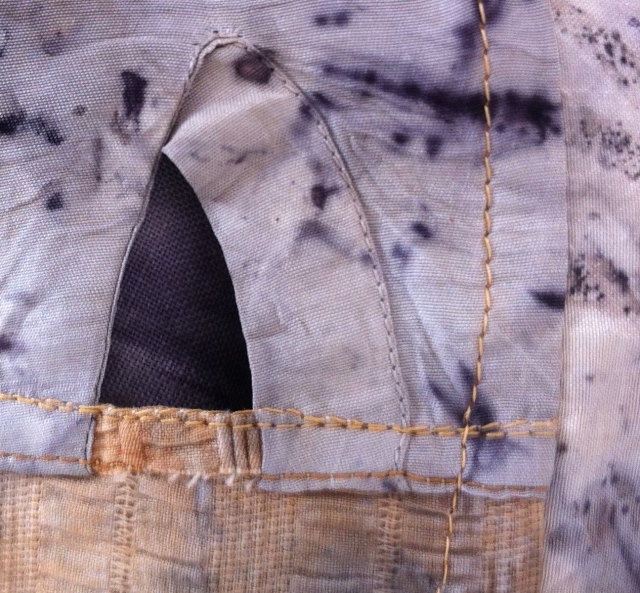
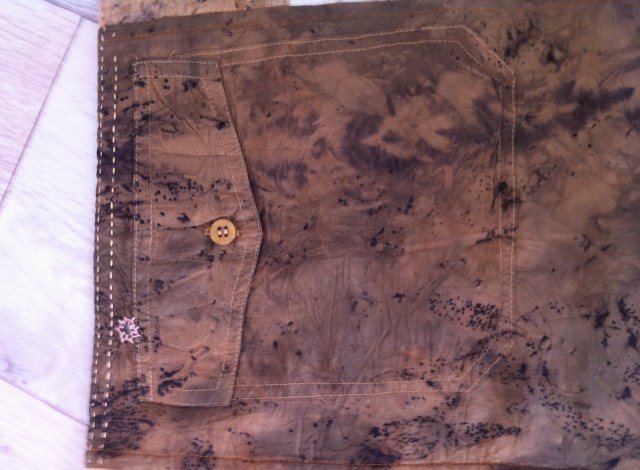
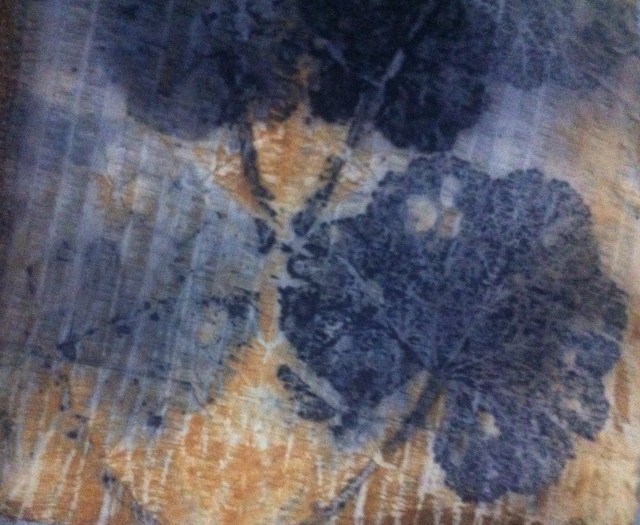
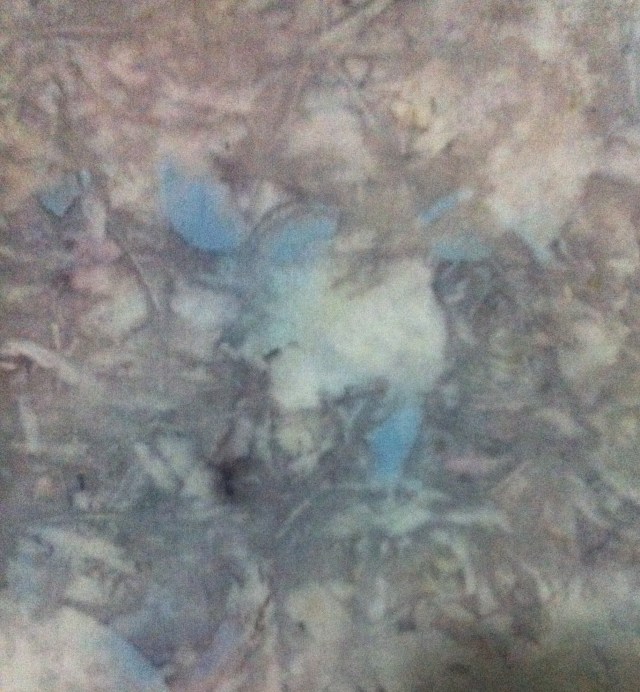
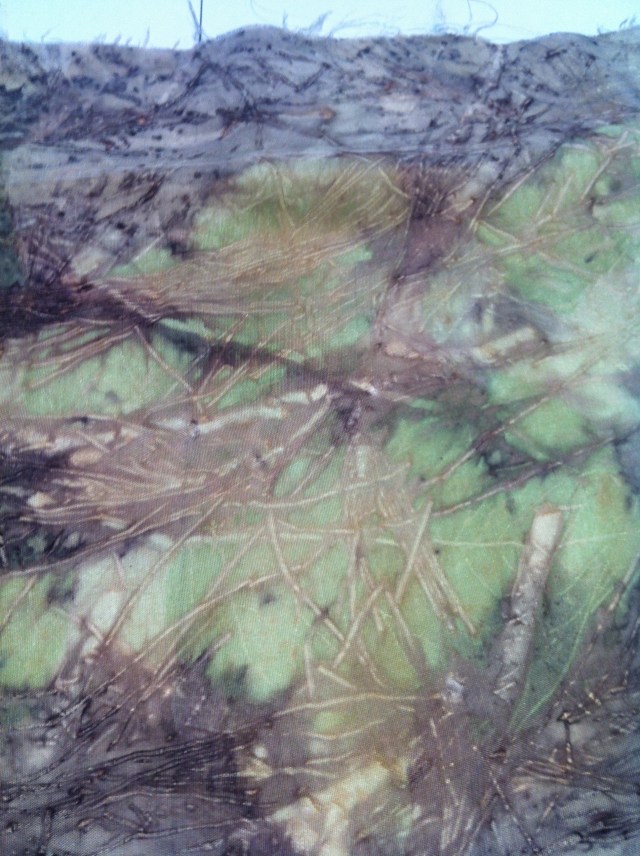
Silk, purple carrot, red and brown onion and eucalypt wrapped tightly on itself and “cooked” for one hour in coreopsis bath

IMG_6679

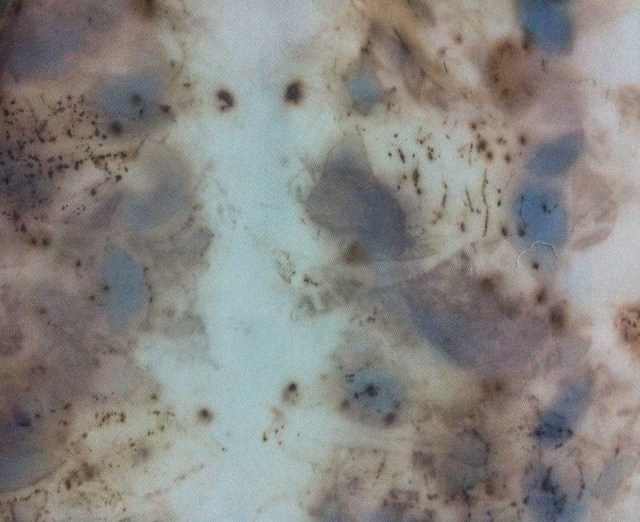
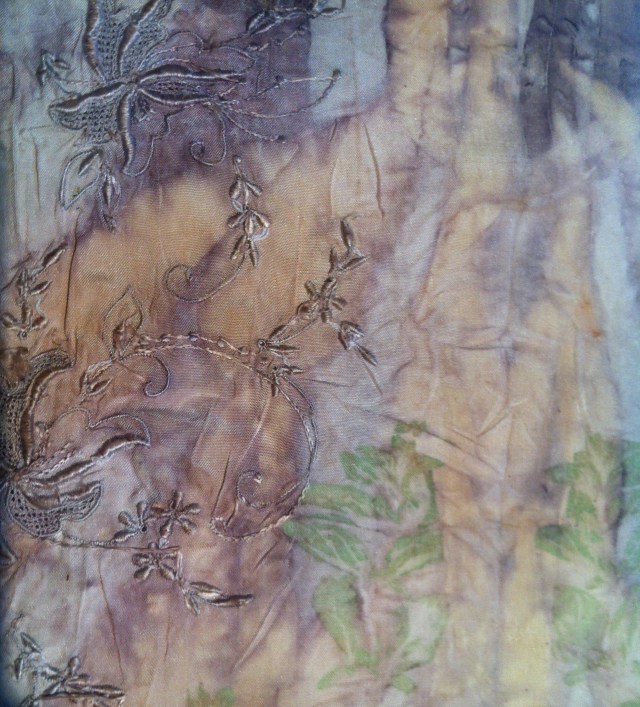
Silk, purple carrot and eucalyptus leaves folded and clamped between tiles and simmered in coreopsis bath for one hour.

IMG_6678

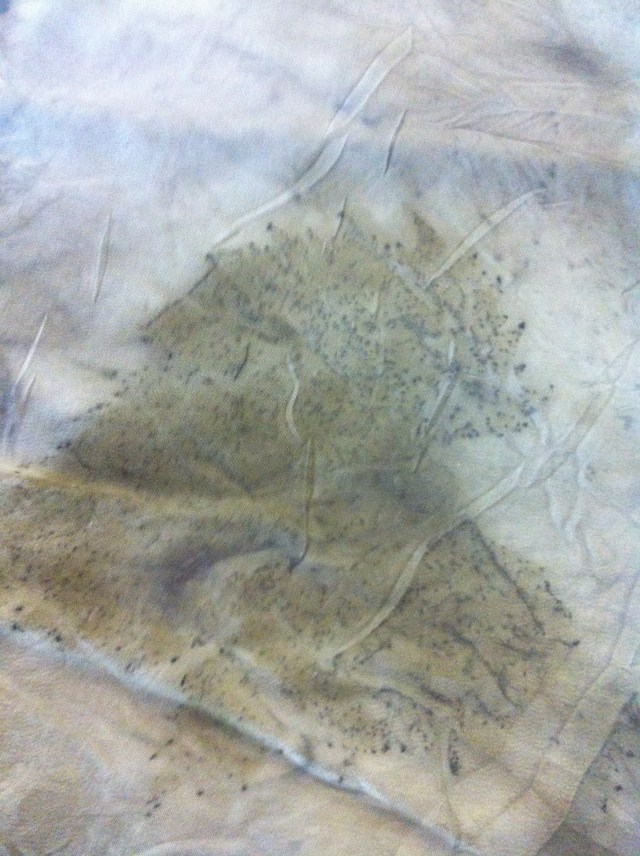
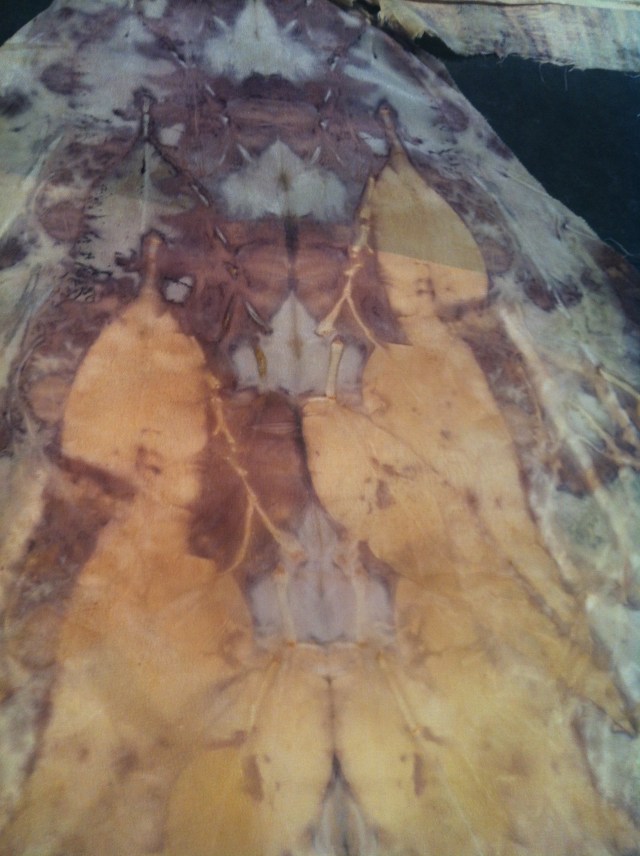
Silk, purple carrot and eucalyptus leaves rolled on itself and tightly bound with string before being simmered for one hour in coreopsis bath.

IMG_6677

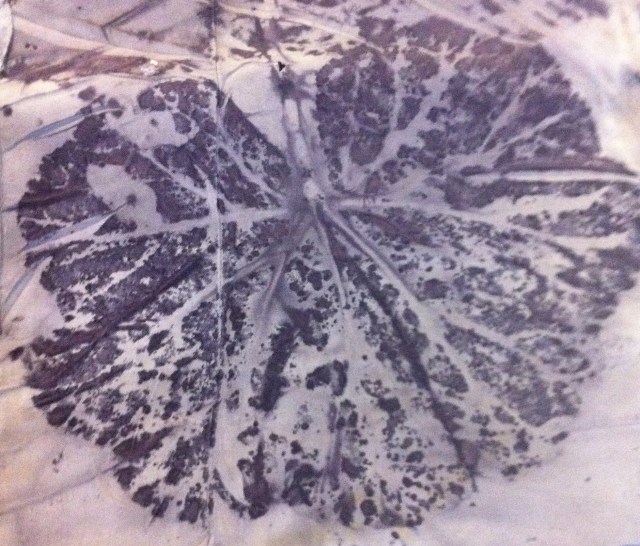
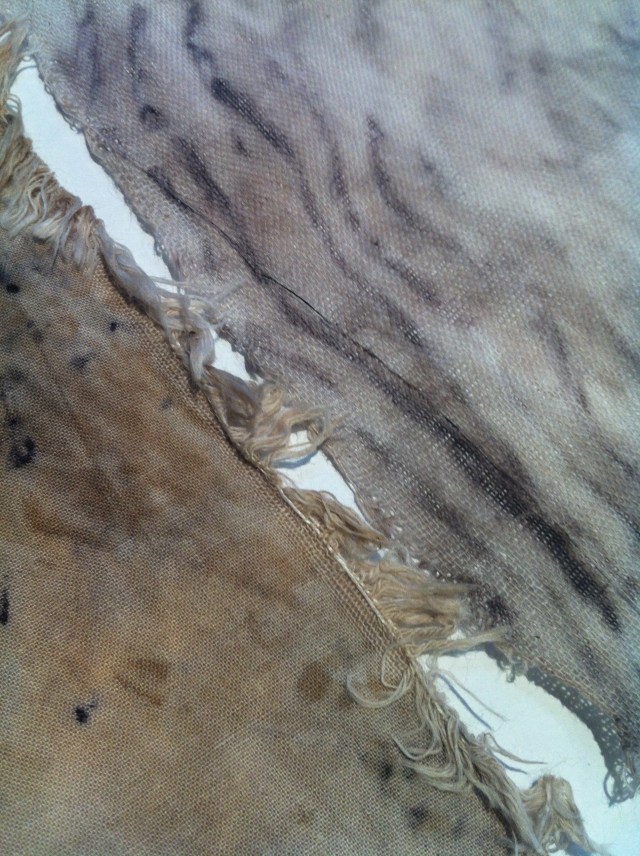
Silk, purple carrot, eucalyptus leaves and red and brown onion skins folded into a small bundle and clamped tightly between tiles before being simmered in a coreopsis bath for one hour.

I have deliberately left plenty of the background play grey design board showing in the images to indicate how bright the colours are.

The surprising thing to me was that the pieces are so different from each other in tone when all went into the same pot!  Another curiosity is the lack of much yellow given the bath was a yellow one.  One of the above pieces shows some of the expected olive-green which is a product of the coreopsis and the iron but the others don’t even seem to show that.  I did notice that the rinsing stage yielded a lot of yellow in the rinse water.  That’s handy.

Finally, since I like to fussy cut these prints into larger pieces here are some details:


Posted in dyeing with red onion, Eucalyptus cinerea as dye, Eucalyptus sp as dye, Iron mordant, Natural dyeing, purple carrots as dyes | 1 Comment

Dyeing vintage silks

It has been so long since I blogged that I feel I need to do a “bridging” story.  That is, something that connects  my last post on my work in Stitched and Bound (see some photos at https://waquilters.com/2017/07/21/stitched-and-bound-2/) and my recent activity.

The connection is natural dyeing of vintage (aka old and used) silks, cottons and linens.

First, here is an image of my piece Windfall Wrap which was juried into S&B 2017.

Stitched and Bound Windfall Wrap full

Windfall Wrap, 2017, 60cmx176cm,silk, linen and cotton. Image by Josh Wells Photography,

The vintage fabrics came my way via a WAFTA “Spring Fling” – an artist in residence  fund-raising stash sale.   WAFTA is the Western Australian Fibre and Textile Association   (http://www.wafta.com.au). I am a proud member of it.

Naturally I cleaned out my stash to contribute to the sale.  Equally naturally, I bought more than I’d contributed (well, that’s probably an exaggeration but I did bring home a lot of stuff)

A prescient WAFTA “Spring Fling” organiser assembled a lot of the donations into bags of fibres and fabrics suitable for dyeing. I bought several bags, some filled to the brim with cotton and linen fabrics (mostly used clothing) and some stuffed with delicate and no longer usable silk garments.

img_5786

These much washed garments got yet another thorough wash at my place…

IMG_6593

Windfall Wrap detail, sleeve placket included.

IMG_6592

Windfall Wrap detail, shirt pocket included.

Posted in Uncategorized | 1 Comment

Stitched and Bound!

Yesterday I blogged about giving a short lesson to members of WAFTA on natural dyeing and eco-printing.

What do I  do with all the fabric I produce?

Today I am recording my absolute pleasure at having had my entry into Stitched and Bound 2017 selected by the jury! Stitched and Bound is, as the title suggests, a quilting exhibition but over the past few years the criteria have been broadened to feature a wide range of textile art works that no longer have to be “bound” and only need to comply with  a requirement that somewhere in them there are two layers held together by stitch.  You can read all about this year’s exhibition here.

Stitched and Bound preferred detail of Windfall Wrap

A small detail…

I can’t show you the whole work of course until the exhibition opens.  It is a 2m long piece called “Windfall Wrap“.  The name comes partly from the fact that I have coloured and printed the fabrics with  plant materials found on the ground in my local wetland during my walks.  The other “found” element is that many of the fabrics are recycled, even vintage, linens, cottons and silks.   These fibres take natural dyes beautifully when they have been washed lots of times. The wrap is designed to be worn with either side showing and is also semi-transparent, allowing light to come through.

14 July can’t come soon enough.  I am so looking forward to seeing all the innovative work in other entries at Zigzag Gallery in Kalamunda!

Posted in casuarina dyeing, Design, Eucalyptus sp as dye, exhibiting, fabric collage, Geranium leaf printing, Iron mordant, kangaroo paw as dye, Murraya paniculata (orange jessamine) as dye, Natural dyeing, patchwork | 6 Comments

An Eco-printing “taster” for WAFTA

I was delighted to be asked to do a  half day introduction to eco-printing for the Western Australian Fibre and Textile Association (WAFTA) three weeks ago.  WAFTA wanted to expose its members to a whole range of skills that they might need in order to enjoy their participation in the WAFTA 2017 challenge called Altered States (http://wafta.com.au/altered-states-2017/).

This is my first blog for ages (extending the house; damage to the internet cables….broke leg on holiday…nightmare!) and even so it has taken me this long since the mini workshop to record how much I enjoyed it. I have never taught before and the limited time was a a real challenge in terms of ensuring safe and enjoyable results for everyone. Thanks to some really great helpers (Madge Smith in particular!) we got some good pots going .

IMG_1215 (765x1024)

From top to bottom: steamer; avocado pip bath; and eucalyptus and iron bath.

IMG_1212 (765x1024)

Close up of the avocado pip bath with everyone’s tied “doughnuts” in it.

IMG_1216 (765x1024)

Wrapped bundles in the steamer…

We designed patterns and wrapped tightly…the smorgasbord had several eucalyptus species, including some that a participant identified for me as Tuart (thanks Jan Cornish!). There were onion skins, casuarina leaves, agonis flexuosa, geranium leaves, purple carrot, turmeric tuber, kangaroo paw roots and tubers, murraya paniculate leaves and some that I have already forgotten.


Fortunately participants seemed pleased with their results:

IMG_1242 (765x1024)

IMG_1241 (765x1024)


IMG_1227 (765x1024)

IMG_1245 (765x1024)


I was too.  Thoroughly enjoyed it.

Photos courtesy of Madge Smith and Jan Holland.

Posted in casuarina dyeing, dyeing with red onion, Eucalyptus sp as dye, Geranium leaf printing, Iron mordant, kangaroo paw as dye, Murraya paniculata (orange jessamine) as dye, Natural dyeing, purple carrots as dyes | Leave a comment

Published again!

I am so pleased that Louise Wells’ article about four Western Australian textile artists was accepted by  Down Under Textiles in Issue 26 of 2016. This is a magazine which produces glorious quality images and is happy to publish local Australia articles.

The article contains a description of my somewhat OCD yarn storage habits and some slightly outdated images of my past work.  Nonetheless Louise’s text is intelligent and analytical and I am very pleased to have been a part of the article.

The more so as the works of Louise Wells, Anne Williams and Emma Seaton, three established WA textile artists, are showcased in the article, with images by Josh Wells Photography!

I am glad I subscribe to Down Under Textiles!!

wafta-talk-bathing-pavilionhttp://www.moremags.com.au/subscriptions/subscribe-to-down-under-textiles

Posted in bead crochet, Design, exhibiting, freeform crocheting, WAFTA | 2 Comments

The Cotton/Linen Dyeing Problem

Silk is a cinch.  Right?  Prints beautifully.

Cellulose fibres, on the other hand, are more problematic.  So I want to master them in eco-printing.  India Flint’s Eco-Colour has some guidance on soaking cottons and linens in supermarket soy milk products.  I followed these and have just bundled the resulting pre-mordanted pieces of linen and cotton from de-constructed op-shop garments with various leaves and stems picked from the ground at my local wetlands and my own garden.

The results?  Every piece of cellulose fabric that I rinsed in an iron water solution printed beautifully in two hours of steaming.  To be realistic, it would have done this even without the soy milk pre-mordant. I won’t even bother to post the images.  Same same.

Well, OK, here’s one

img_5976

Geranium leaves printed onto cellulose fabric which has been pre-mordanted with soy milk, dried, then soaked in iron water before bundling

The disappointment was that those I rinsed in copper solution (vinegar soaked copper tacks) and then steamed for two hours scarcely  showed any prints.  Almost white linen and cotton fabrics emerged from the bundles. I didn’t even photograph the relatively blank white cotton fabrics that emerged after I washed the bundled fabric.

What I DID do was to bundle them anew. This time I heaped the “used leaf refuse” from previous bundles in each piece of cotton and linen, adding a small quantity of chopped purple carrot for some different colour.  This is a technique I learned from Jane Flower  (https://foliosandfibre.wordpress.com)  She calls it “water colour”.  I bound them as usual but instead of steaming, I simmered them for two hours in the base of the steamer, that is, in the water. Not just water.  I added a few small branches of Euc. wandoo thinking that the tannin would be helpful.  I dropped a small lump of iron in too.  Iron takes some time to work itself into a bath; adding it just up front of a boil up I figured would add some mordant qualities without sending everything black…

Voilà!

img_5970


img_5974


img_5975

Above three images: various fabrics in cotton and linen bundled with used leaf material and purple carrot and simmered in a bath of Euc. wandoo and iron

Finally I want to record the fabric that resulted from my printing of a collection of leaves picked up by Julie Devereux on our walk in the wetlands last week. They were very interesting in that they seemed to have been eaten by insects in a way that made them look like lace. One was heart shaped.

img_5981

Now I just have to find a way of giving these fabrics a new life in a work of some sort!

Posted in Eucalyptus sp as dye, Geranium leaf printing, Iron mordant, Natural dyeing, purple carrots as dyes, soy milk mordant for cellulose fibres | 3 Comments

Vine leaves and geranium fabric printing

My friend  Louise Wells didn’t just bring delicious smoked salmon blinis to Melbourne Cup lunch last Tuesday.  She brought a large bag of garden cuttings.  Among them, vine leaves.

So I had a little go at bundling some of them with silk pre-soaked in strong iron water and then simmered for two hours in a rich black pot of iron and onion skins.

The result is not spectacular but it does encourage me to experiment further until I find a way to get really good prints.

img_5876

Preparation for the building of the studio continues.  I have just pruned back all the planting along my battle axe driveway  to protect it from the builder’s heavy vehicles.  So in the same pot and using similar pre-soaked silk i also bundled some geranium leaves and flowers.

I suspect that these prints are very dependent on the heavy iron dosing but will now try them with steaming.

img_5879

The print from underneath the geranium leaf

img_5878

The print made from the top of the leaf

Posted in Geranium leaf printing, Iron mordant, Natural dyeing, vine leaf printing | Leave a comment

Adding iron to an onion pot


This post is about two things.  First: the wonders of iron in a pot (thank you Jane Flower!).  Second: rose leaves (thank you Louise Wells for the latest batch!)

I am building up a store of silk with eco-prints for a project.  I am still using recycled silk where I can get it. Below is the (very short) sleeve of a much worn pyjama jacket. The impact of the iron in the onion dye bath is seen in the strong lines of the casuarina leaves and the dark green of the rose leaves.


Even a small collar is grist to the dyeing mill. It has taken the green of the rose leaves very well.

What intrigues me is the way the iron outlines the stalks without changing the green of the rose leaf prints! The images include yet another sleeve!

Finally here is one of those prints that is (to me) just poetry.  No specially clear prints;  just pattern and texture.  Like a painting.


img_5857

Posted in casuarina dyeing, dyeing with red onion, Eucalyptus sp as dye, Iron mordant, Natural dyeing, Rose leaves | 3 Comments

Dyeing used silk by simmering: 3 lessons

I decided to give the steamer a break and make an onion dye bath in the boiler. Before bundling local and garden material around sticks, I rinsed each piece of silk in a dilute iron water solution (see Lesson 2 below).

Some of the silk pieces were rescued from worn /worn out silk garments.  I learned a good lesson with these. Lesson 1: bundle up the softer plants only as tough stems rip the old fabric.


img_5840

A former cream silk shirt sleeve

img_5828

I quite like the effect of the embroidery on this piece from a silk pyjama top.

Lesson 2: Use more iron!  I am reasonably happy with the results below although I think some of them would have been more striking if the iron solution had been stronger.


img_5830

Casuarina needles and oregano

img_5820

Miscellaneous fallen Eucalyptus leaves from the Bayswater wetlands

Lesson 3:  the nature of the “bandage” affects the penetration of the dye into  the fabric.  Where I used cotton gauze to bind the bundles there was a greater contribution from the onion skins than in the cases where I used heavier cotton.


img_5837

Heavier cotton on the left and the gauze on the right.

My next blog will record the result of adding a lump of scrap iron to the same bath as was used for the pieces above.

Posted in dyeing with red onion, Eucalyptus sp as dye, Murraya paniculata (orange jessamine) as dye, Natural dyeing | Leave a comment

Murraya paniculata- who knew??

Murraya paniculata, common name Orange Jessamine, is an excellent hedging plant.  A native of China and South-east Asia,  it is in several spots in my small garden because of its wonderful orange blossom perfume when in flower and its neat small dark green leaves when it’s not.

In pursuit of my experiments with natural dyeing, I bound some Murraya leaves in recycled silk (the unpicked “bias cut bow tie” of a silk blouse).  I brought a pot of mixed red and brown onion skins and water to the simmer and inserted the bundle of silk and Murraya in it for two hours.

Wishful thinking goes with the territory of dyers.  However, I did not predict the sensational green of the result. What a shame I didn’t collect the prunings when the hedge was manicured last week!

I actually did a ten bundle batch of garden material in recycled silk in the same pot.  More later.

Posted in dyeing with red onion, Murraya paniculata (orange jessamine) as dye, Natural dyeing | 7 Comments