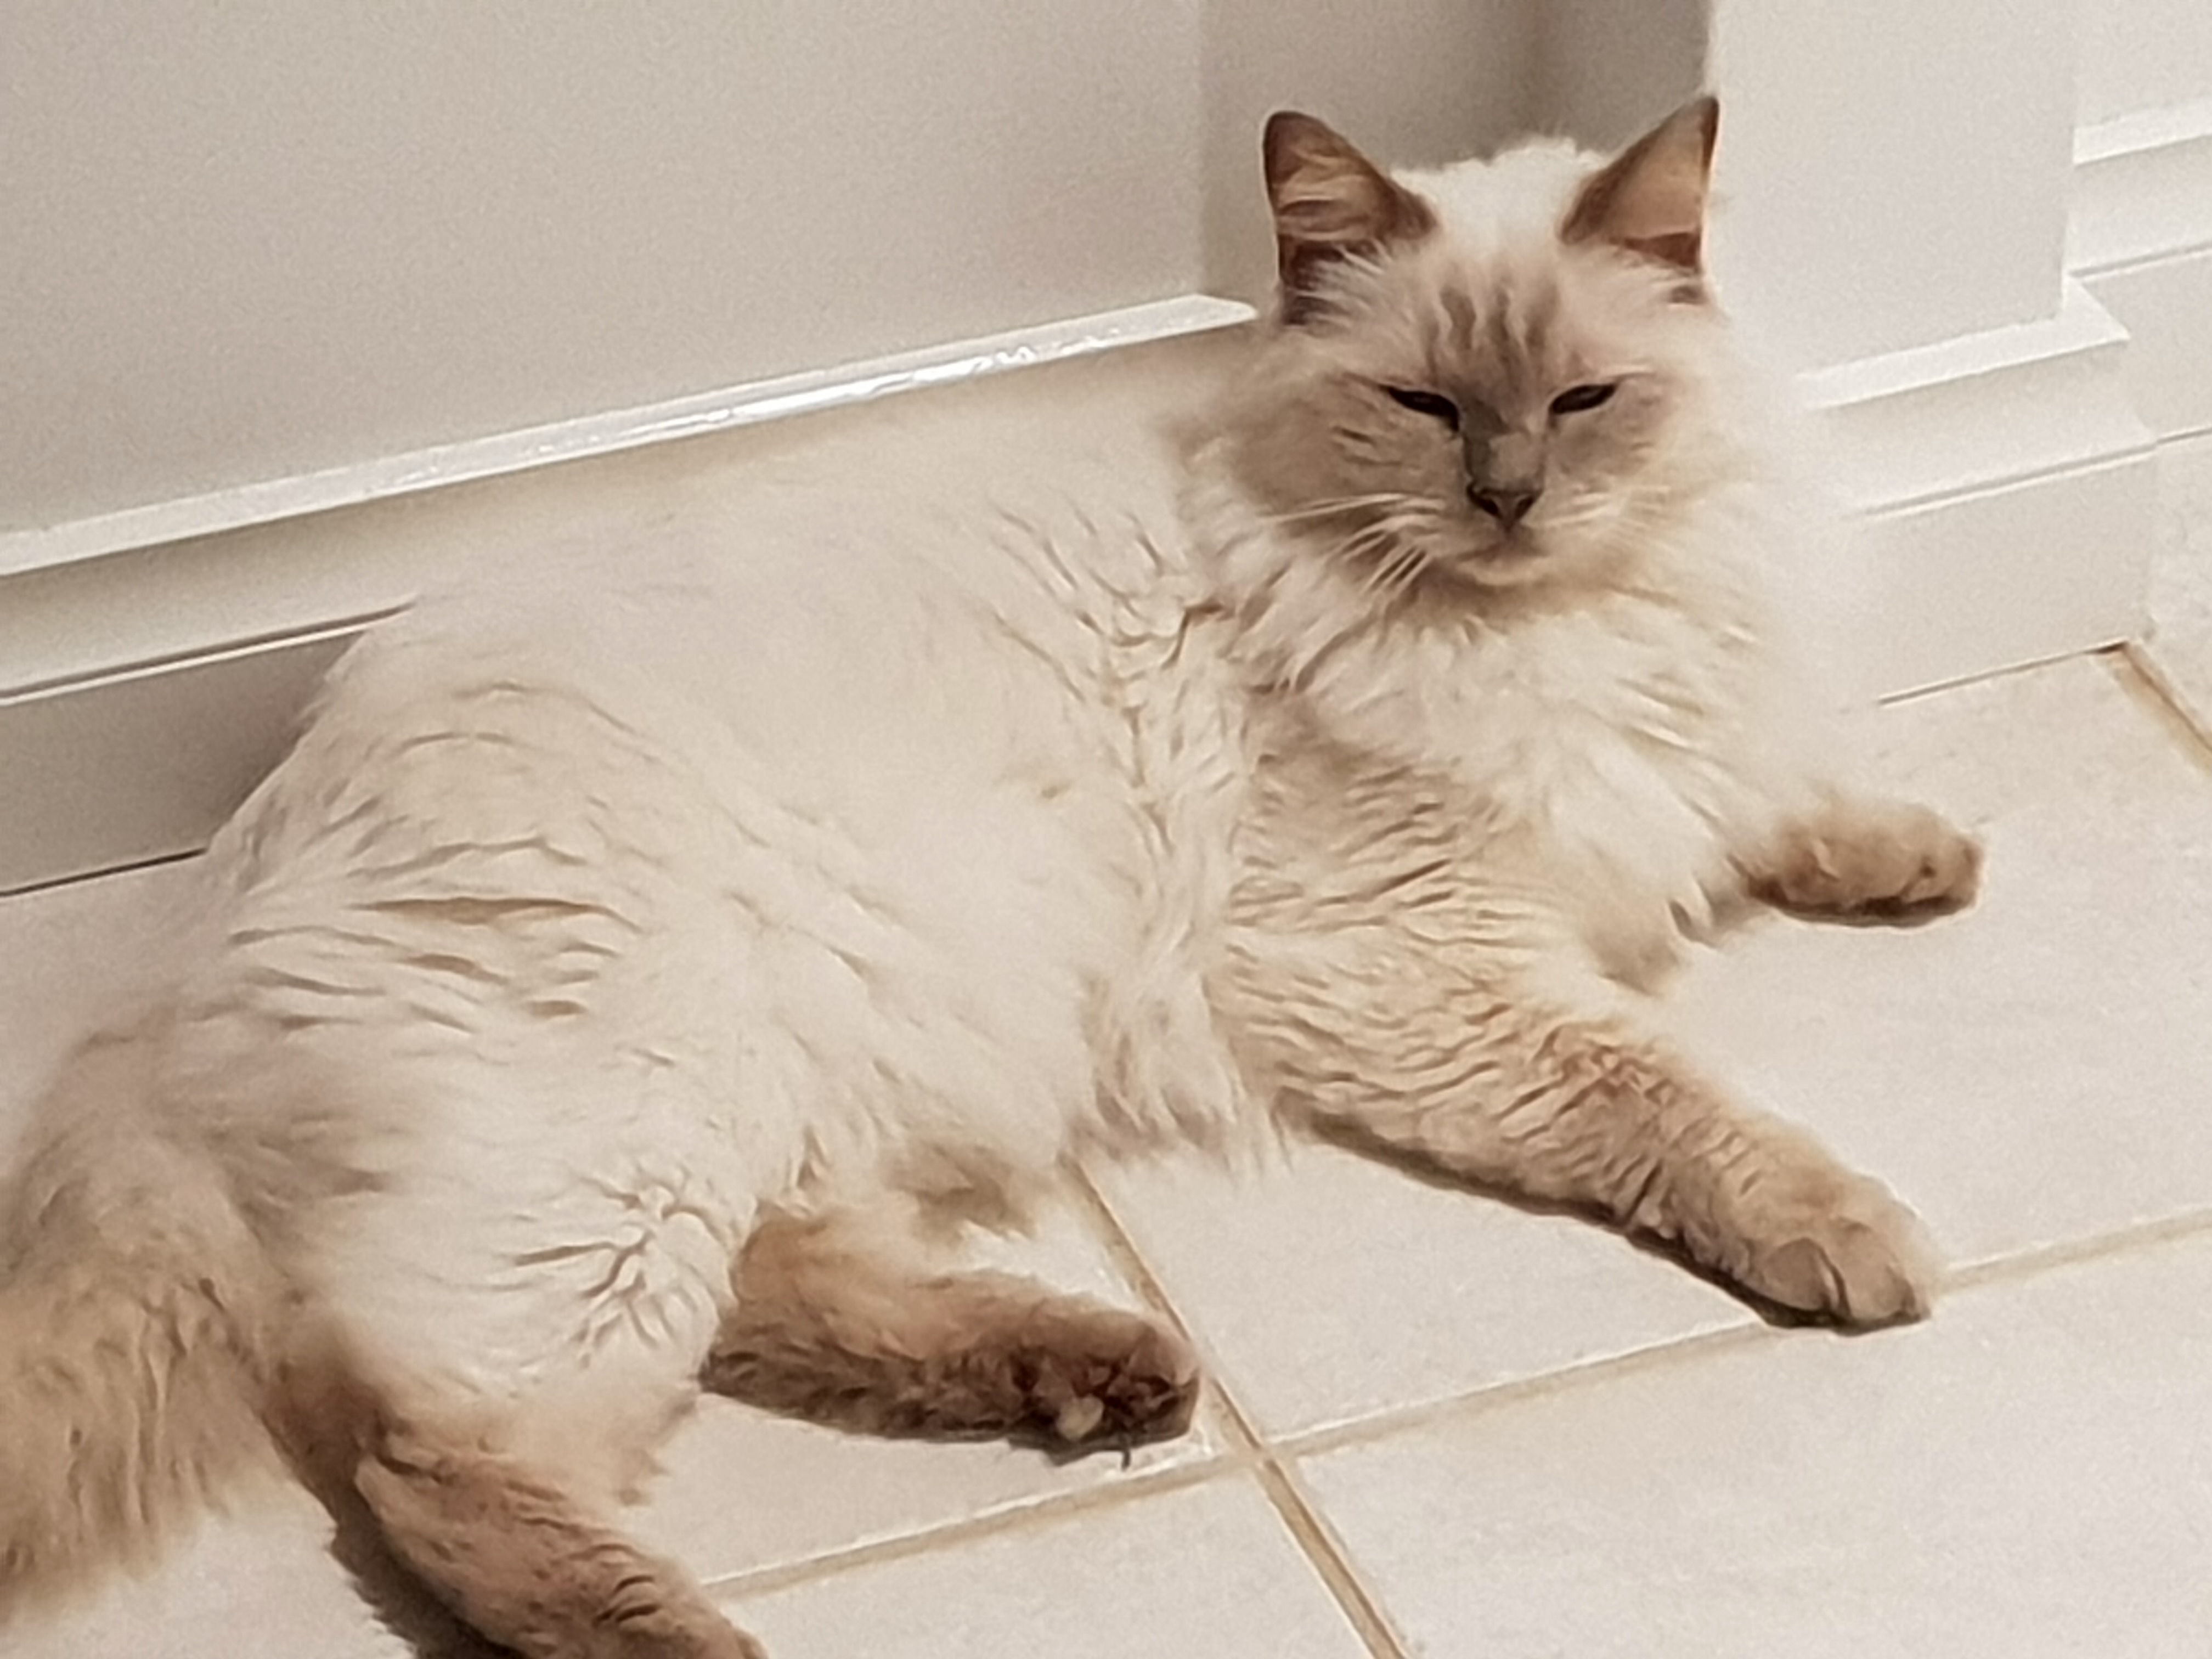
My cat Sam is a blue point Rag Doll. So he has a lot of very fluffy fur that he sheds generously every day and everywhere, even more so in Summer, which is now.
This is Raggelida Sampson aged 5 years.
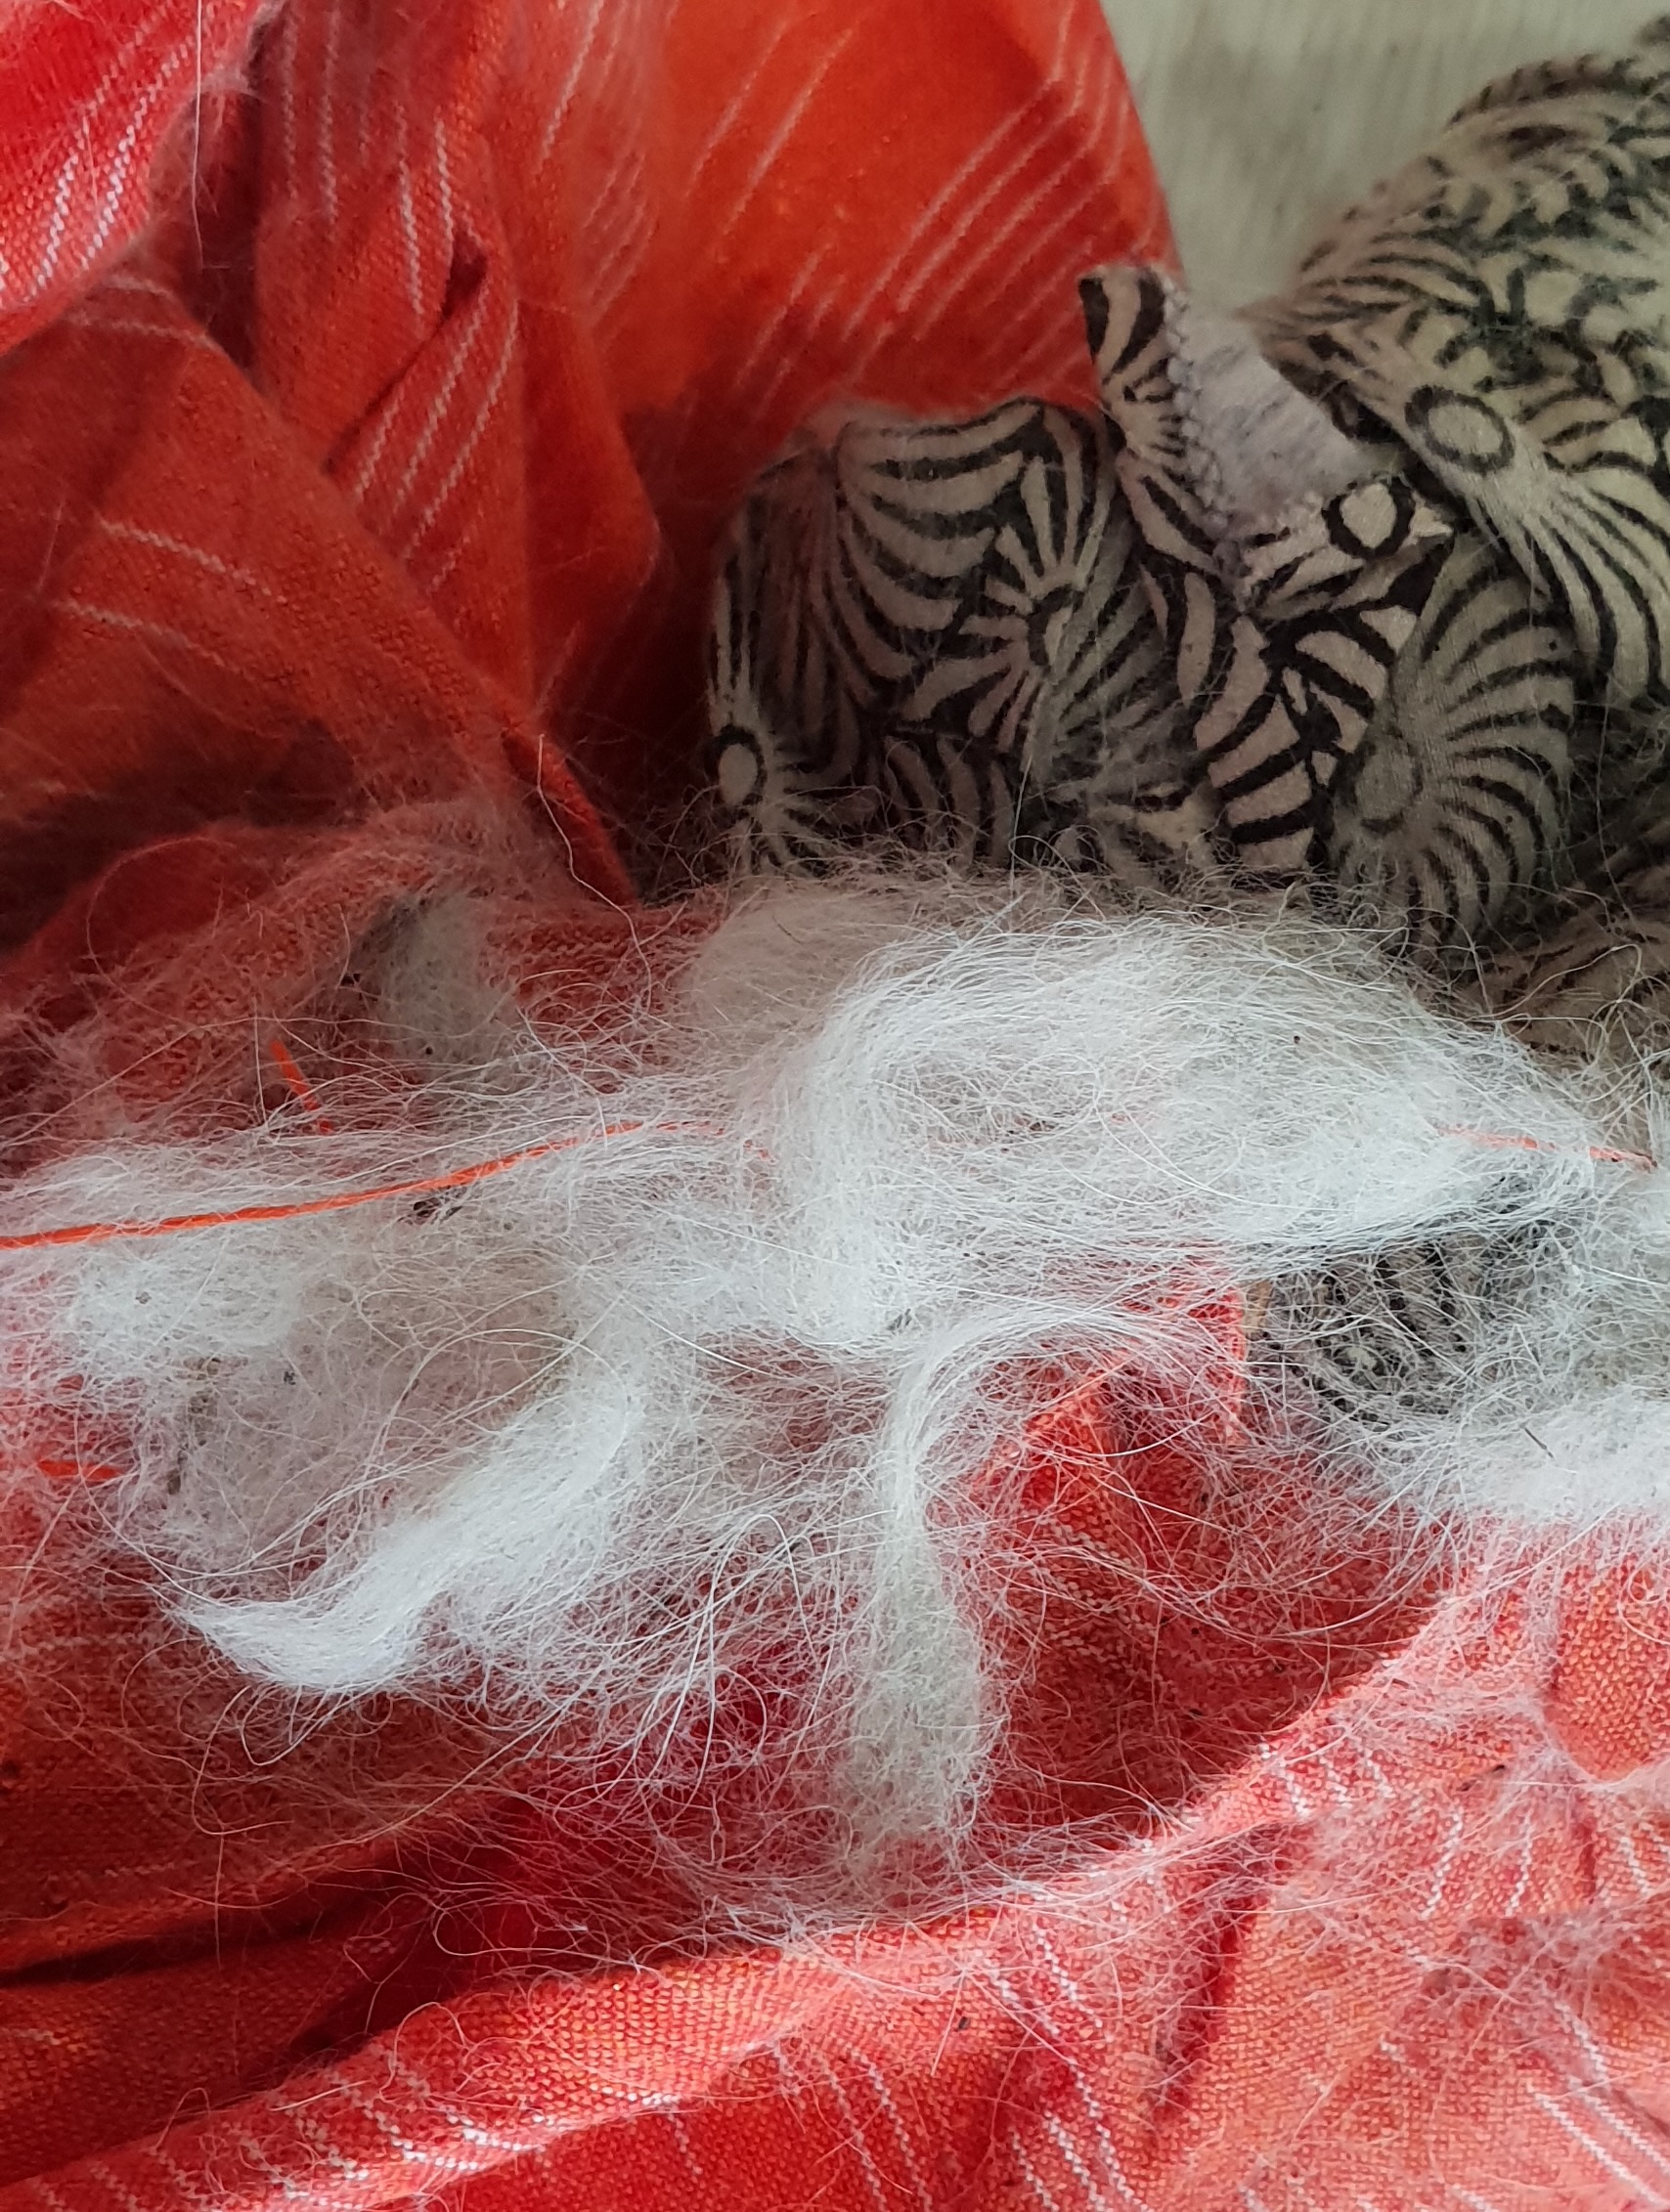
The deposit below is typical of Sam’s output over a few hours of napping. This occurred this past Winter when he slept without authority on a skirt I was making. The skirt was never finished.
I have a very small house so have no room for a traditional Christmas tree. Instead I have a Scandinavian-inspired wooden dowelled “tree” which has many hand made decorations on it. It also features pieces I’ve acquired on trips outside Australia. Some of the hand made ones have been made by me; some were given to me by other makers, including family members. Many of them are at least twenty years old. So the tree is a bit special. This is what it looks like this year.
All my family members are represented by at least one decoration. Except Sam.
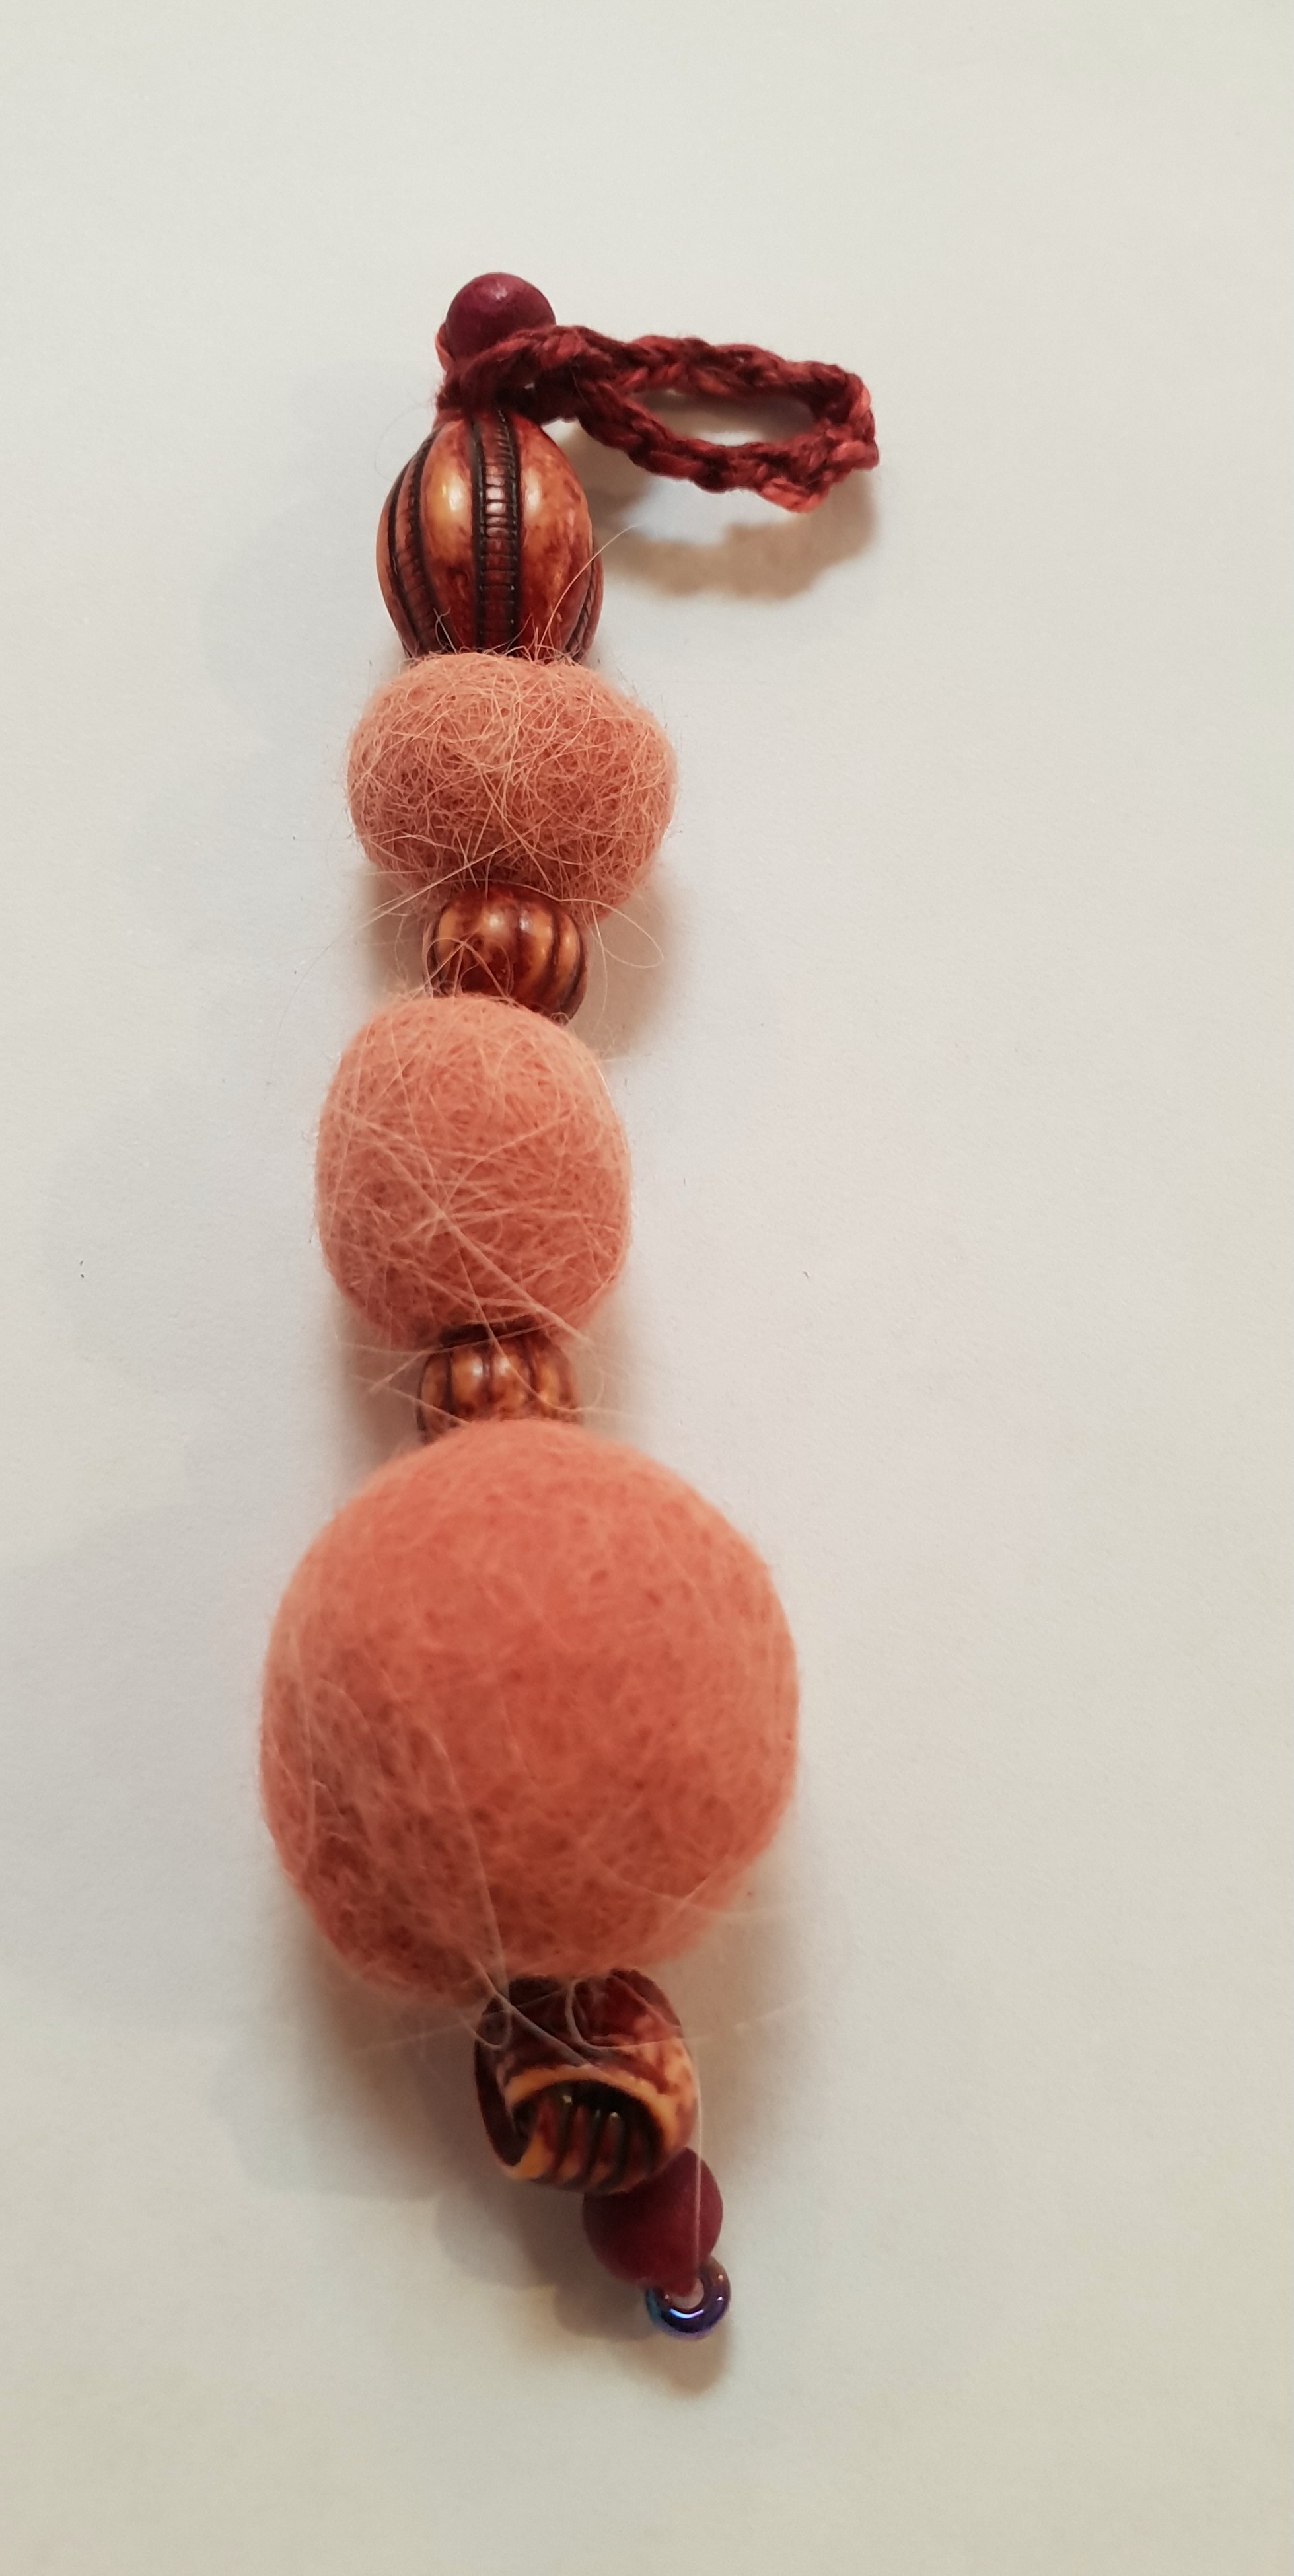
So, since his fur felts very readily, without even requiring any water, I collected enough to make three small “balls” by rolling the fur in my palms.
Adding a few beads and crocheting a hanging loop gave me a little piece of Sam that could join the tree.
Note: Sam is not pink. The colouring is from red food colour which is very easy to do on protein fibre. The beads are recycled from an old necklace.
I wish every one a very happy holiday season with their pets/families/mates….
A friend alerted me to this absorbing and powerful book which I read before Christmas.
First published in 2019 in the UK, it is packed with startling facts.
For example:
*100 billion garments are produced every year.
*The average garment is worn only 7 times
*20% of all garments go unsold
*Fewer than 2% of workers in the clothing industry receive a living wage
*1 t-shirt and 1 pair of jeans uses 5000 gallons of water. For those of us more familiar with metrics, this is nearly 23,000 litres.
*Over 60% of garments contain fabrics derived from fossil fuels.
You get her meaning? I did. In fact I began to feel increasingly uncomfortable with my practice of buying on-line from a particular chain. A quick look at the inside labels of the first six garments hanging on the nearest wardrobe rack revealed that two were made in China and four came from Vietnam. All were polyester or polyester mixes.
Was it finally time to break away from my dependence on these relatively affordable (and very often available at massive discounts); easy to wear and wash; and convenient- to-order on line clothes?
Yep. Certainly. But how?
When I was young and broke, and store bought clothes were made in Australia and expensive, I did make my own. It wasn’t a pleasant experience though. Paper patterns for home sewers were complicated. To compensate for having only one size pattern in each envelope a quantity of what was called “ease” was allowed by the drafter. Ease translated more often than not to an ill-fitting garment. Too tight in some places; too loose in others.
The actual instructions were often complex, involving much marking of stitching lines and notches and little circles….plus redundancy of language (see image below for repetition of putting right sides of fabric together) and unnecessary steps like pinning AND basting.
Well, I’m not going back there…..
Enter my local patchwork store which stocks the patterns of Sew To Grow (www.sewtogrow.com.au)
I booked a quick lesson in their basic pattern called The Bondi Top.
That had me walking out with a top that actually fitted! A bonus was that I also discovered how nice patchwork fabrics are when used for light tops.
Blue 100% patchwork cotton made in three hours from The Bondi Top pattern adjusted to fit me. Easy!
This could go on forever!
Another excellent patchwork cotton print.A longer line top made in a 100% linen. I turned the fabric around to avoid horizontal stripes and centred the black lines. The making was then easy using my already fitted master pattern.
Since these were made I’ve gone further and made longer tunics.
Tunic made with fabric from Woven Stories ( https://wovenstories.com.au/) which sources hand-printed cottons from small villages in India.
I made this one as a Secret Santa gift for a member of one of my sewing groups.
It’s constructed using a variegated Perle 8 thread crocheted with beads into a tube then inserted into a white plastic cylinder that had previously had another thread wrapped around it. The skirt is simply made from the same thread and the hanger is a knitted i-cord.
Today I sat down to start blogging another experiment. I found lots of Covid-time blogs in my drafts!!! Here’s one below.
Sometimes one eschews the pressure to create. One simply wants to “make”. Preferably while sitting on one’s front porch in the mellow Autumn sunshine watching the birds.
That’s a reaction to a lot of things. In this case I put it down to isolation due to COVID-19 and my severance from the usual stimulus of friends.
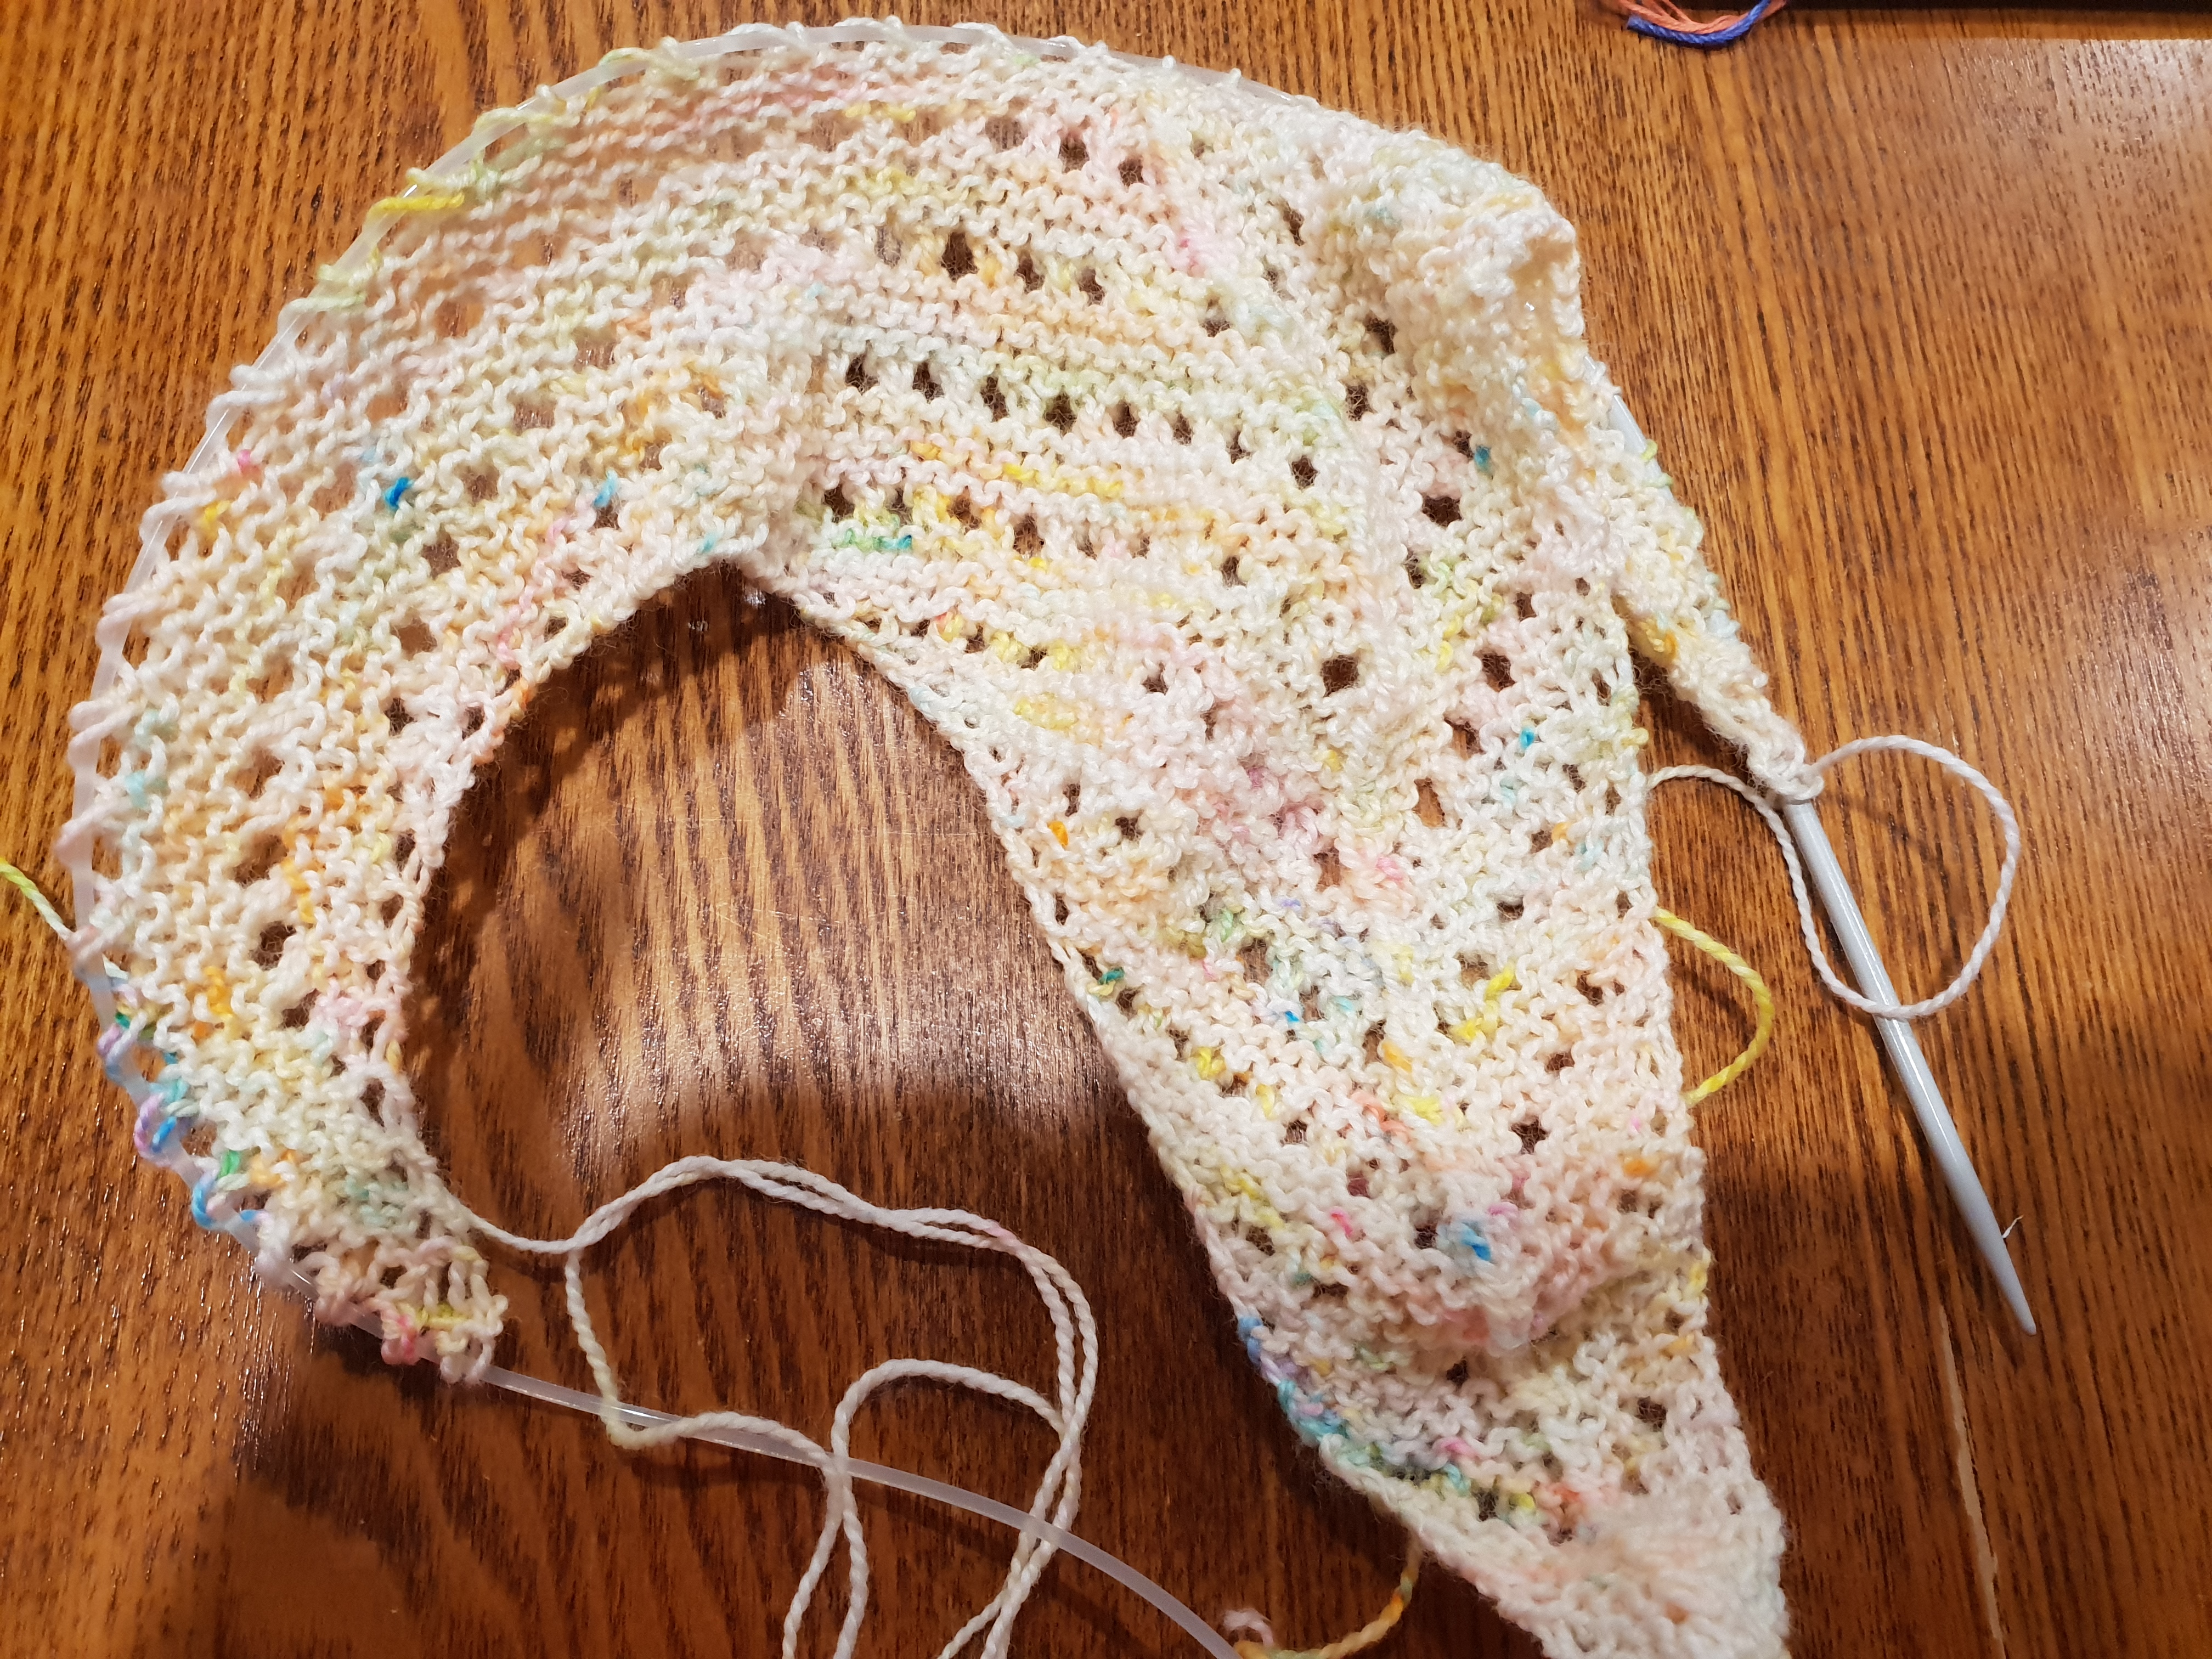
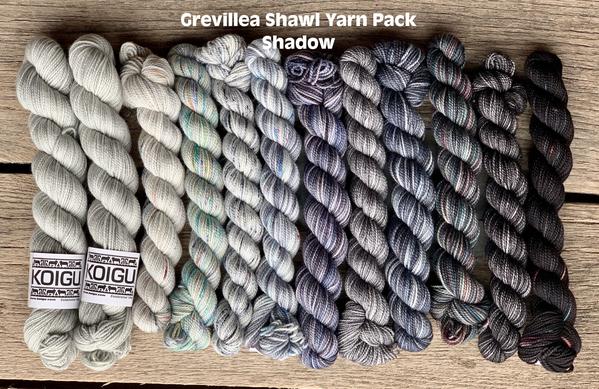
It’s Monday (20 April 2020) and I want a sort of instant project. I look in my files and see I have purchased and downloaded a pattern from Ravelry. It’s the Venation Shawl by Ambah O’Brien (https://ambah.co). I liked it because it looked simple to knit while being very drapey and light. I live in the relatively warm west of Australia so my knits need to be not too heavy.
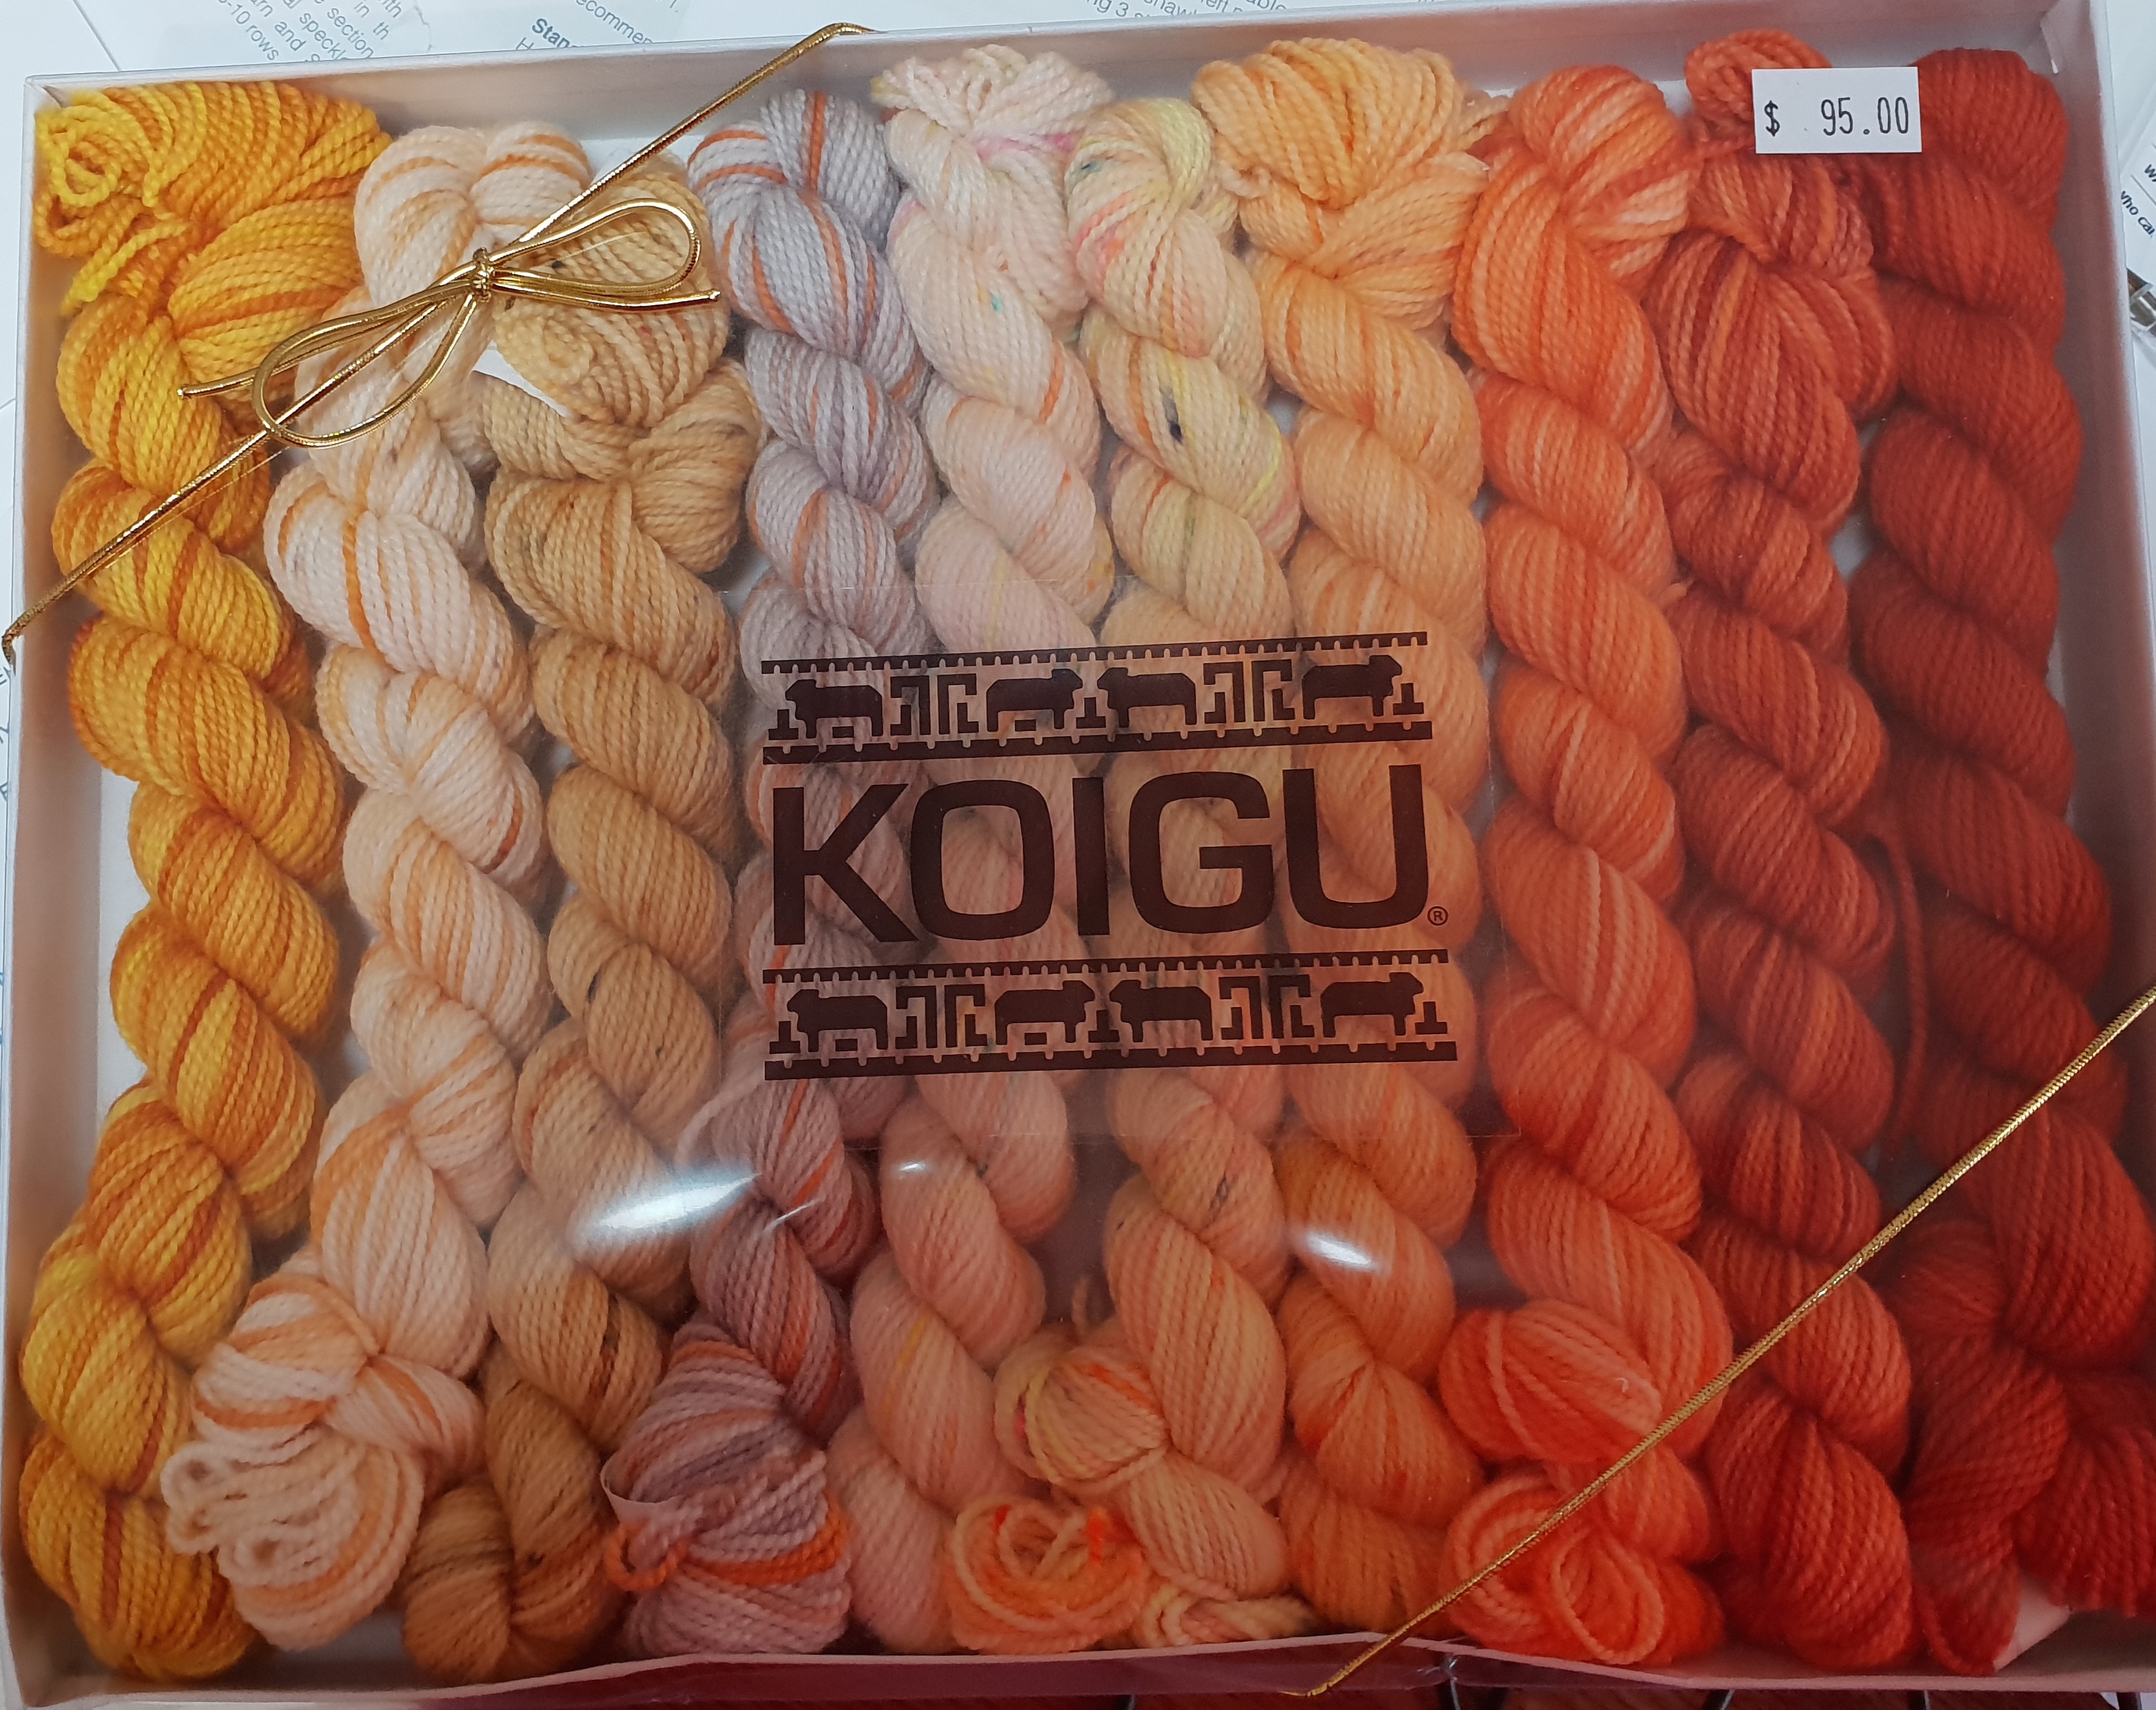
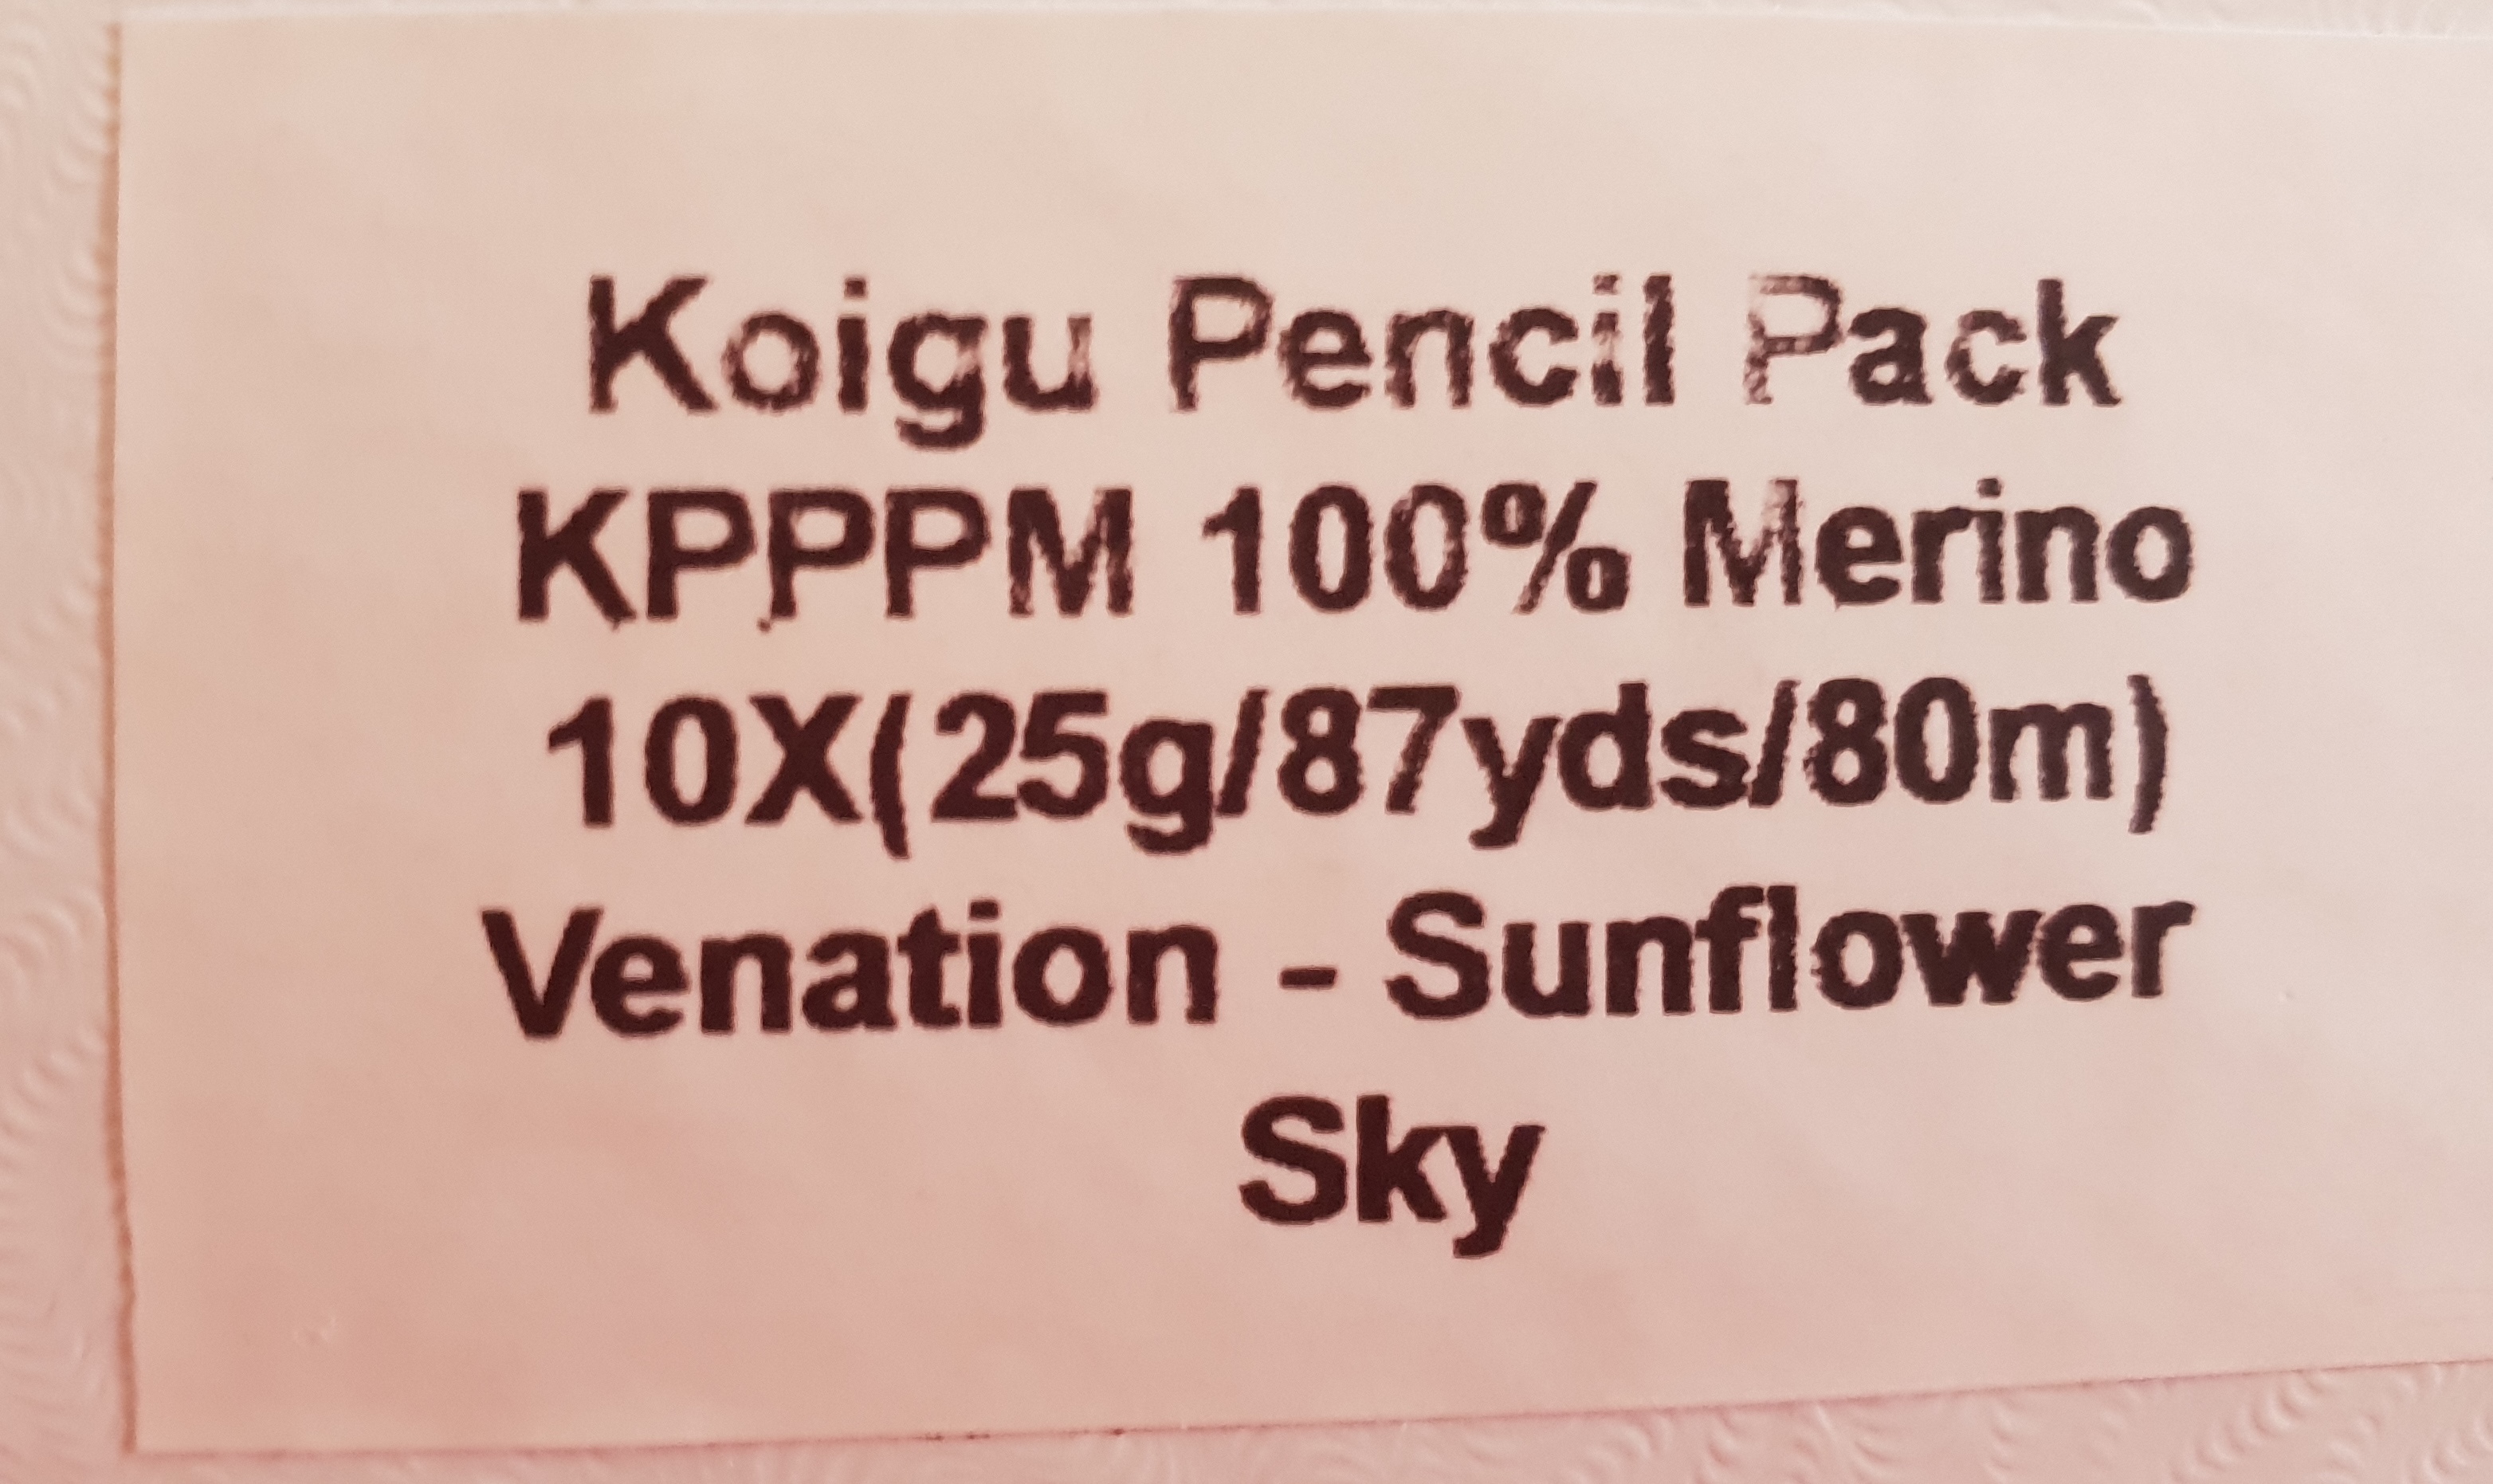
As it happens, I had also bought some time ago a box of fingering weight pure merino yarn from Canada called Koigu Pencil Box. Spotting it on a walk through my studio, it seemed ideal, notwithstanding the fact that its yellows are not part of my personal palette.
.
So I decided to leap straight into making up Ambah’s Venation scarf with the Koigu box.
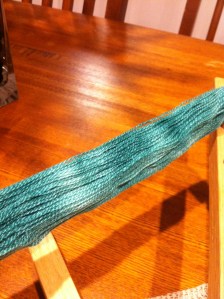
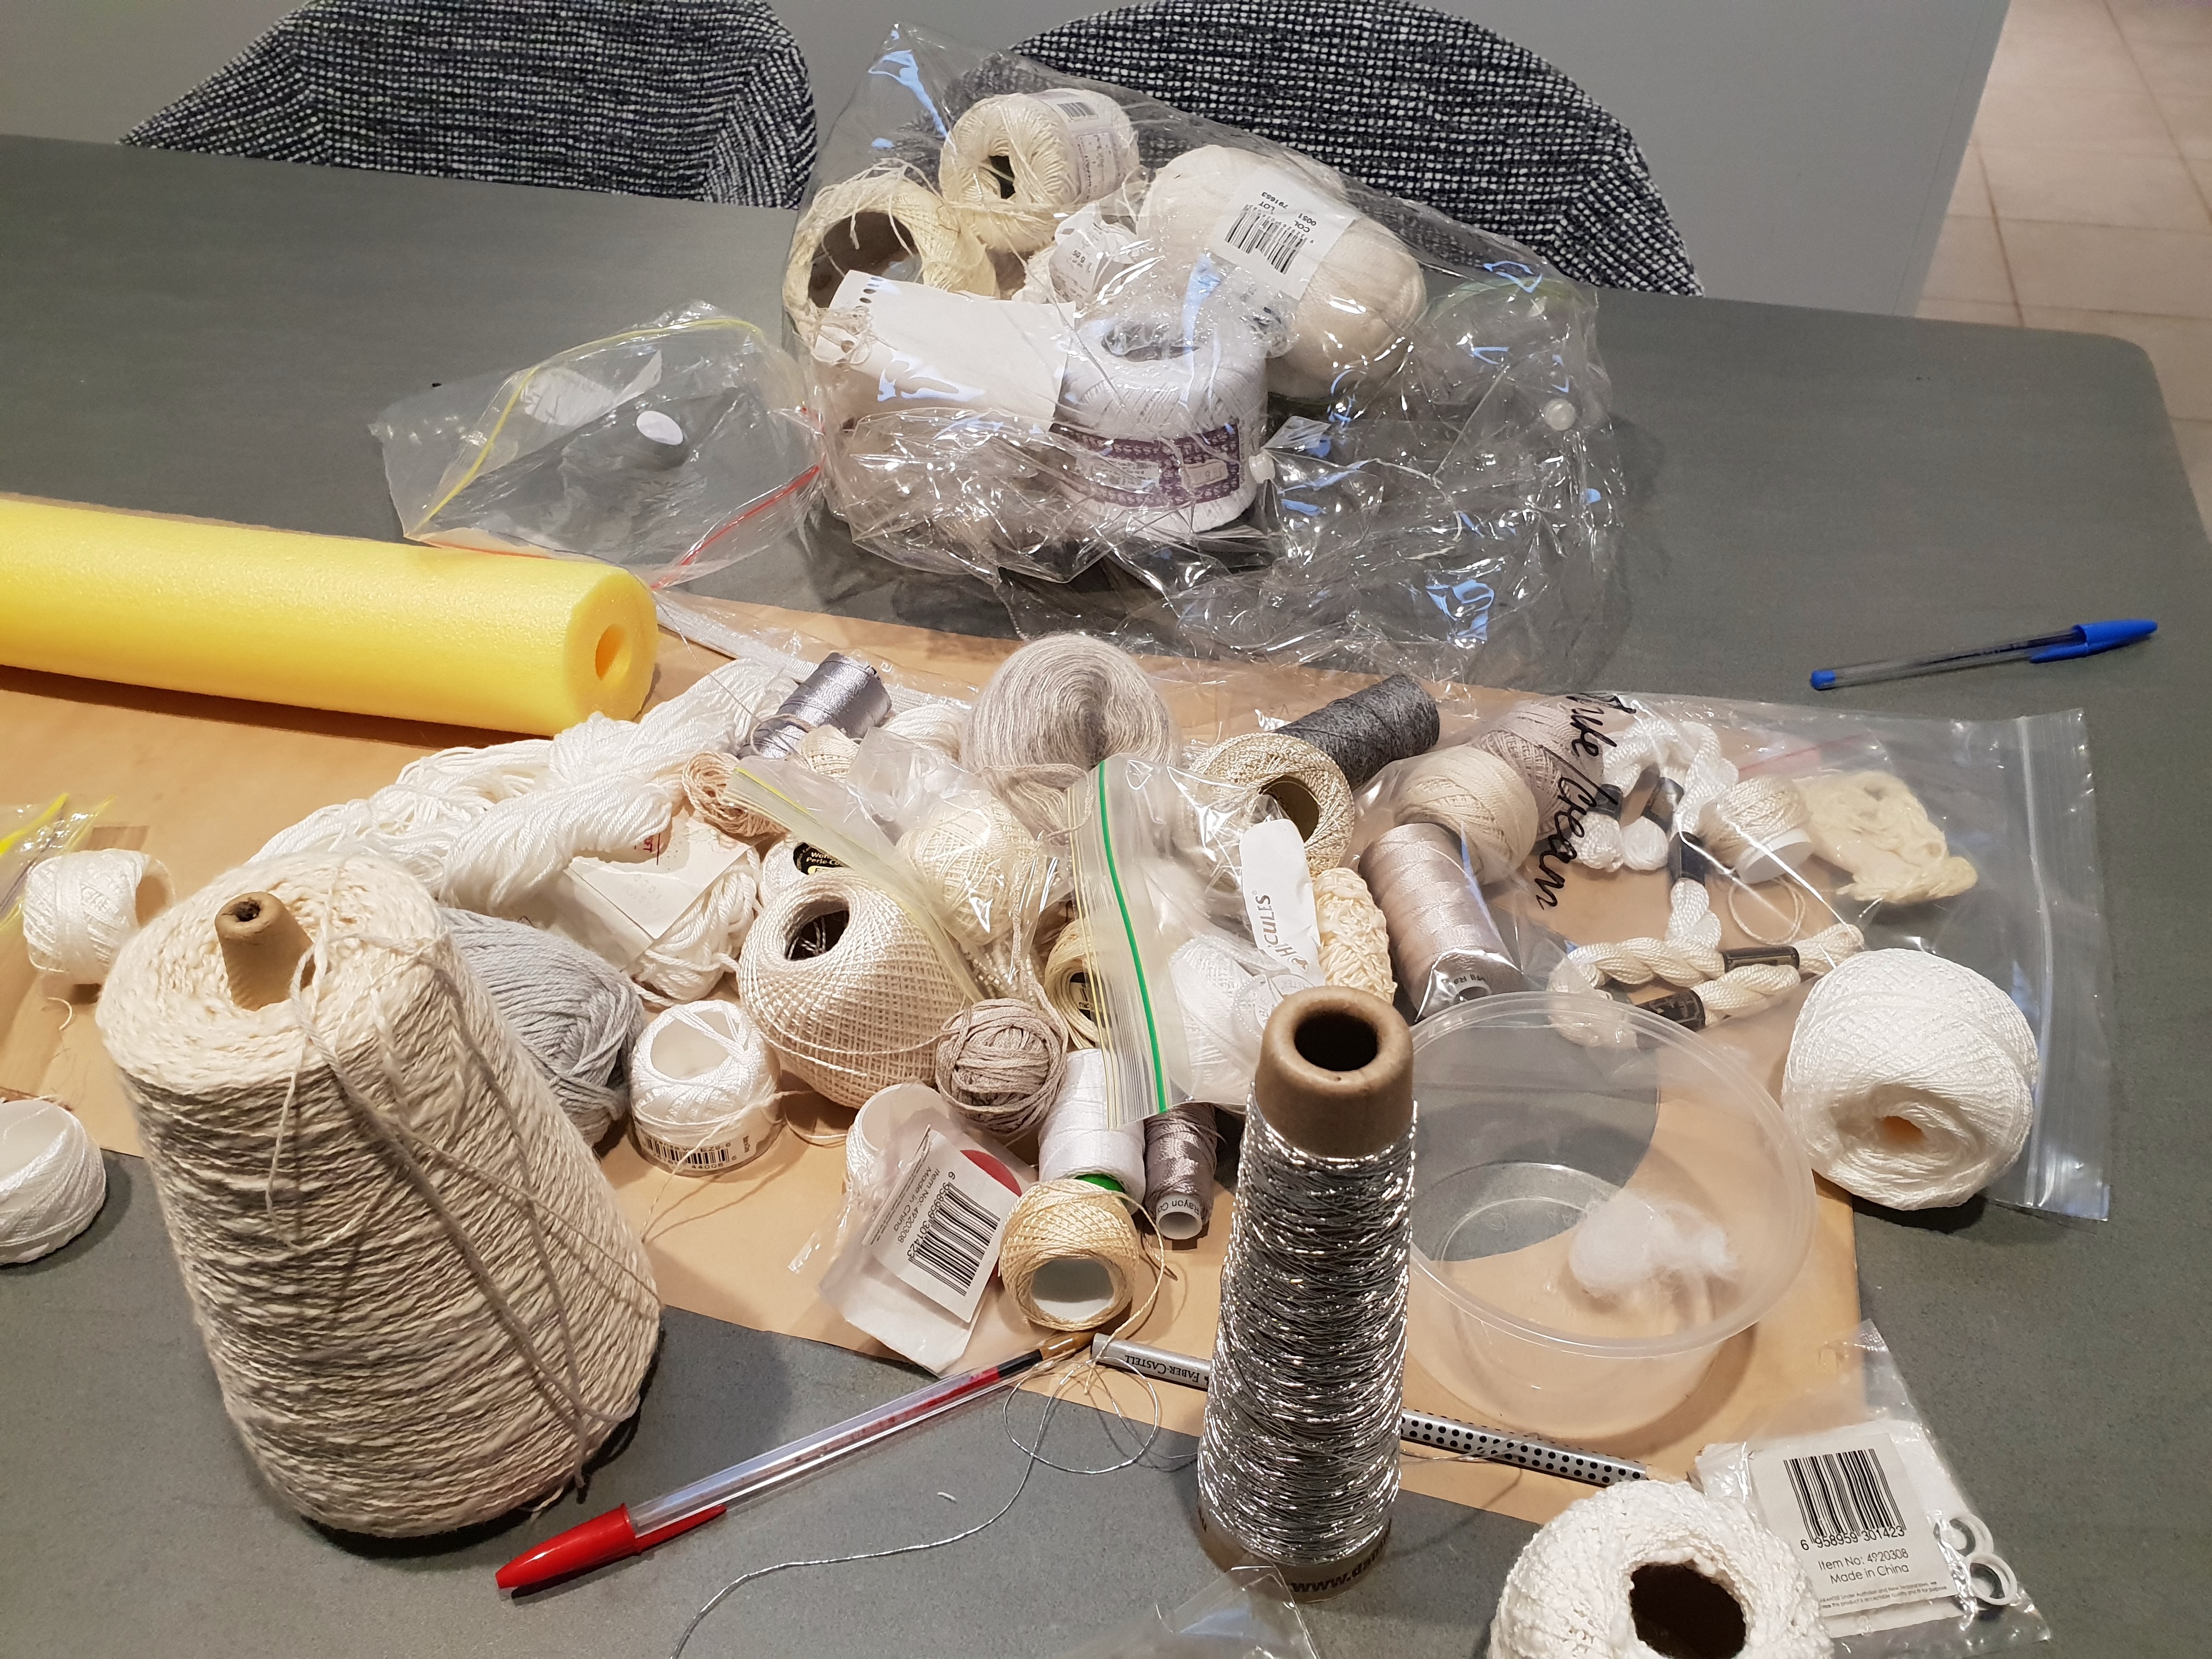
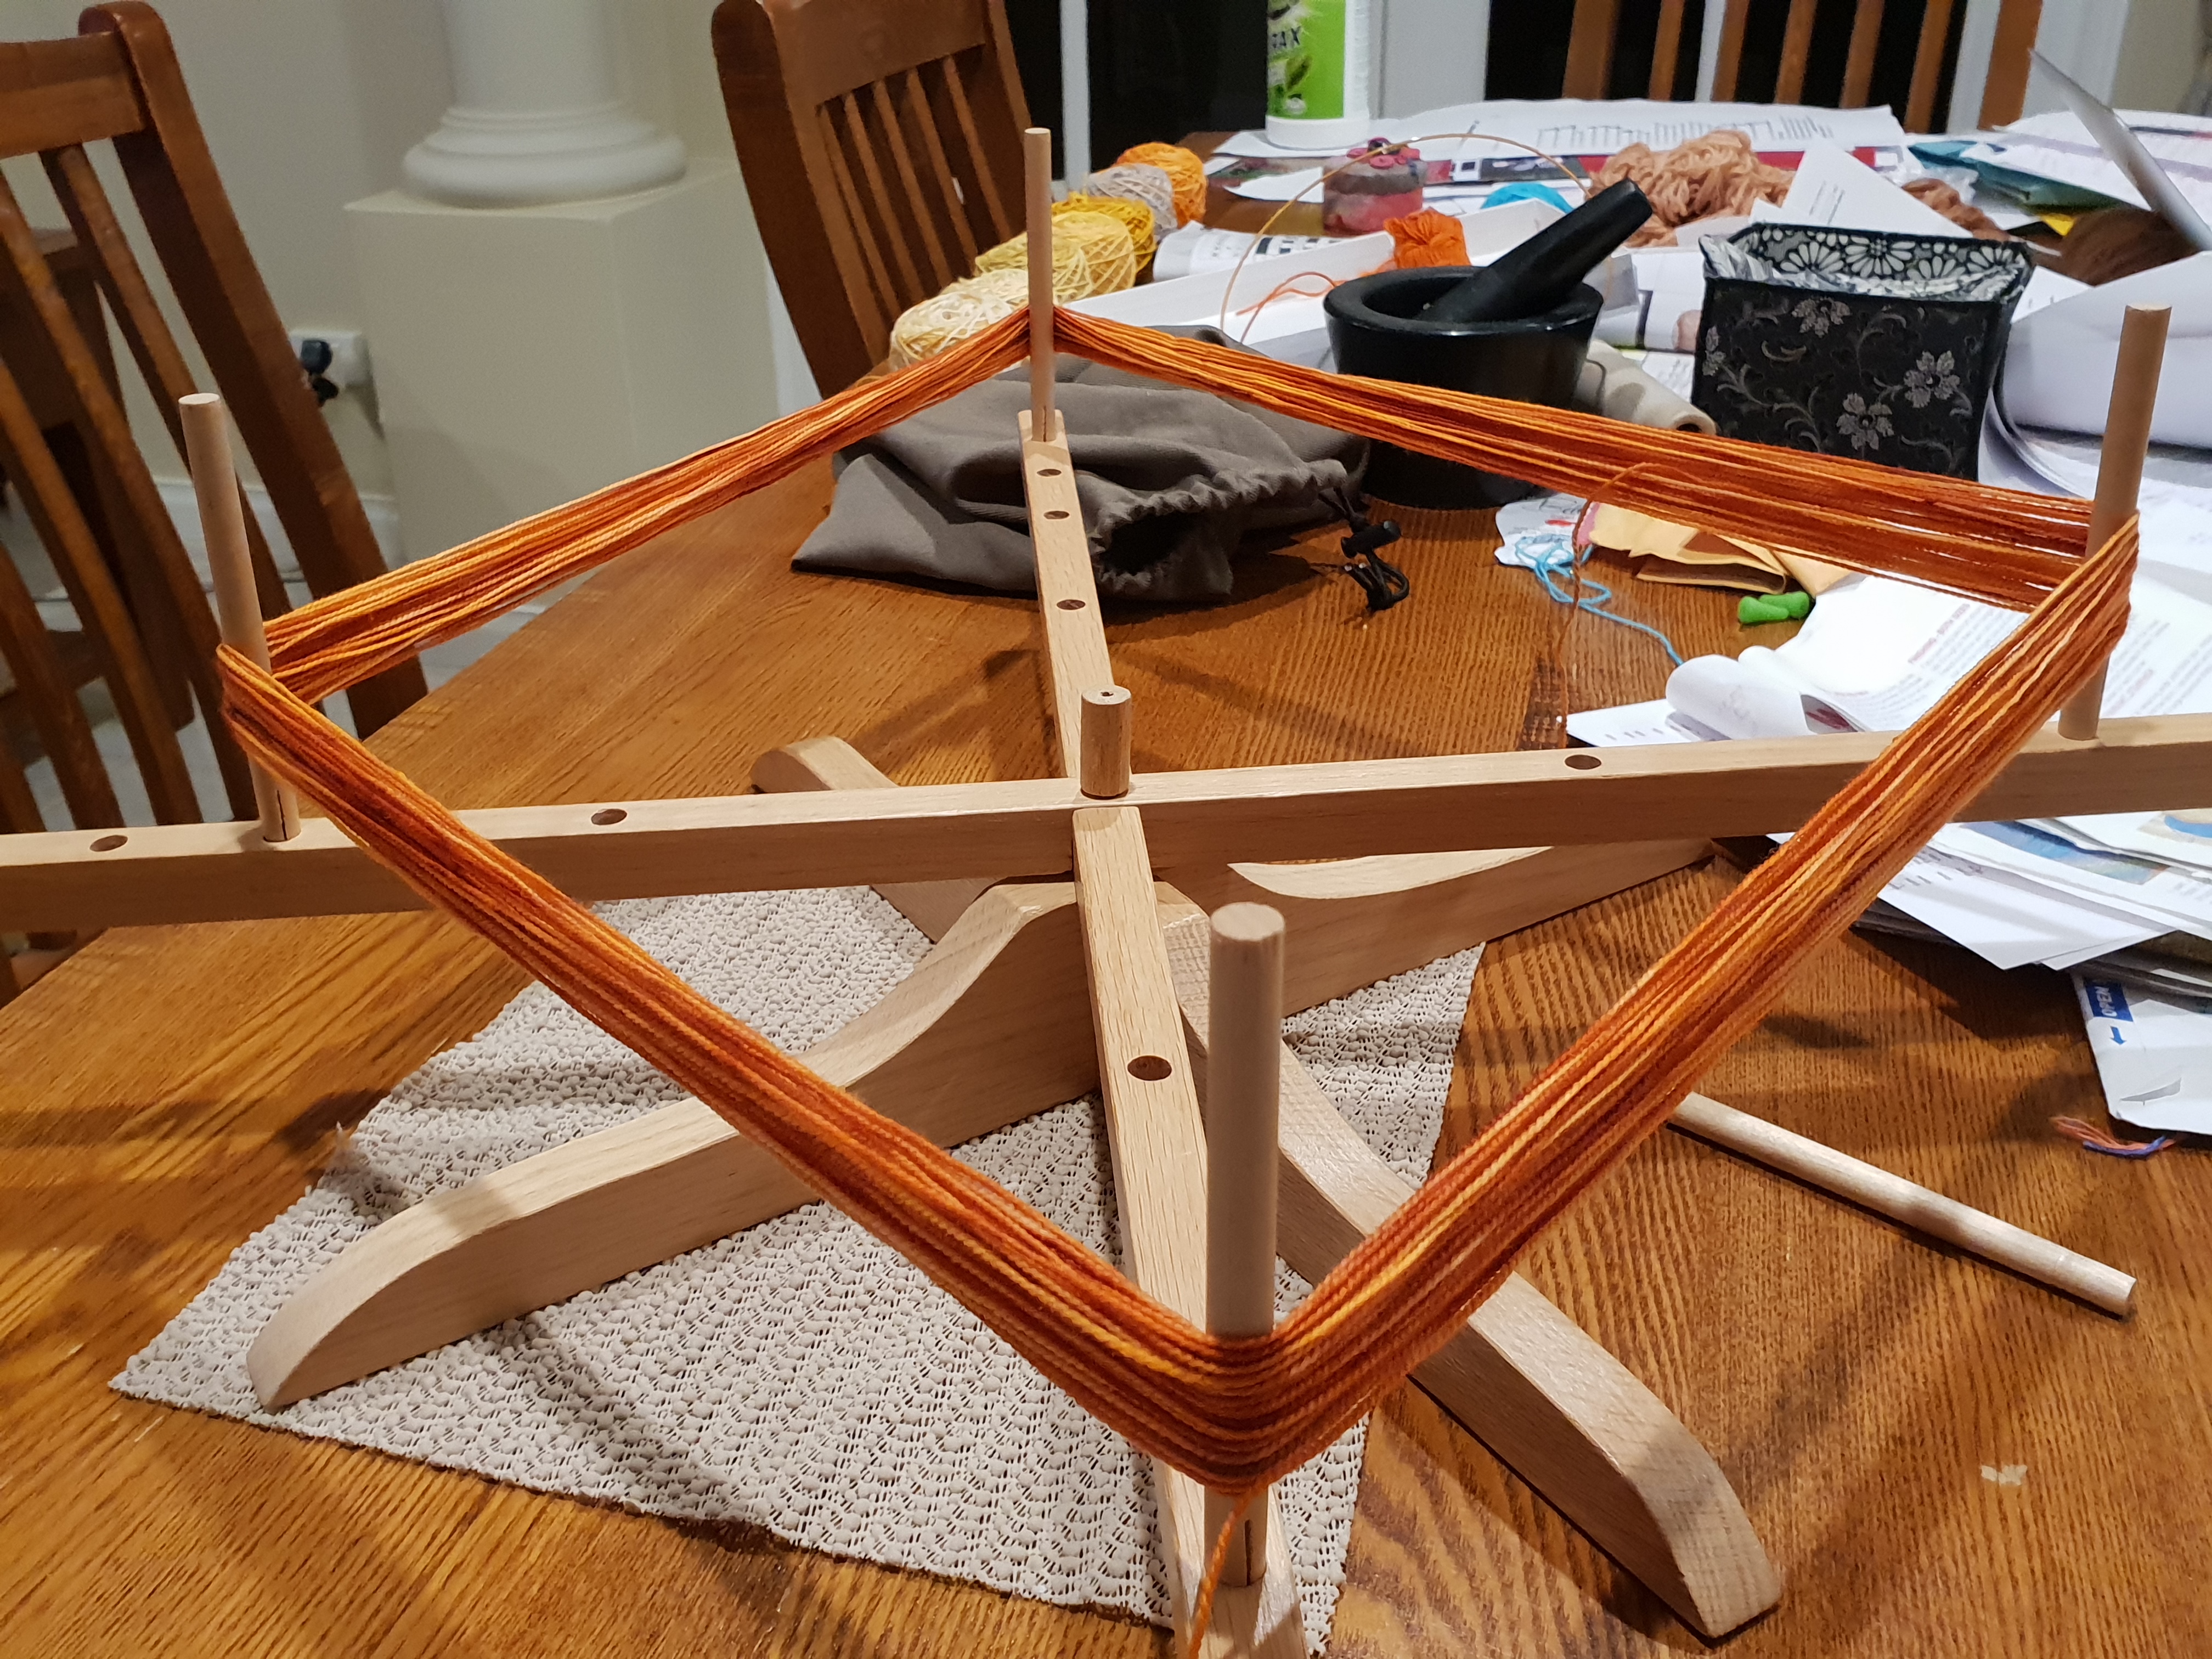
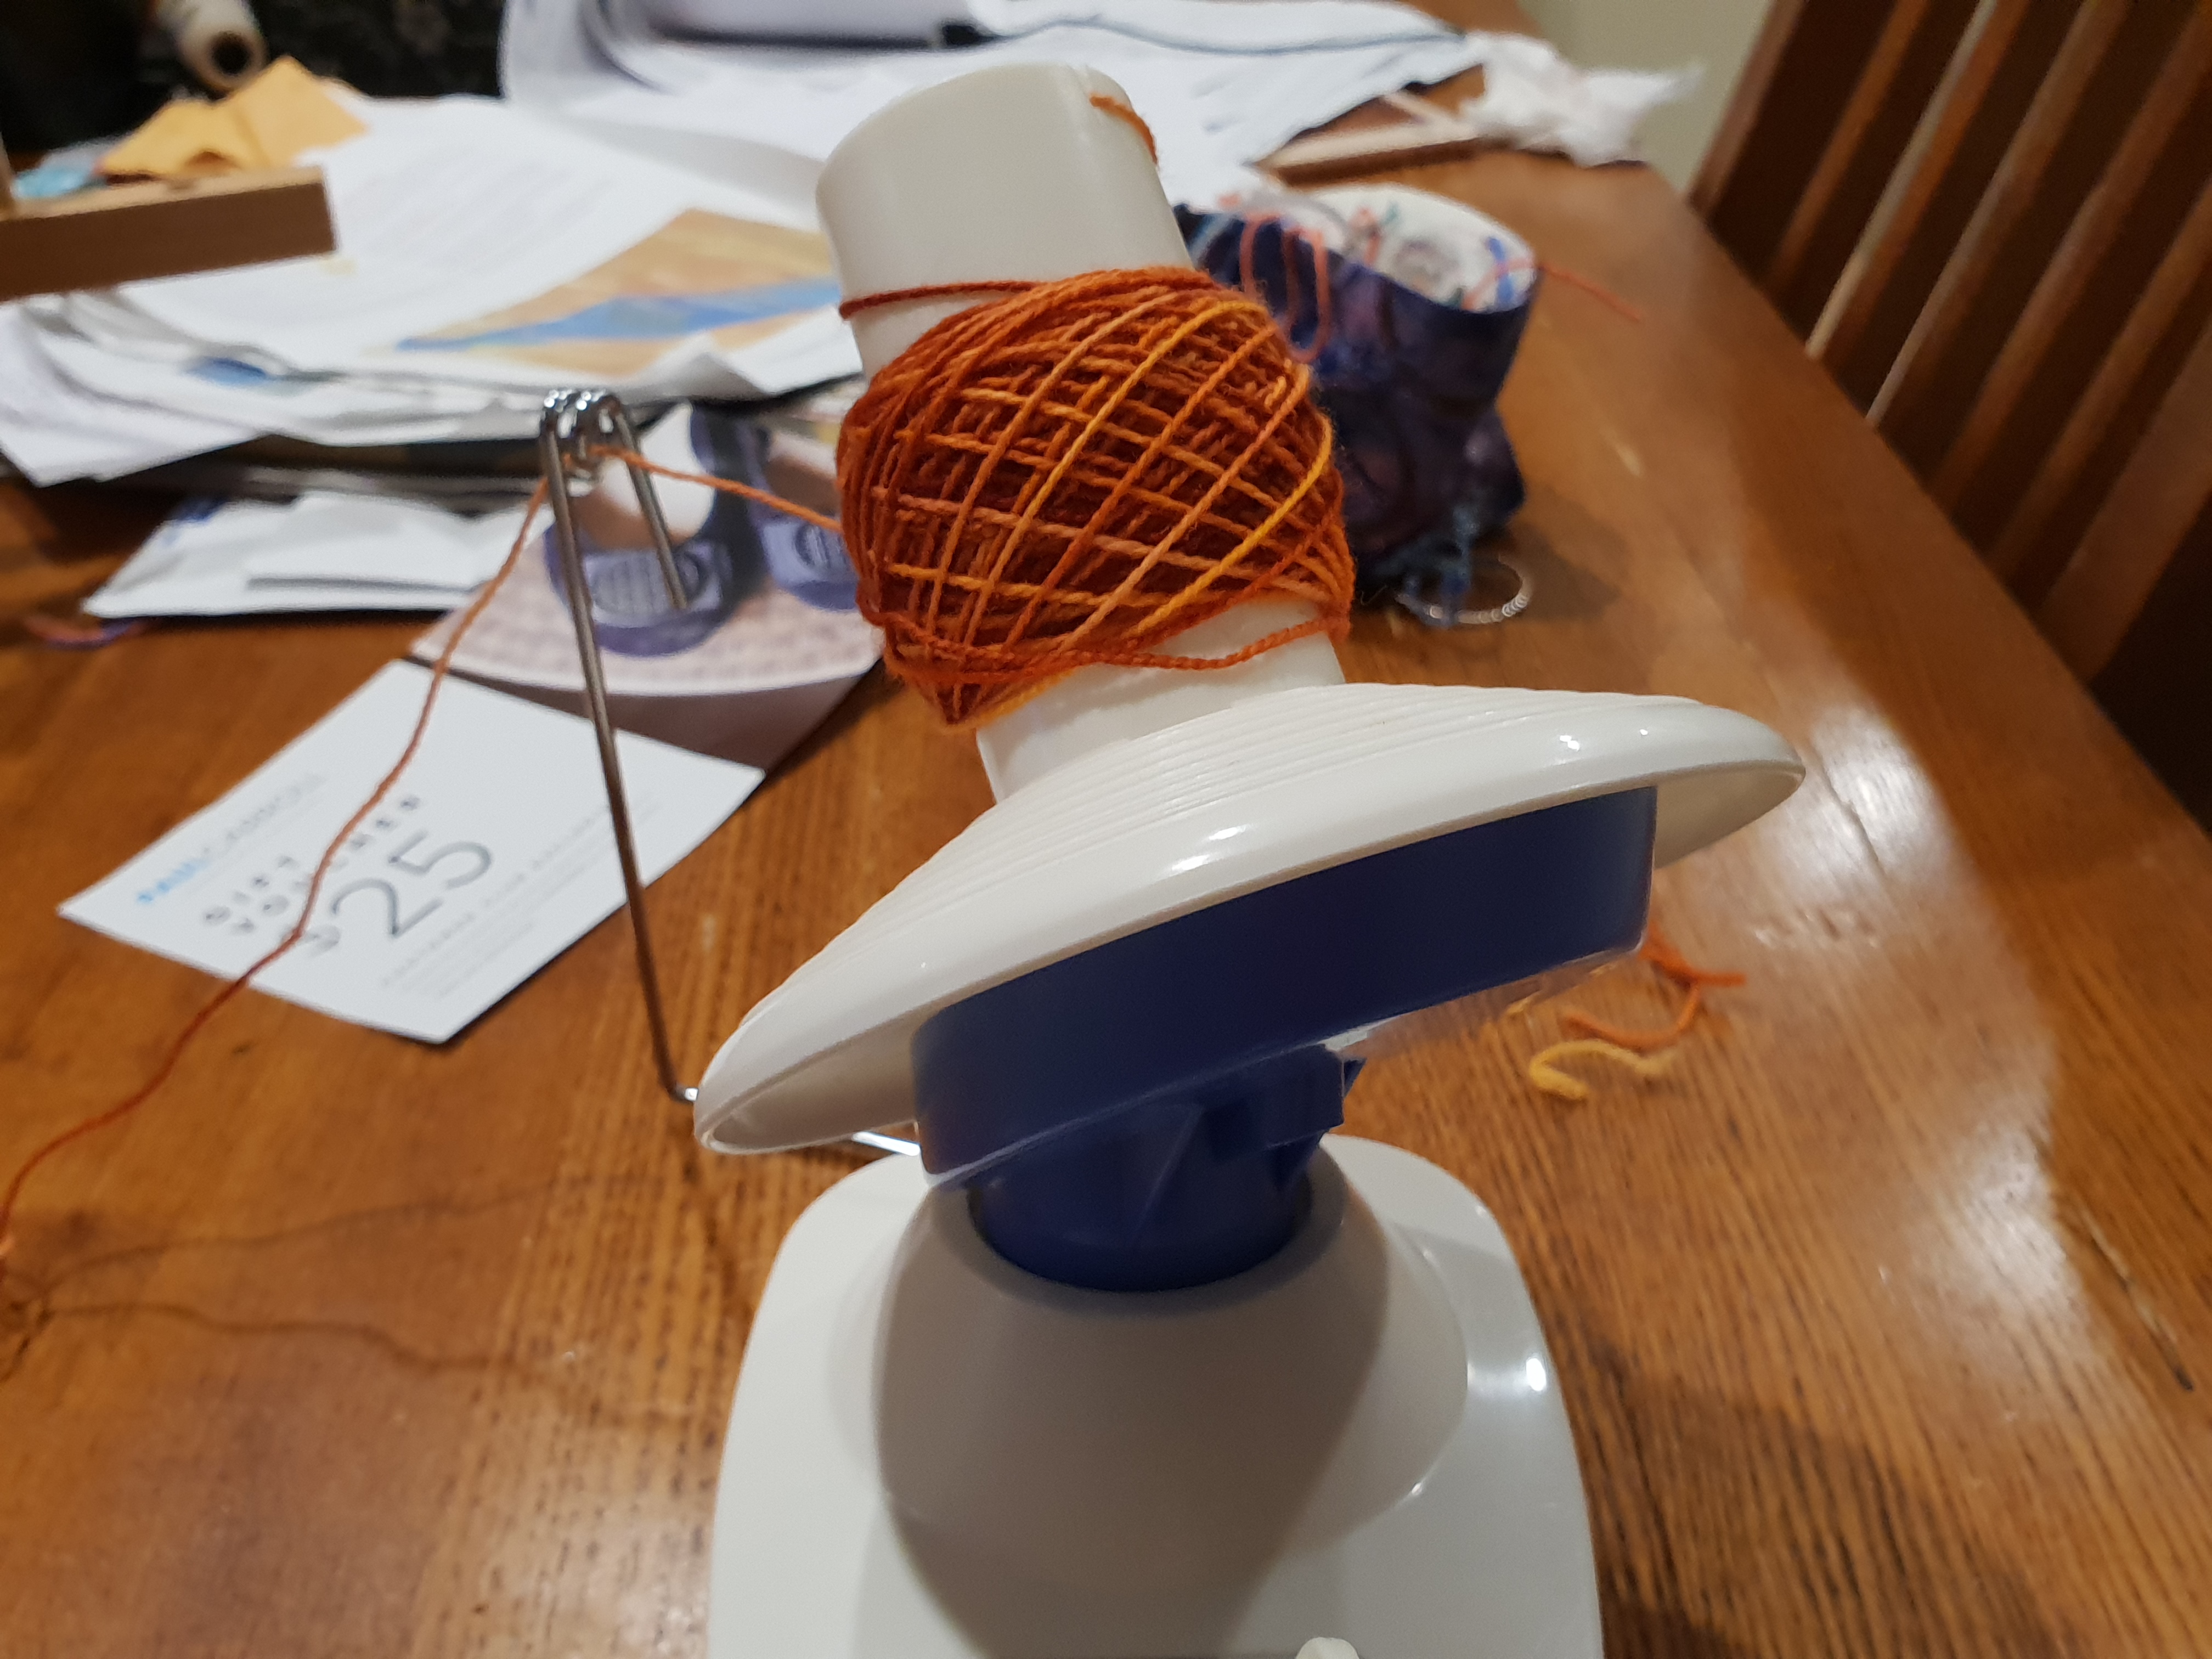
First, of course I had to turn the mini skeins into balls:
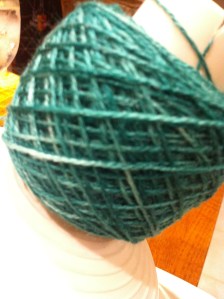
Then I rearranged the balls into my desired shading order:
I am a relatively loose knitter so I decided to use a circular 3.5mm needle rather than the recommended 3.75mm needle. I did not do a tension test as I rely on my own judgement and, besides, a wrap’s dimensions are not as critical as those of a worn garment.
After two days I was on my second colour exchange and enjoying the ease of the instructions.
Thereafter progress was simple. At this point I must praise Ambah O’Brien for the clarity of her instructions. As an example: when doing a recent Stephen West project I came across the instruction “ssk”.
Stephen West’s instructions for “ssk” in his pattern Marled Magic Shawlwere simply “ssk: slip slip knit ” where Ambah O’Brien says “ssk: slip, slip, knit. Slip the first stitch as if to knit, slip the second stitch as if to knit, then slide the left needle into the front part of both stitches and knit them together”. While making the Marled Magic Shawl I could see that slipping two stitches then knitting the next as implied by Stephen West’s pattern was not going to end well. However, it took my friend Liz, sitting in a cancer chemo centre, to tell me what I should do. That was lucky. If Liz had not been there I would have probably had to trash the whole project.
……………………………………………………………………………………………………………..
It’s now 8 May 2020. Australia is doing very very well so far in managing COVID-19. Today our new COVID- 19 institution, called the “National Cabinet” and composed of our 8 State and Territory Premiers and Chief Officers and the Prime Minister, agreed to a staged and careful relaxing of our social restrictions and a reopening of businesses and other public places.
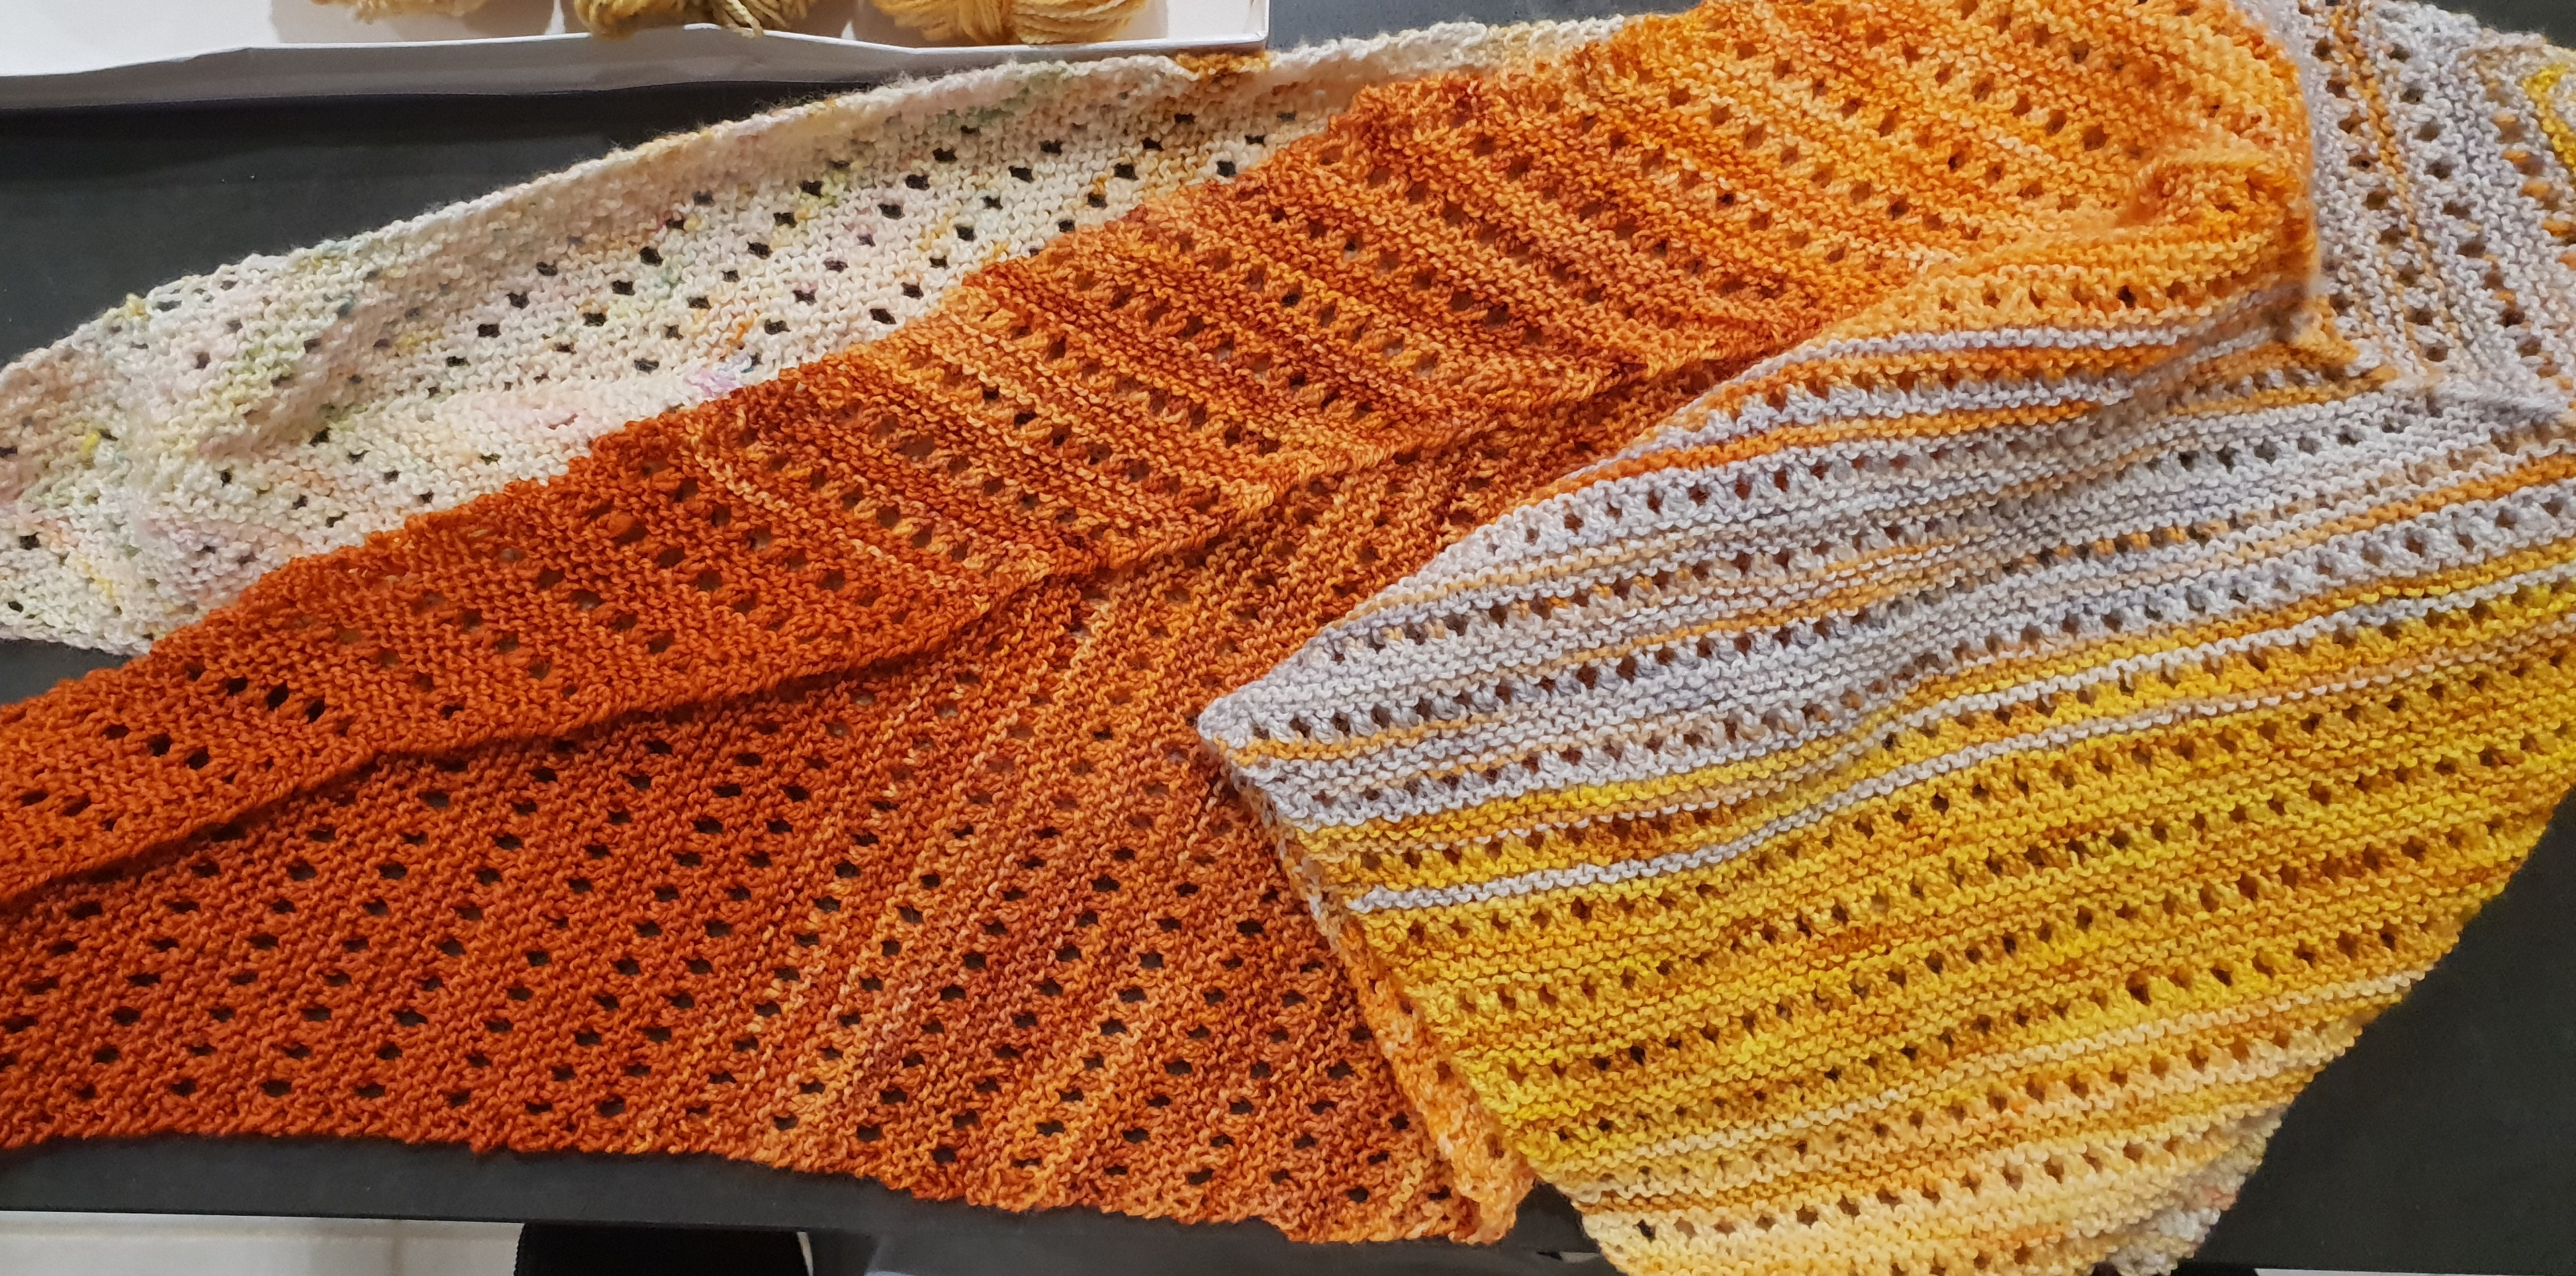
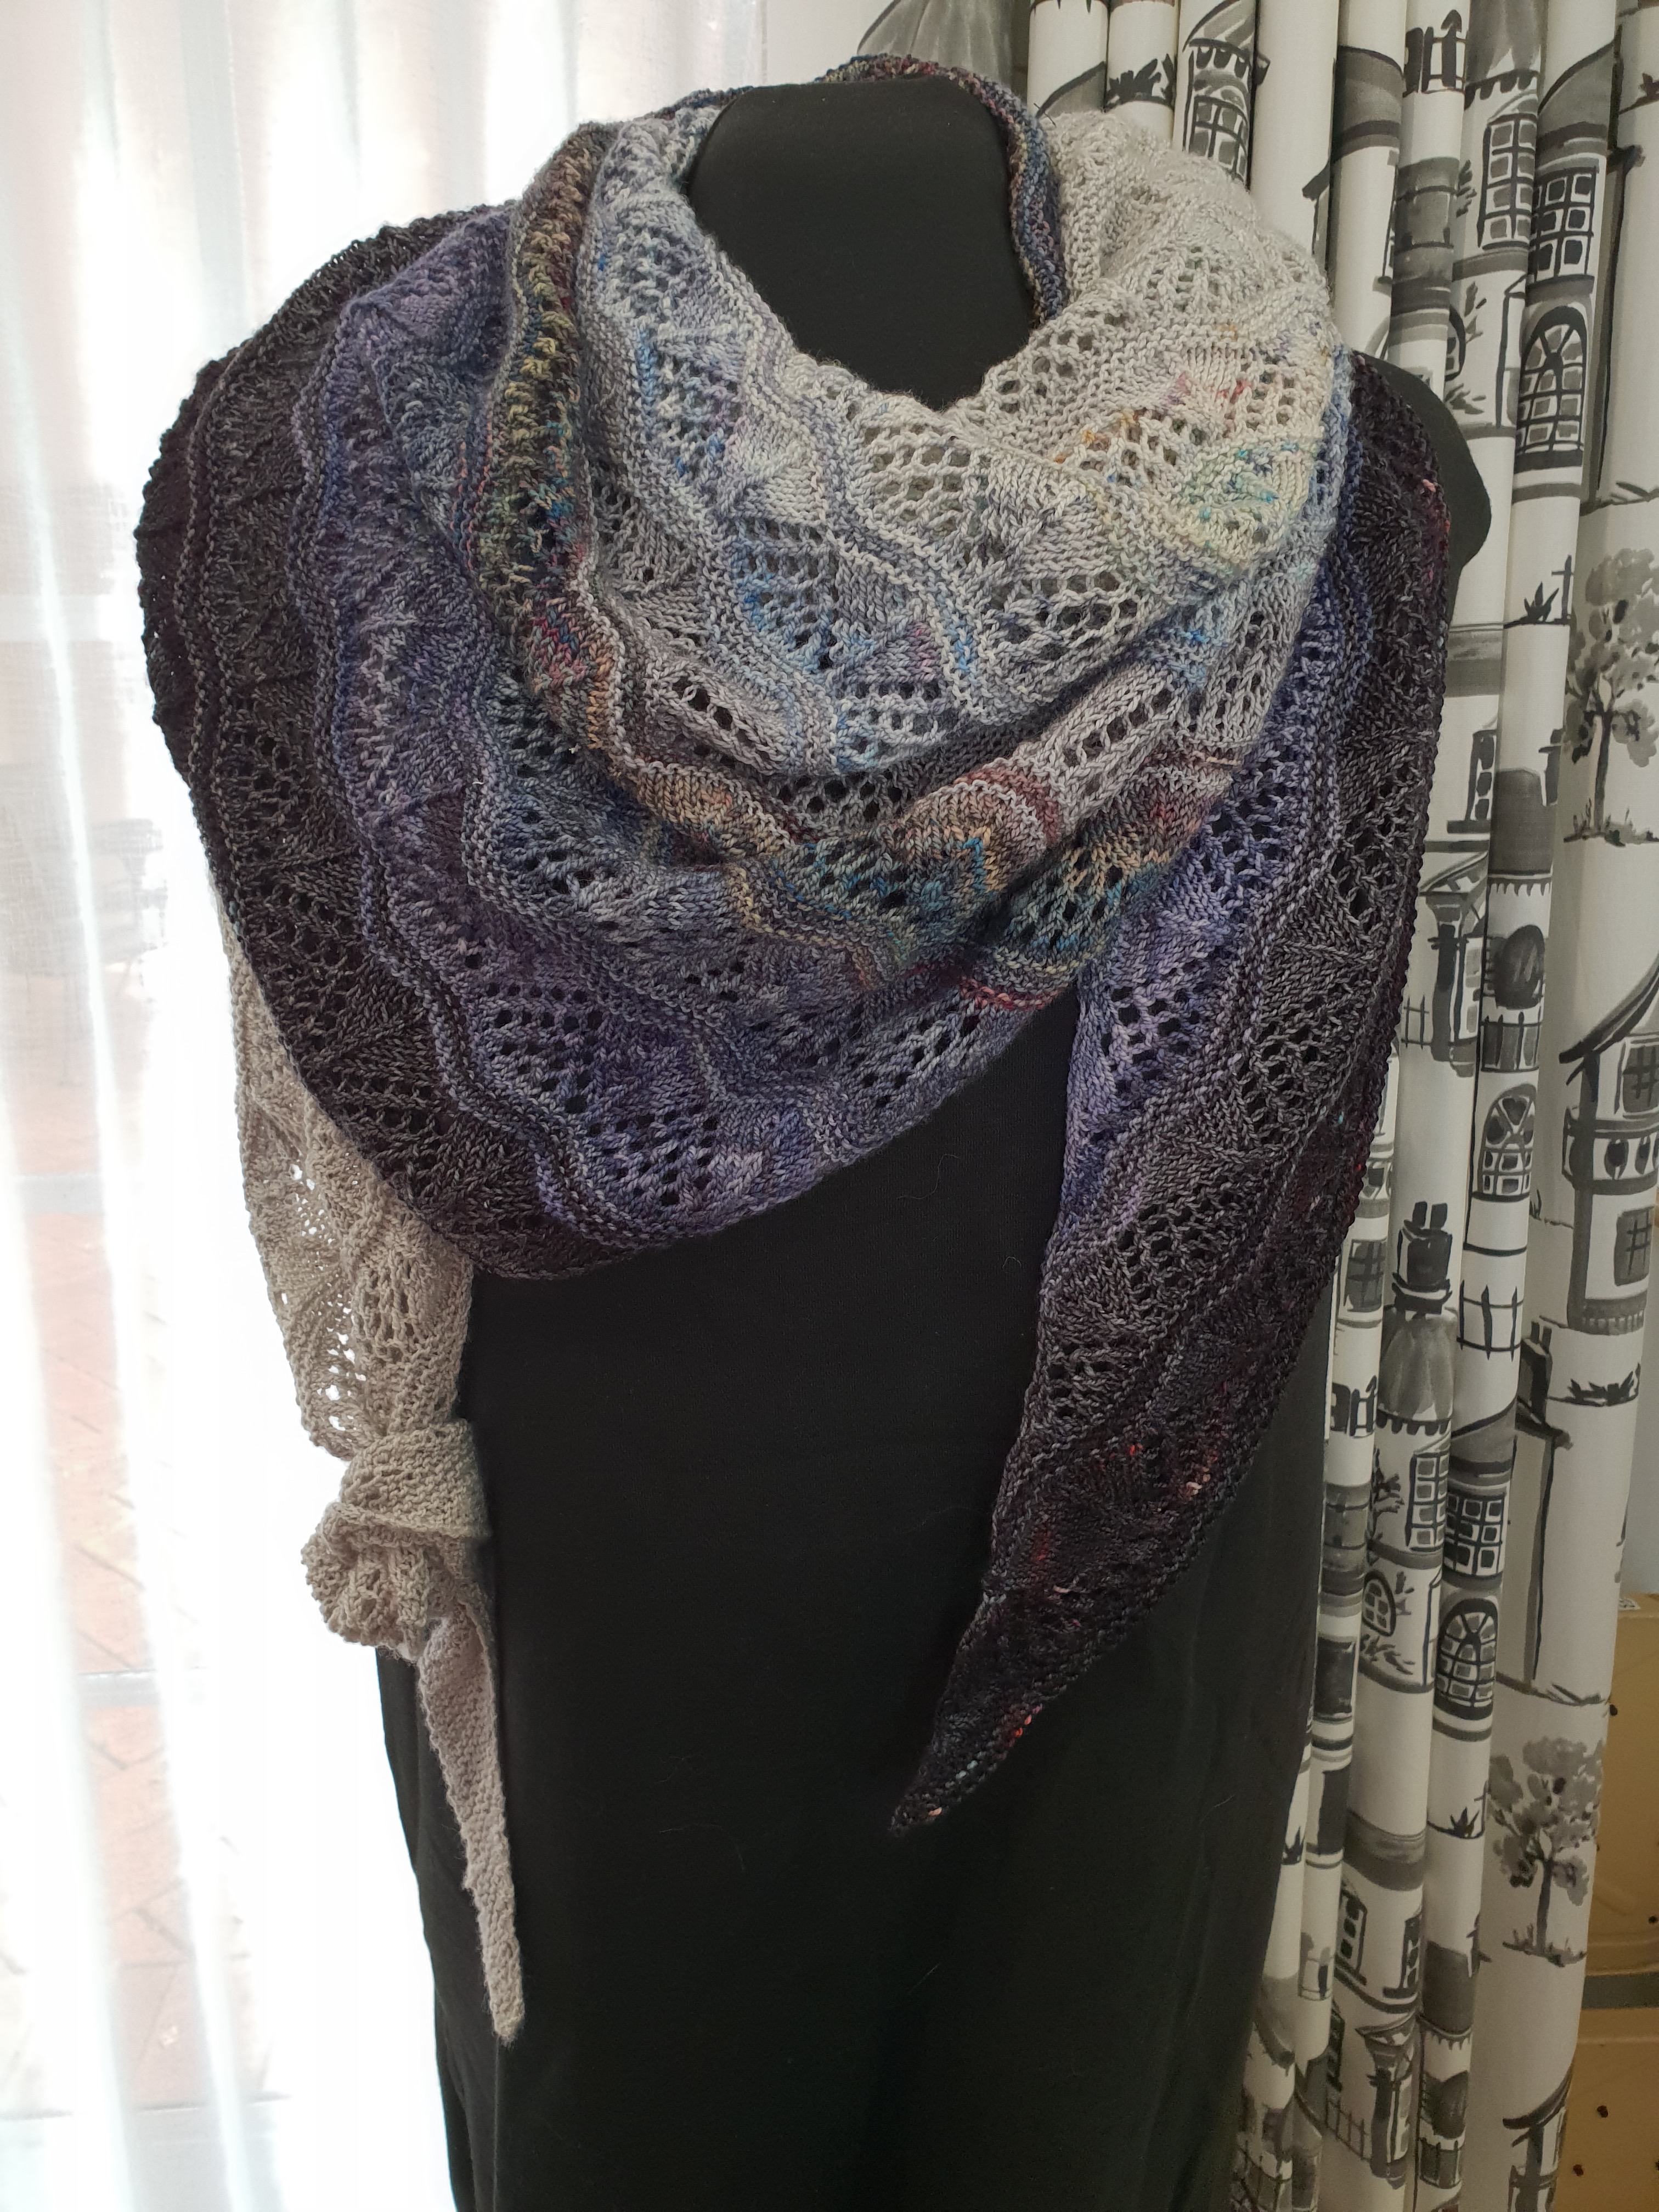
So since I have been steadily working a bit each day on the Venation Shawl, it seems appropriate that today I finished it. Of course, it’s not yet blocked so officially it’s still a newborn. But I’m pleased with the marriage of the pattern and the yarn.
Here’s what I have left so there is another project or project element waiting….the weight of these leftovers is 108g so I used 250-108= 142g of the yarn.
Below is the unblocked scarf.
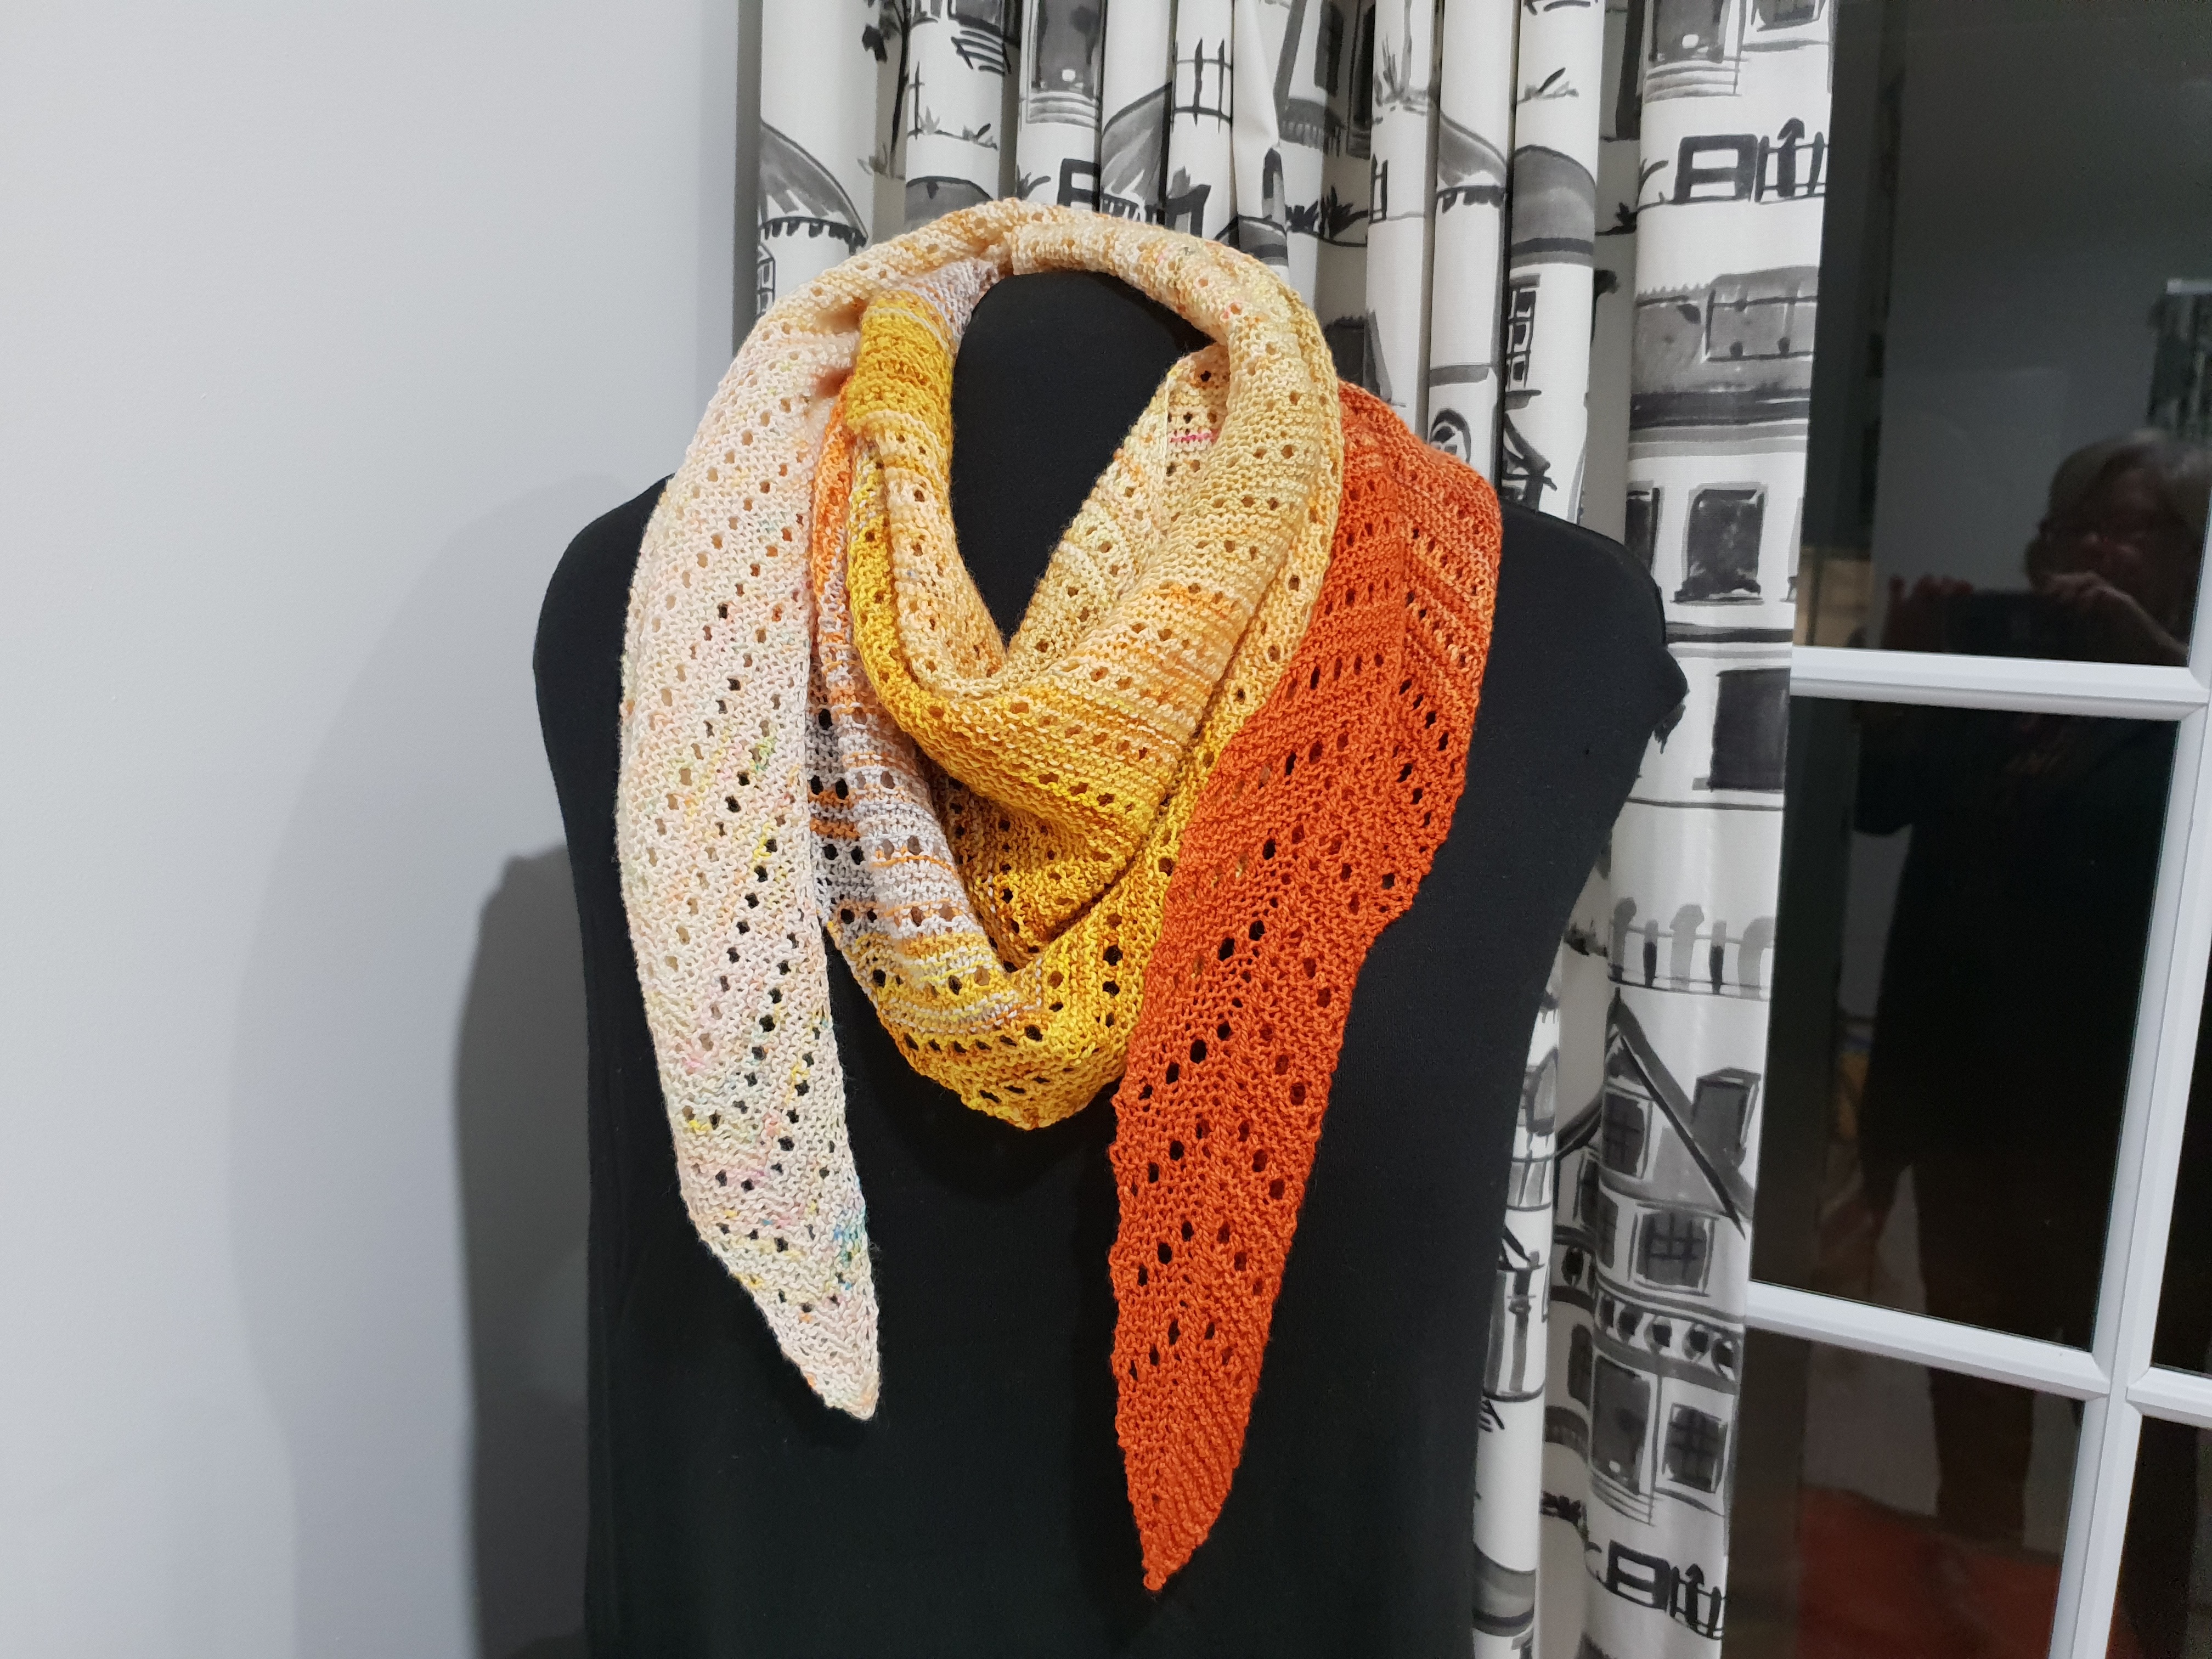
Here, on 12 May, is the fully blocked scarf. I’m pleased. I hope whoever gets it will be too!
Postscript: I can’t find this wrap so I must have given it to someone!
Life as a cotton sheet can be fraught. Not always of course. The lucky ones get bought by people who use them on their beds for years. They get to serve a very passive but important role. They mature and soften and are appreciated in a gentle way by numerous sleeping humans.
Not so for me. I am a victim of the “upsized bed” phenomenon. That means that SHE (who shall remain nameless) decided that Queen sized was not enough. When the King Sized bed moved in, with its accompanying sheet sets, I was lucky I suppose. I was neatly folded and put into the back of the linen cupboard.
For a while I enjoyed the freedom of breathing fresh air (well, relatively speaking, if you imagine the cupboard was fresher than the bedroom….) and of not having my fibres stretched and polluted by the heaving of human bodies.
THEN something that is becoming increasingly common happened. SHE got the “natural dyeing” bug. You will have heard of it. Victims are usually members of a privileged society with every material benefit, yet they feel disconnected from “nature”. They may not be over-familiar with what “nature” is, but they know it is GOOD.
These natural dyeing converts often also feel guilt at their consumption patterns. Mind you, they don’t often eschew their purchases of Chinese or Vietnamese or Sri Lankan -made garments but they do want to make a statement. One option is to put their bras into a (plastic) bag and mail it to China where it will somehow be used to power a city.
Another option is to create art or fashion based on dyeing with plants on “natural” fibres.
Natural fibres can be plant based (like cotton or linen) or animal based (like silk or wool). Wait a minute! What will the vegans think? Best to stick to plant fibres, eh?
So notwithstanding the prevailing wisdom about animal fibres taking natural dyes better than those of us made of more cellulosic stuff, SHE decided to dig me out of the back of the linen cupboard.
And chop me up!
I used to be a lot bigger than this……..
And boil bits of me in brews of oxalis or gum leaves or oak galls….
And I used to be clean……
And put itchy bits of plants from HER garden or the local park onto me, pressing them in and screwing me up hard so there was “good”, albeit painful, contact between these weeds and me.
If you think leaves are painful, try these gumnuts!
“But wait, there’s more”, as one of those damned humans says. I then get to be either boiled or steamed for a couple of hours. I can’t sensibly tell you which is better. SHE says it depends on whether iron or copper or ash or…..is involved.
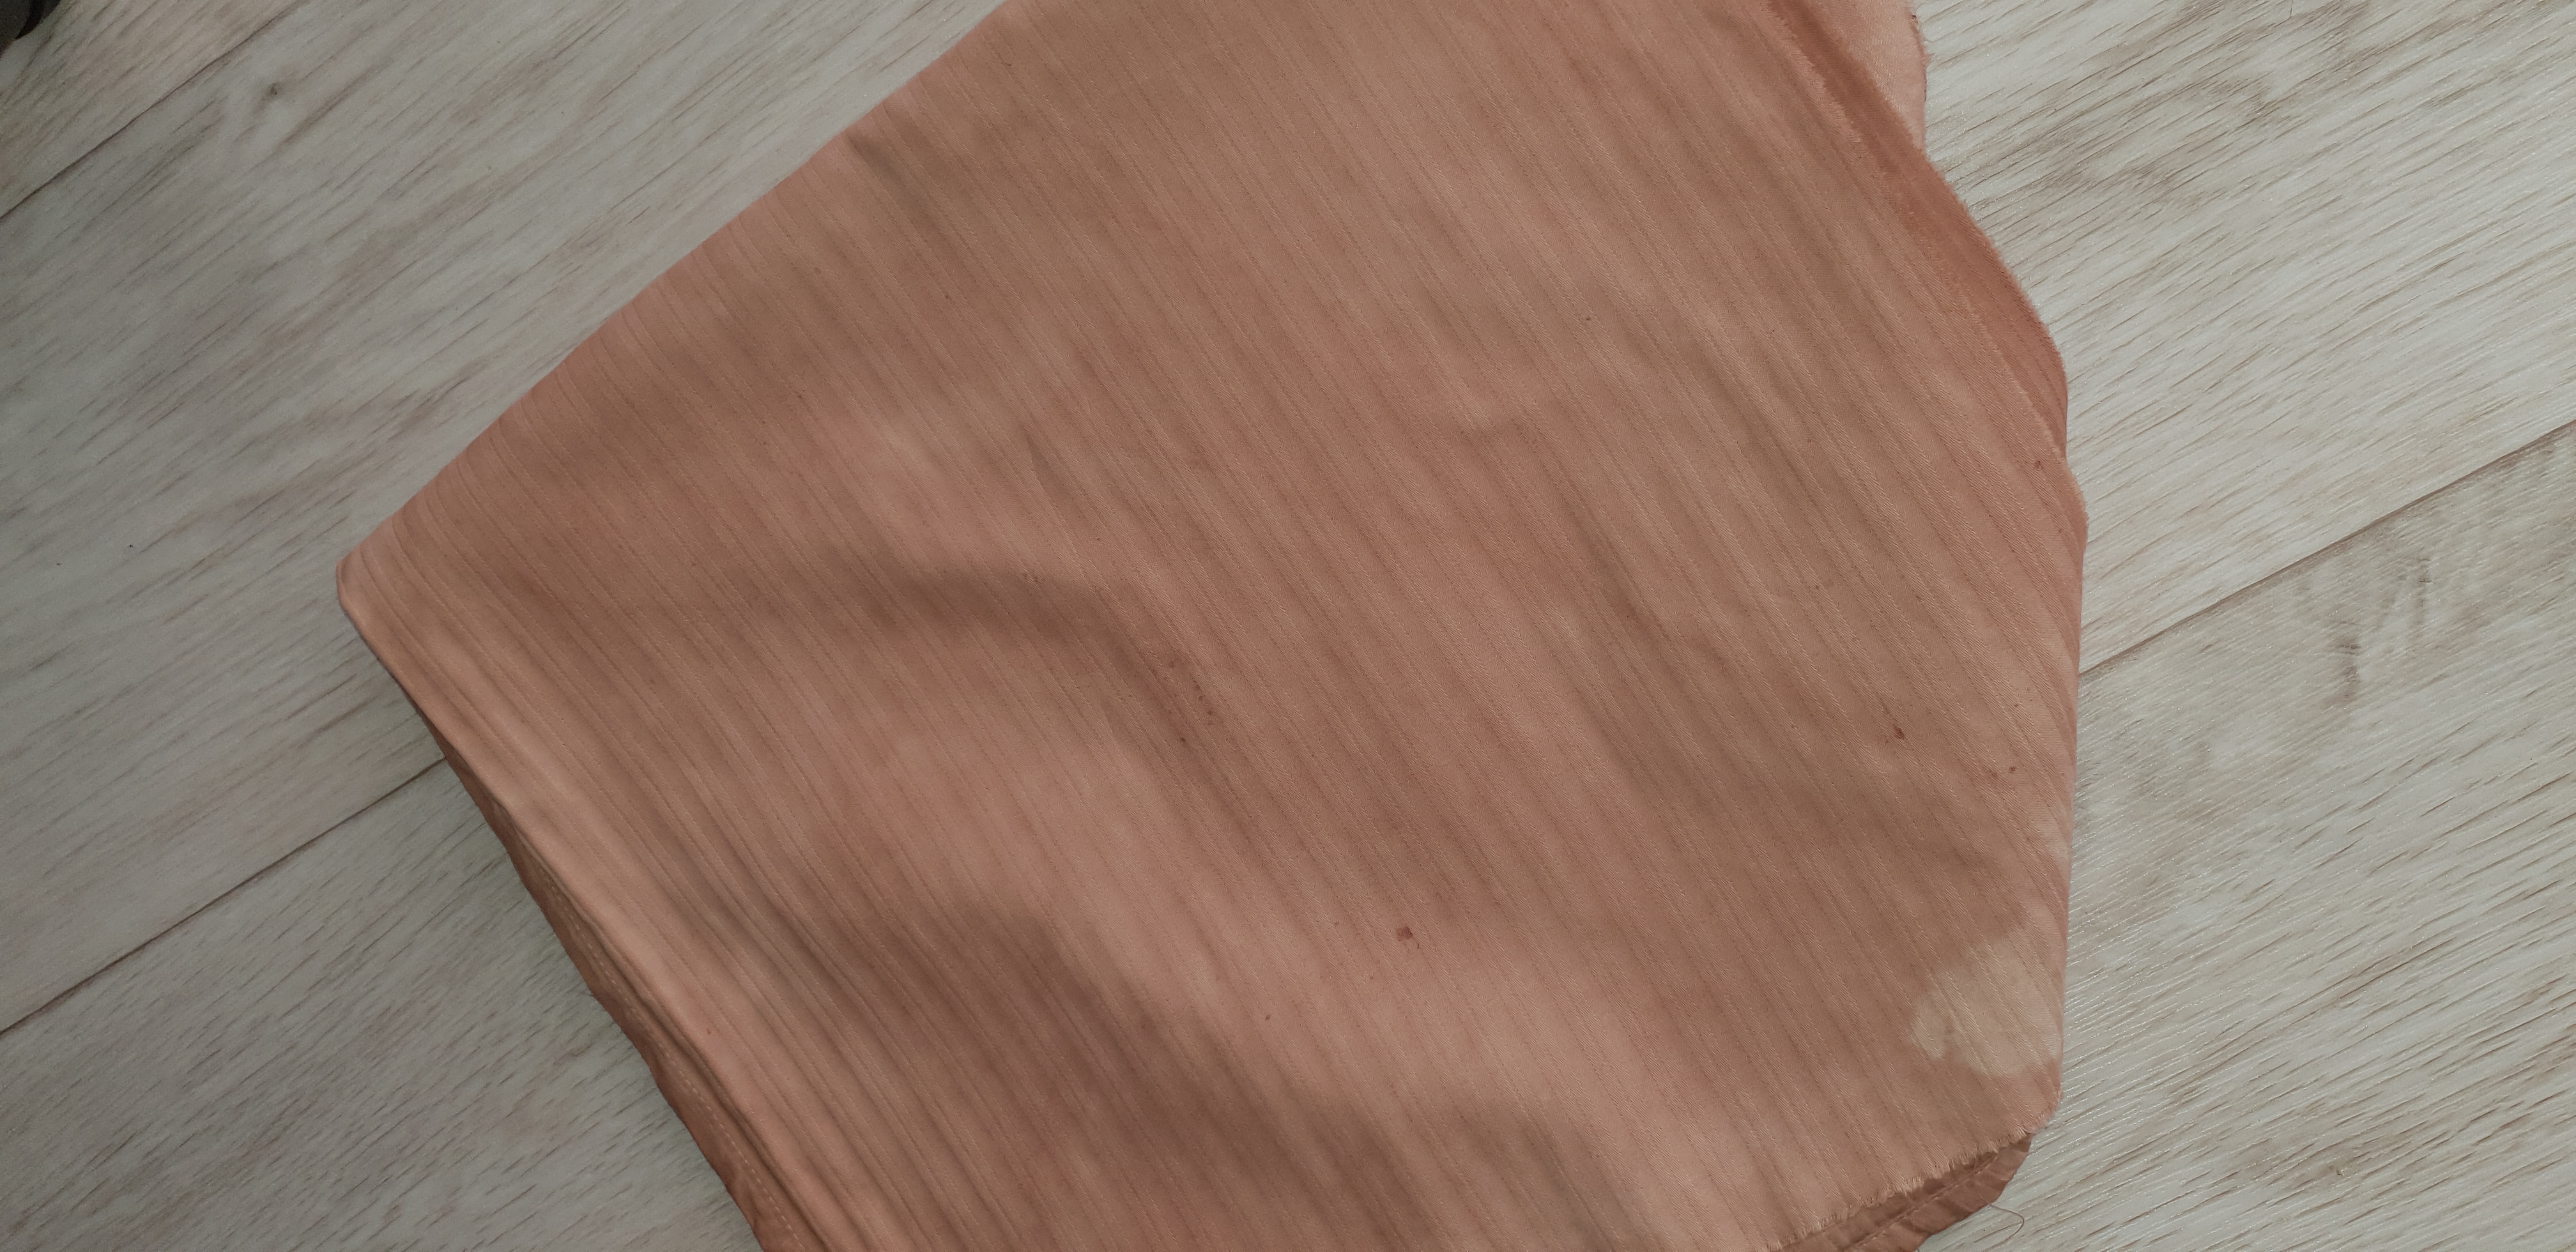
It takes a lot of rusty iron up close and personal to me to get this kind of geranium stain on me
Before I disappear entirely I want to introduce a distant family connection. It is a sheet formerly owned by one of HER friends. In a callous act of sheet trafficking it was passed into HER hands with malice of intent. That is, the trafficker KNEW of the likely exploitation that would result.
It’s hard to see from this photo but my fellow cotton sheet has a most distinguished set of stripes that will make it hard for sheet traffickers to disguise.
Ensuing blogs will undoubtedly feature this hapless victim *, albeit unacknowledged. Vale cotton bed sheet, originally woven for a very different purpose.
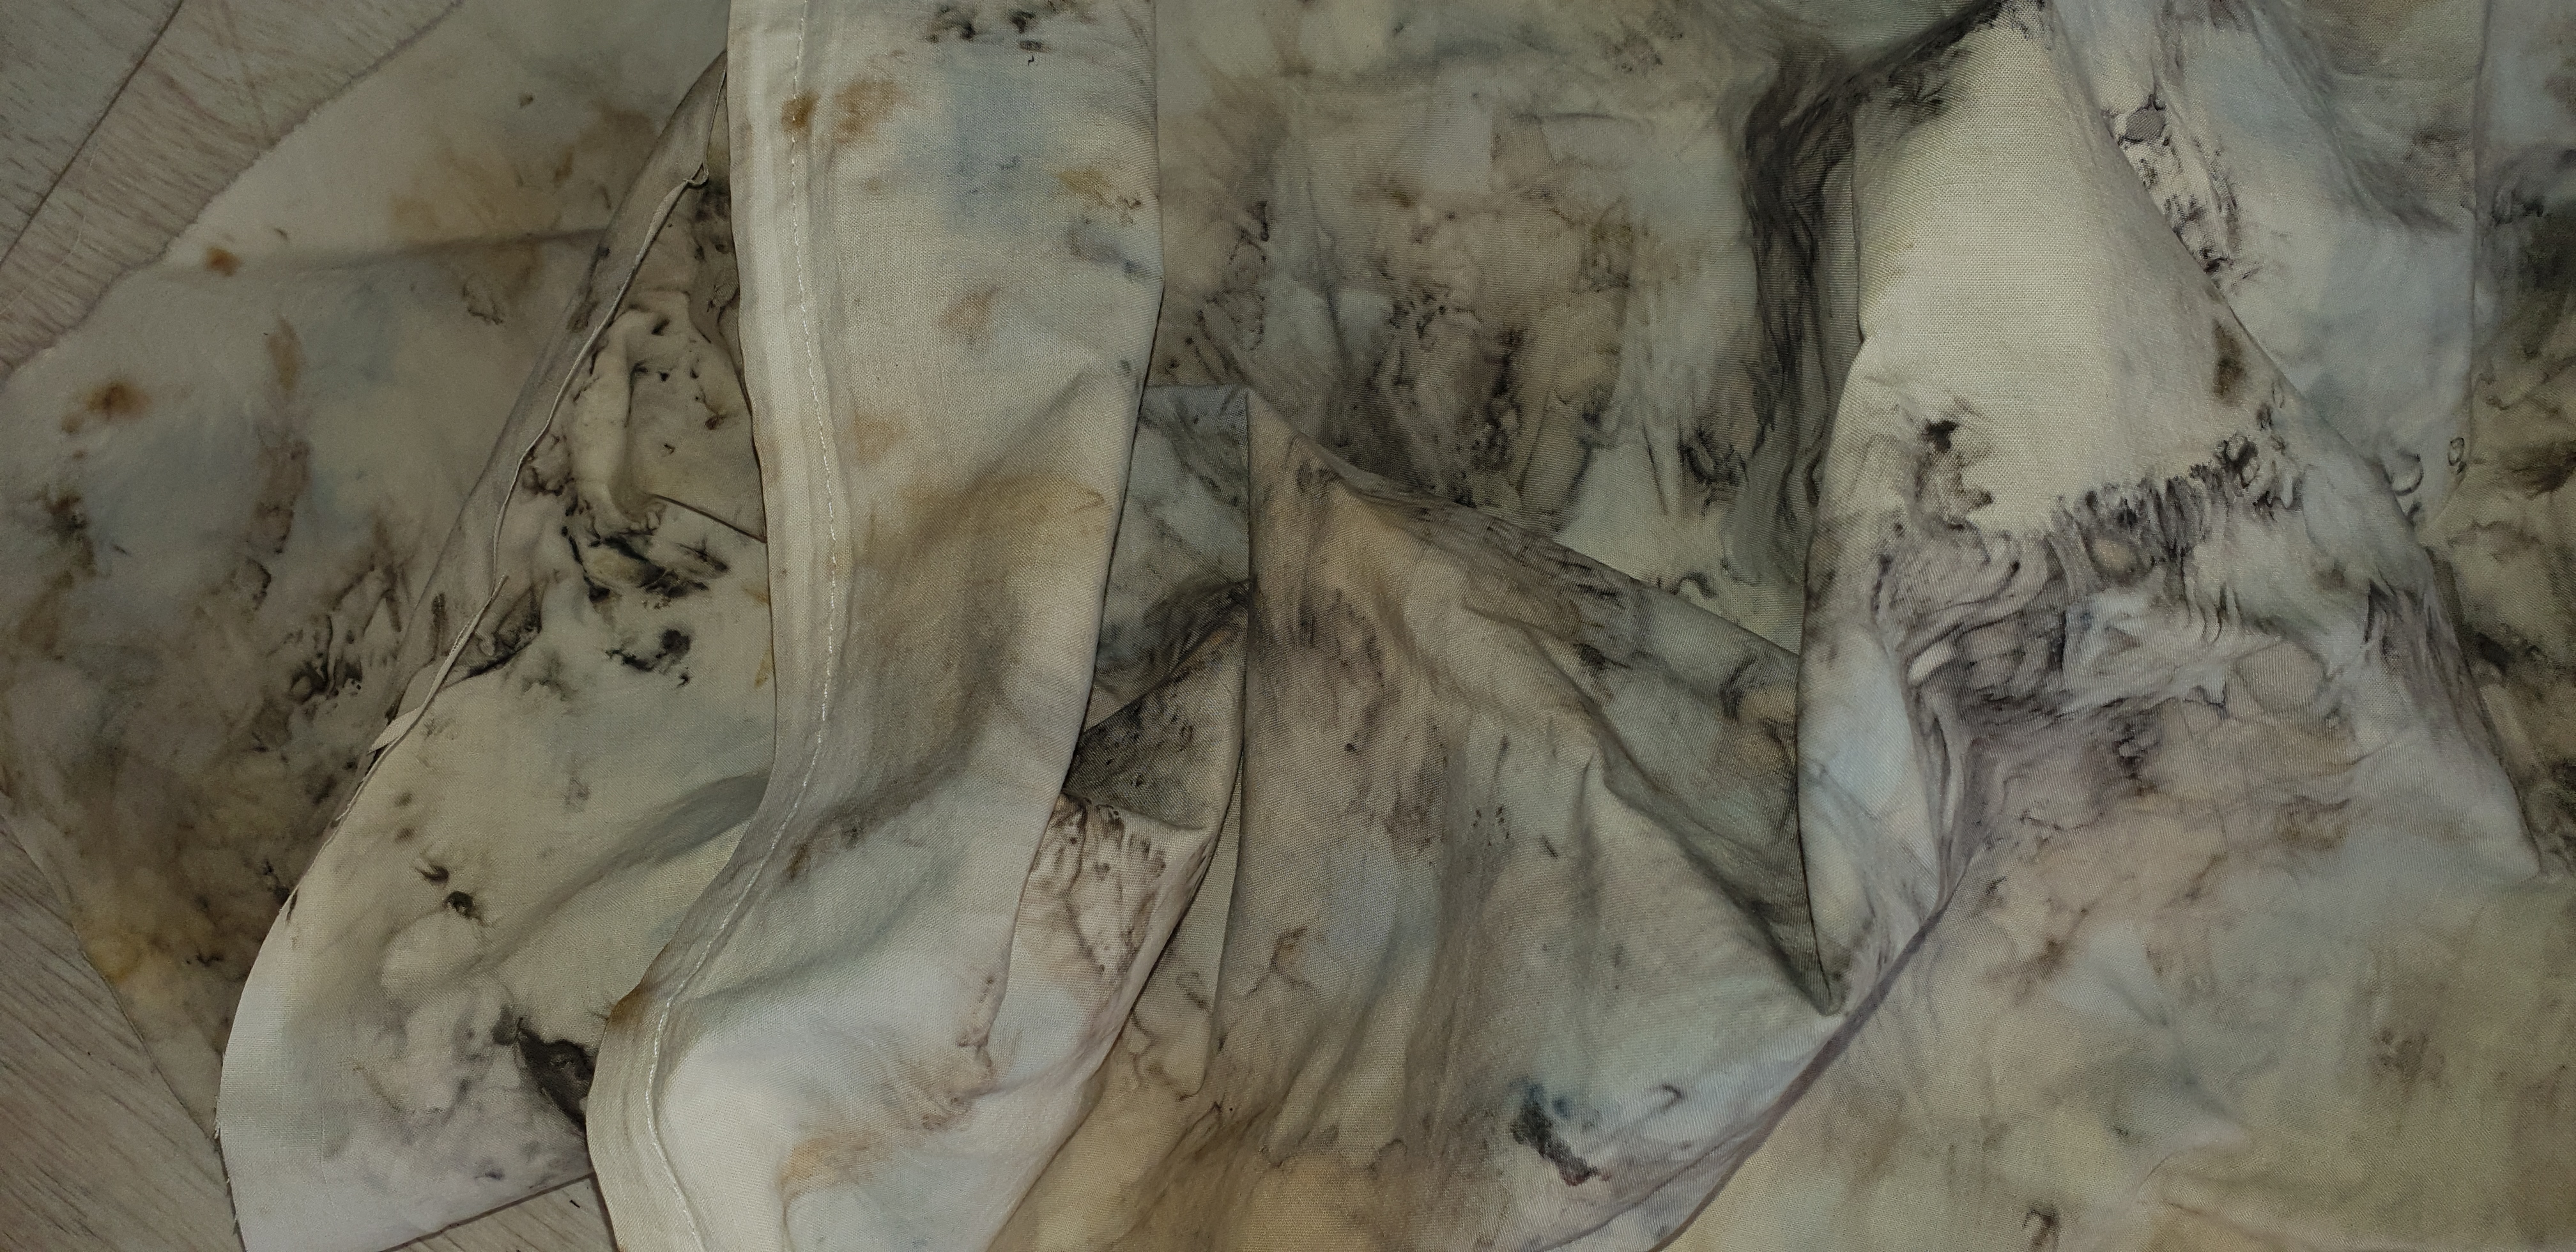
* for a taste of this sheet exploitation, see the following result of BOILING a piece in avocado pips laced with caustic soda!!!! Aaaaaagh!!
To paraphrase Milton: “They also serve who only stand and wait”
Or should that be “.…….who only get ripped up and boiled“?
Artistic inspiration, always an elusive commodity for me, has left the building over the past week. It’s rainy and cold: it’s soup weather here in Western Australia.
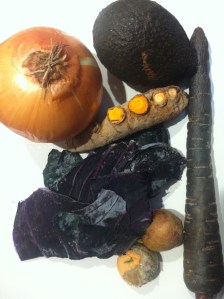
So my inner Earth Mother must have kicked in. Why not add a few things from the greengrocer into the basket? That way, you can dye yarn in the kitchen rather than in the windy outdoors.
Brown onion, avocado, turmeric tuber, purple cabbage, avocado pips and a purple carrot.
Dyeing with vegetables is a lot easier if the plant matter is cut as small as possible. I know that those of us who own Thermomix appliances are regarded as wealthy and gullible dilettantes but, hey, they are useful when you want to make your turmeric tuber /purple cabbage/purple carrot yield as much dye as possible. It’s all about surface area exposed to water, right?
[I realise, reading this again, that I have merely fed the poor reputation of Thermomix owners!]
Of course, when you have finely minced plant material as your dye medium you really need to keep it from getting into your fabric and yarn. Voilà. Enclose it in silk and you keep the dyed fibres clean while giving yourself some lovely pieces of fabric.
Top to bottom: Purple carrot, avocado pips and turmeric on silk
To keep the whole indoors process safe, I decided not to try any mordanting. I just lowered the yarn skeins into the pot containing a silk-wrapped bundle of the vegetable concerned, brought it to simmer, turned the temperature down and maintained it at around 60 degrees centigrade for at least 30 minutes. In some cases I left the whole pot to cool to room temperature overnight.
I raided my stash of undyed, white or cream natural fibres (that is, silks, cottons, wools, kid mohair) and made small skeins from them.
The results are pleasing to me. They are not spectacular. Nor should they be. The thing about natural dyeing for me is that the colours are soft and, yes, natural. They seem to play well with one another somehow. Because I use small quantities of both fabric and yarn in my work I relish small variations. I don’t want to produce metres at a time of the one dye lot. Each small batch of dye produces a slightly different outcome, even with the same fibre. Obviously, that’s because the amount of dye material in the pot varies, the amount of pigment in a particular plant varies with season, etc.
Left to Right: Wool; Patons baby wool; mulberry silk; and cotton yarns dyed in grated turmeric
Three balls on the left are all Patons 2 ply baby wool and far right is 20/2 mulberry silk, all dyed in purple carrot
Left to Right: Kid mohair, cotton, silk cord. cotton dyed in purple carrot
Left to Right: kid mohair; kid mohair; 60% cotton with acrylic and polyester; and 100% linen dyed in purple carrot
Clockwise from top left: cotton thread; linen thread, kid mohair, 60% cotton with acrylic and polyester, silk cord, and chunky cotton thread dyed in avocado pips.
Enter a caption
From left to right: 20/2 silk; Patons 2ply baby wool; fine wool; and silk fibre from Loom in Bangkok dyed in purple cabbage
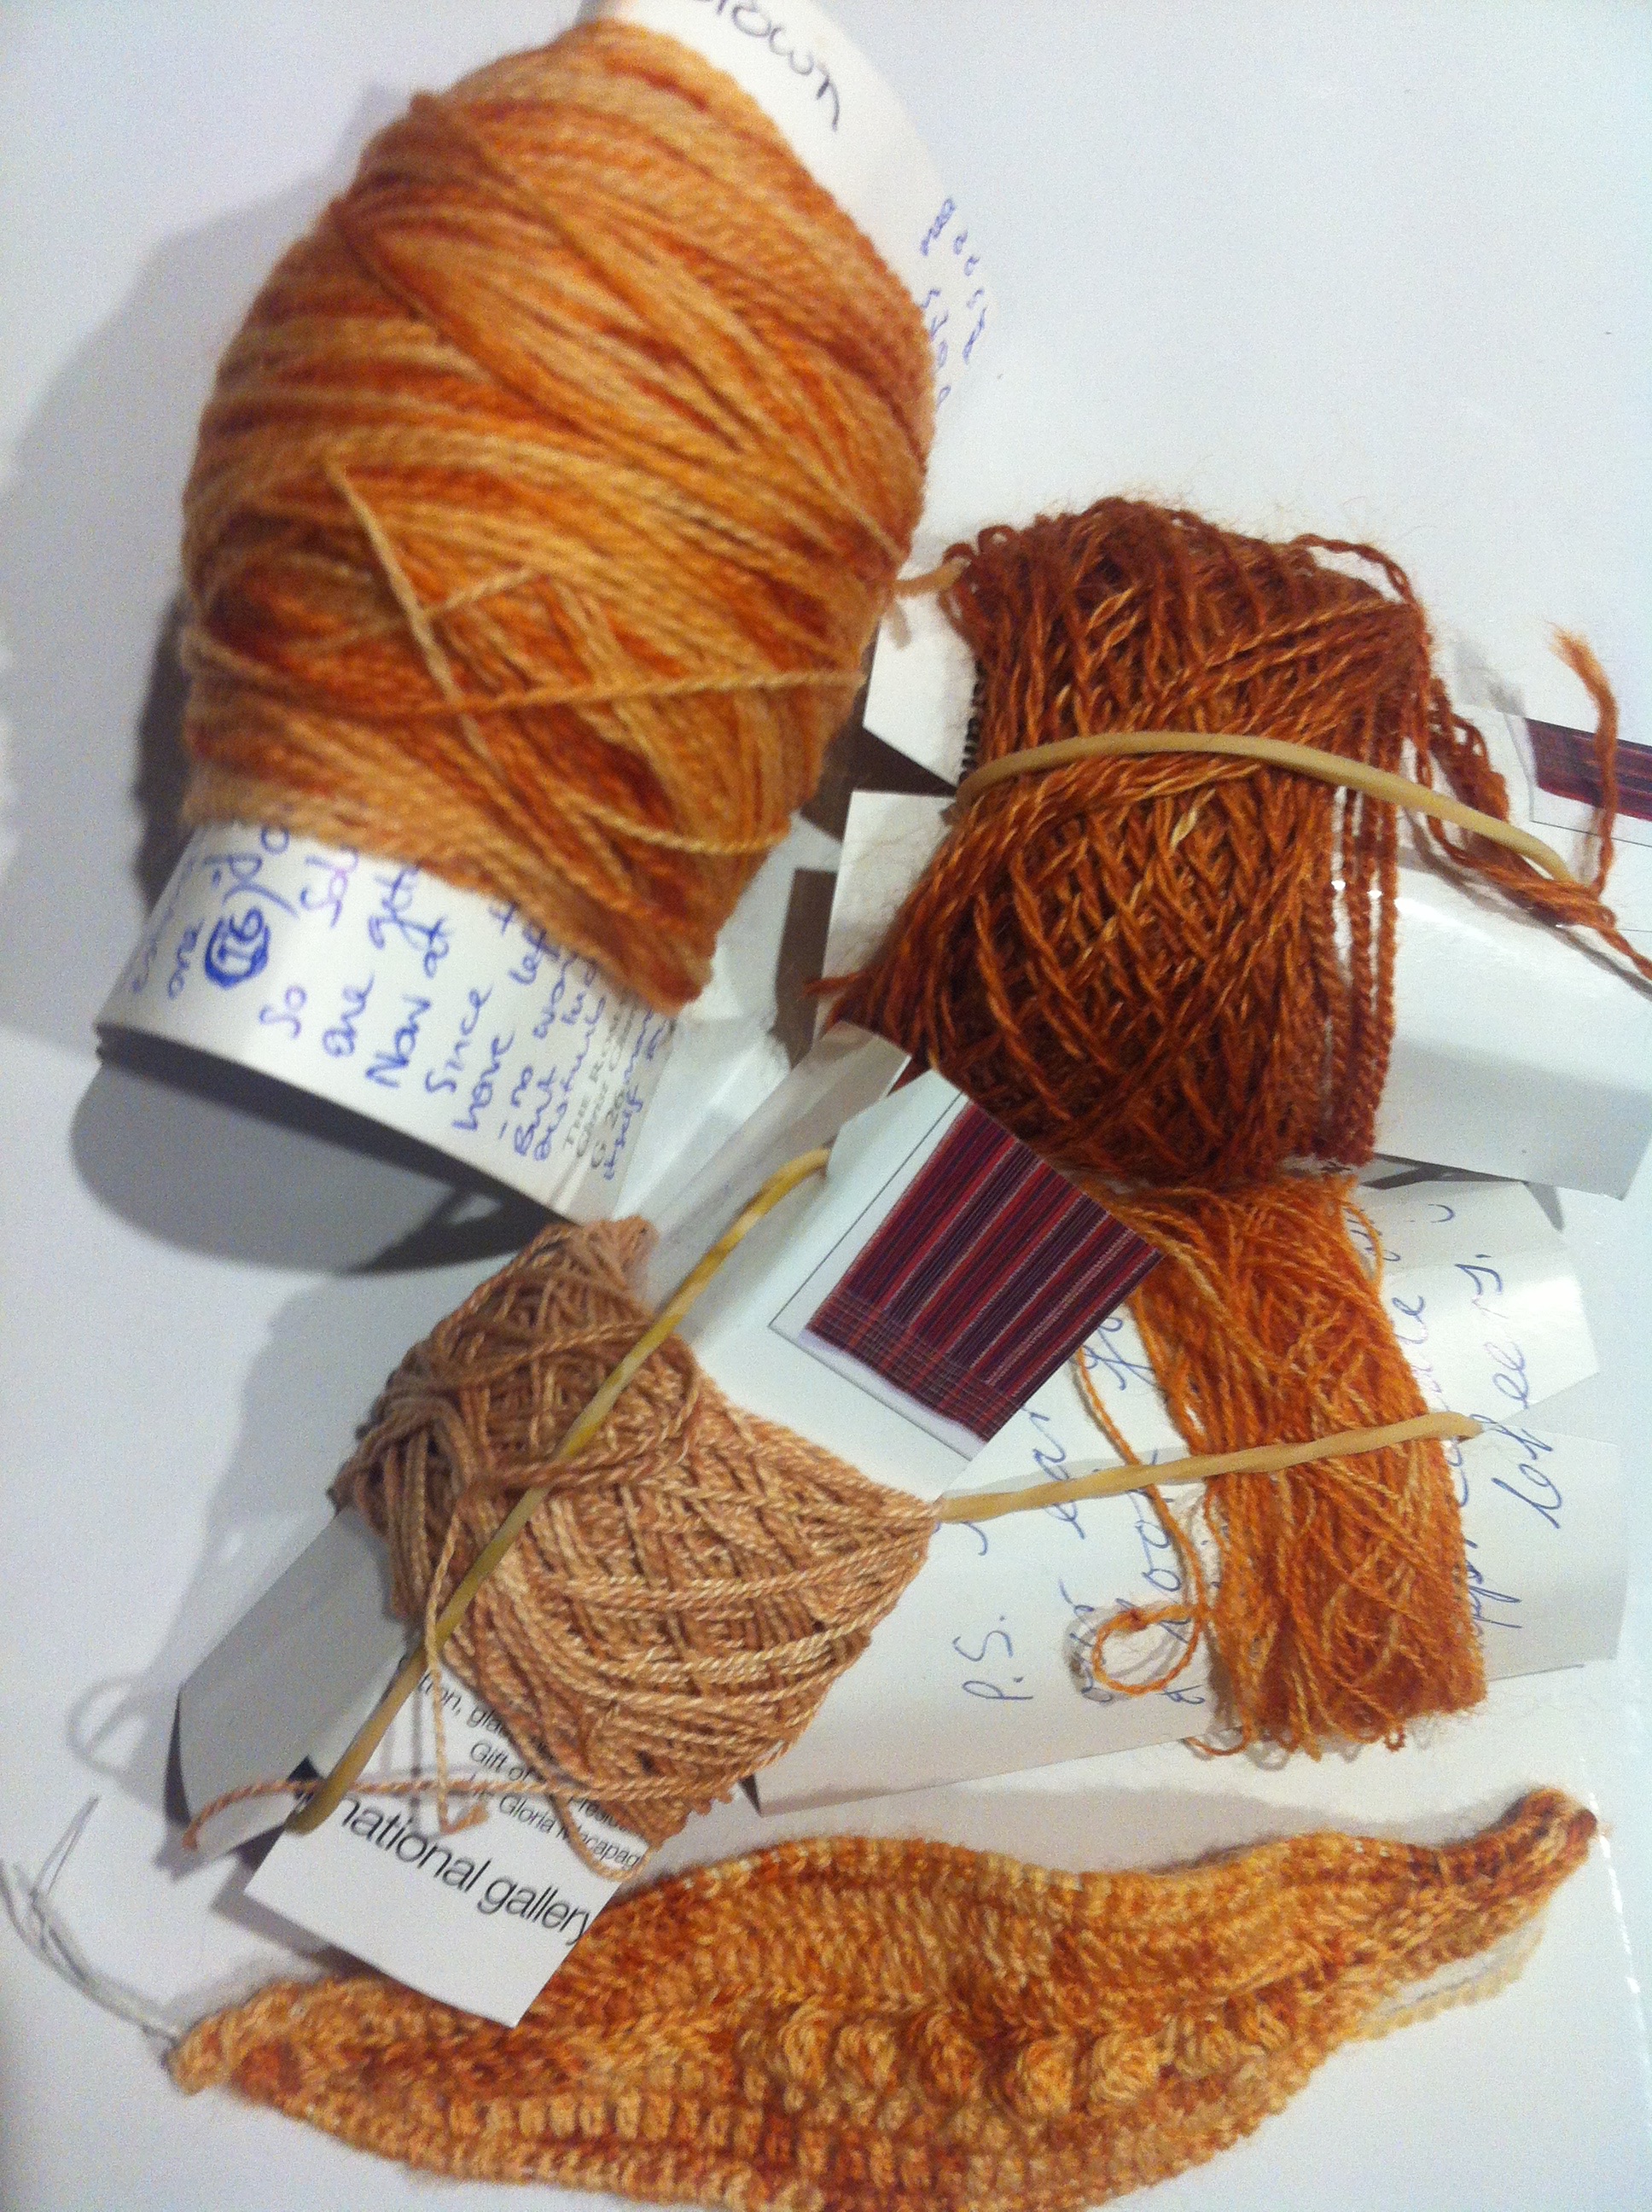
Clockwise from top left: 20/2 silk; kid mohair; fine wool yarn; and perle #8 cotton, all dyed in brown onion leaves. Leaf crocheted in 20/2 silk.
Now I just have to find that artistic inspiration that has been eluding me. These yarns deserve that!
Last weekend I went to a fibre fair in a rural town. Although i love dyeing my own yarns, especially with plants, I couldn’t resist buying some skeins of 70:30 merino:silk yarn dyed by hand by the seller with what was described as “an eco-friendly acid dye”. [I have not researched this since the dyer could not recall the name of the product (!) and I’m guessing I might be disappointed at what I found – but then, I’m cynical]
The pink skein with its blemish where too tightly tied
The green skein also had a blemish
On this occasion I am not worriedbecause I work small and quite like variations in any case. However, it would annoy me if I had bought the yarn for a garment!
The lesson here is to look closely at the skeins before buying them unless you know the product and can be sure that it’s been dyed correctly.
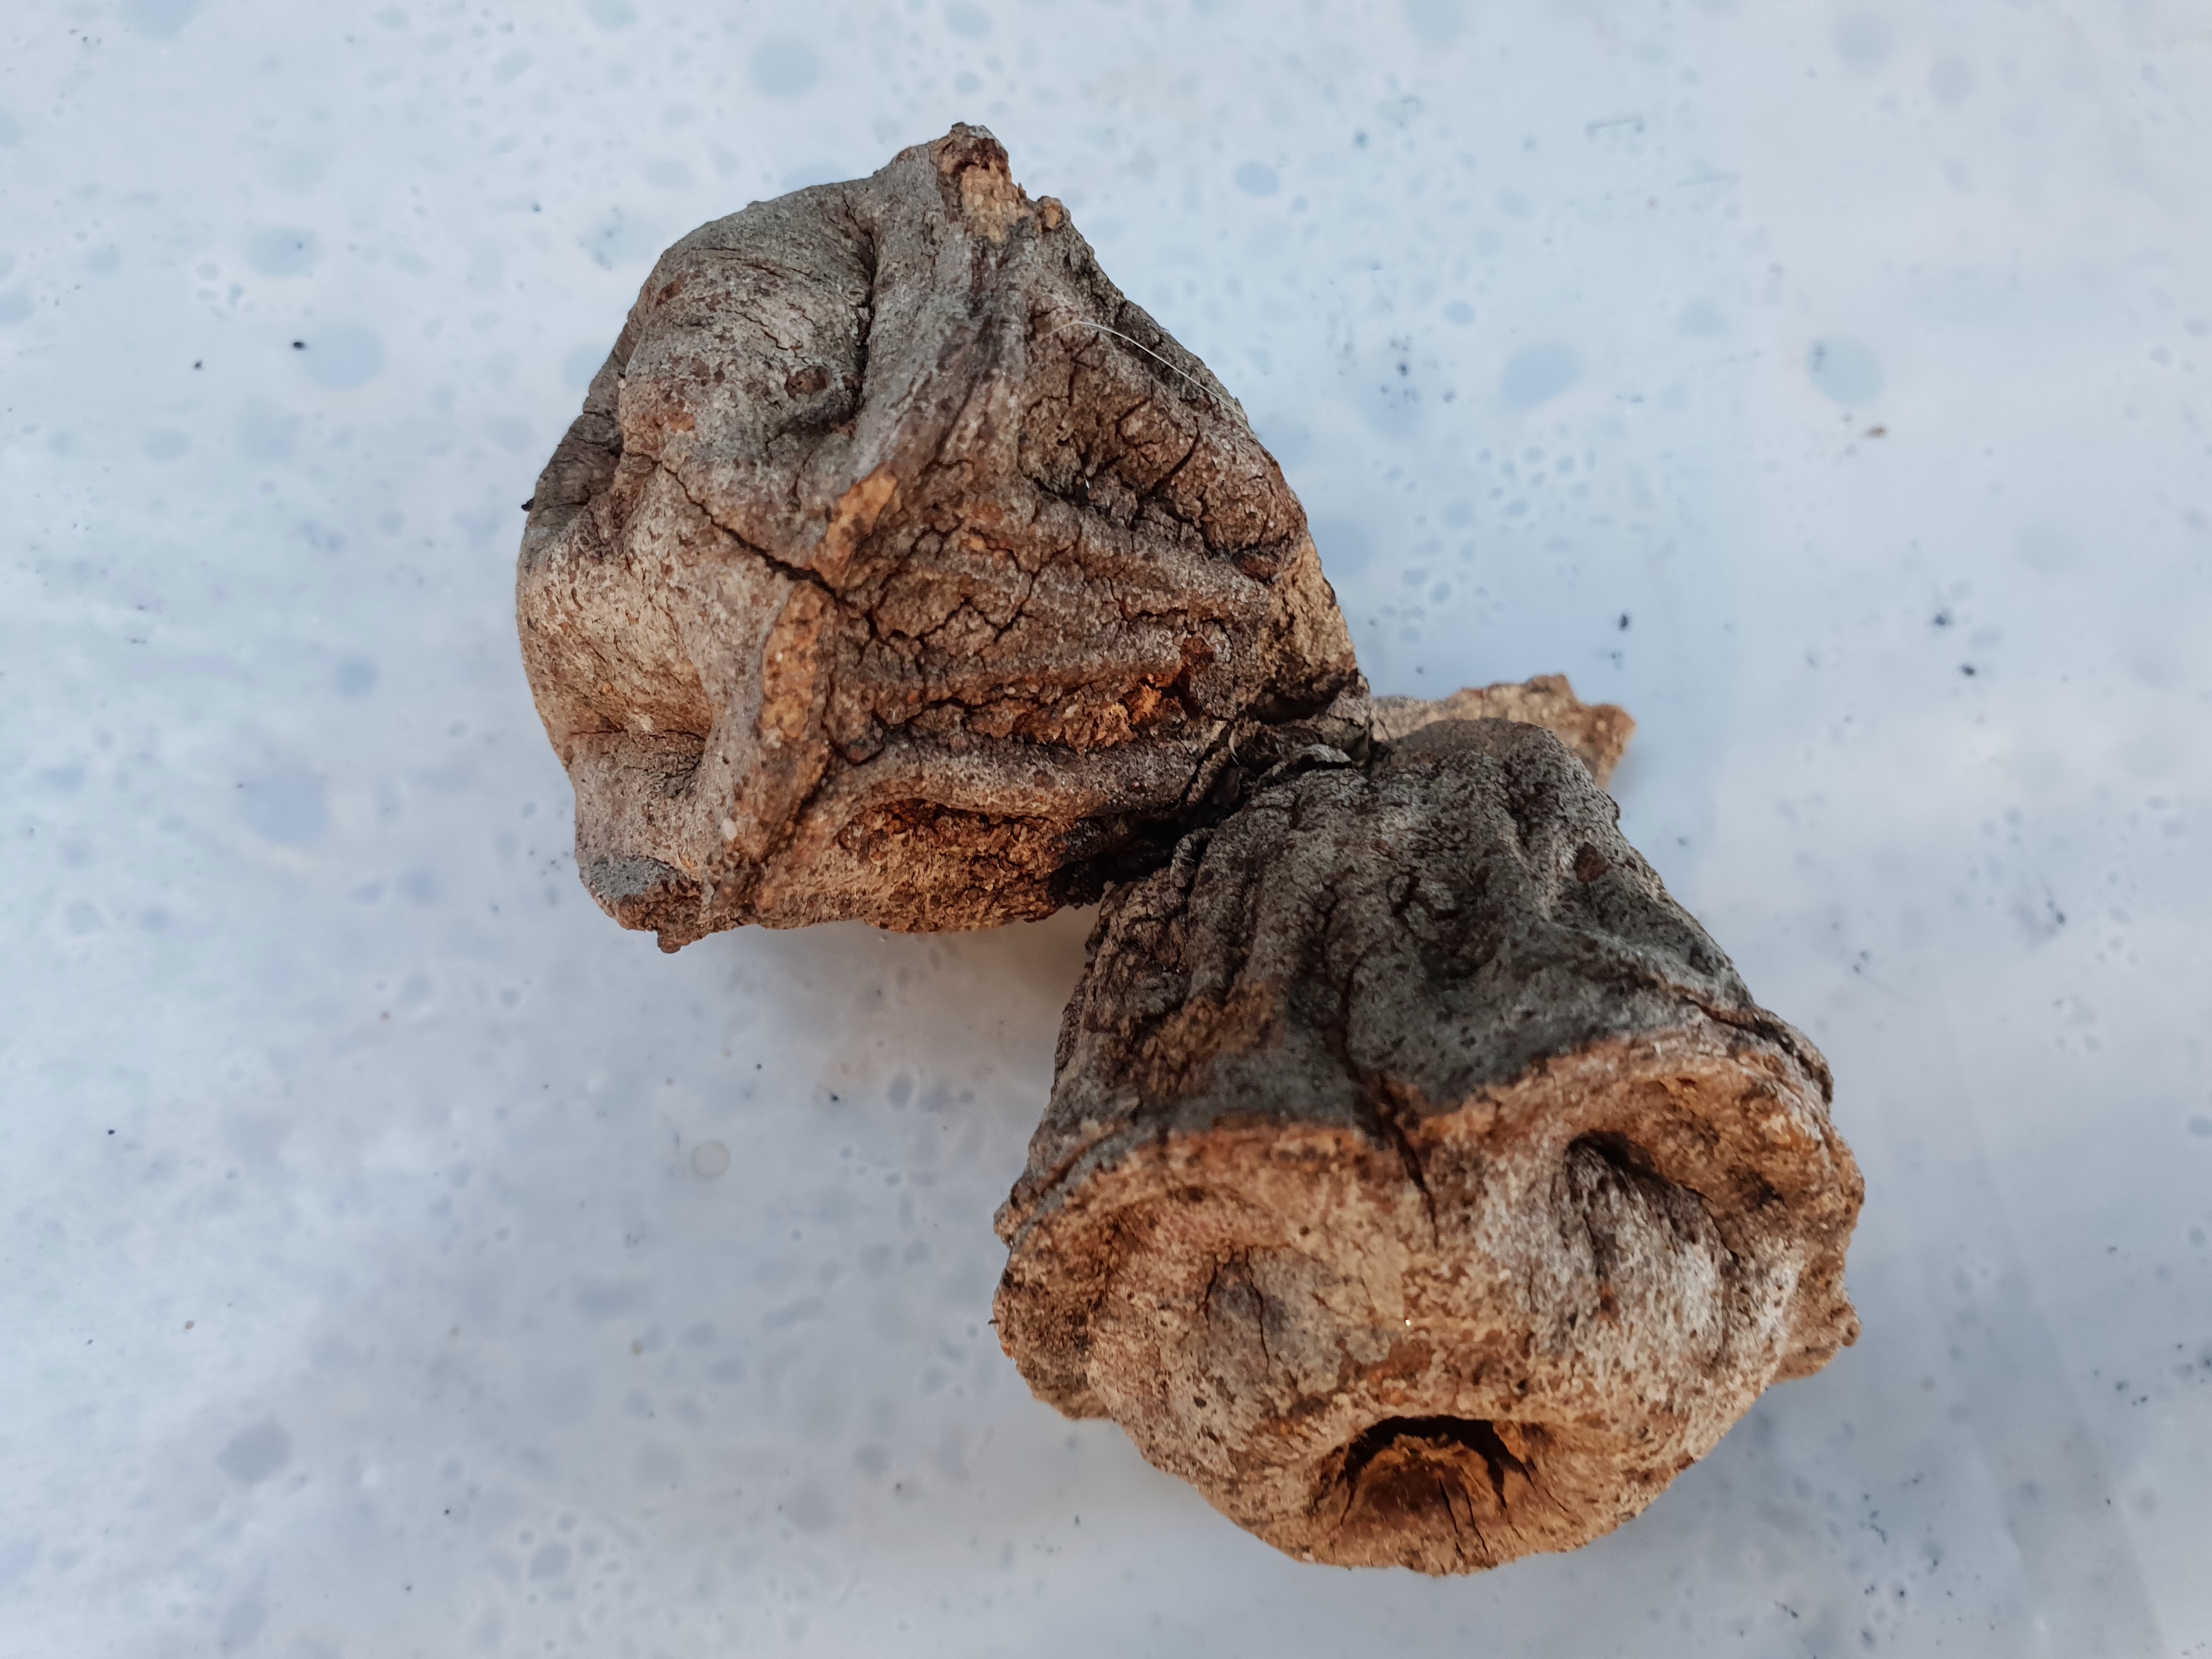
My friend Anne gave me a huge paper bag of gumnuts which I’ve recently rediscovered after cleaning out the dyeing cupboards. Another friend and I have been invited to participate in the opening of a new arts hub in Inglewood, Western Australia, displaying our natural dyed fabrics and yarns. Space will be limited so I decided to demonstrate the many effects that plant dyeing and printing can have even if the dye-pot has just one ingredient (well, almost just one; more later).
I soaked the gumnuts for about two weeks in tap water. They went a bit grungy on the top but this disappeared shortly after I started simmering them yesterday.
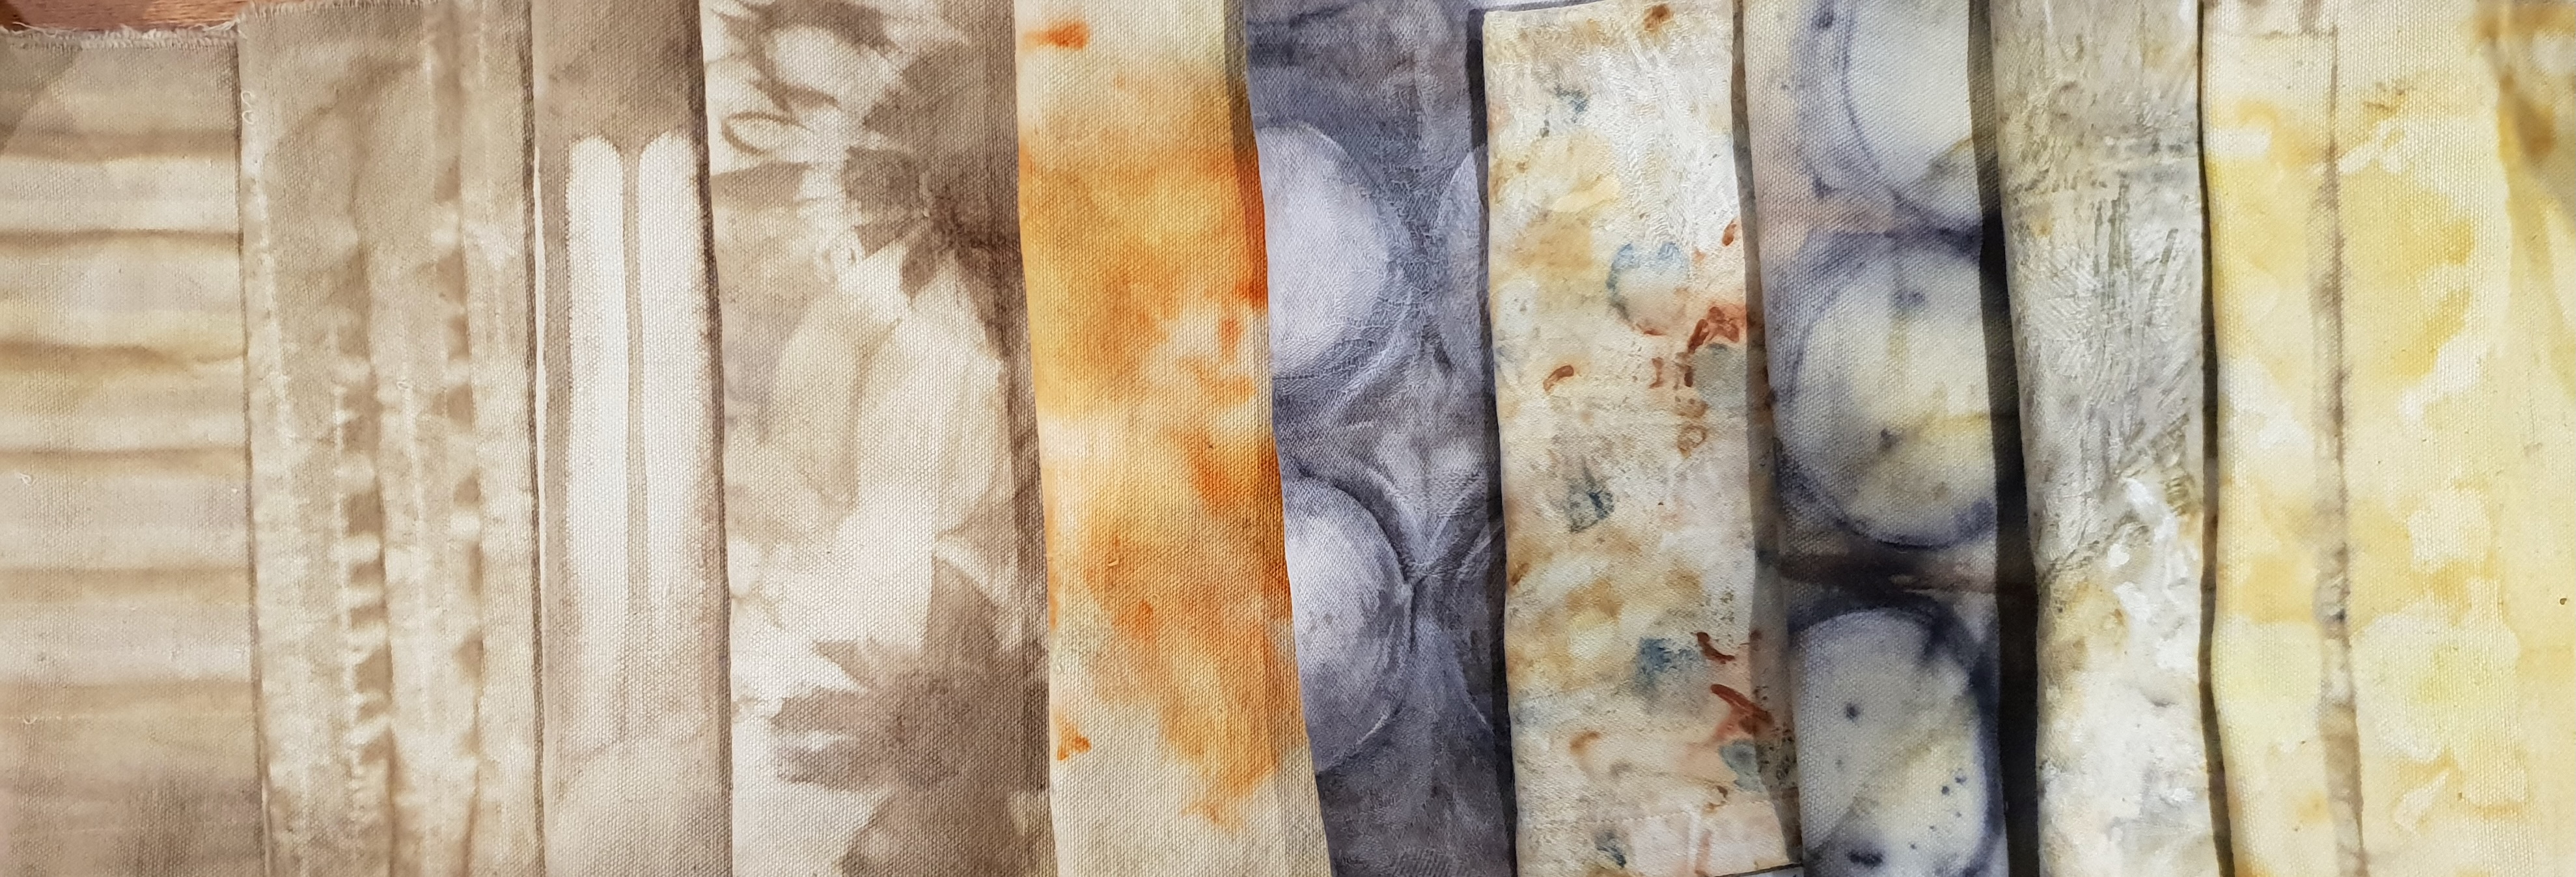
Two types of fabric were used. One is a cotton canvas of medium weight acquired on the closing of a curtain manufacturer [COT1] . The second was a set of recycled damask cotton hotel table napkins [COT2].
The cotton canvas was treated in myrobalan as a form of tannin (I should have used a clearer tannin because the myrobalan [MYR] did give the fabric a yellow cast.) Then I mordanted with aluminium acetate [AA].
The damask napkins were mordanted in a mixture of iron, alum and lime [IAL] so I expected they’d produce some darker colours and they did.
The fabric samples in the image above are in the order they were done, starting at the left.
Sample 1: COT1/MYR/AA, stitched with pin-tucks lengthwise and put into dye-bath as is, no wrapping or clamping. Simmered two hours. Result: a subtle light brown shade made more interesting by the resist pattern.
Sample 2: COT1/MYR/AA, stitched with narrower pin-tucks cross wise and immersed as for 1. Again, the somewhat unexciting shade of the dye-bath is compensated for by the resist pattern.
Sample 3: COT1/MYR/AA, pleated and clamped around wooden tongue depressors and treated as for 1 and 2. Ditto ditto.
Sample 4: COT1/MYR/AA, with “flowers” made by enclosing wine bottle tops within the fabric with elastic bands. Immersed as for 1, 2 and 3. Ditto ditto. Pattern wins; colour not so much.
Sample 5: COT1/MYR/AA, sprinkled with frozen coreopsis flowers and frozen carrot tops then wrapped tightly around a plastic wrap covered rod, bandaged, and tied with string. Immersed as above. What a great colour! I expected yellow but got a marvellous orangey red, brighter than the image shows. The carrot tops seem almost to have discharged the colour of the fabric but it may just be that they print pale yellow….
Sample 6: COT2/IAL, pleated around rusted lids of cans. What a change! Iron in the mordant and iron in lids equals a DARK print.
Sample 7: COT2/IAL, sprinkled with frozen coreopsis flowers, carrot tops, oxalis flowers and leaves and some blueberries, then wrapped tightly around a plastic wrap covered rod with bandages and then string. There is iron in the mordant and by now perhaps also in the bath but it’s only served to enhance the impact of the prints of the plants rather than darken the background.
Sample 8: COT1/MYR/AA, pleated and clamped around rusted lids of cans. This is an interesting contrast to Sample 6 in that the myrobalan/ aluminium acetate has given the background a warmer hue.
Sample 9: COT2/IAL, a sprig of grevillea leaves with orange flower and some oxalis and blueberries wrapped tightly around a rod , bandaged and tied with string. Still not enough iron present apparently for a really strong dark print of the grevillea leaves.
Sample 10: COT1/MYR/AA, pleated and inserted with oxalis and leaves of Agonis flexuosa. The whole bundle was then wrapped around a rod. Interesting that the yellow of the oxalis came out well but the peppermint tree leaves didn’t print despite there being, by this time, a considerable amount of iron in the bath, as evidenced by the take up at the edges of the pleats. I found this surprising. Note that the yellow of the oxalis is paler than the yellow of the coreopsis in Sample 5.
I will be taking this series to the opening of the new Arts Hub to show what pattern and colour variations can be obtained on fabric even if the dye bath is a simple gum-nut one.
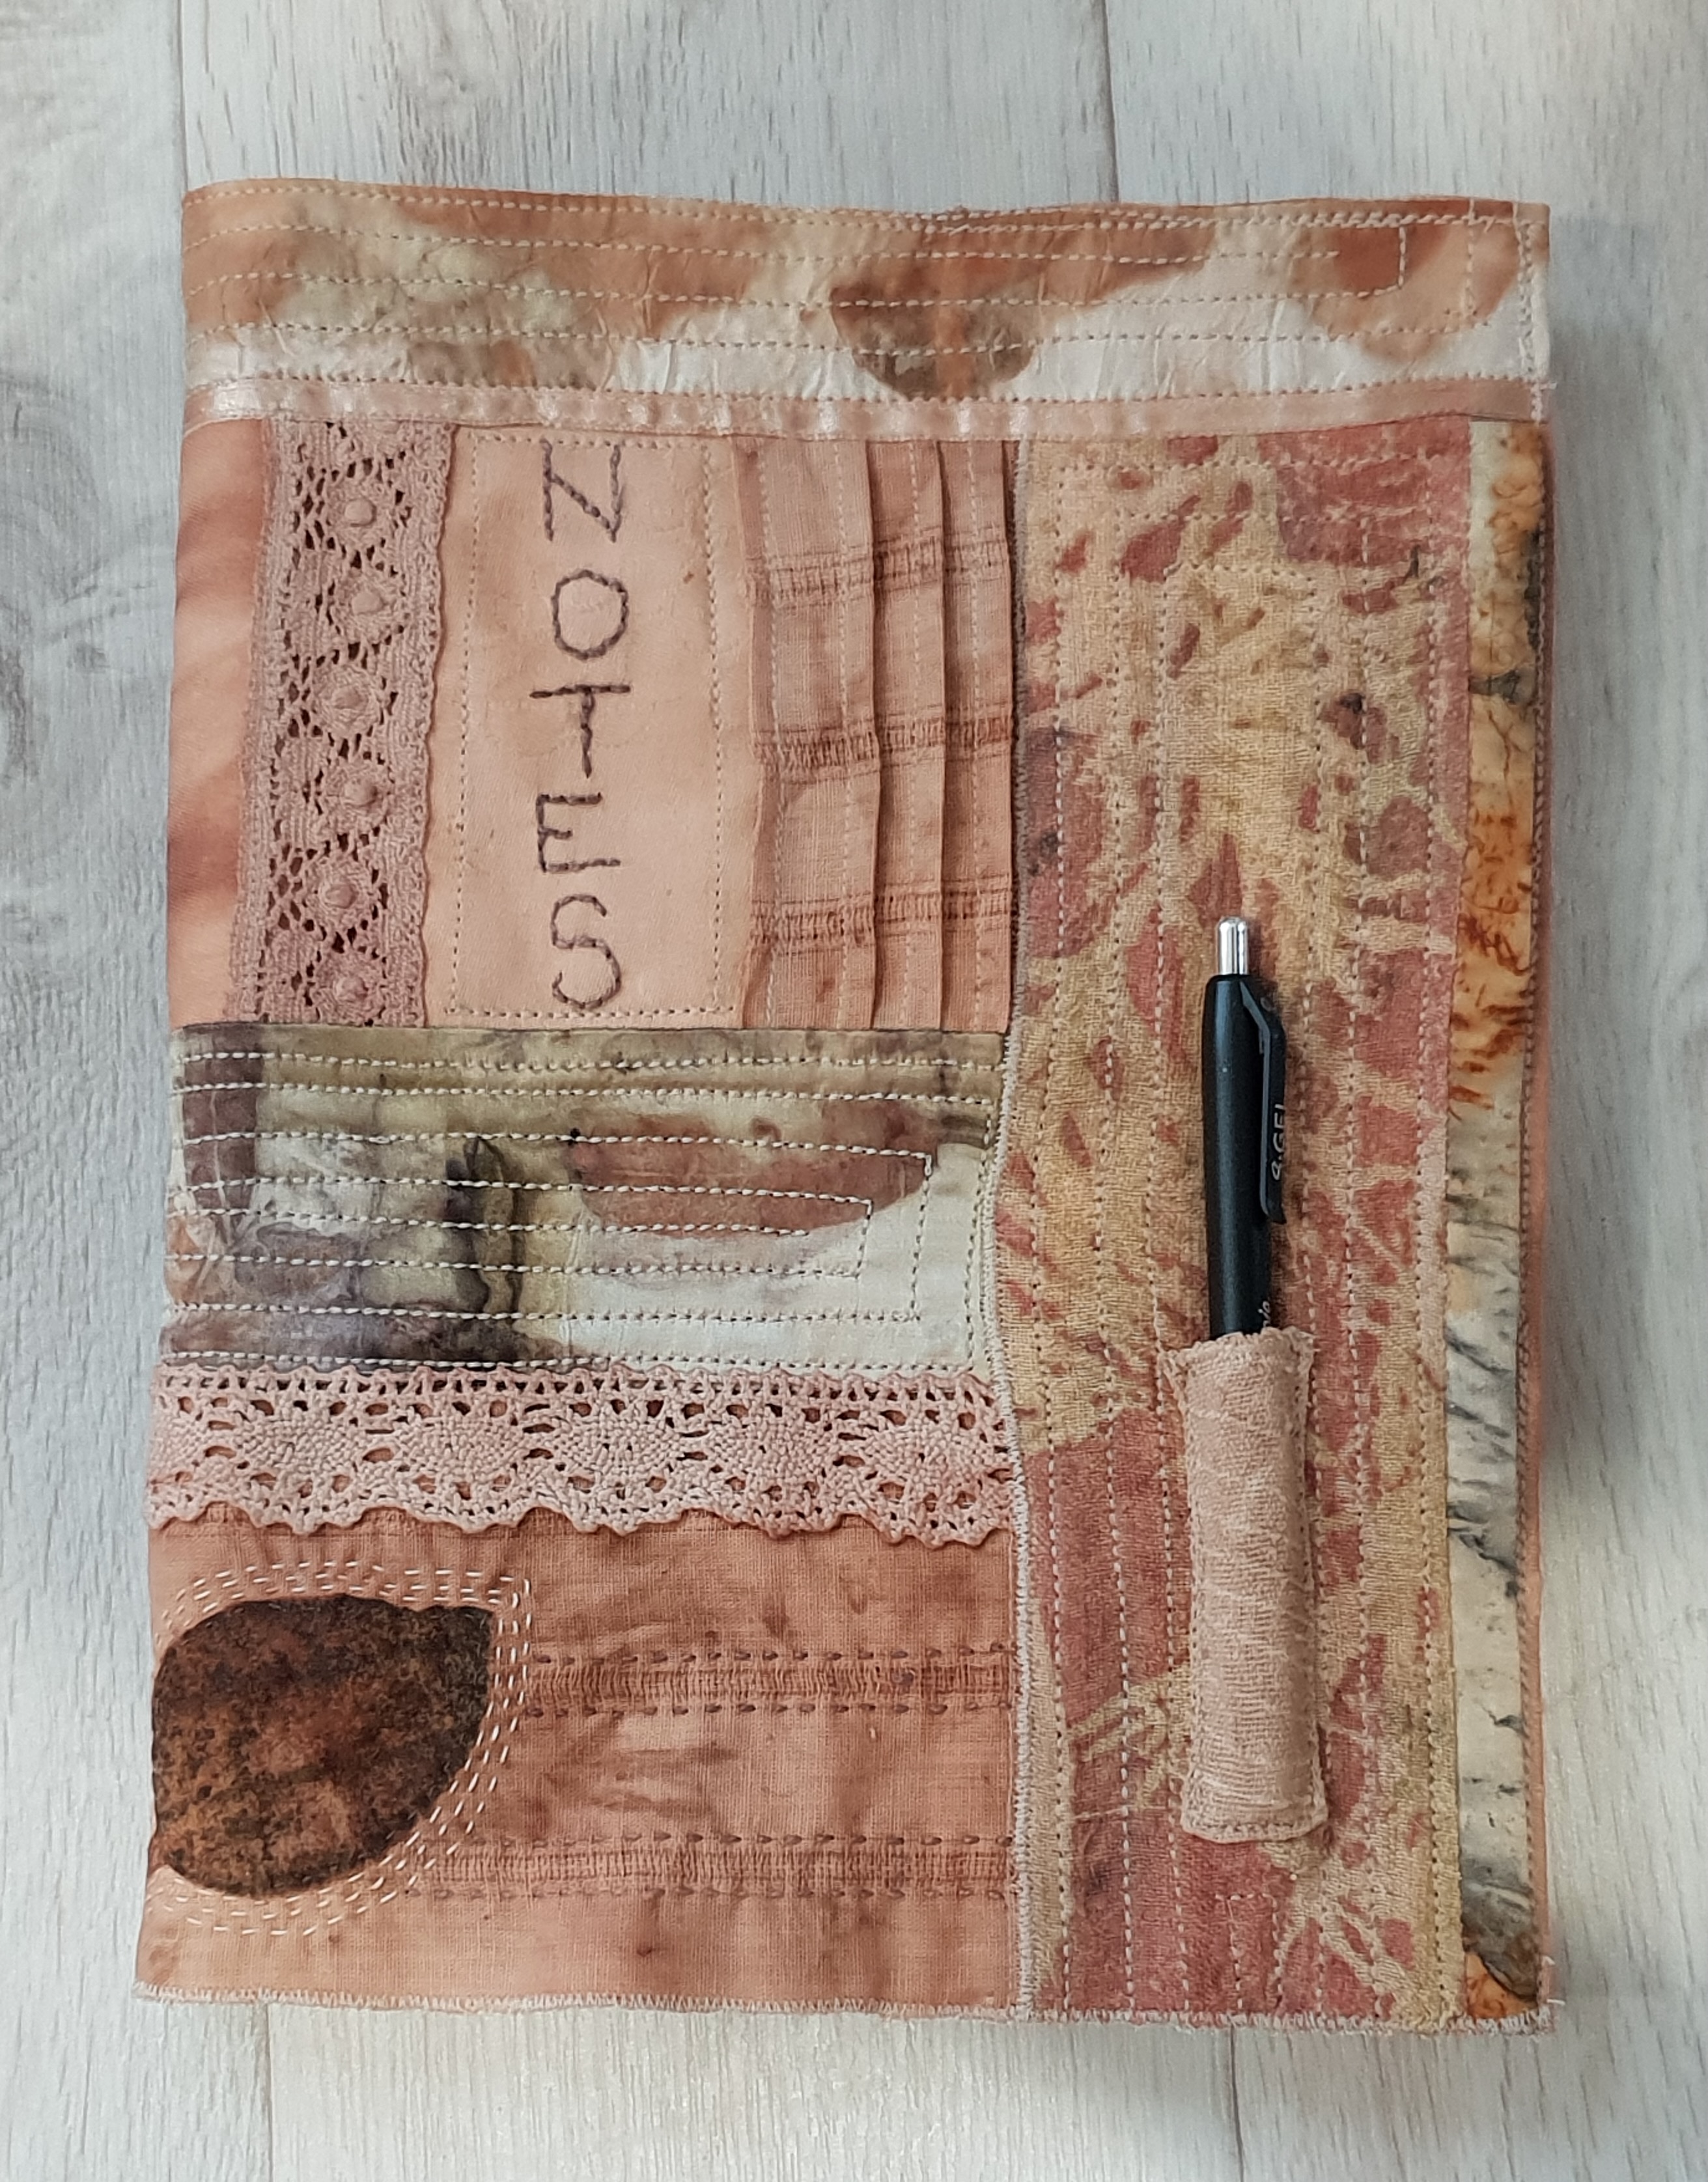
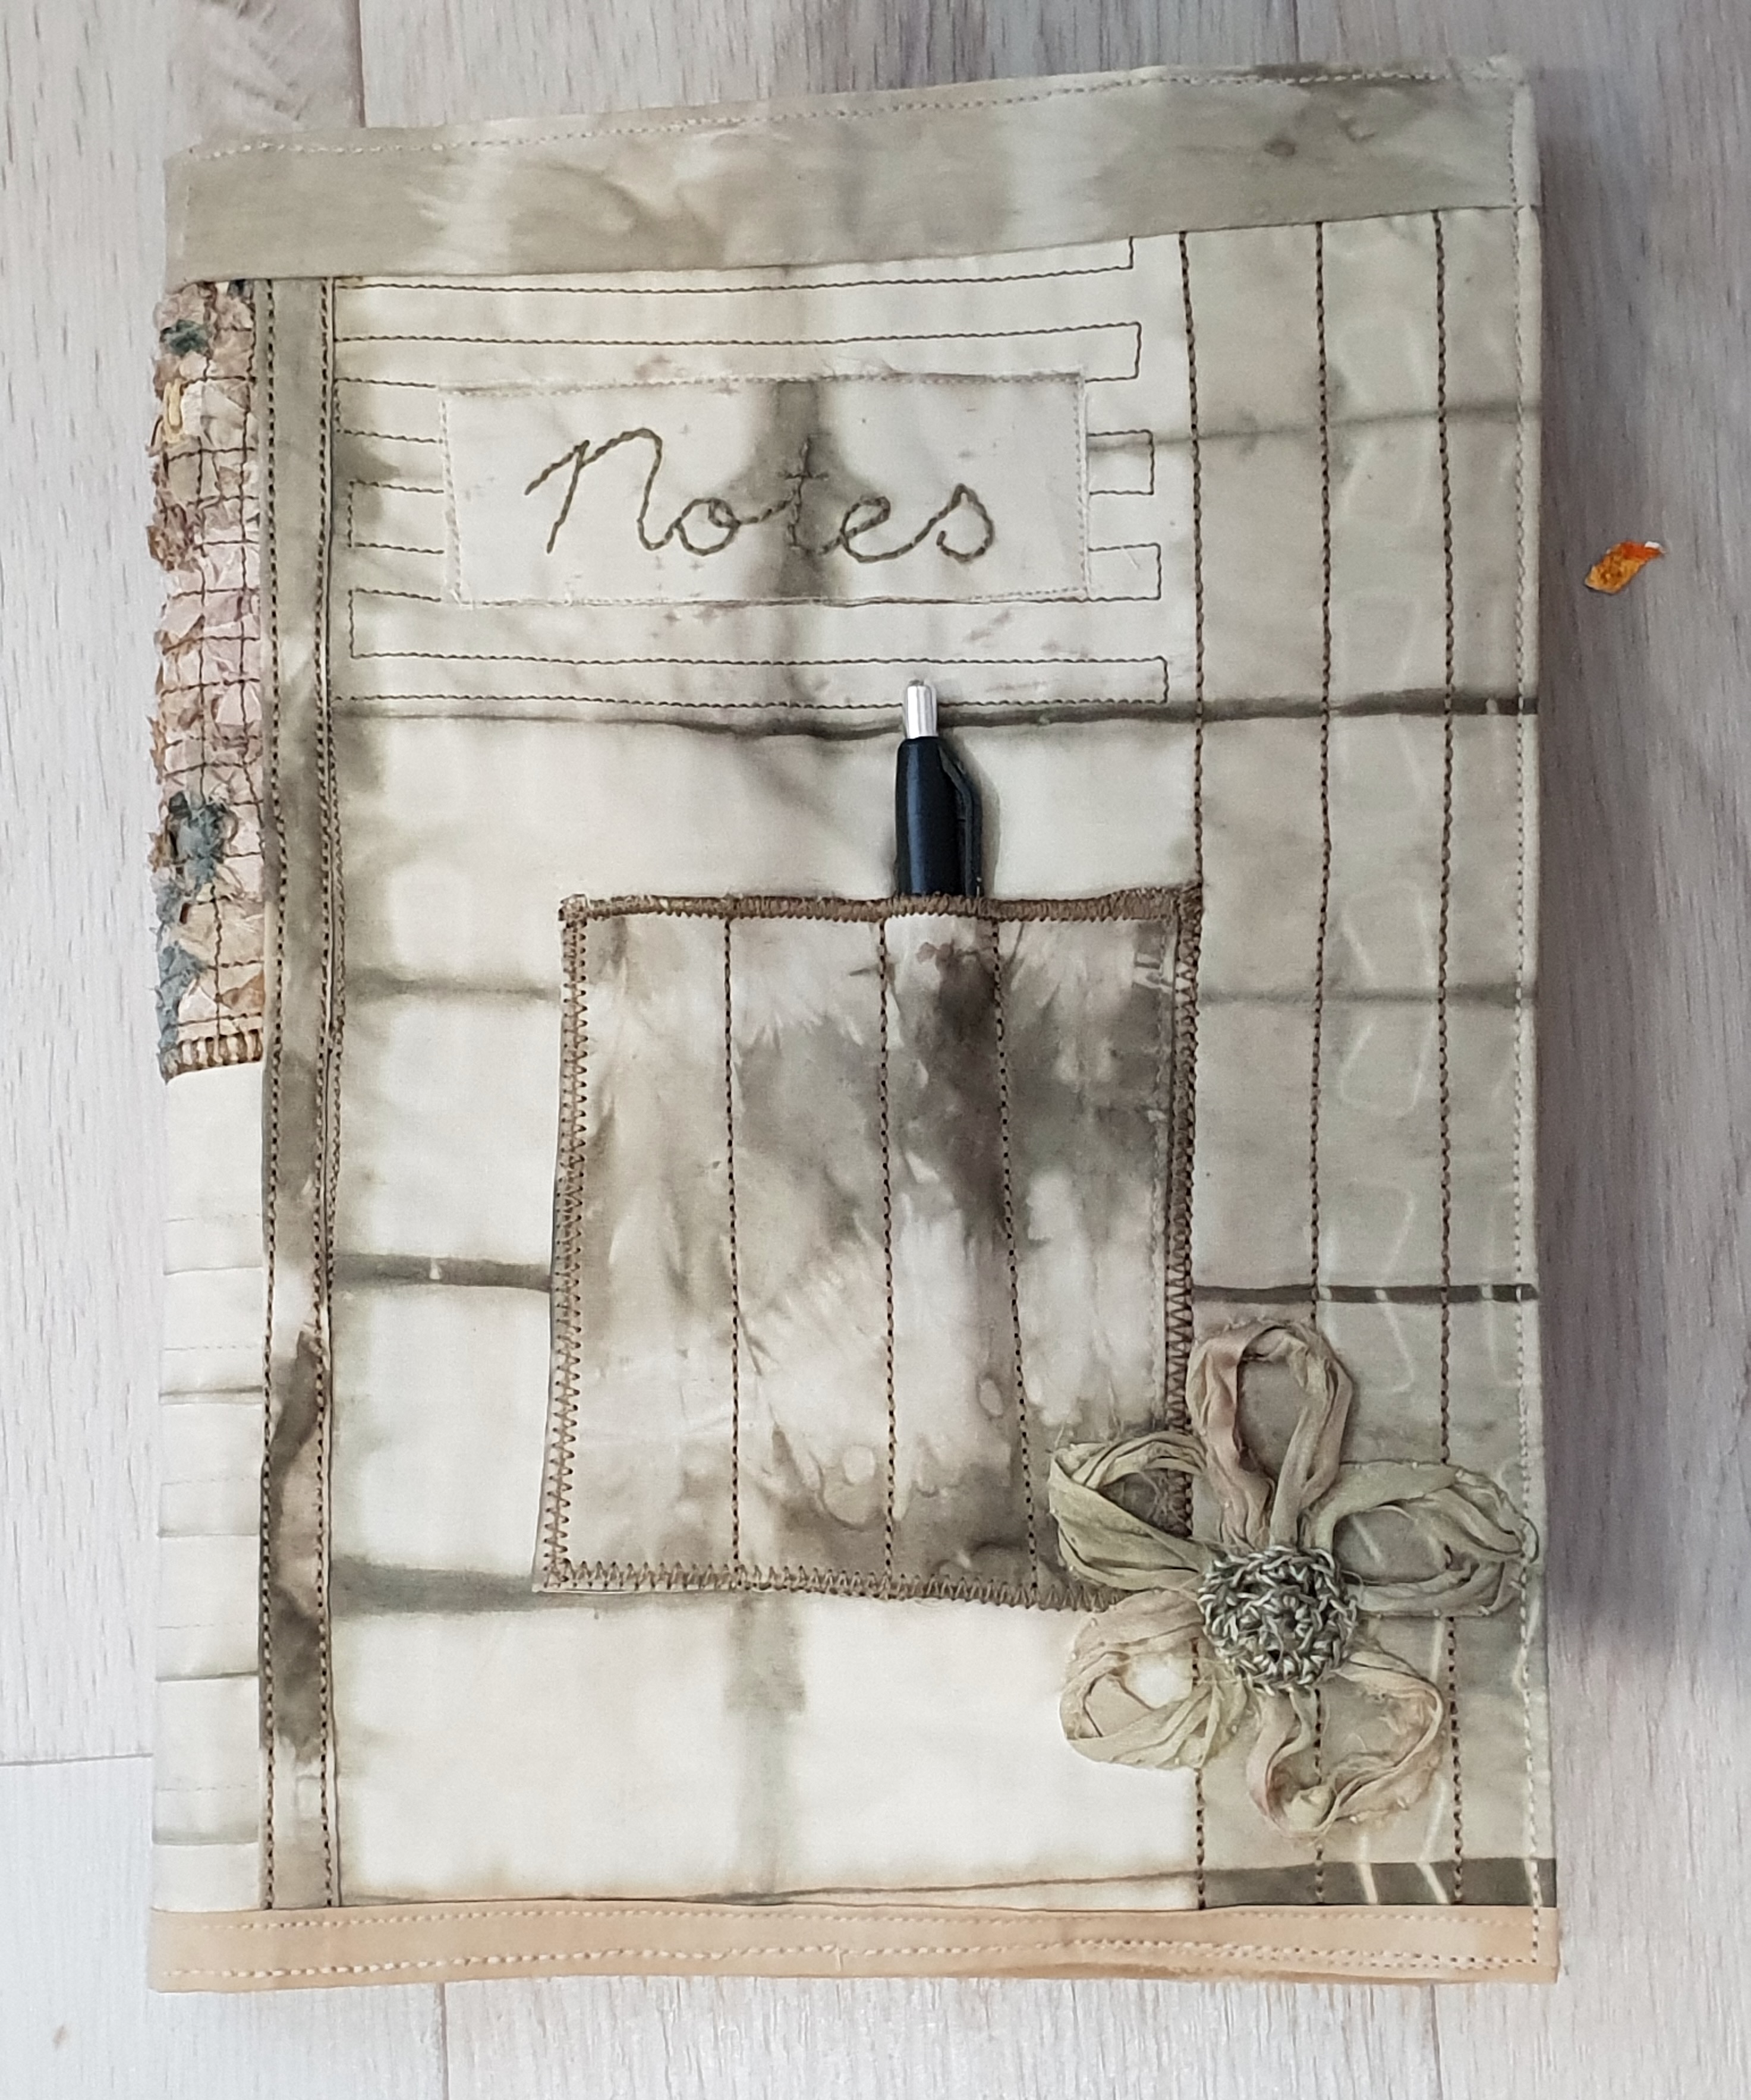
To jazz up the table a bit I’m also taking a small quilt (about a metre square) and two covers I’ve made for large sized notebooks. Both illustrate how naturally dyed and plant printed fabrics can be mixed and matched. As is the case for the most recent dyed collection, the fabrics are all reclaimed form old clothing and napery, including bed sheets.
Large notebook cover made of assembled madder, red onion and Eucalyptus cinerea dye-baths, with plant printing
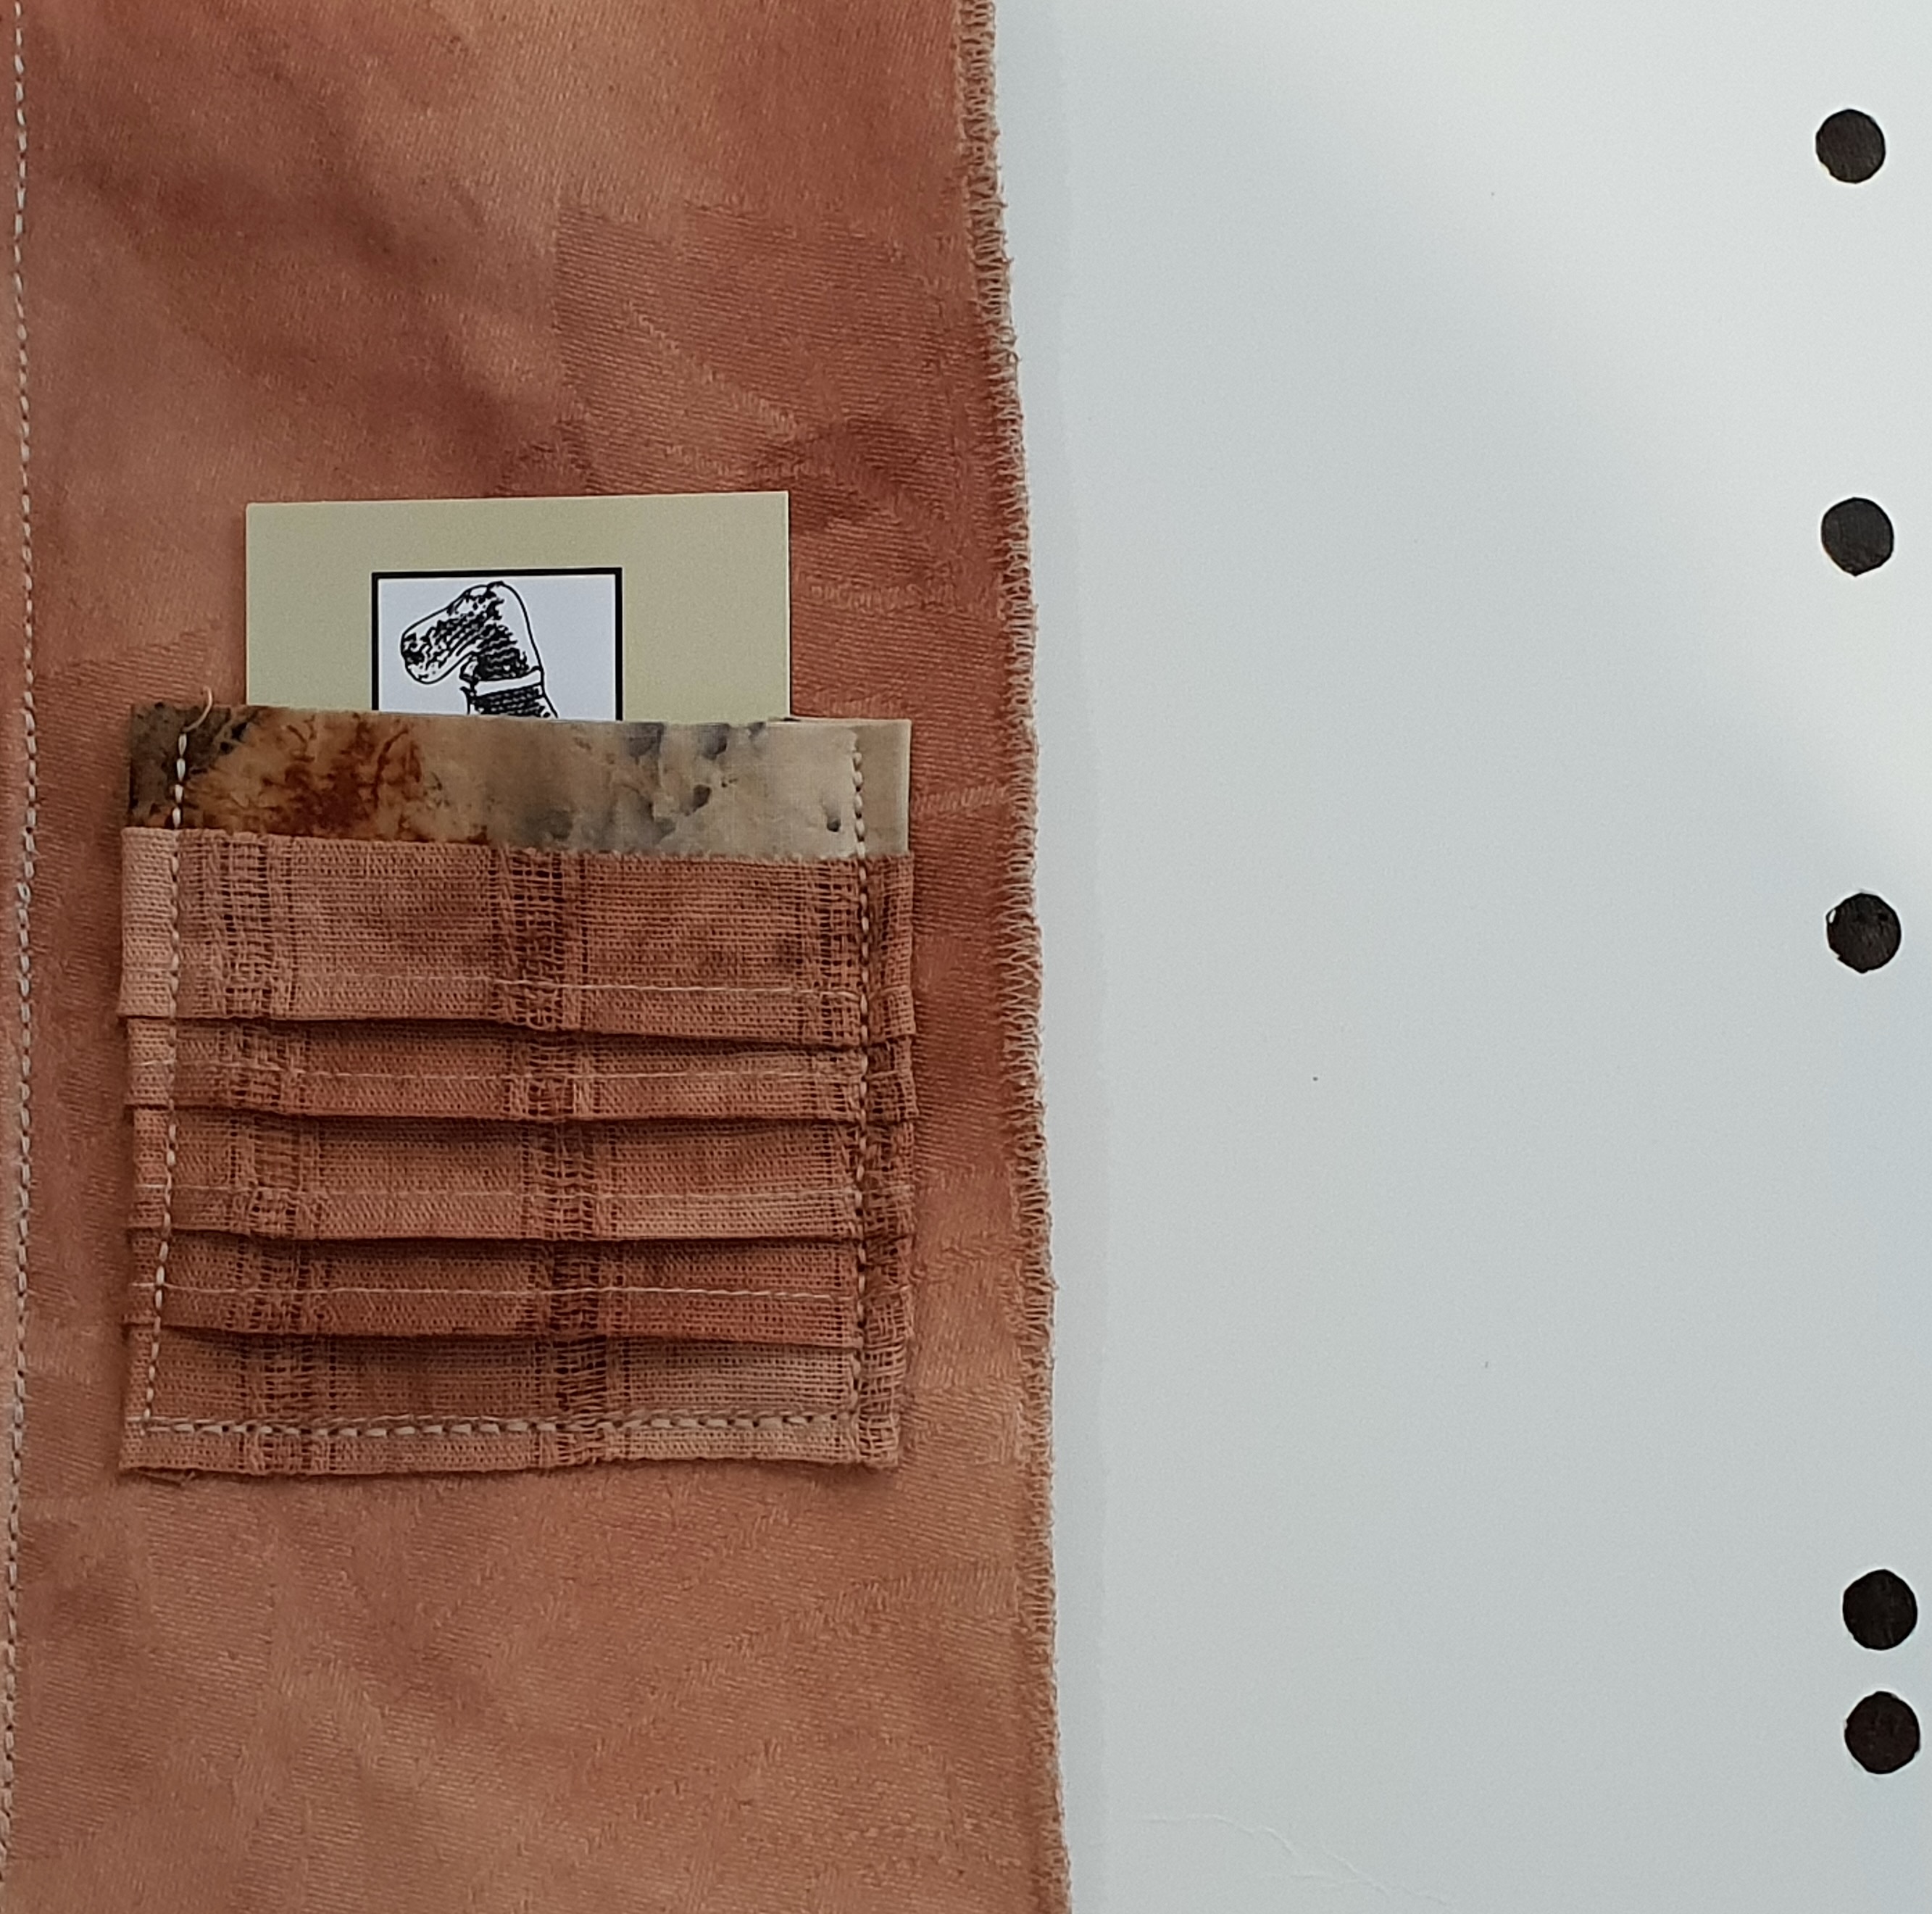
Rear view of the same notebook
The inside flap of the pink/red cover showing the pocket for business cards
Green notebook cover
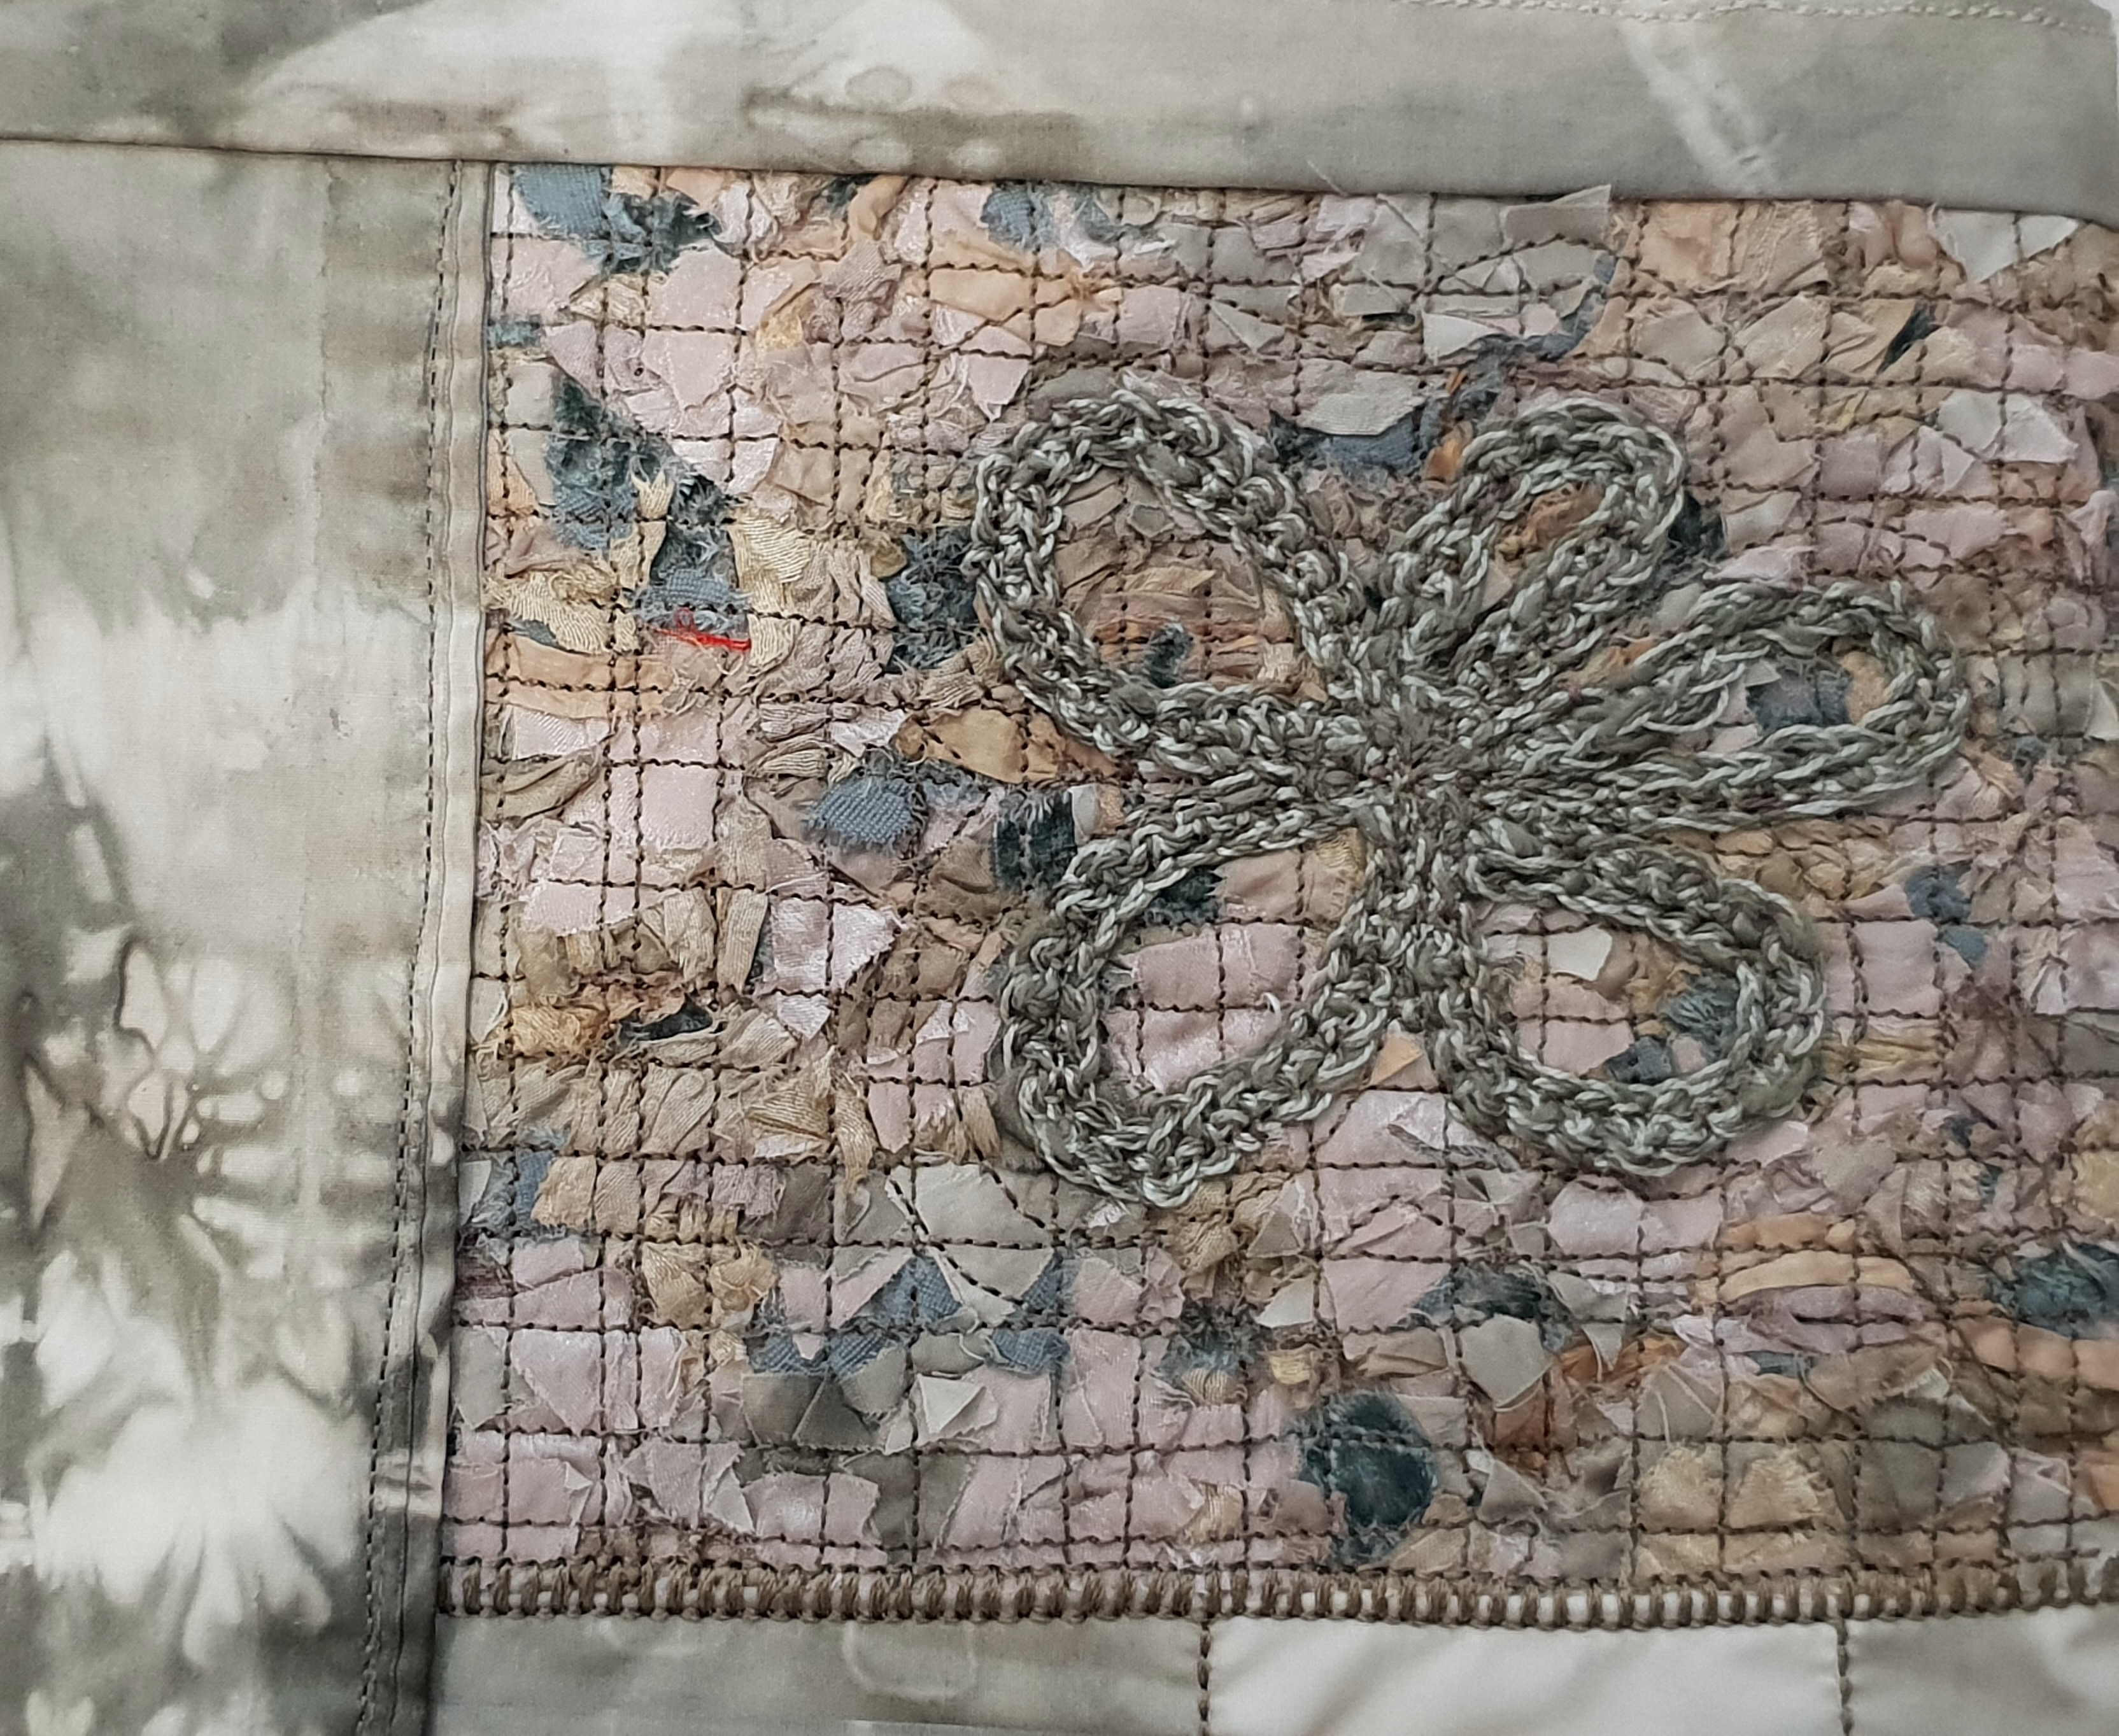
Green dyed and printed notebook cover showing back detail
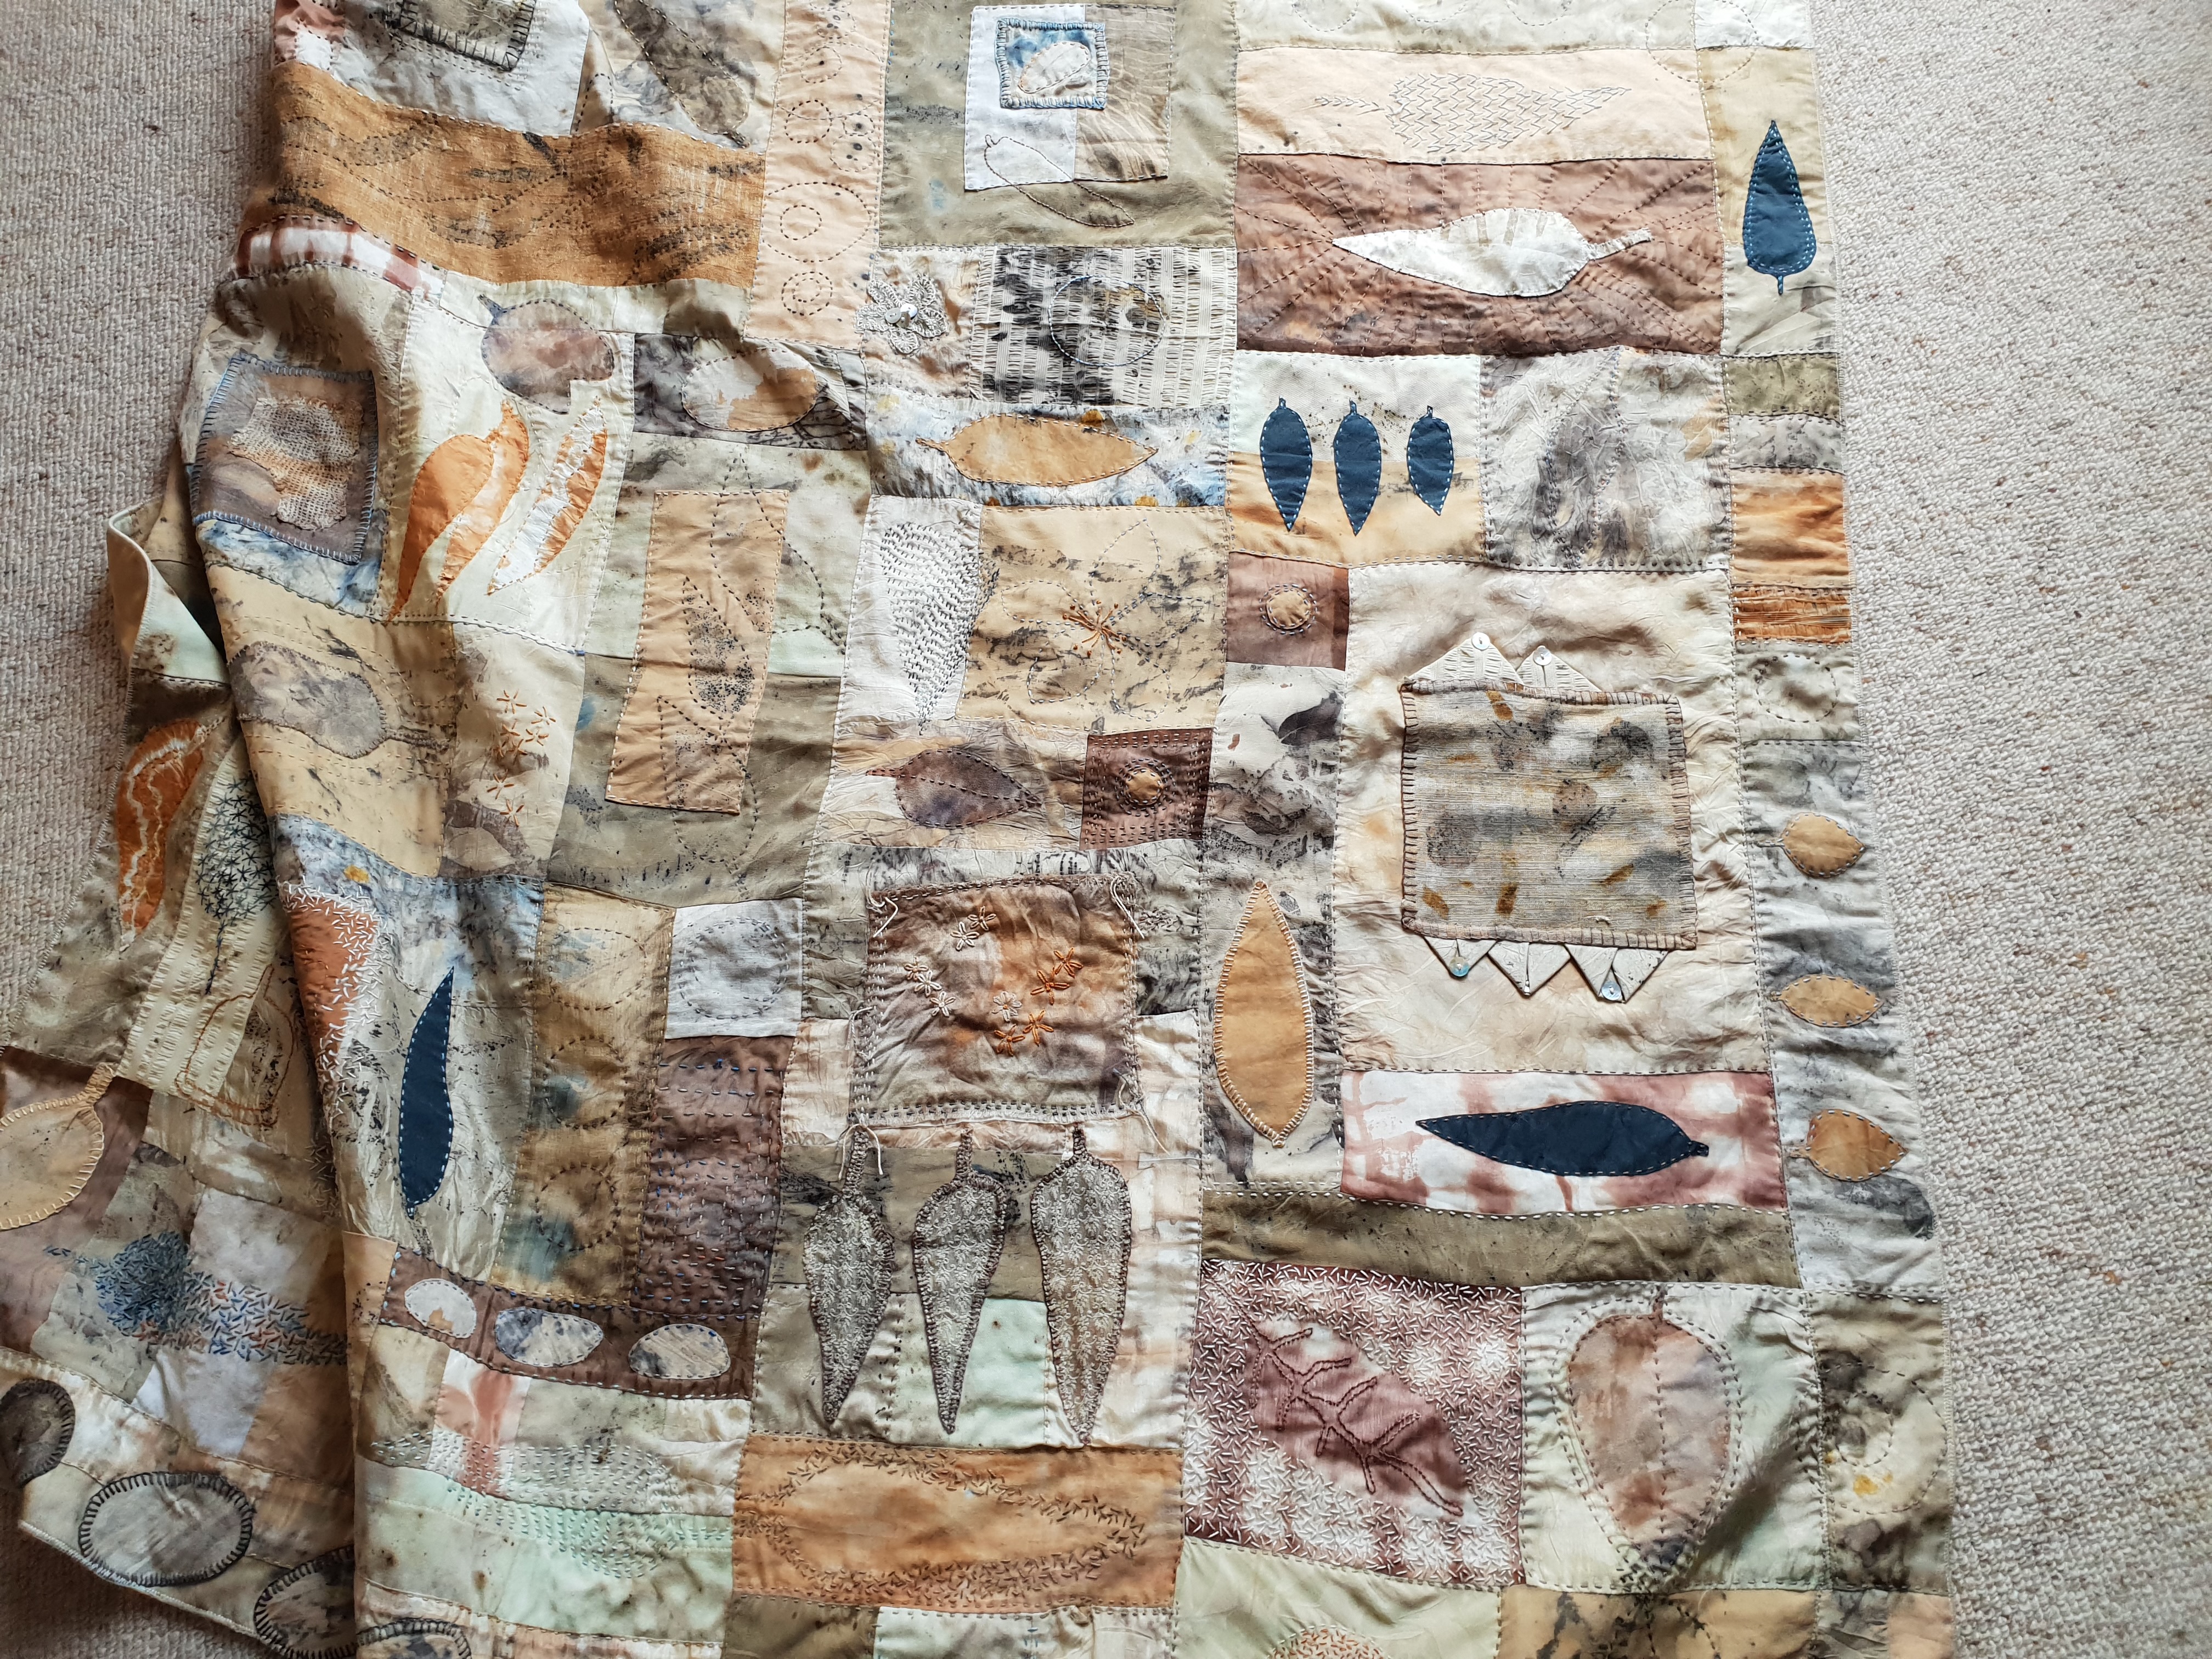
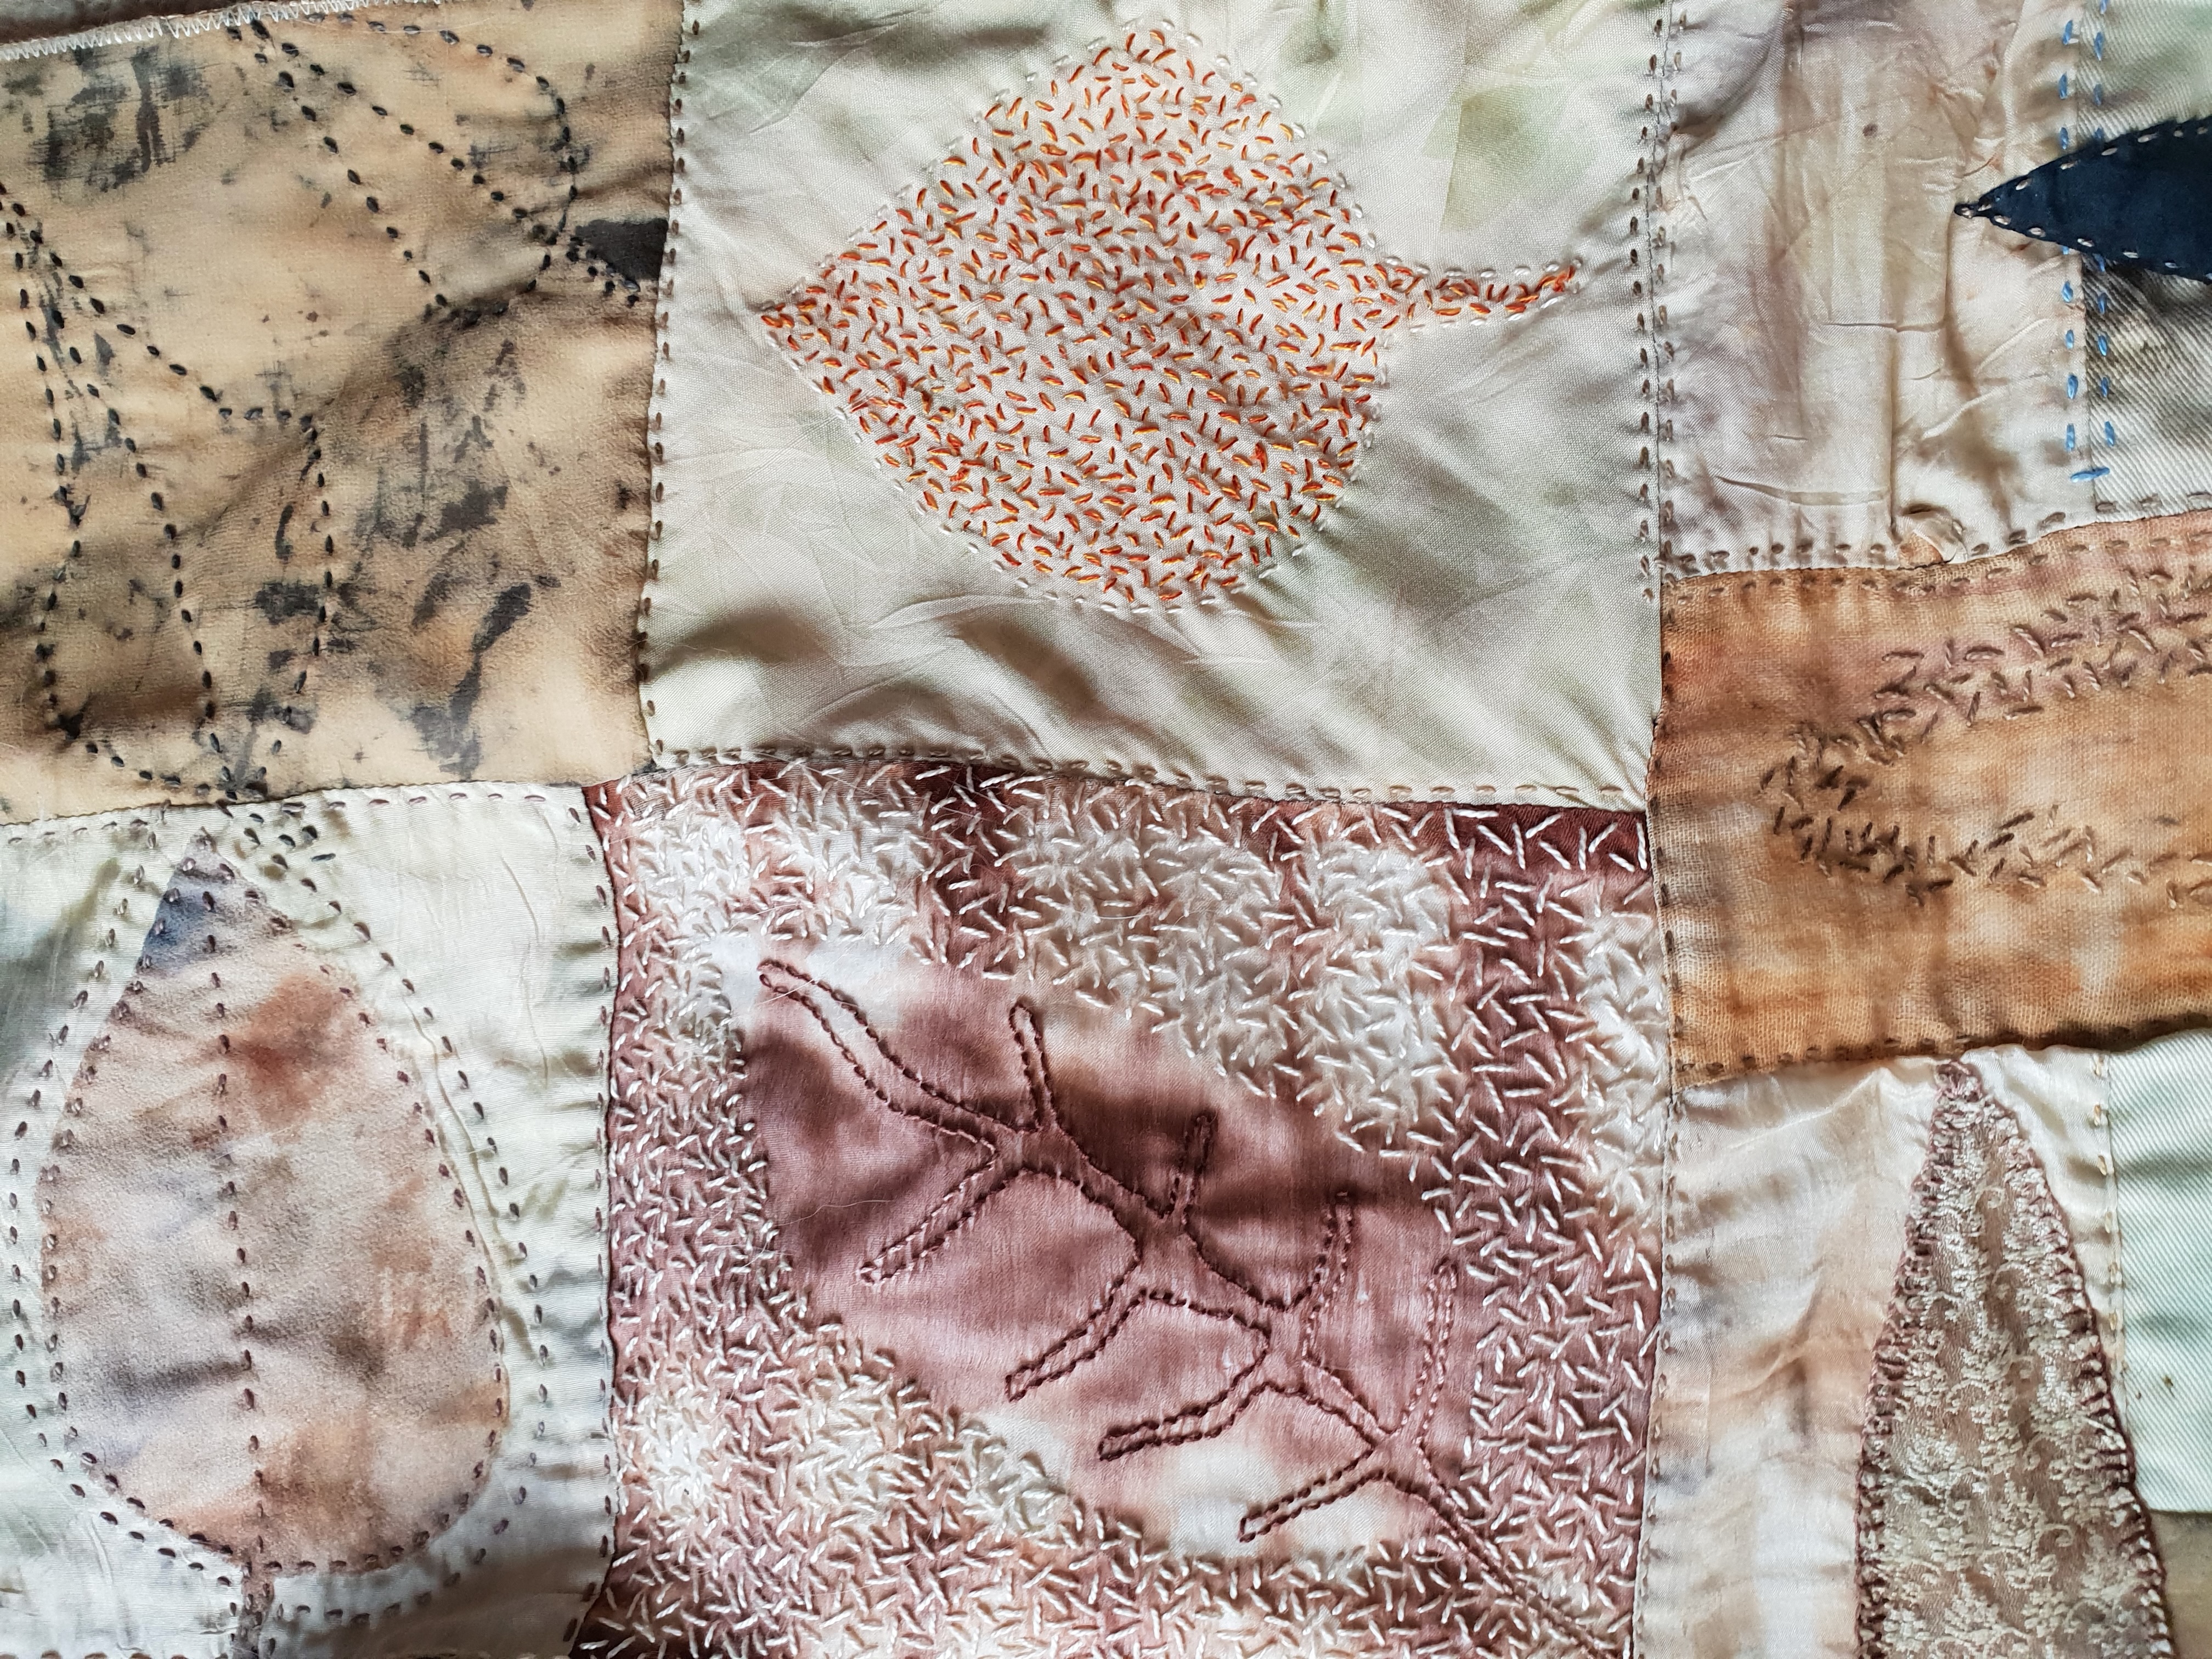
Natural dyed and appliquéd quilt: silk, cotton and linen fabrics, hand stitching, quilting and applique
I love caramelised onion. Particularly caramelised RED onions. They make great tart fillings with goats cheese or blue cheese, served as entrees at a dinner party or as the main lunch option, especially if you might have vegetarians in the mix.. They are also terrific on a plate of cold meats, cheeses and pickles.
PLUS, anytime you use red onions to make yummy food, you are also creating the possibility of a fabric dyeing bonanza.
Recently I was at a Thermomix demo that included red onion chutney. I went to view another product entirely but came home to the thought: “you’ve got everything in the pantry that you need so why not make it?”
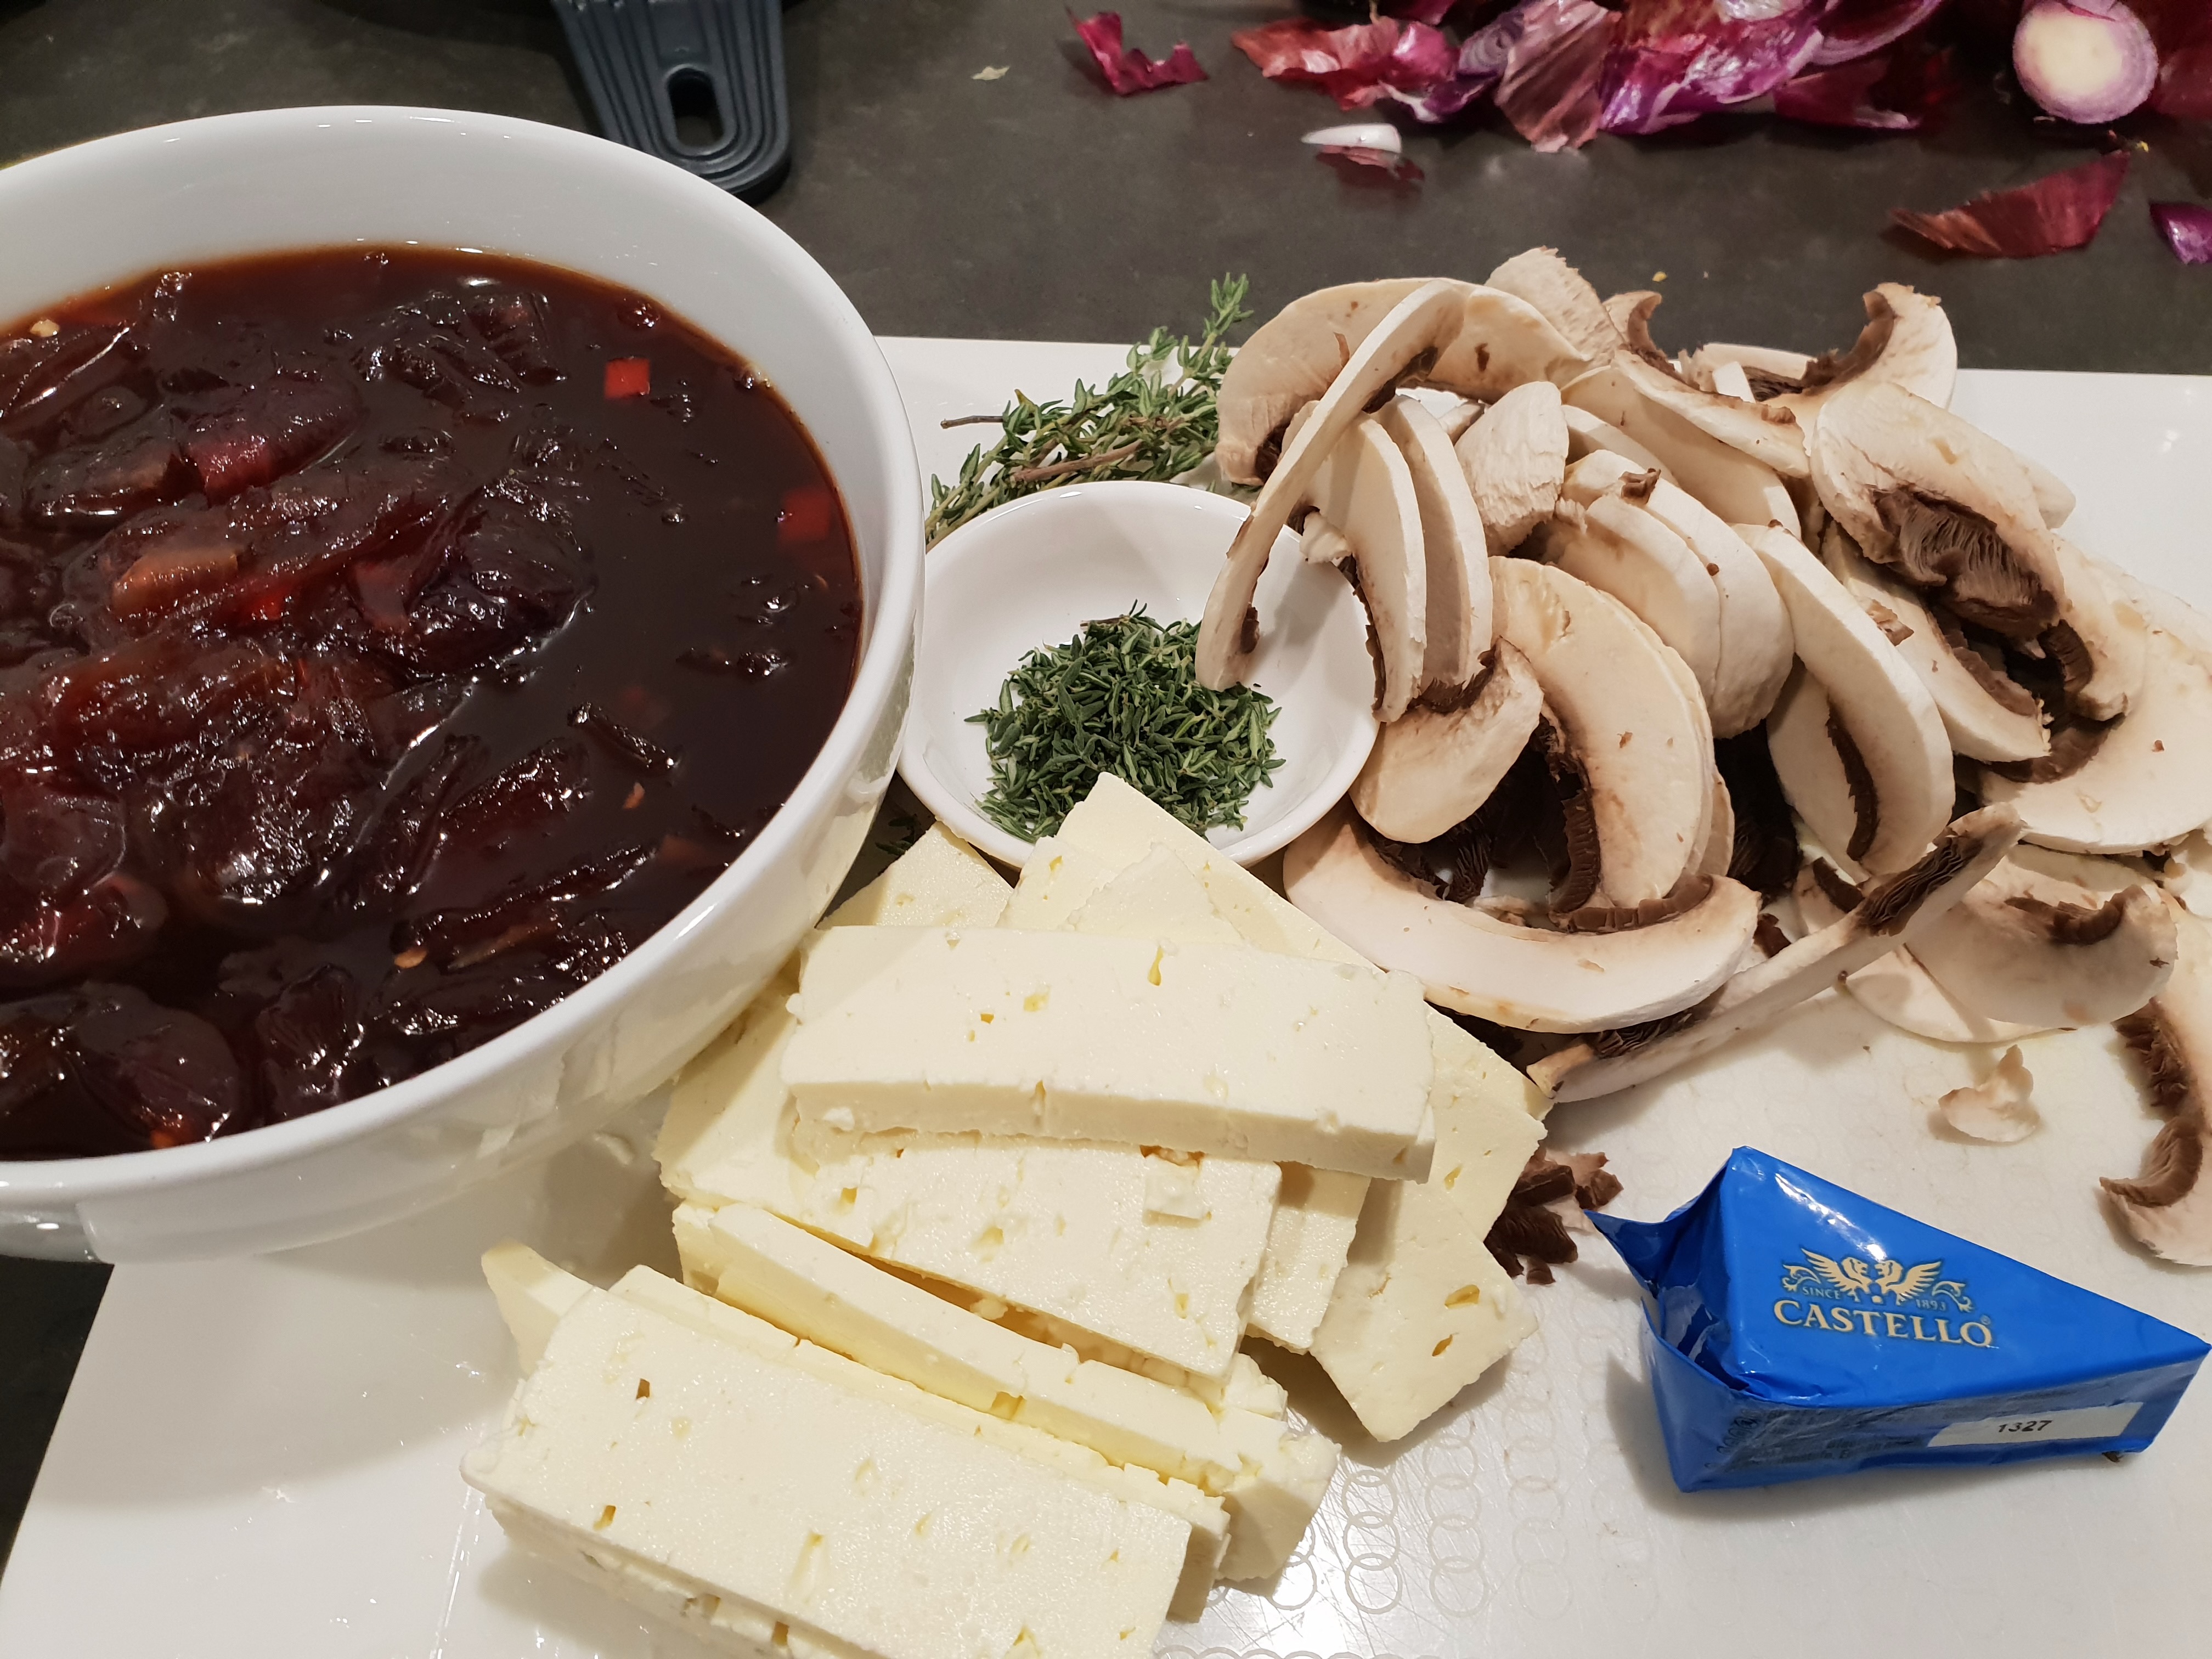
Below: 500g of red onions being peeled and sliced. Note the skins as a product.
Cook in olive oil
Above: Add other ingredients
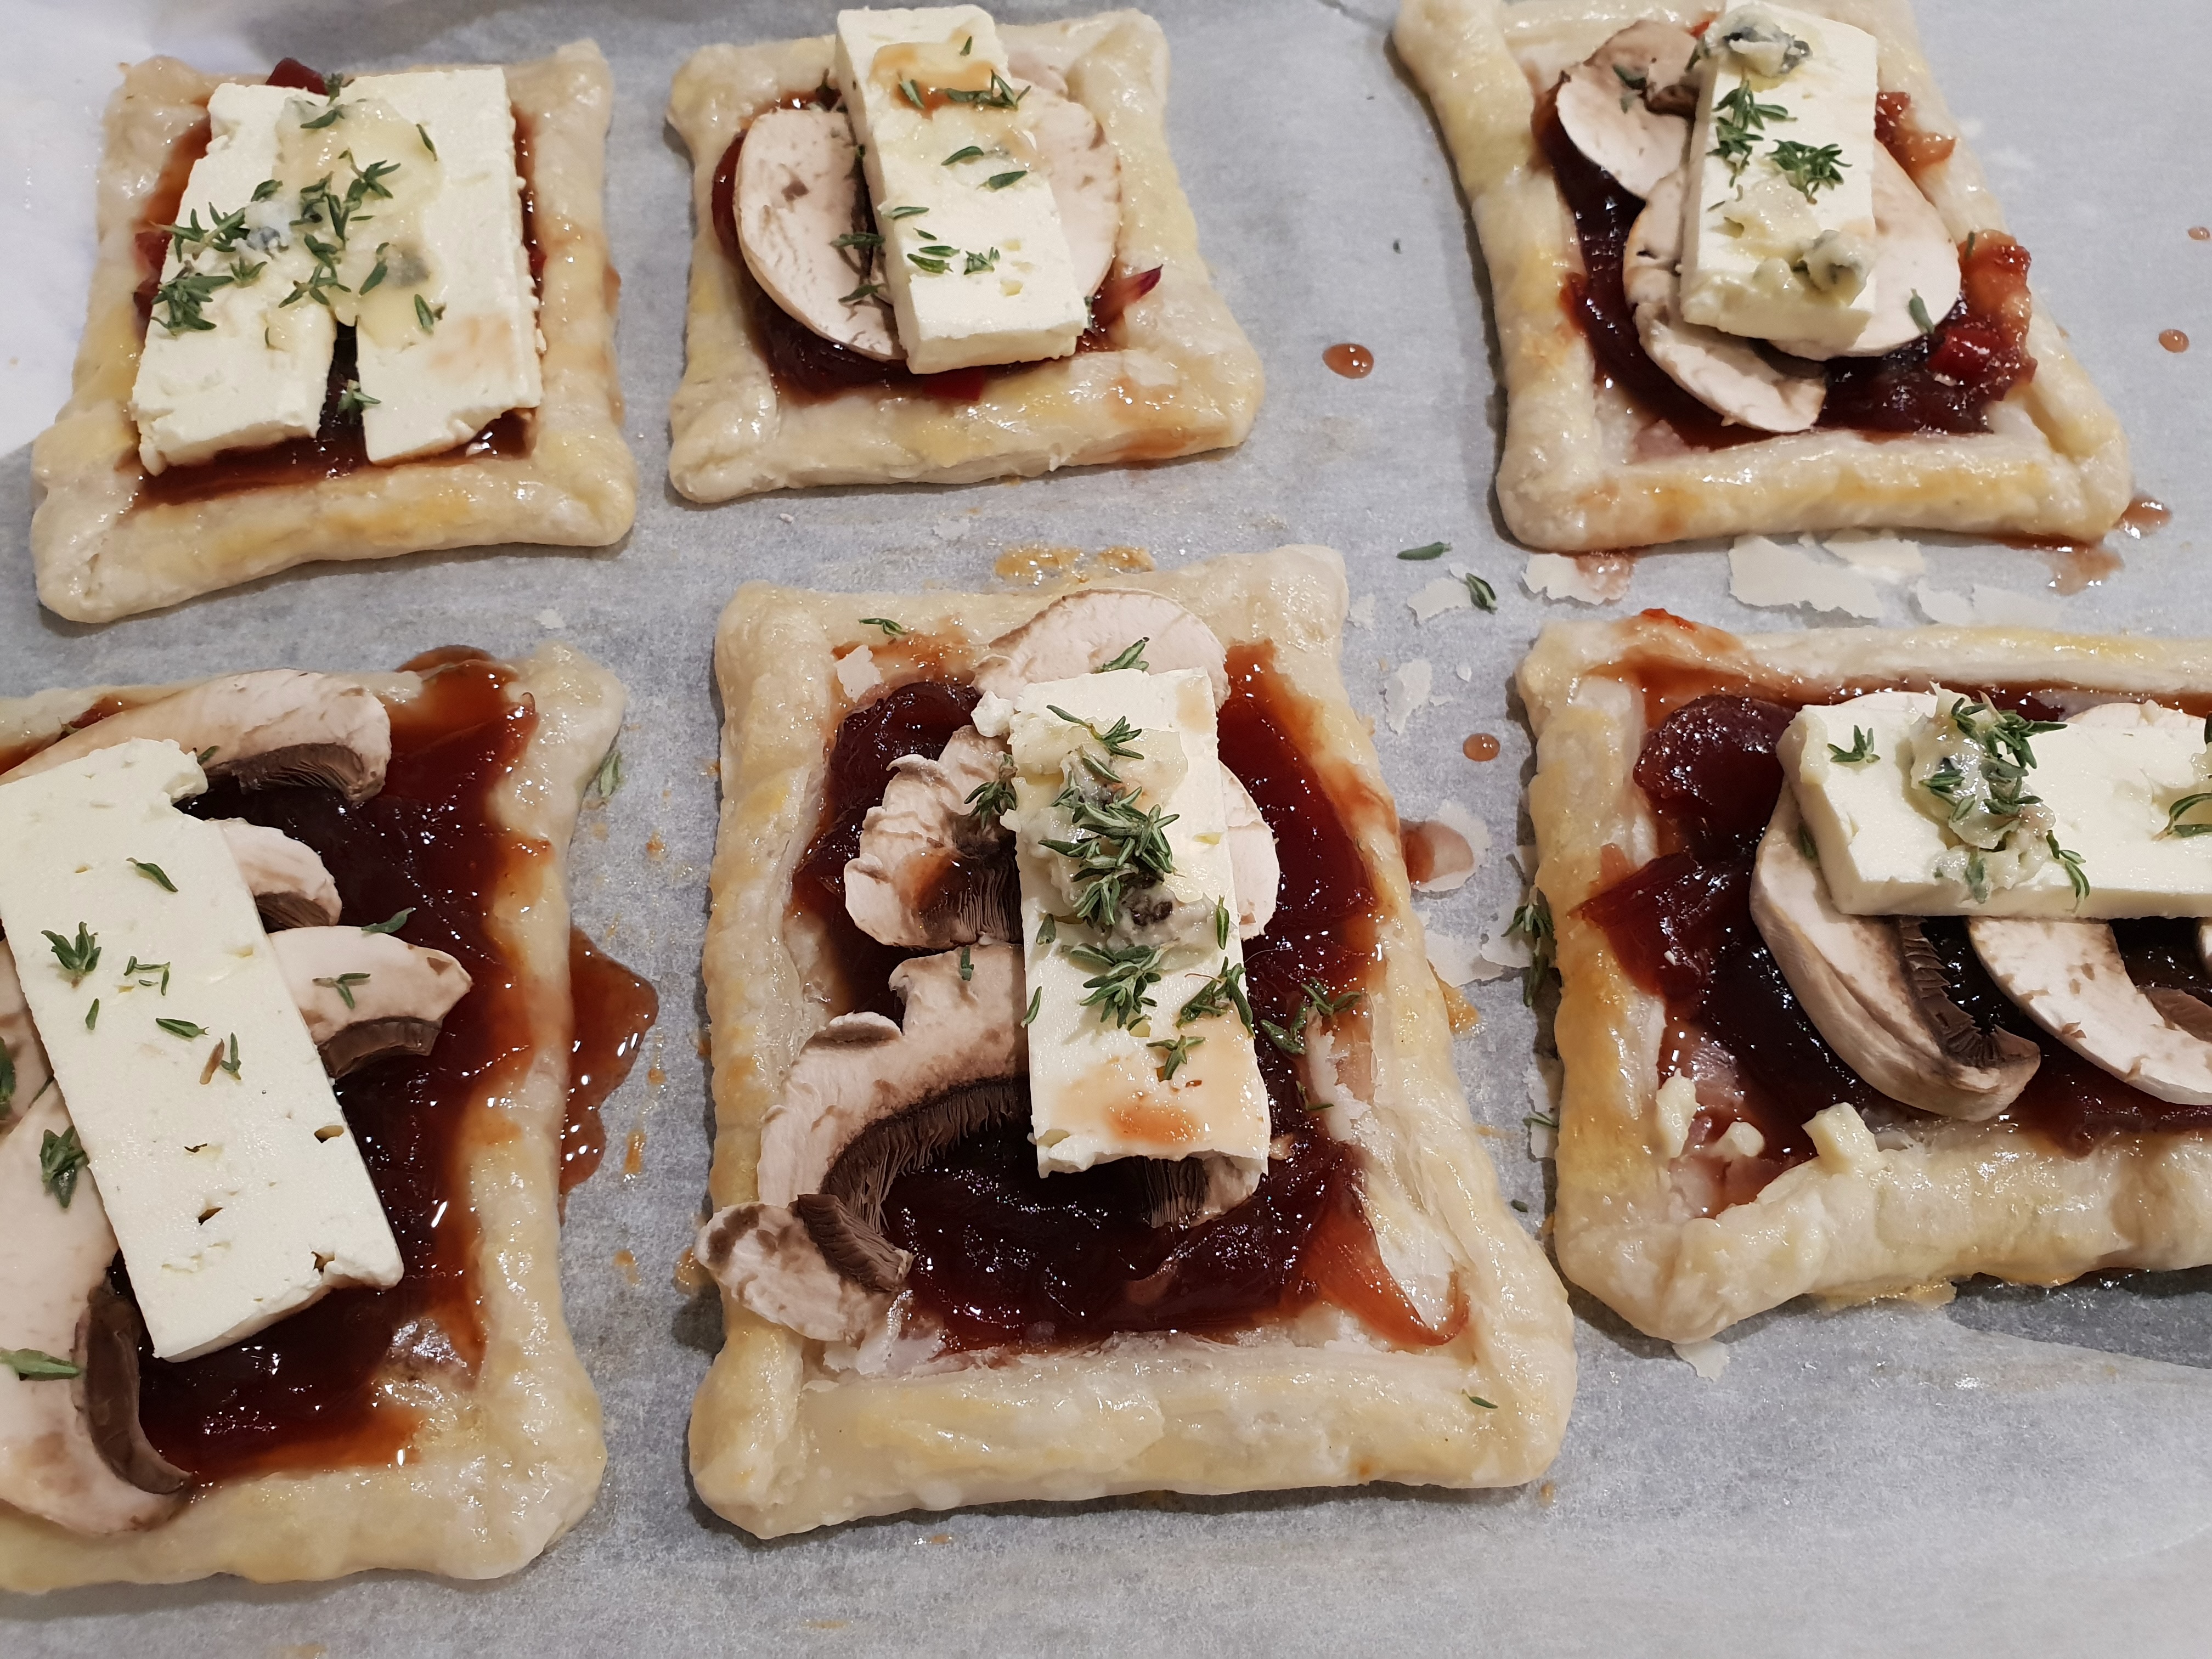
Above: Red onion chutney with mushroom, feta, blue cheese and thyme to fill tart cases.
Above: Some filled tarts
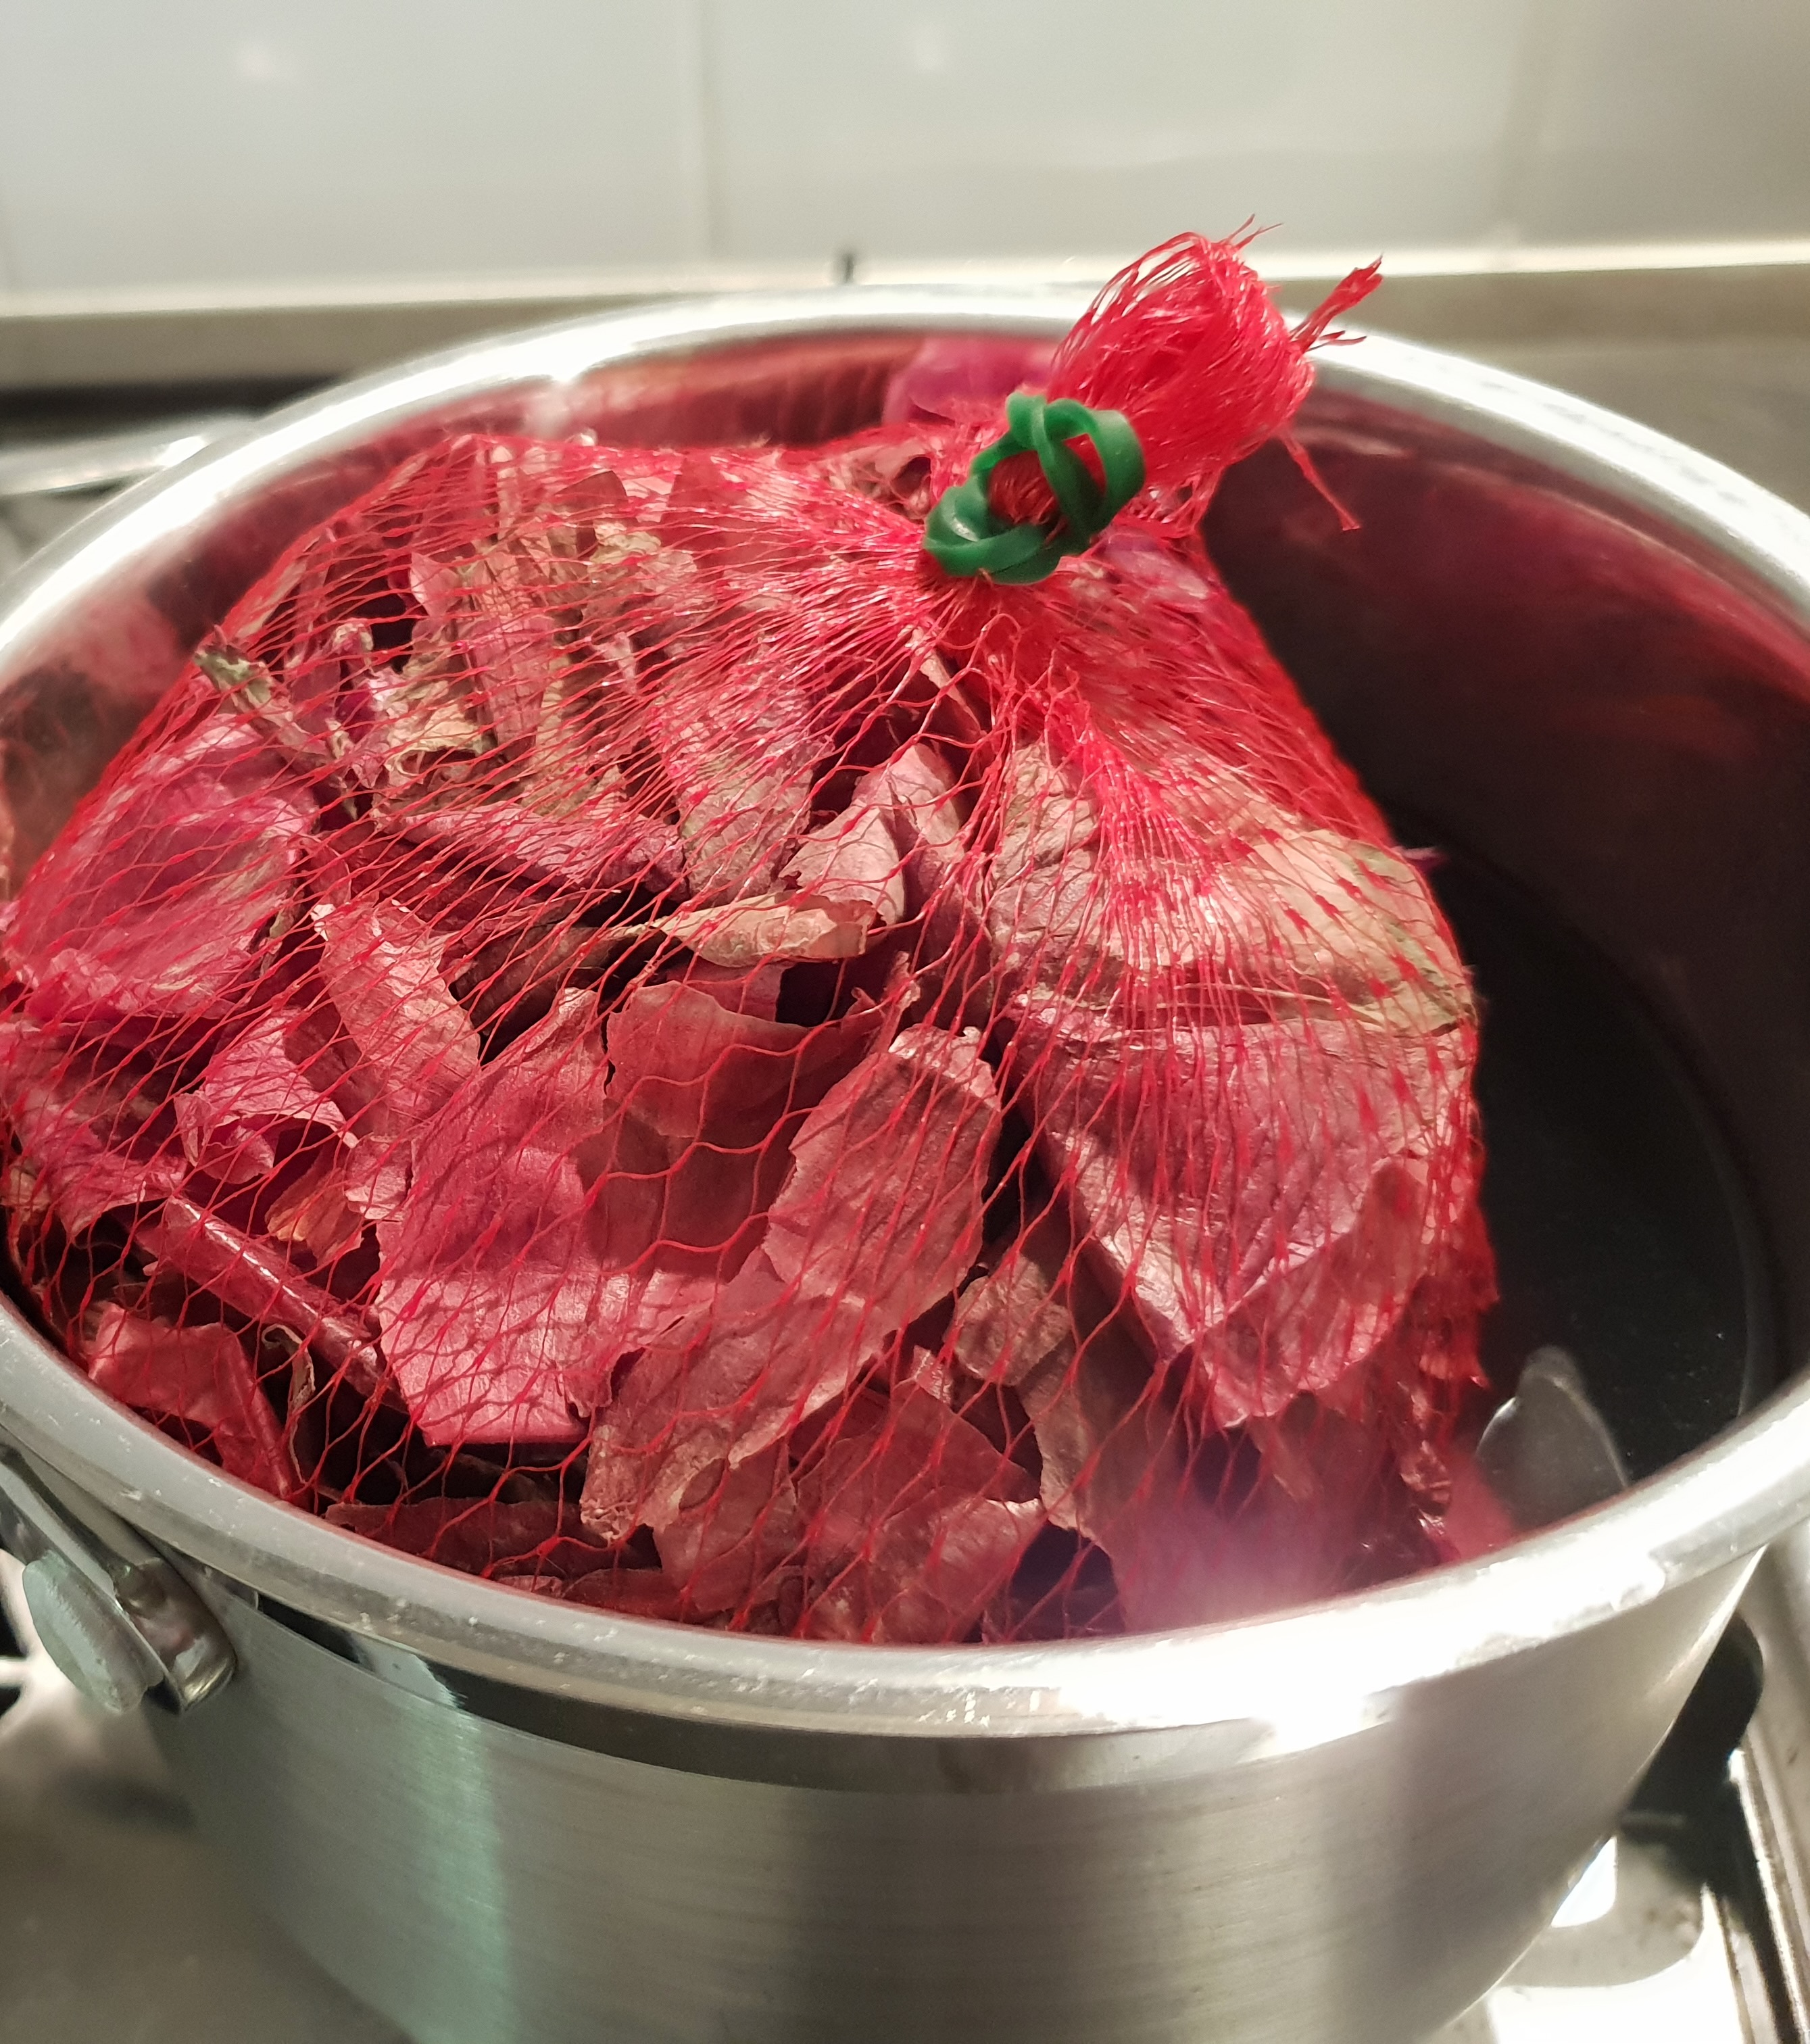
But, wait, there’s more. I now had the saved red onion skins from 500g of red onions dried and aching to yield their colour….So I bagged them and lowered them into a pot full of water over high heat.
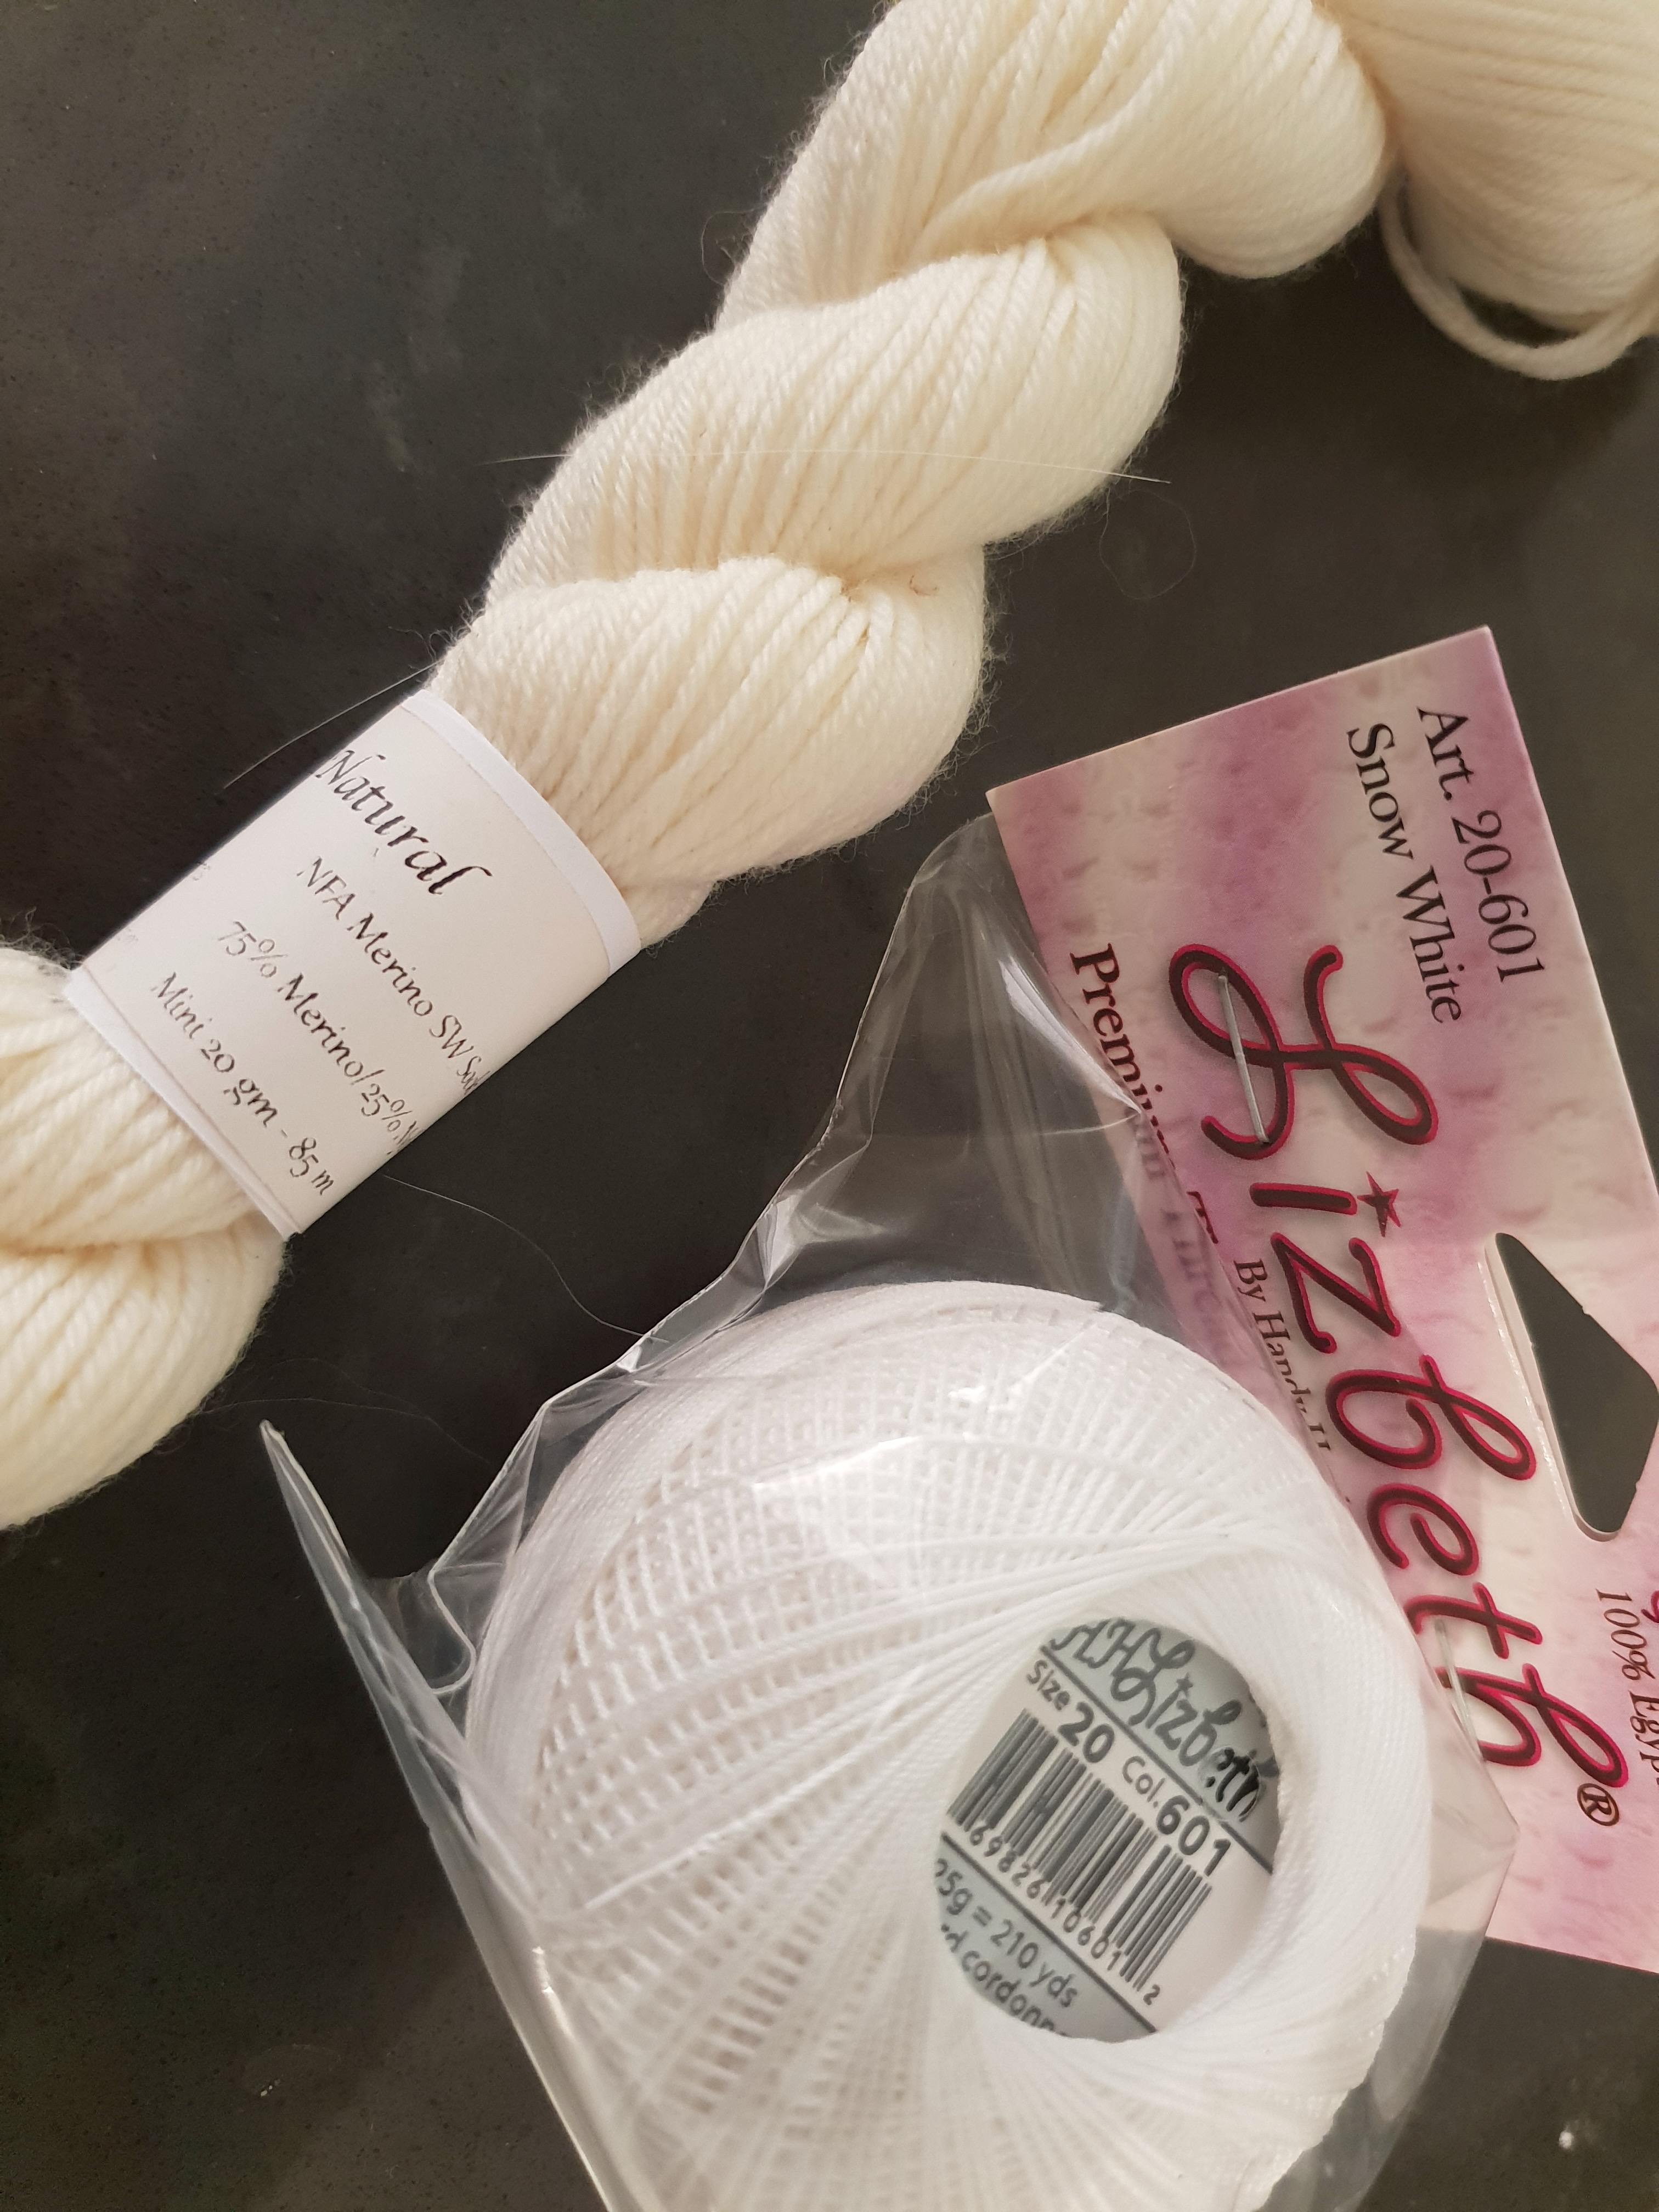
Above: while the water and dried red onion skins were warming, I pulled out a 25g mini skein of cream sock yarn (75% merino wool; 25% nylon) and a ball of No. 20 mercerised crochet cotton in white.
Above: As the water started to simmer I put in the sock yarn and the cotton.
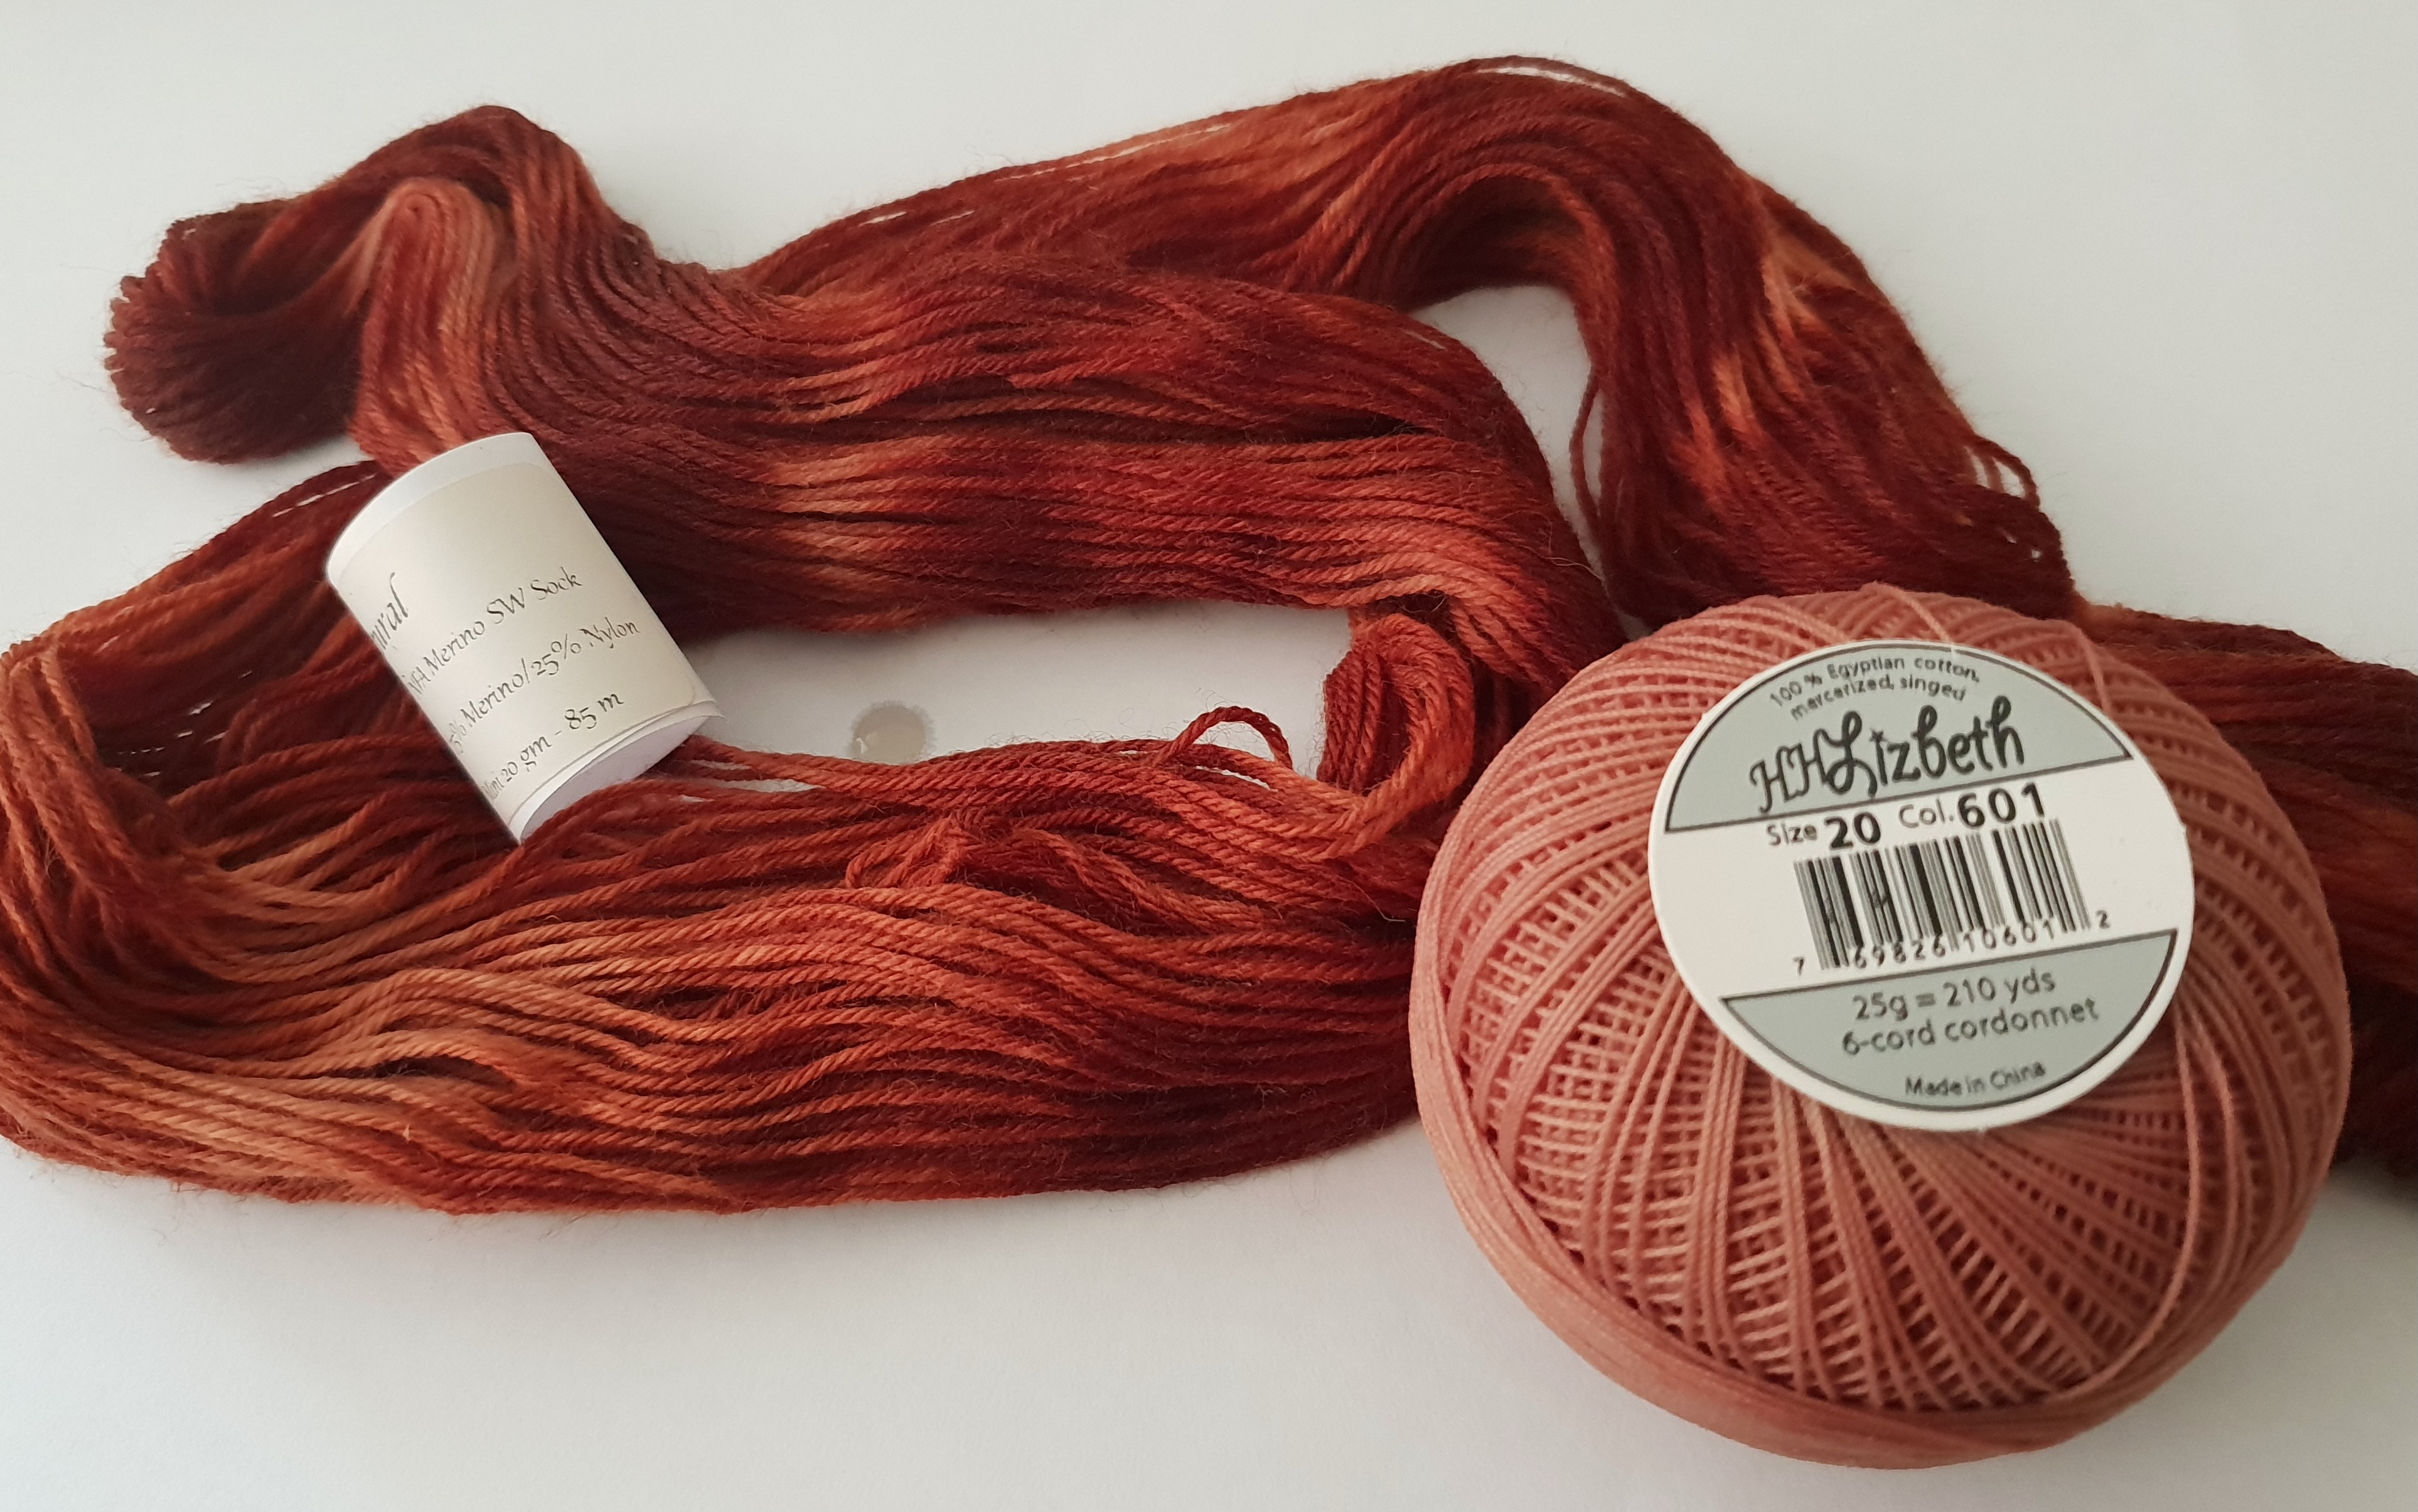
Above: After 30 minutes the wool and nylon yarn is a satisfyingly deep shade of red. The cotton, as expected from a cellulose fibre, is not as dark but is a pleasant dusky pink. Because I added the wool/nylon skein in its still twisted form to the bath, I’ve managed to get a subtle variation in shading but have thankfully avoided any white bits.
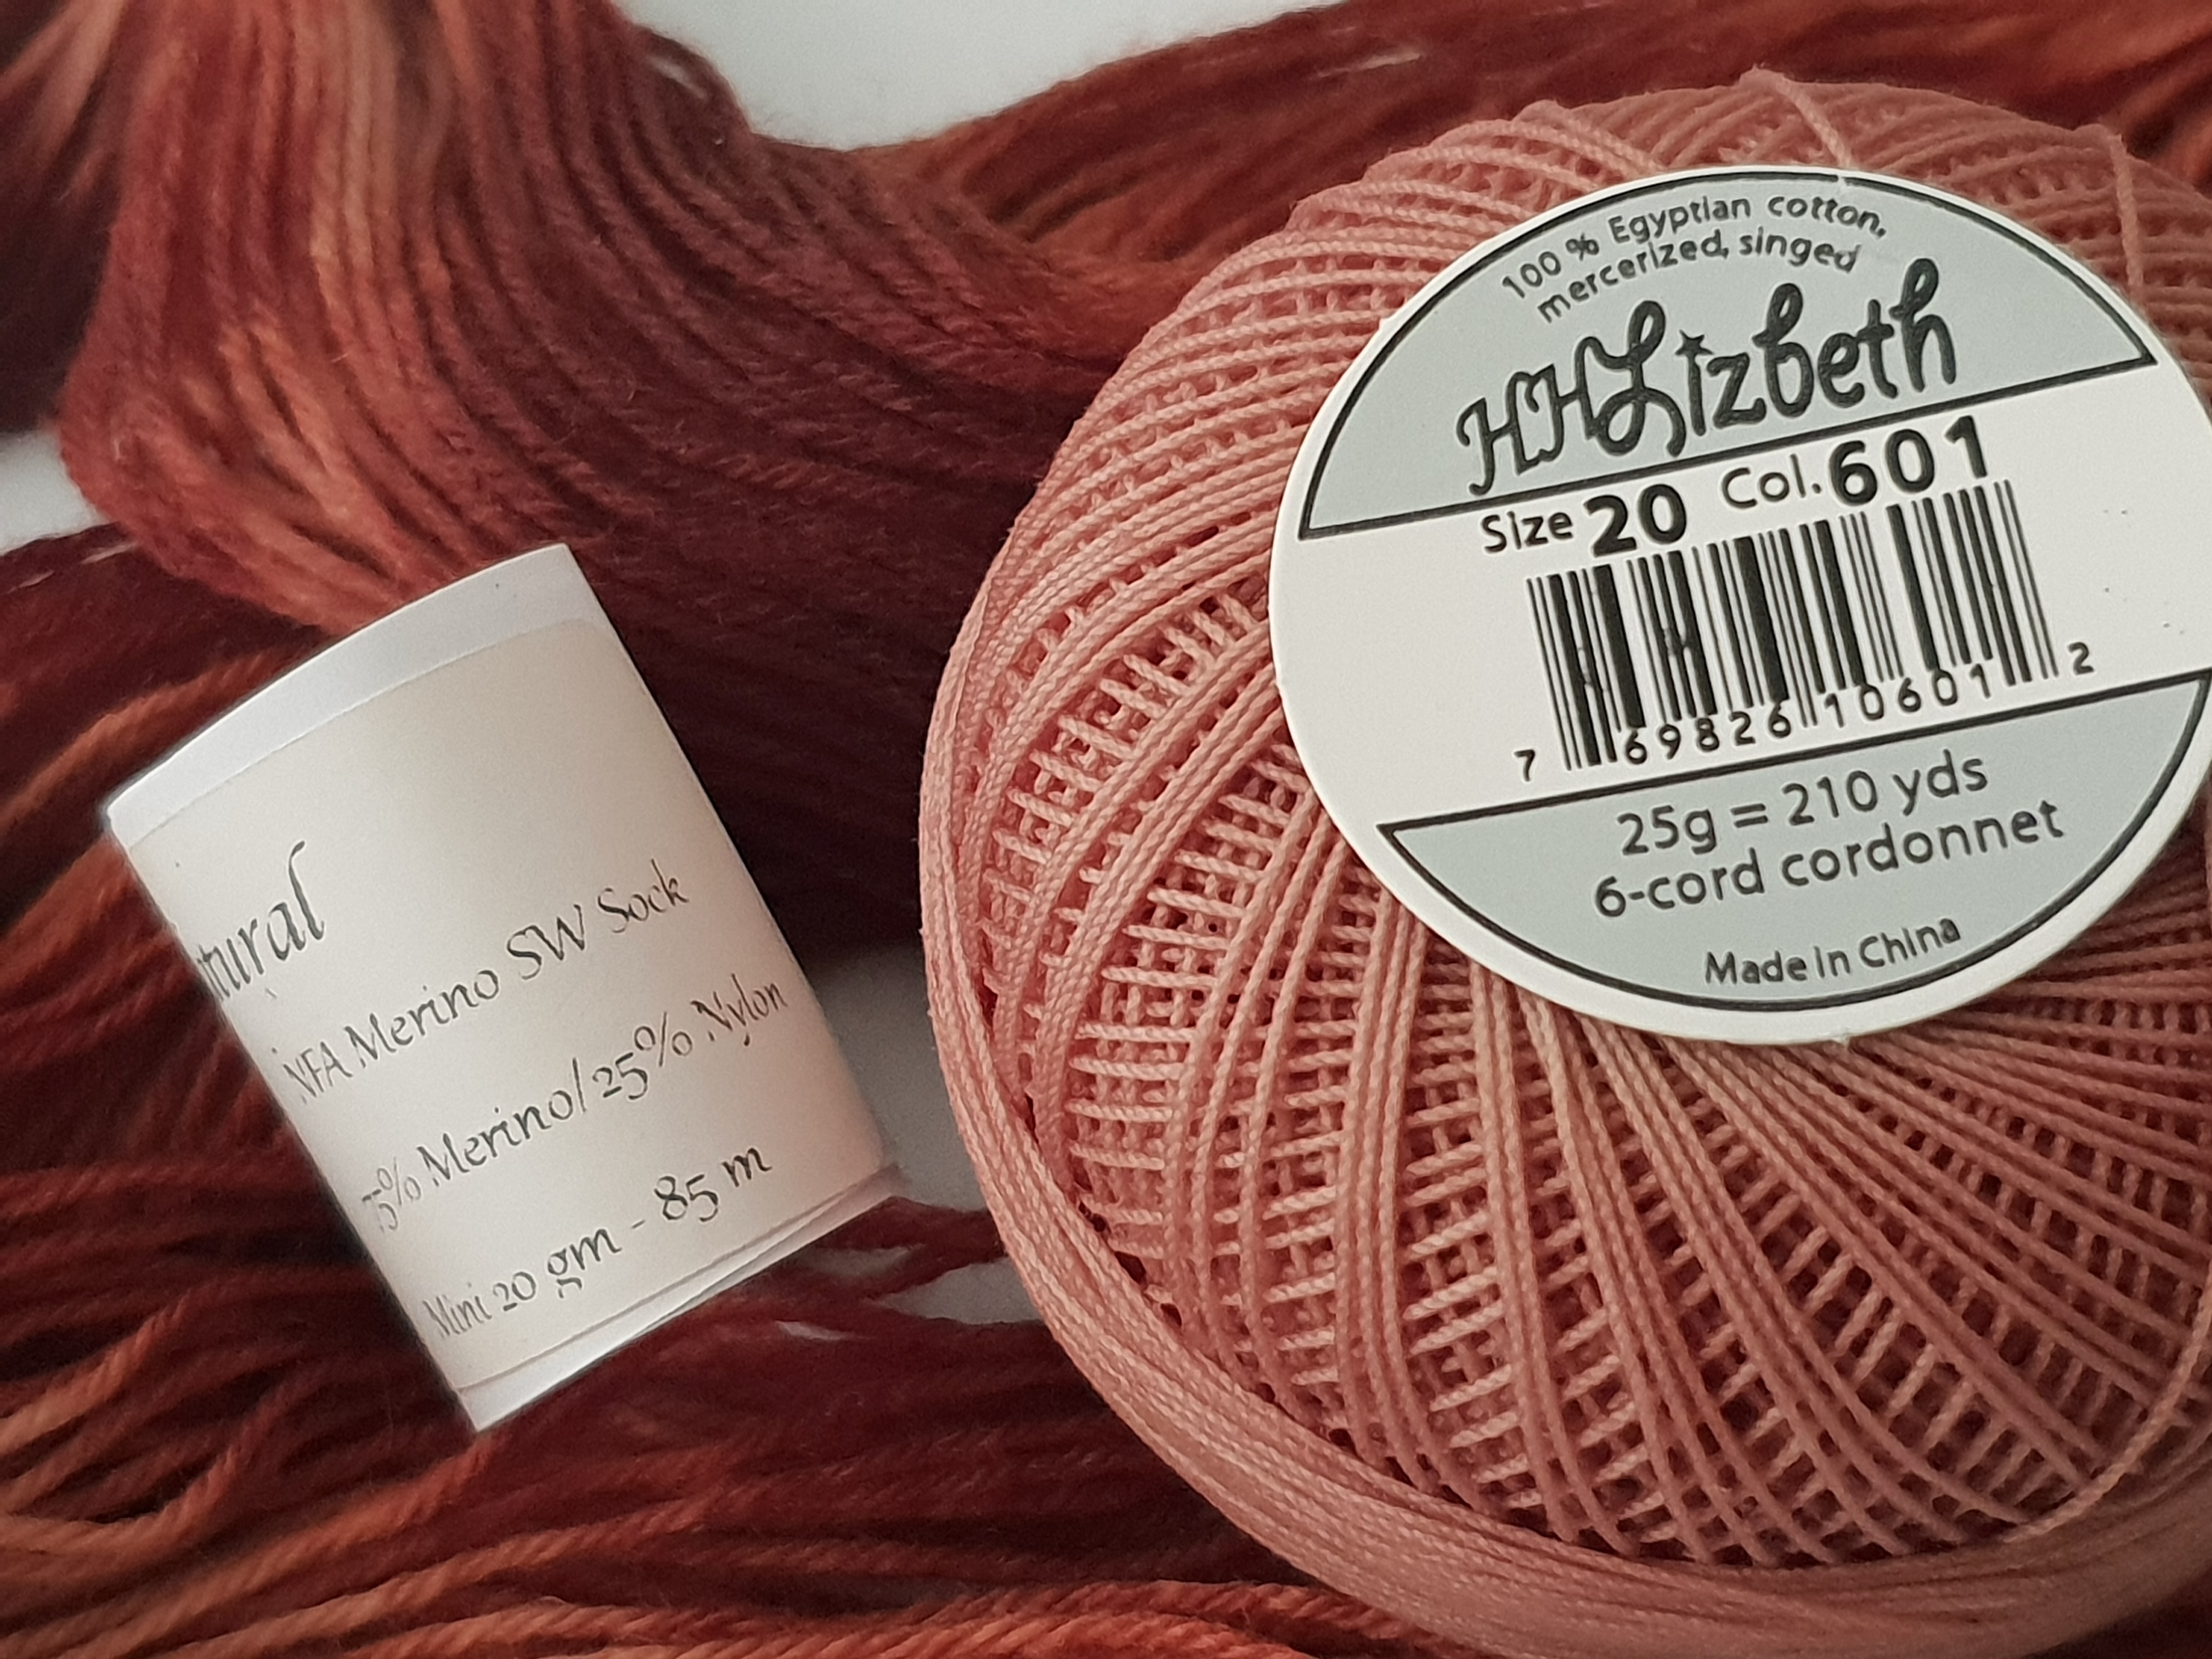
Above: A close up of the two yarns given 30 minutes in a bath of red onion skins left over from making red onion chutney. No mordant required.
Conclusion: Never let a cooking binge go by without looking at your scraps for potential colour!!
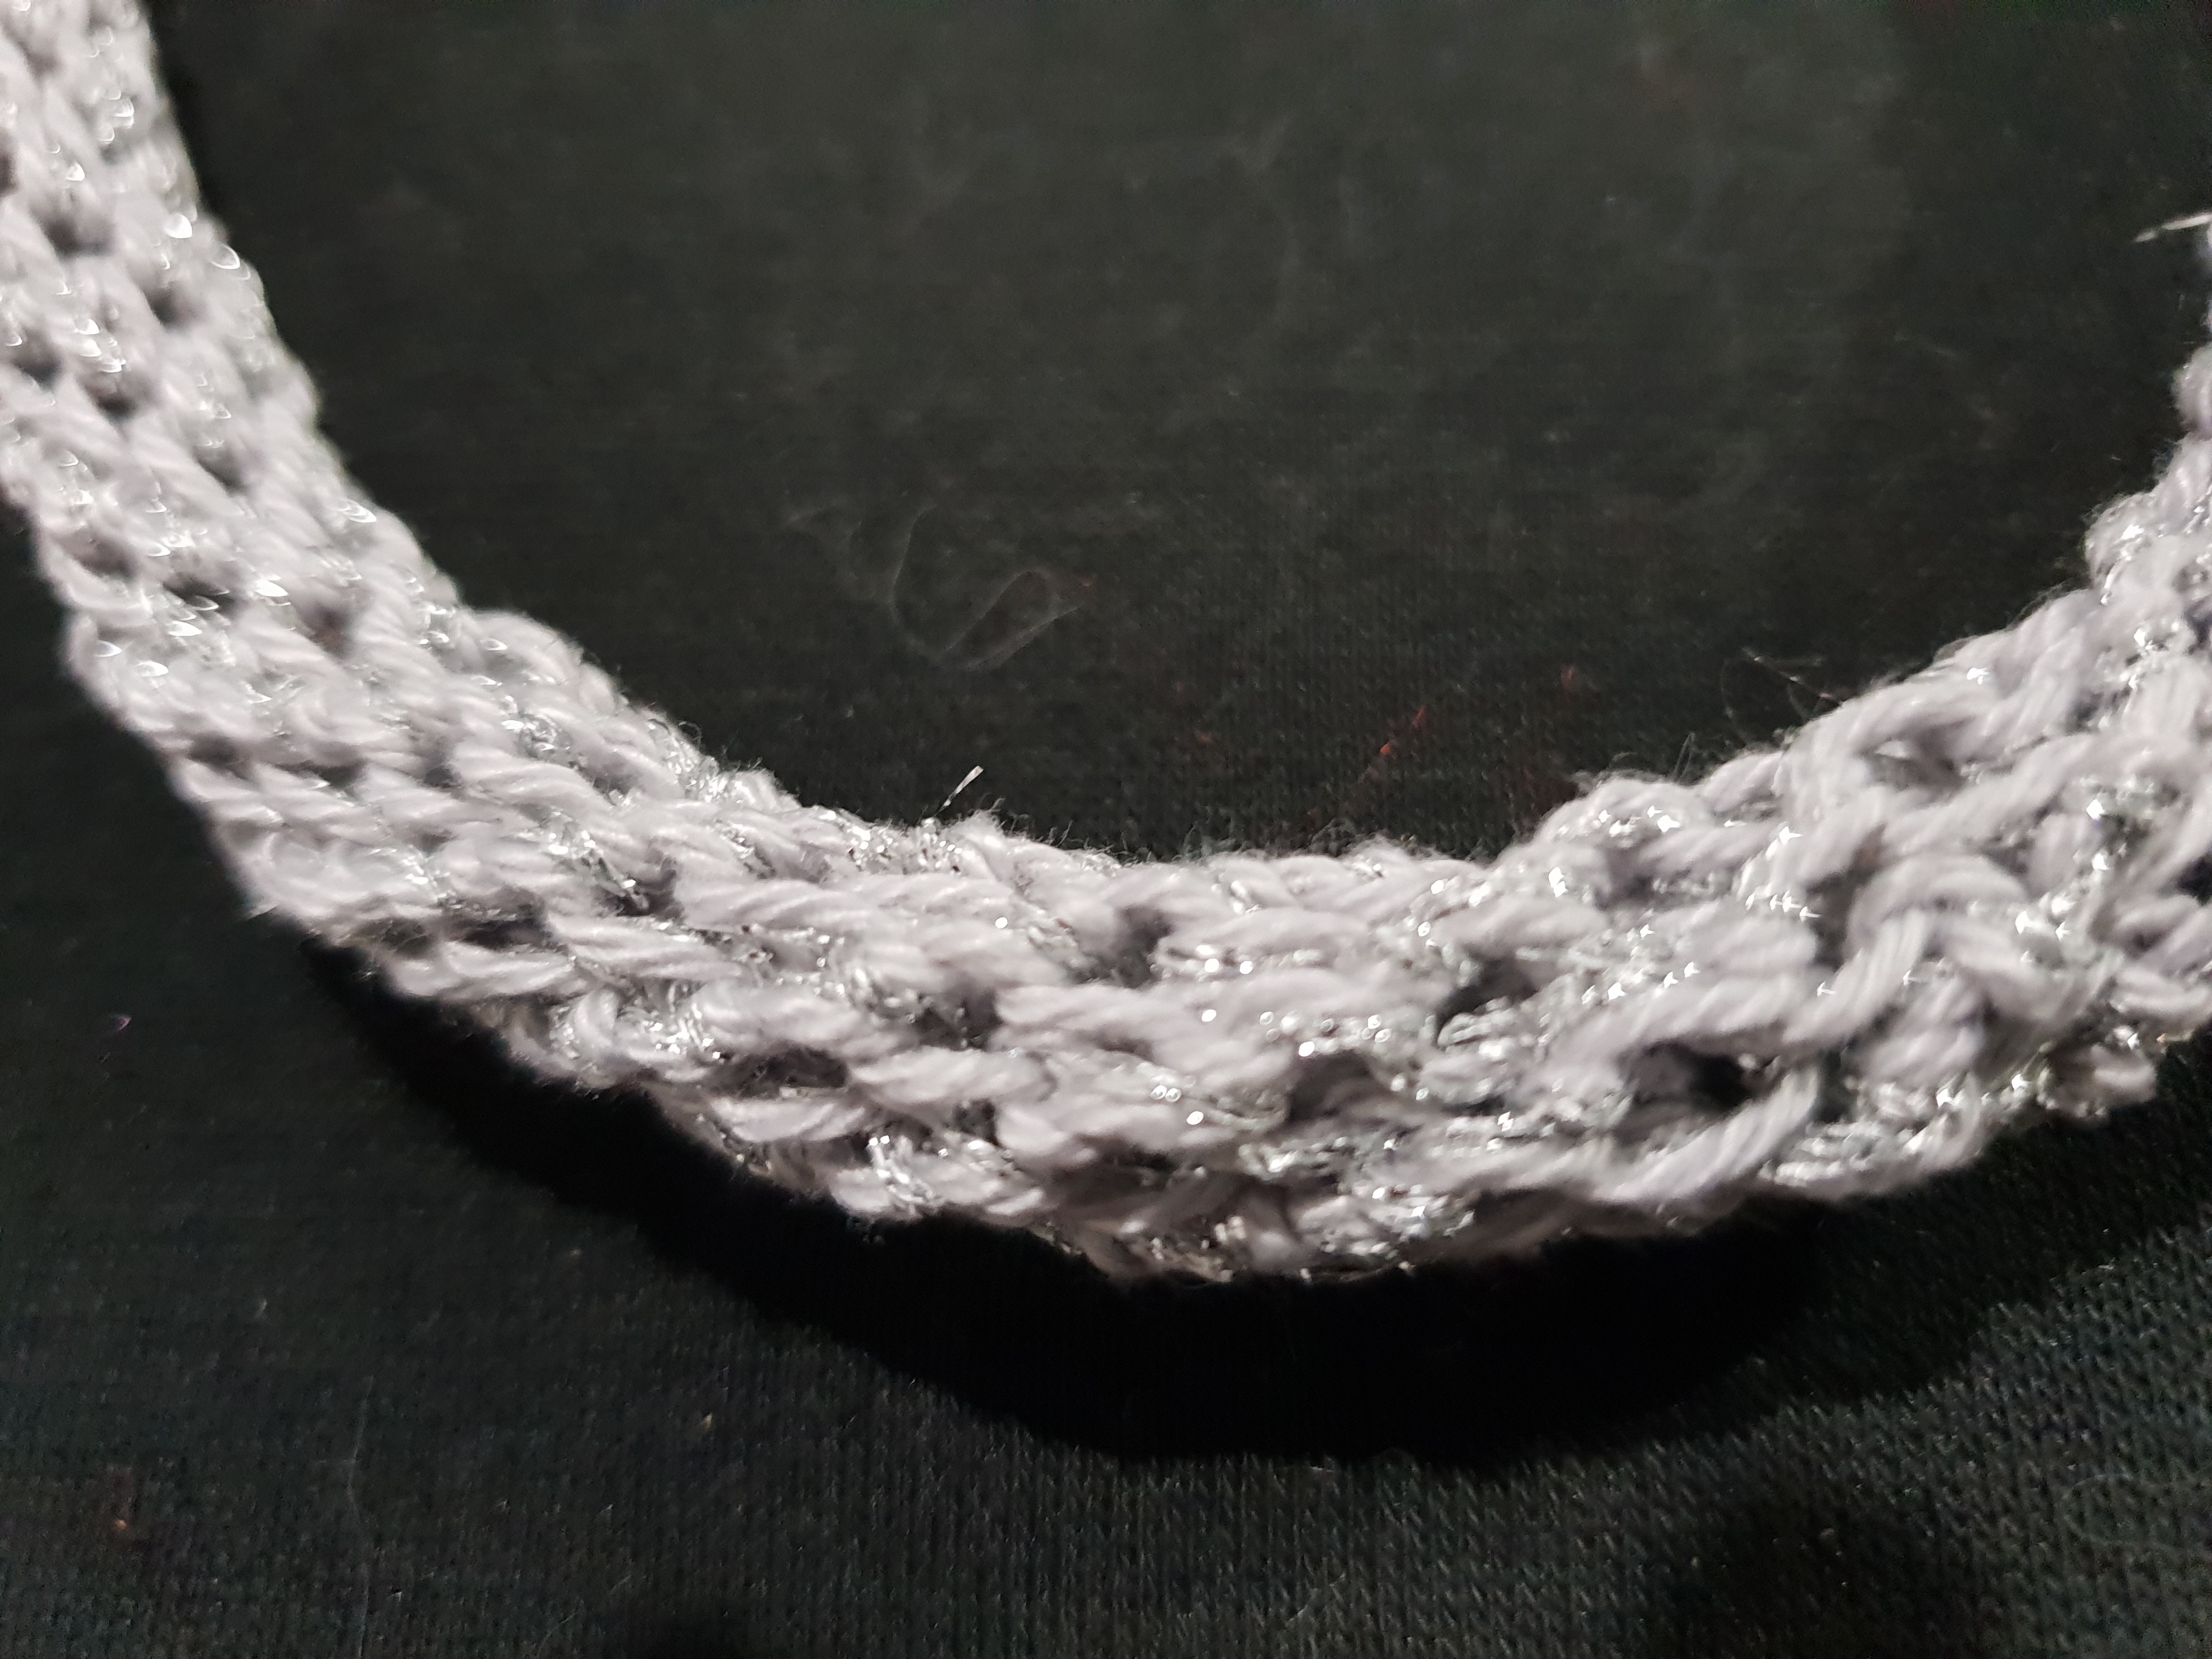
Recently I was showing some friends the bag handles I’d crocheted for an, as yet, UFB (unfinished bag). I got this technique from a marvellous u-tube video: https://www.youtube.com/watch?v=RnX4t8ypGtc
The comment was “that rope would make a great neck piece”.
So….
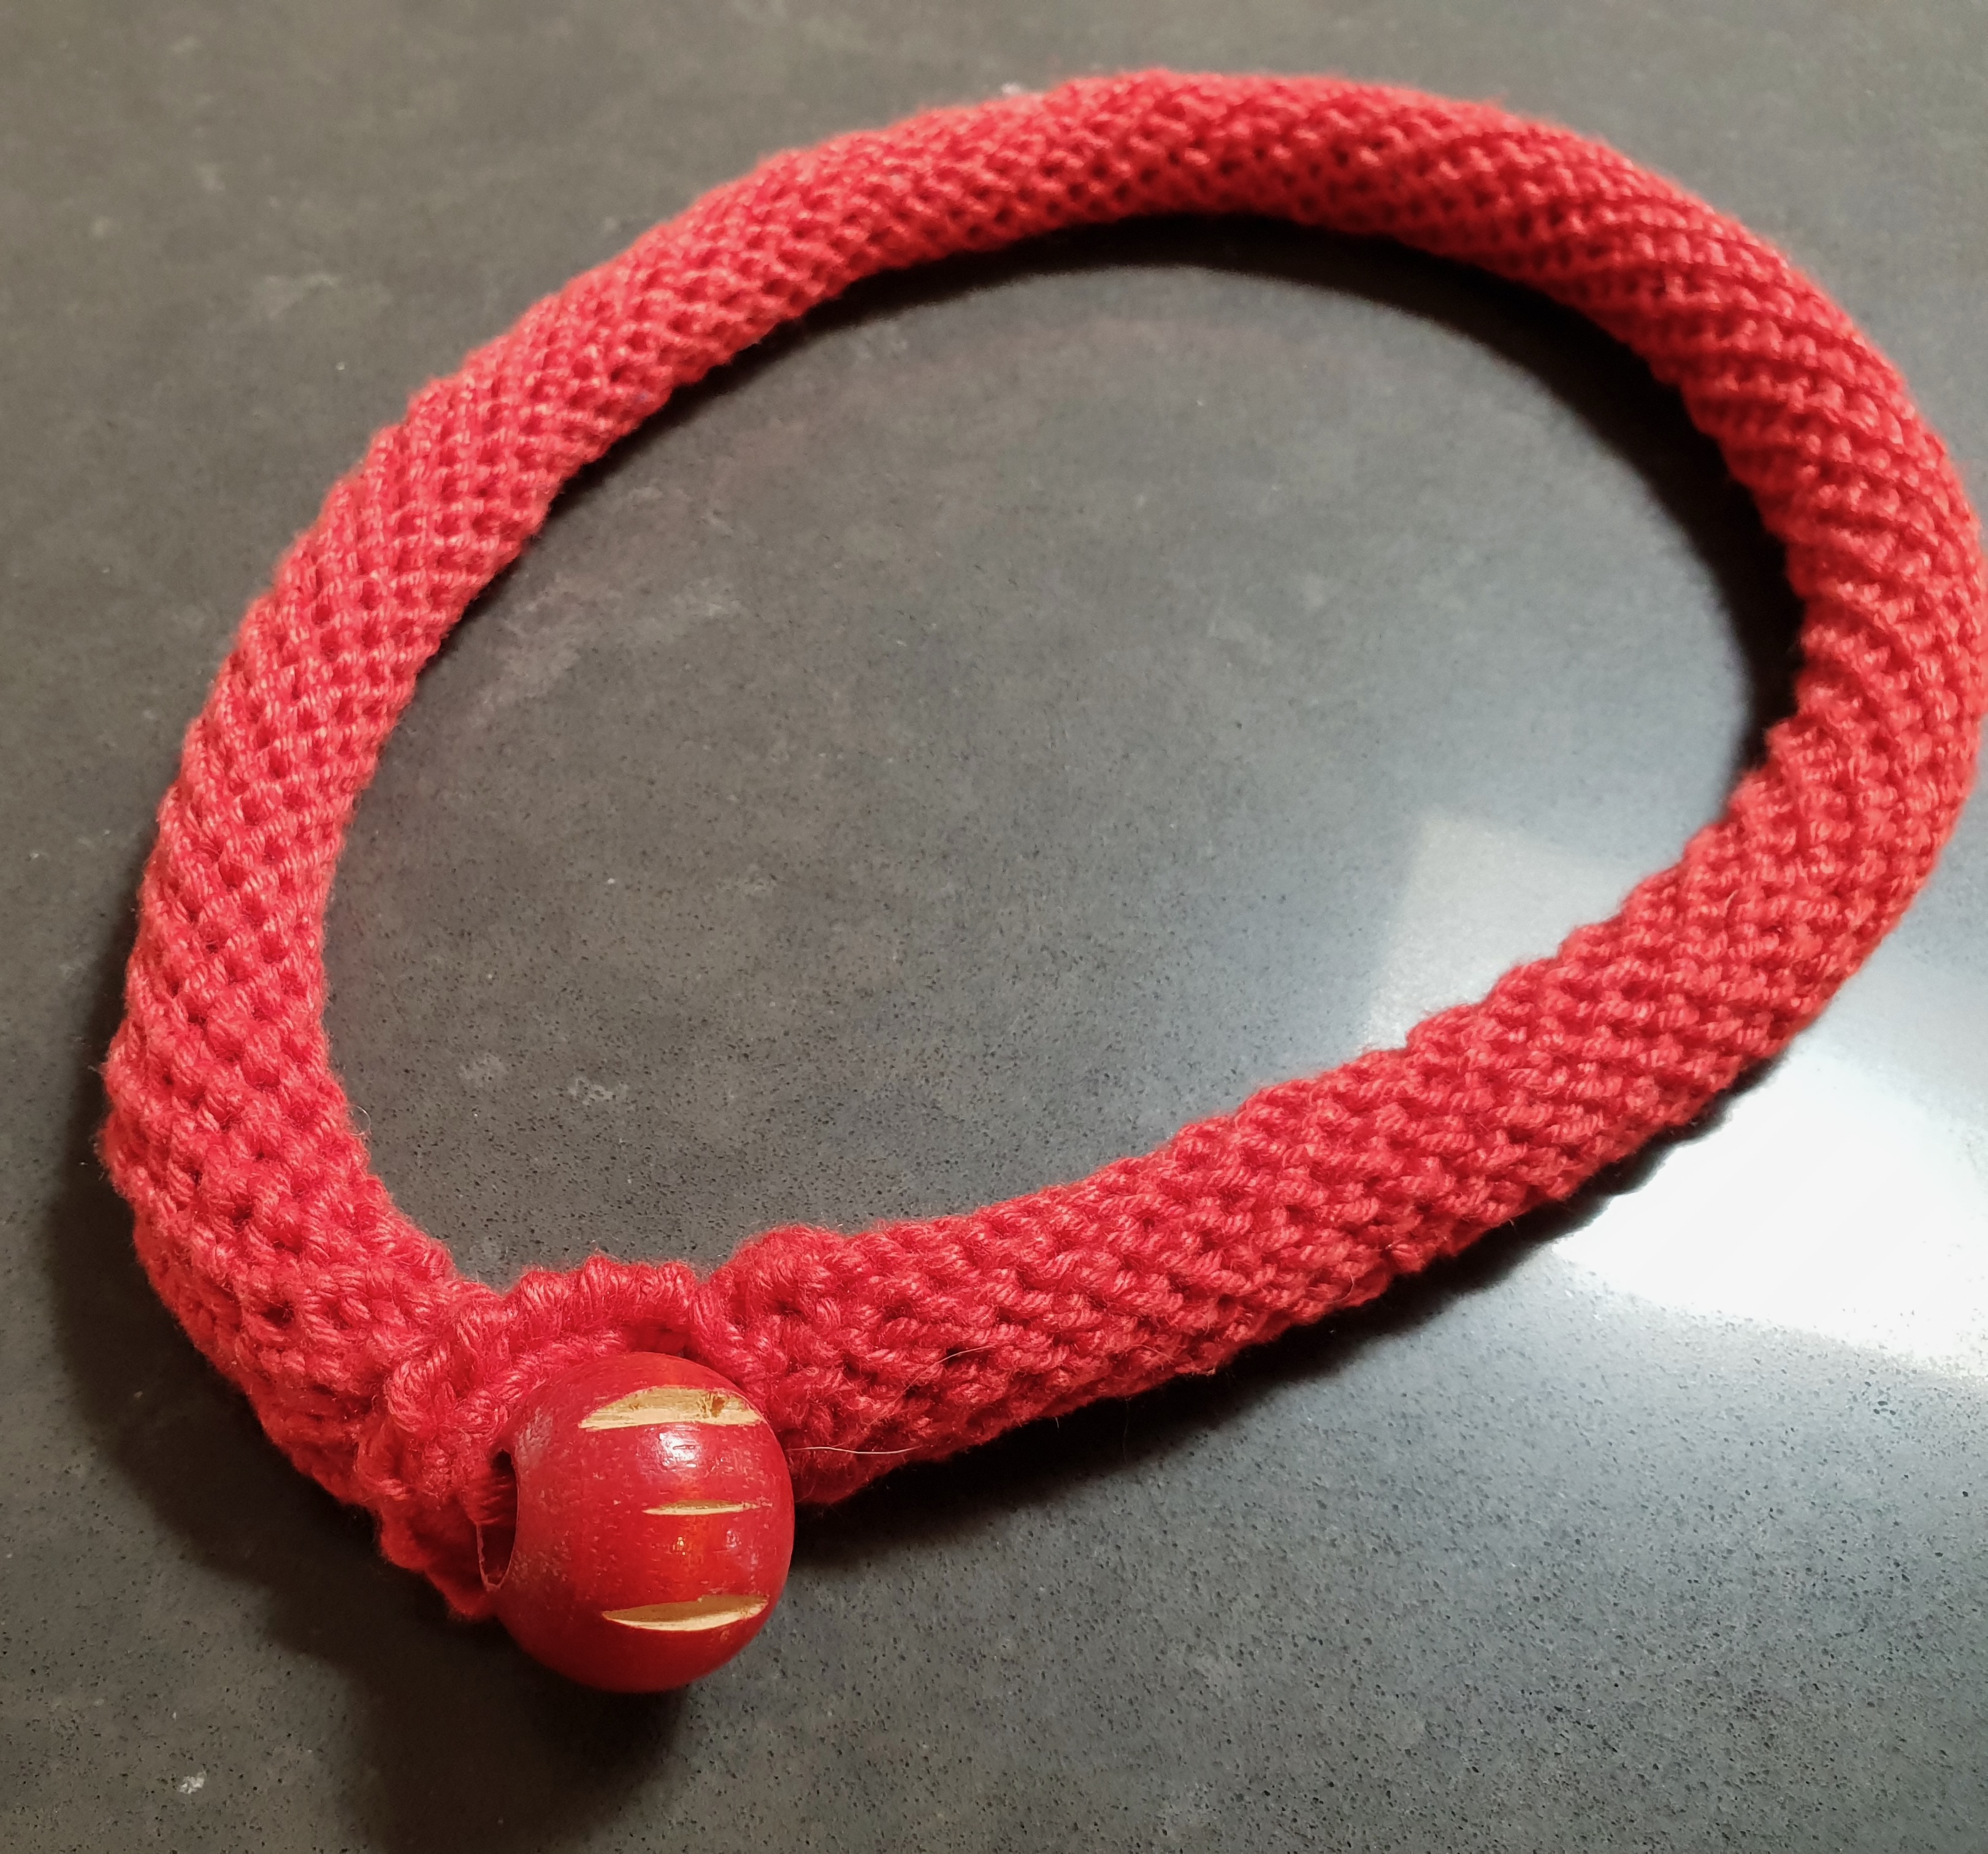
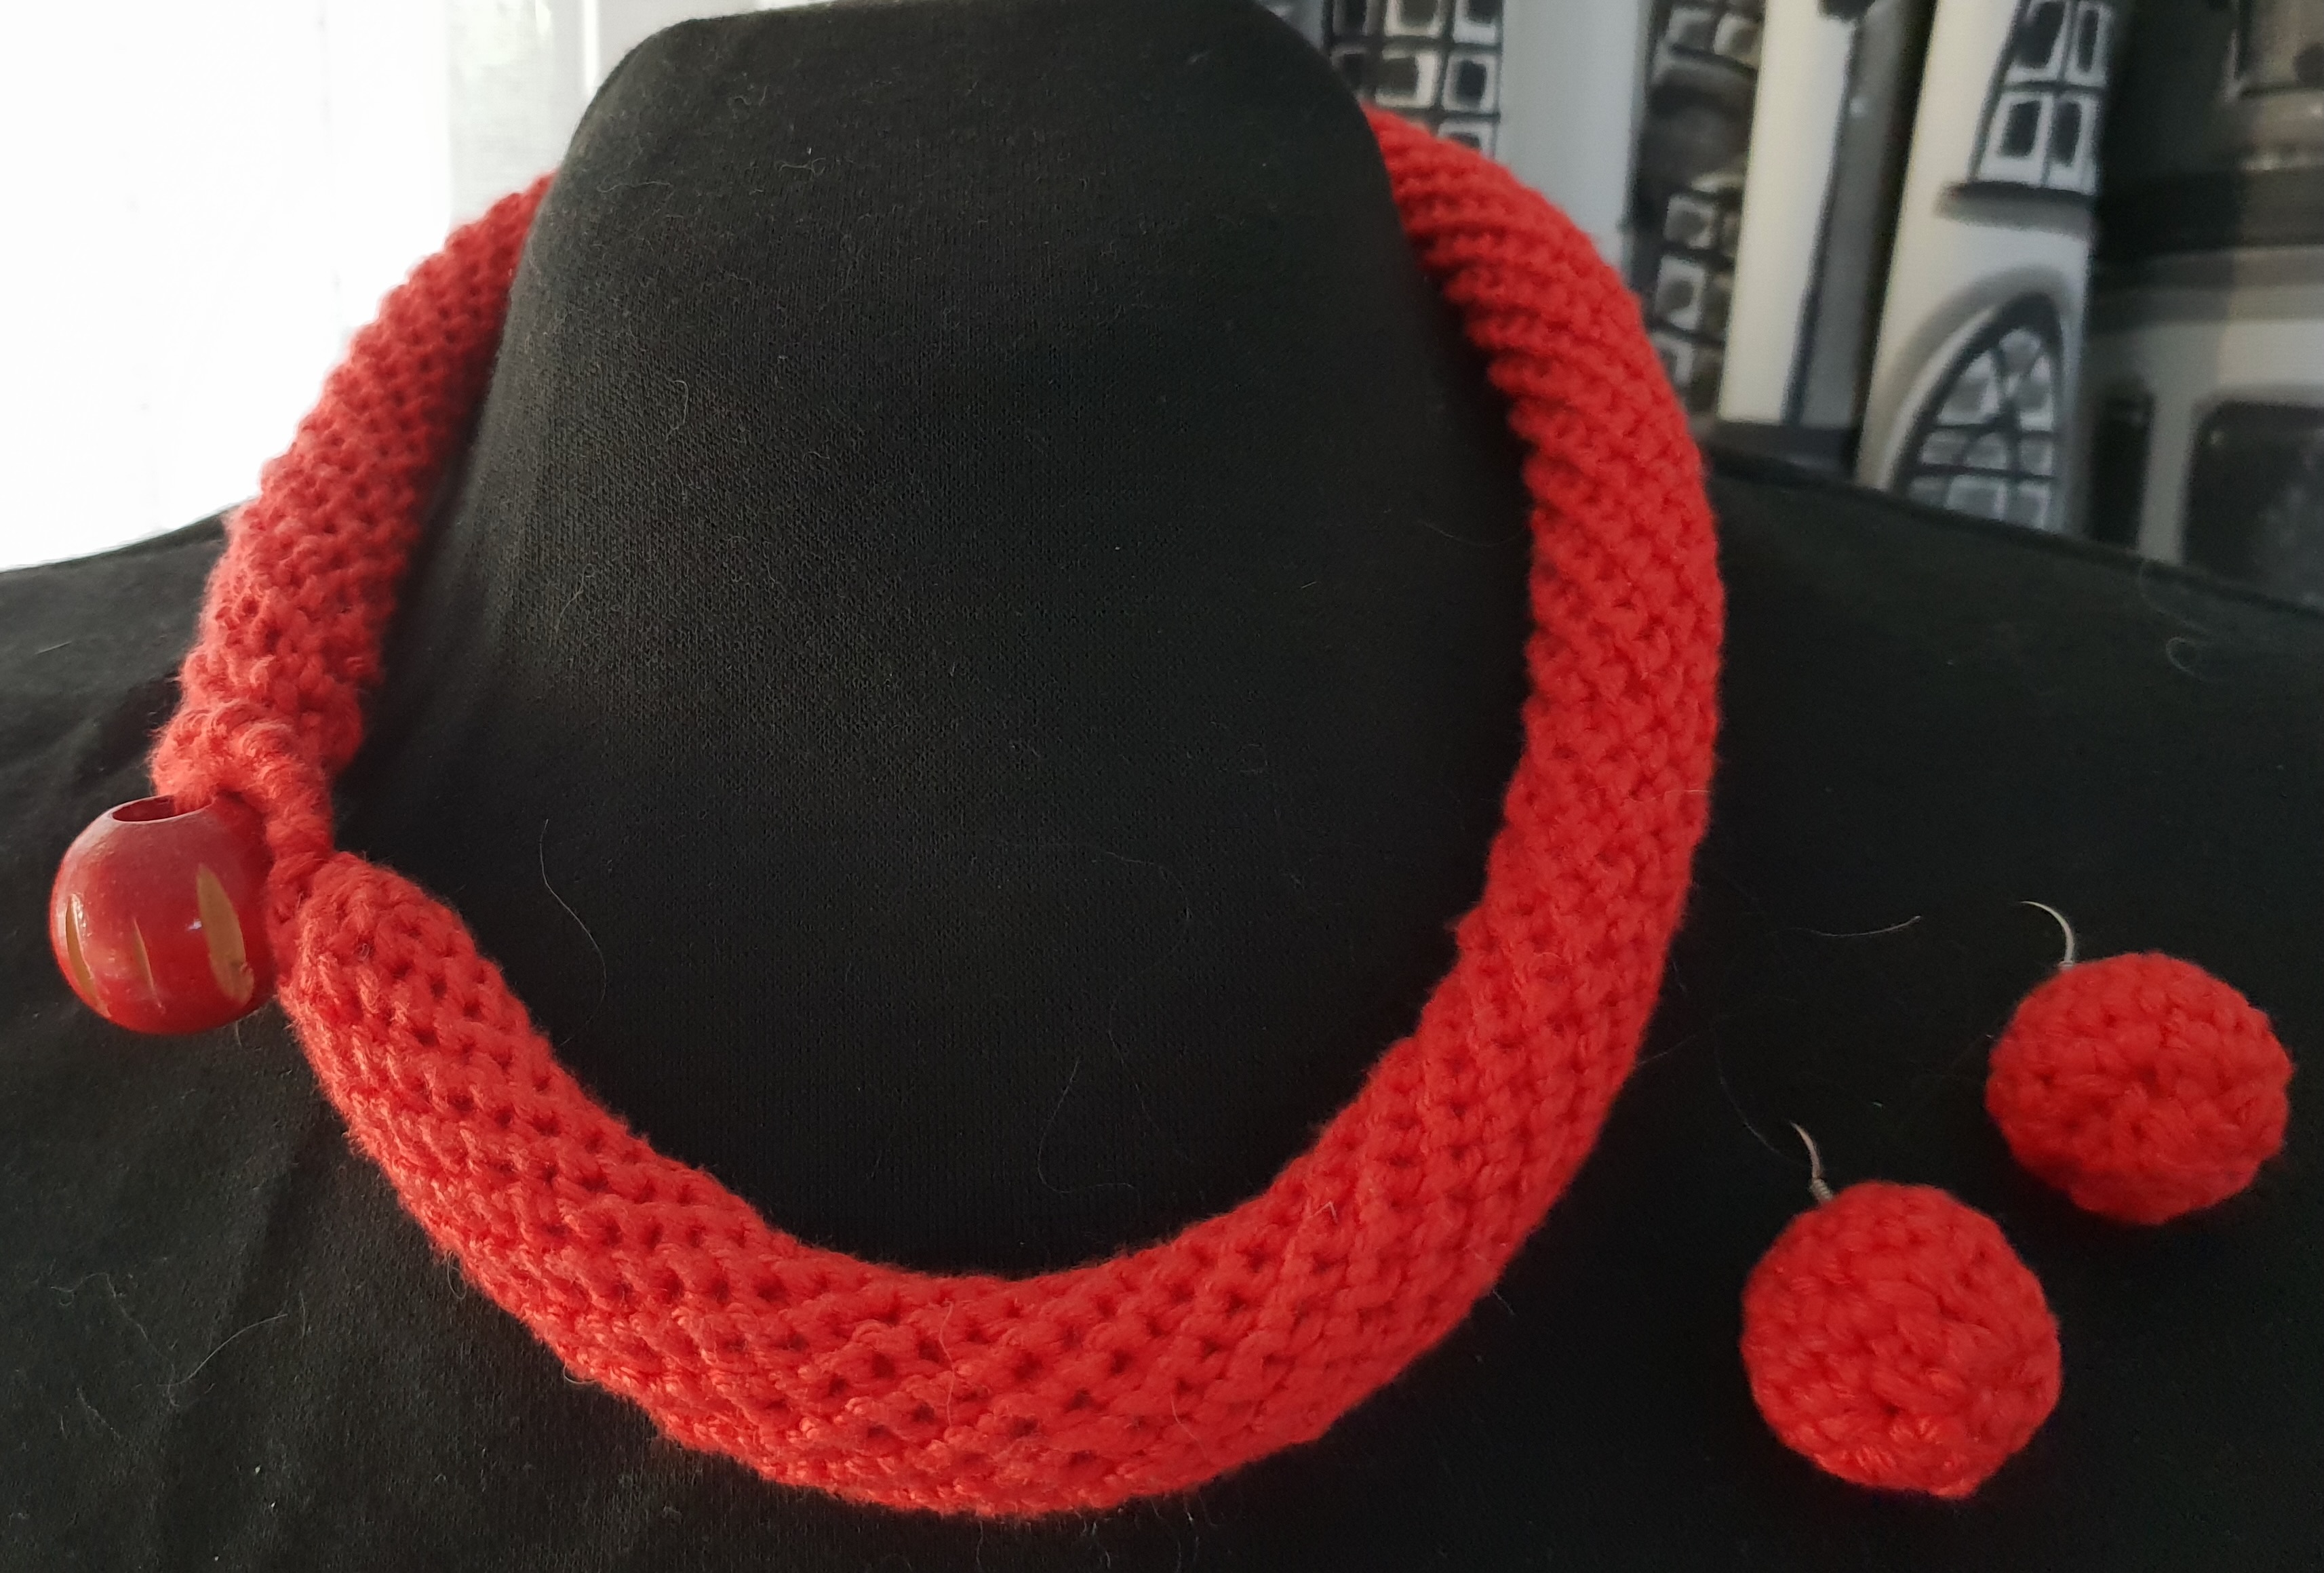
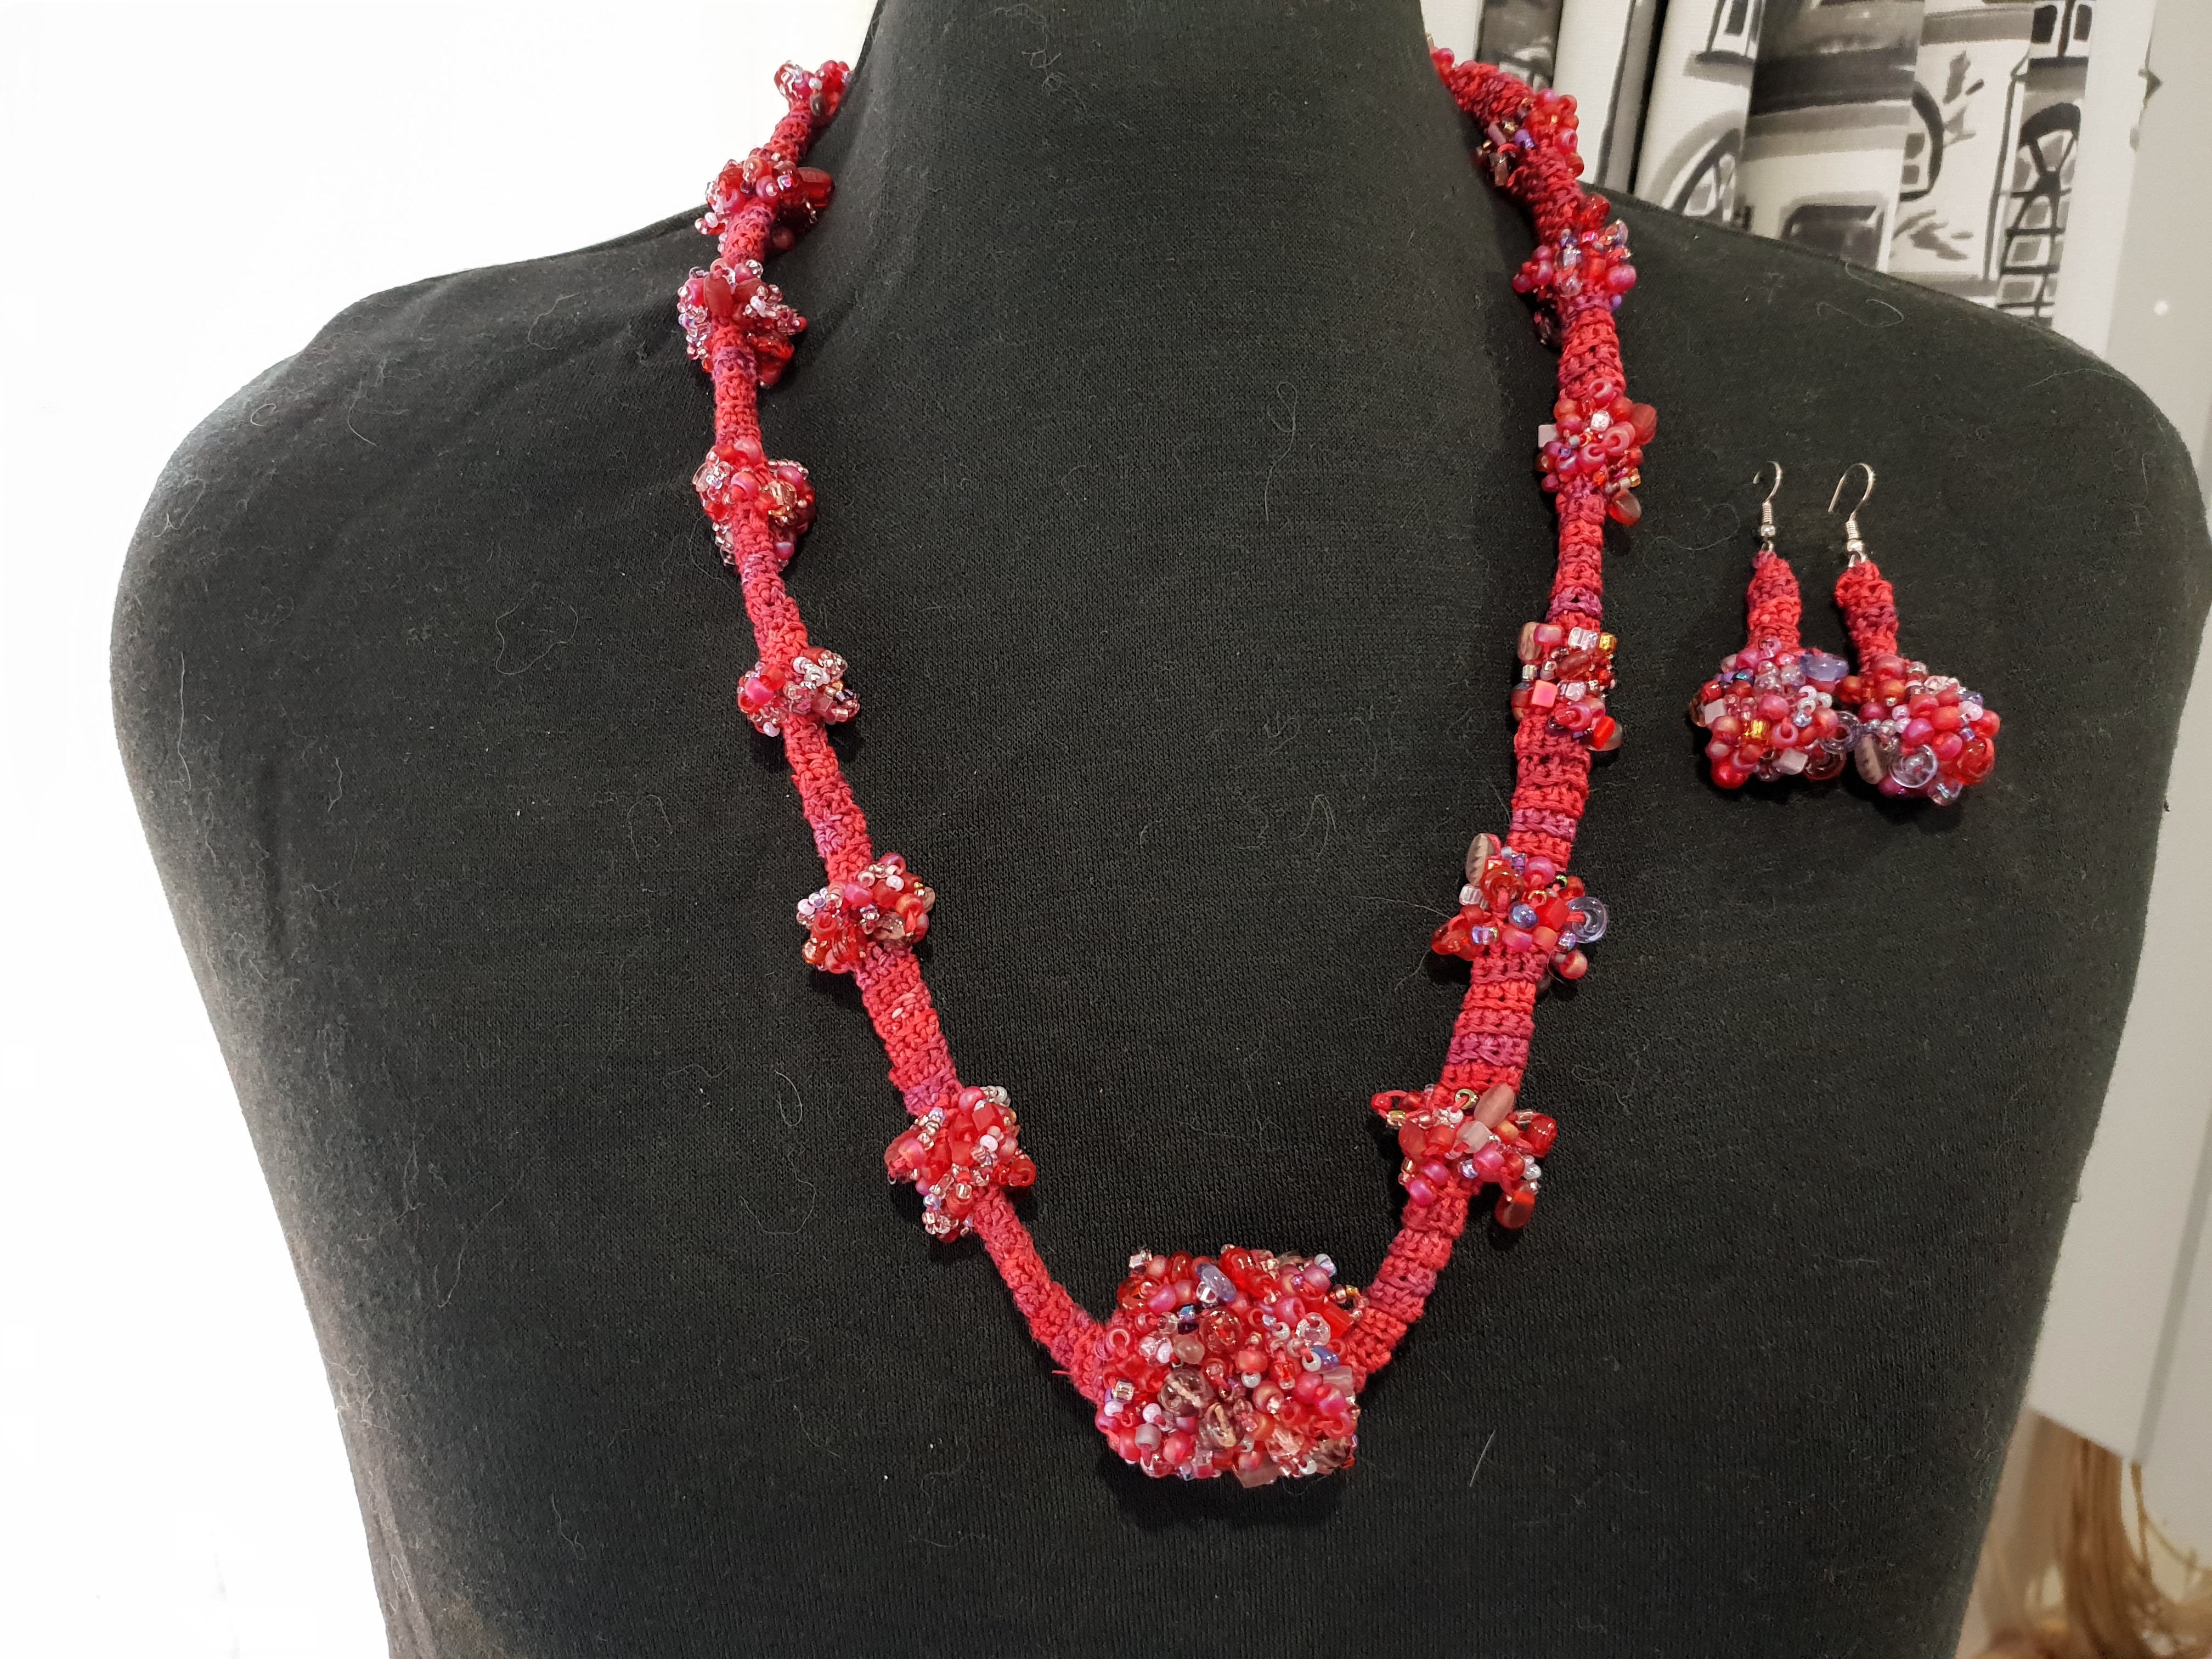
I’d been given a skein of “bamboo silk” in a gorgeous coral/orange colour at Christmas by my friend Julie. I used the twisted rope technique to make a necklace which I trimmed with an interesting wooden bead my mother had given me.
The closure loop is a 10 chain loop over worked in dc, then reverse worked in crab stitch.
Matching earrings are not essential usually but this thread is such an unusual colour that I thought they’d be handy.
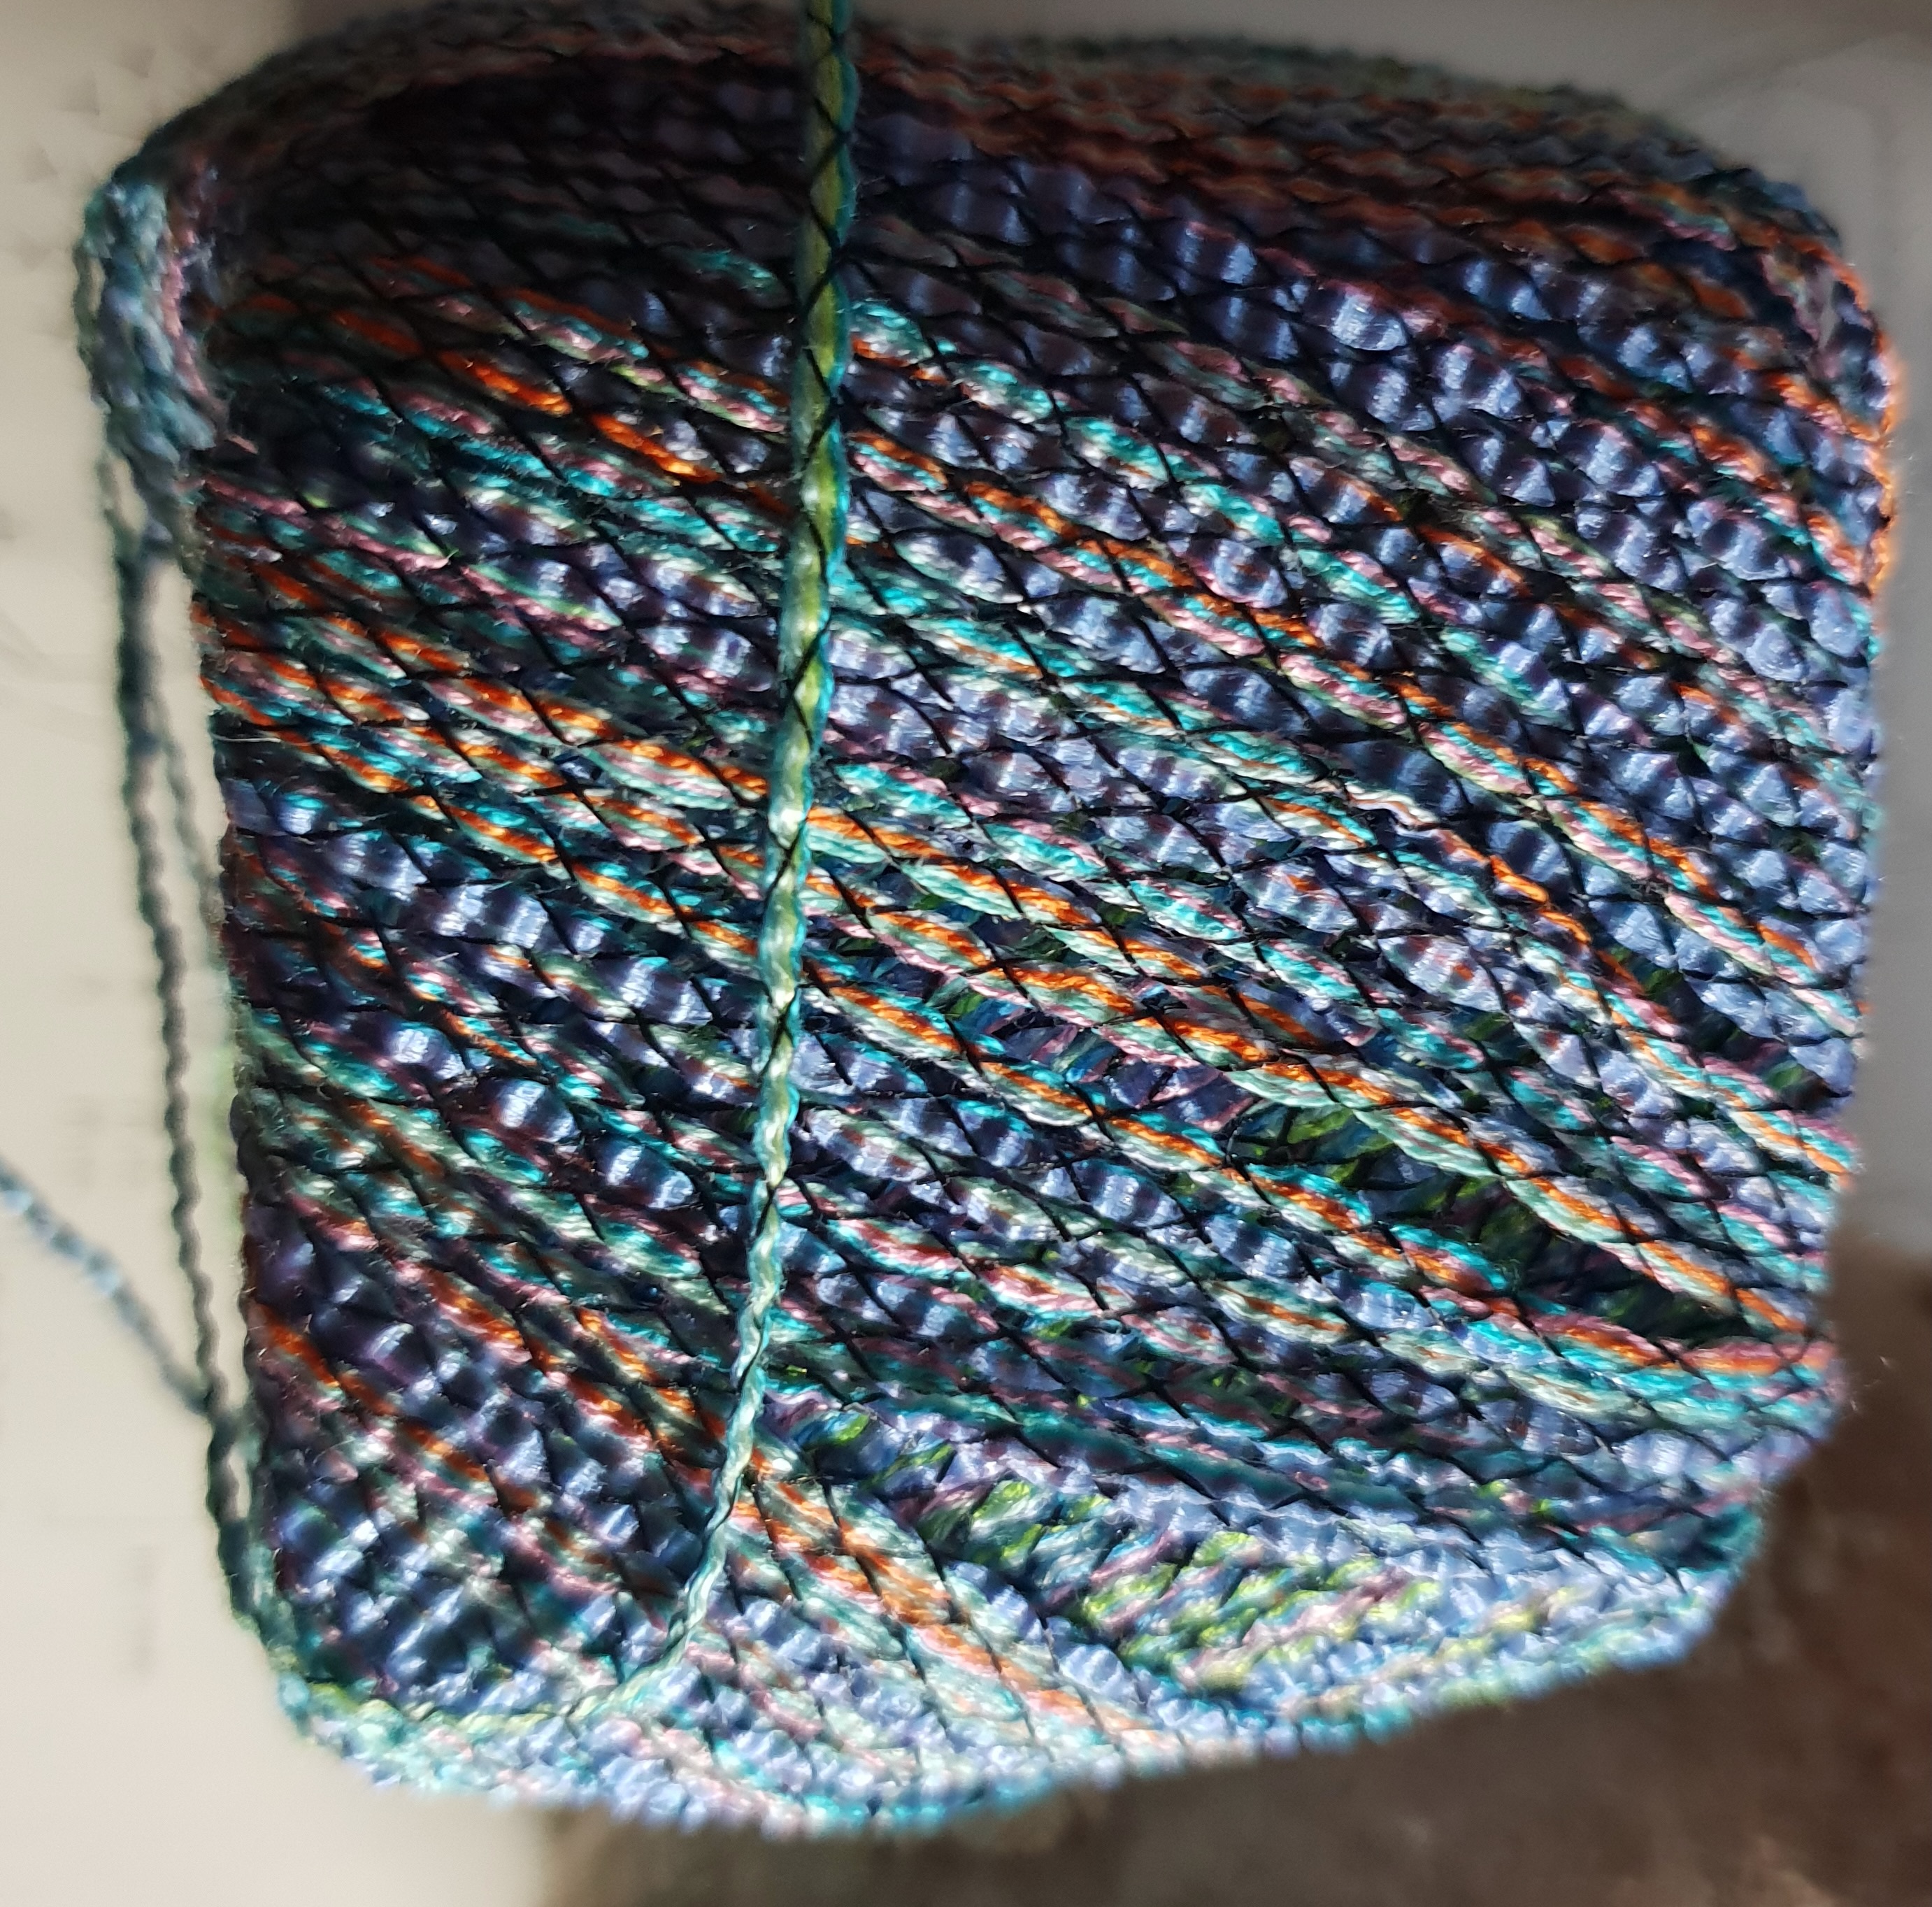
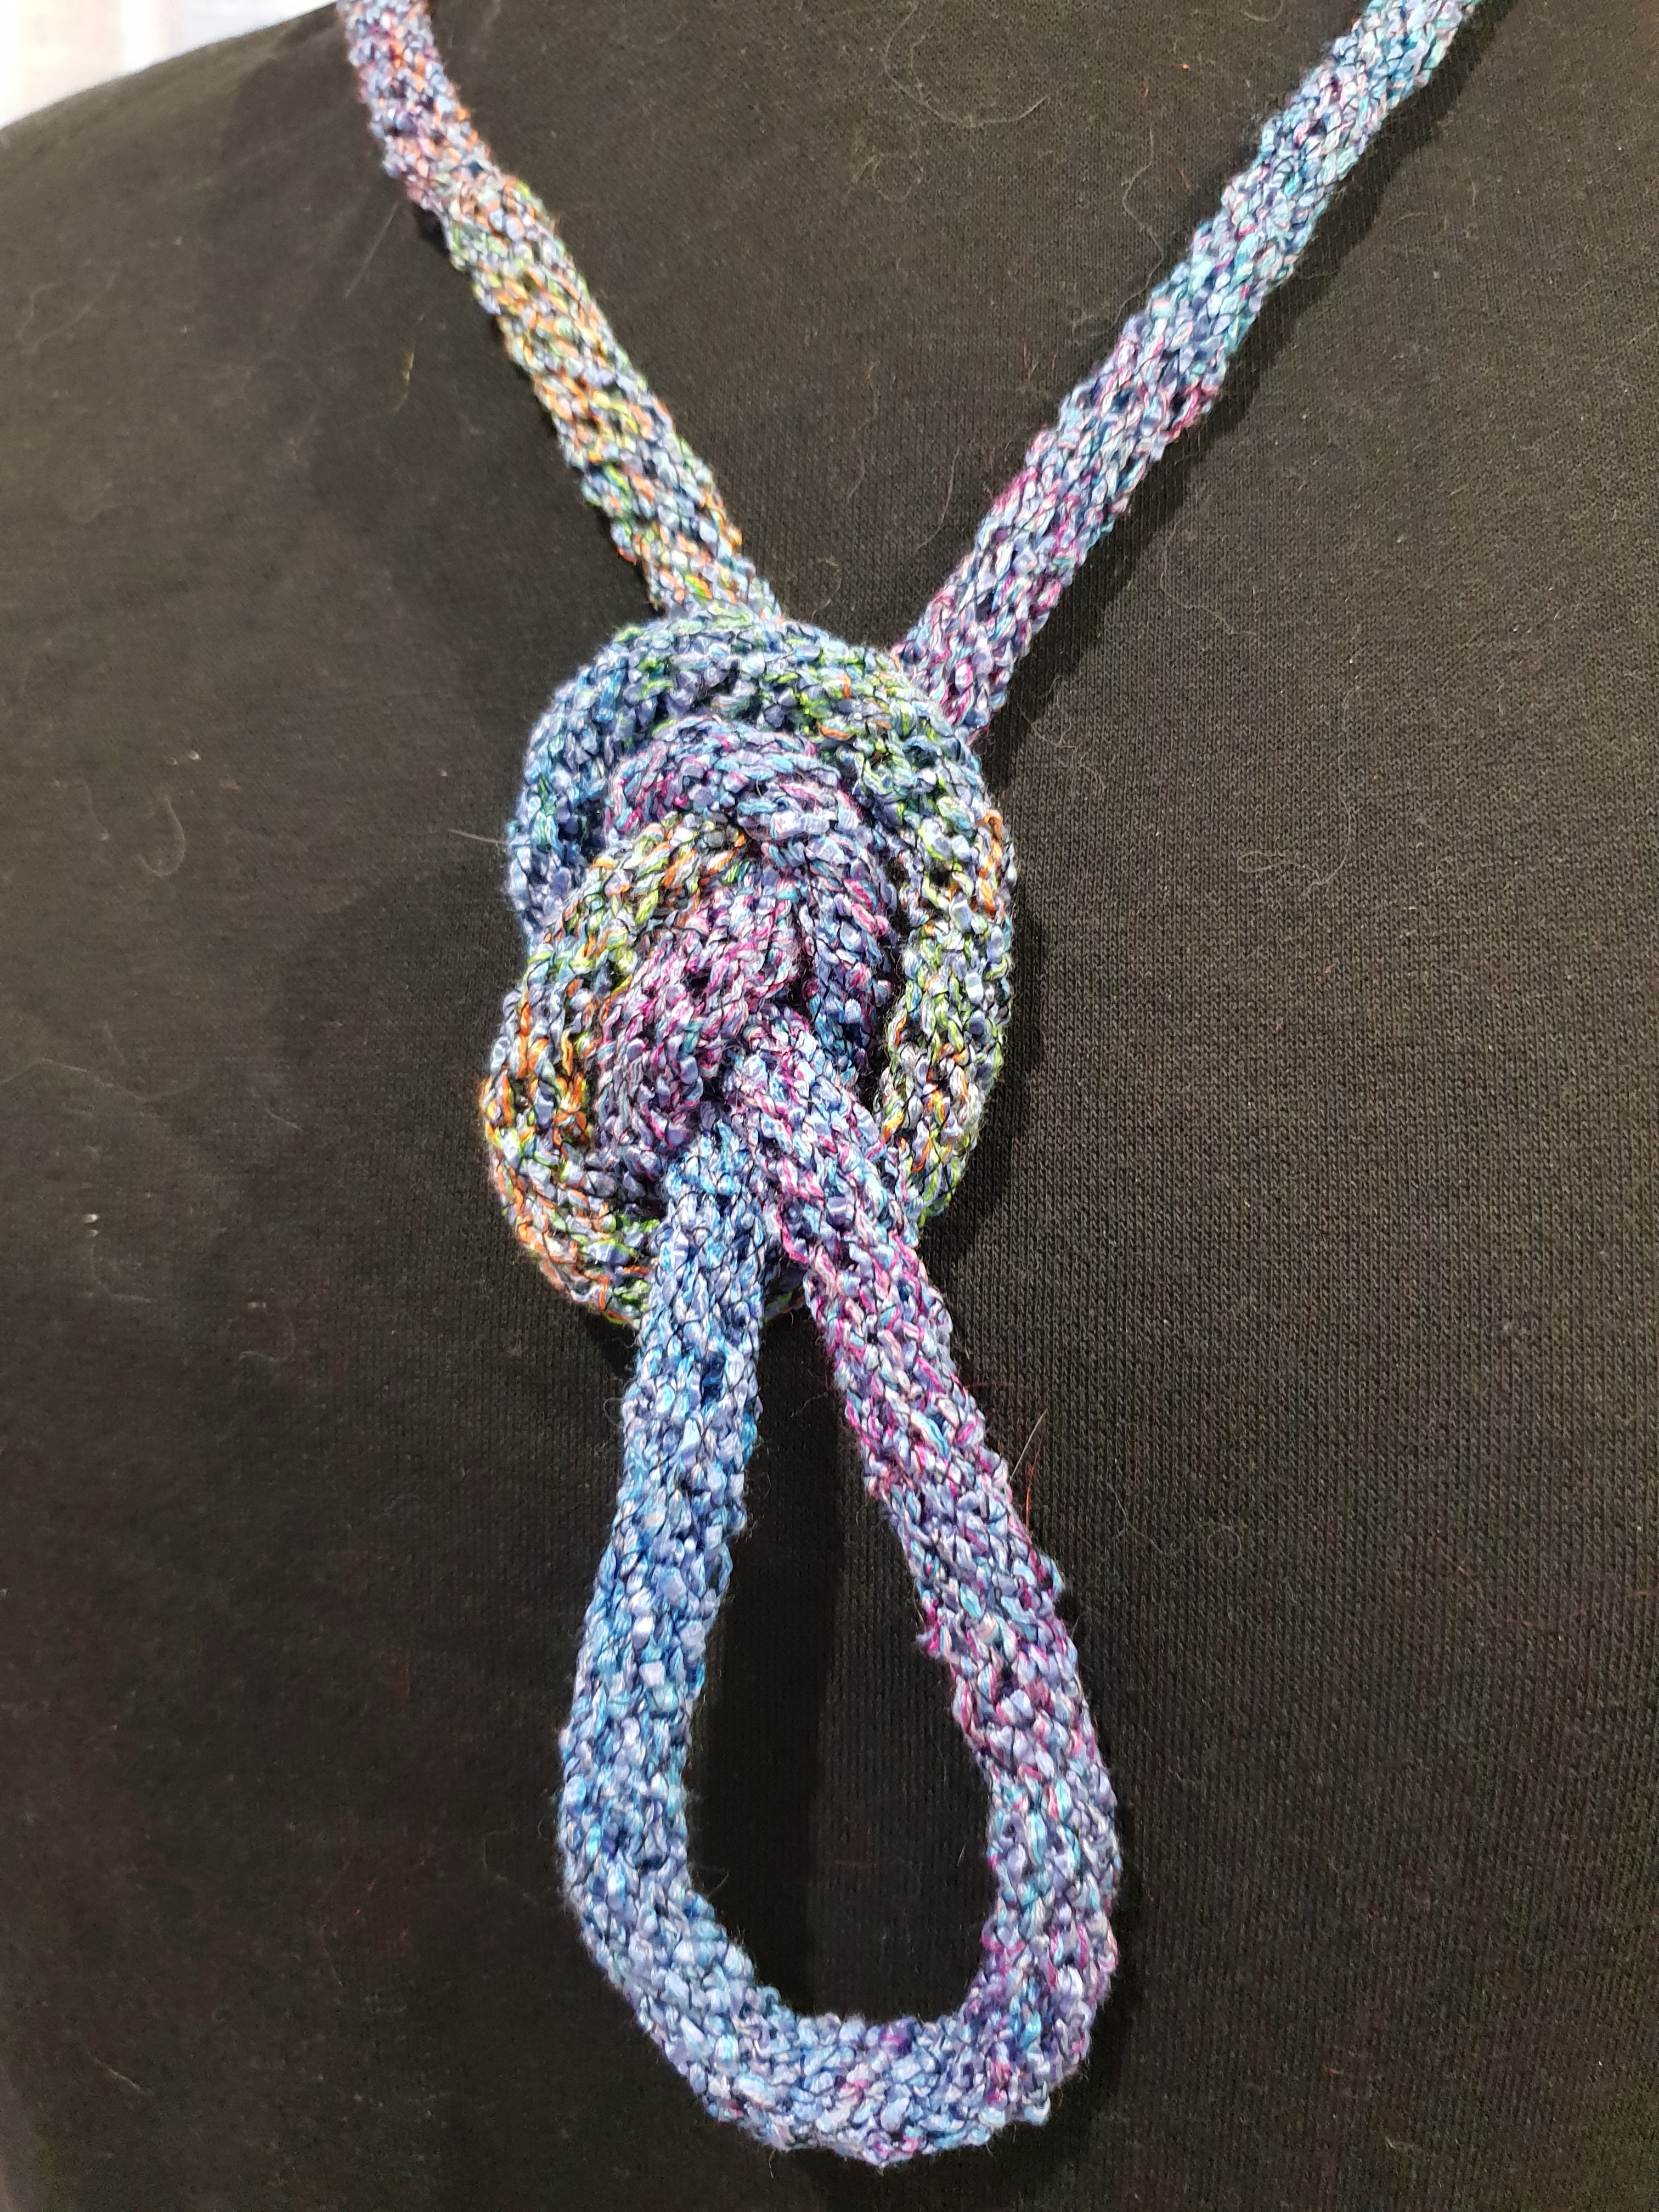
I had a marvellous synthetic yarn bought somewhere in Asia on a trip. It looks like the result of four very fine strands of yarn zigzagged over with a fine black thread.
I decided to use this yarn in a finer version of the bag handle cord. It looked so good that I did a much longer length so as to give me options for wearing it. And, of course, I added earrings!
I had my mother staying while I was experimenting with these cords and of course, she wanted a silver one!
Finally I tried silk ribbon in a variegated reddish-purple colourway. It’s a (now discontinued) 100% silk ribbon called Silken Straw made by Alchemy Yarns. An alternative is unfortunately not easily available. (See https://yarnsub.com/yarns/alchemy_yarns/silken_straw for a list of suggested substitutes). I’d love to be able to buy more silky ribbons/tapes to crochet.
I also couldn’t resist using some of my bead stash as the tape was fine enough to allow small beads to be threaded onto it easily. I stirred up a “stew” of small and larger, matt and shinier beads in the range of colours featured in the ribbon.
This cord was trickier to work because instead of the spiral cord I decided to make one with a horizontal striped effect by working double crochet stitches into the front loop only. A tube size of nine stitches meant that inserting the hook only into the front was difficult.
Next, I’m planning to relearn/recall some macrame techniques to see what potential that has for jewellery.
In my last post of 26 October 2022 called 25+crossover: a juried exhibition I admitted that my original ambitions for the selected piece were stymied by my lack of the requisite skills of armature building. I had designed a work in 3D that viewers could walk around. Moreover, it would have enabled shadows to be driven by the light through the work. In the end I had to default to a 2D presentation. Perhaps because of the limitations of the gallery’s lighting and mounting systems, the work was presented flush with the wall and without lighting.
As a result, my piece, although selected for the exhibition, was not as personally satisfying as it could have been.
Sooo, what next? I want to be able to make 3D pieces of freeform crochet, knit, knotting, fringing etc that float freely but robustly.
I am a member of WAFTA (Western Australian Fibre and Textile Association Inc.) so I saw a post about a woman who is dedicated to providing women like me with the skills to use power tools and construction techniques that we normally did not acquire in the 60s, 70s , 80s or 90s.
Janet is passionate about helping people who have never had the chance to use power tools, or tinker in a shed, to acquire the skills needed to do the work they want to do. It could be home maintenance jobs; art pieces; or furniture.
I enrolled in a two day welding course with JC, as she calls herself. I didn’t have to provide anything. I did have to wear enclosed shoes, long pants and long sleeves. All equipment and materials and catering provided!
Originally the class project was to have been to make a kind of “bin” in sheet metal with welded seams. When she heard of my interest in textiles and making large scale armatures, JC redesigned the project to maximise the number of individual skills I could learn that might be useful in designing an art project.
To cut a long, revealing, story short, in two days I learned a great deal.
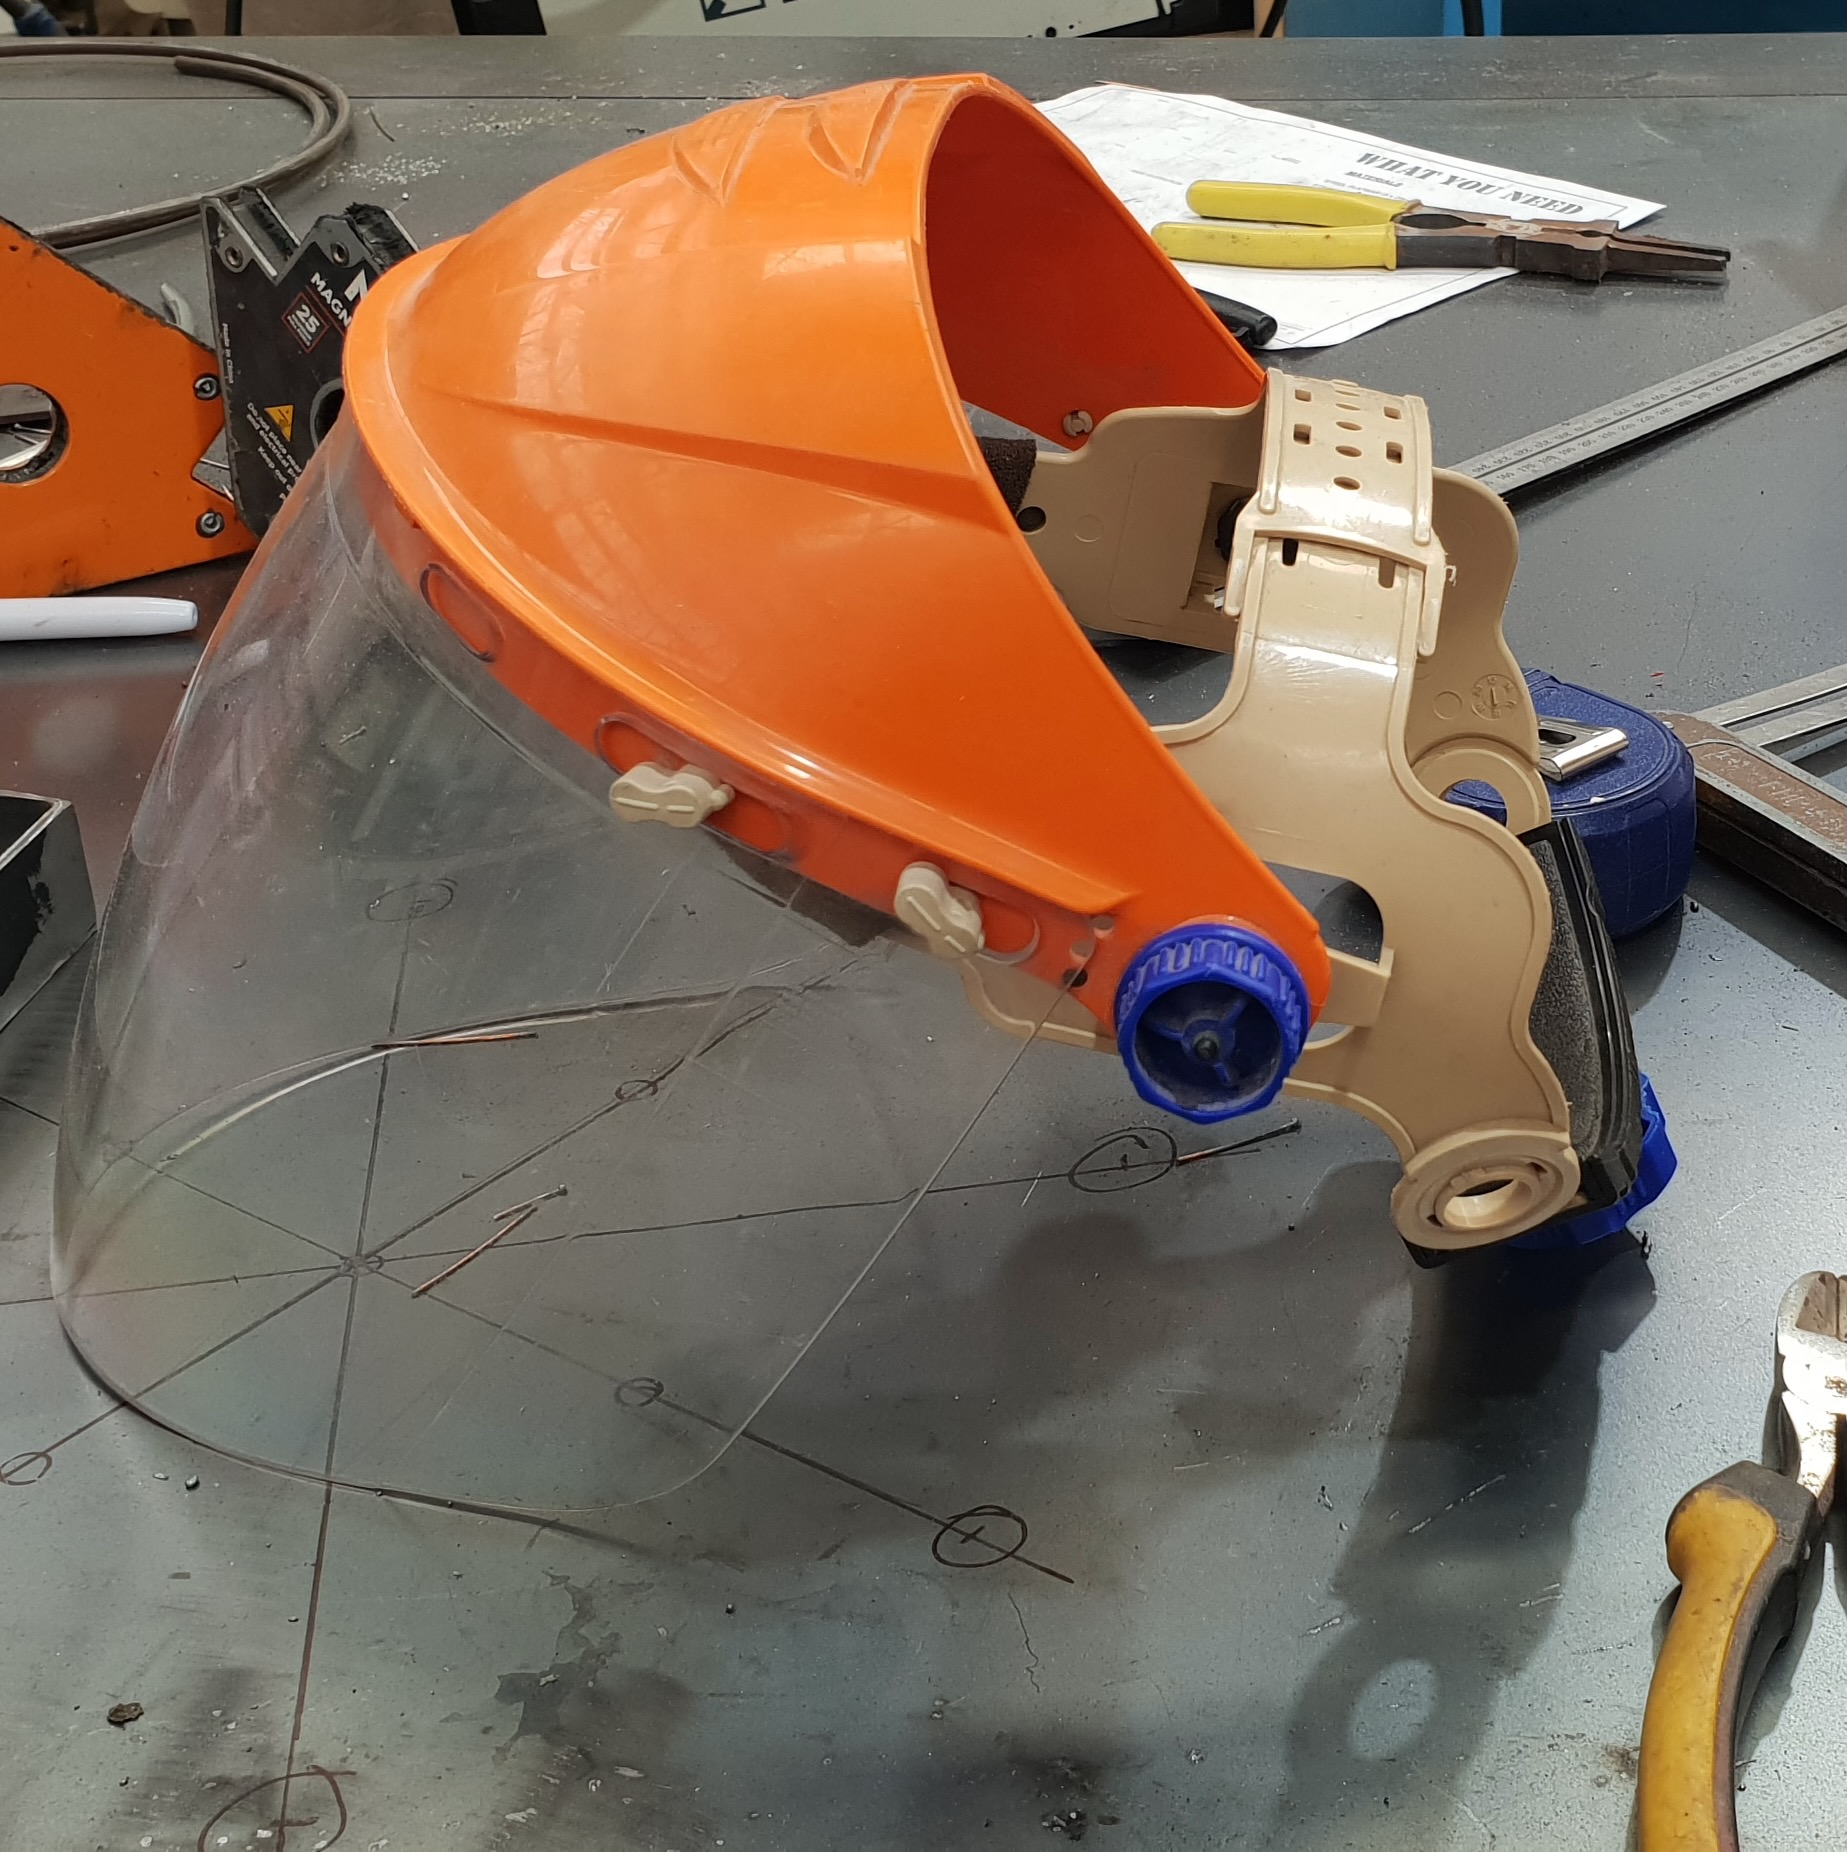
Face protection used when cutting and grinding
First I was fitted with safety gear. The helmet above is for protection when cutting metal or grinding. It’s paired with earplugs. There was also a much heavier piece of headgear for use when welding.
This is not the helmet I wore but it looked like this
The gloves were also pretty impressive.
Gloves with long gauntlet sitting on a terrific adjustable welding table that was ideal for height challenged me!
My first job was to prepare a cutting list for the components of the design, taking them from the technical drawing JC had. After that, it was learning how to use the red laser line on the cutting machine to ensure that all the metal pieces were cut precisely.
An initially terrifying metal cutter
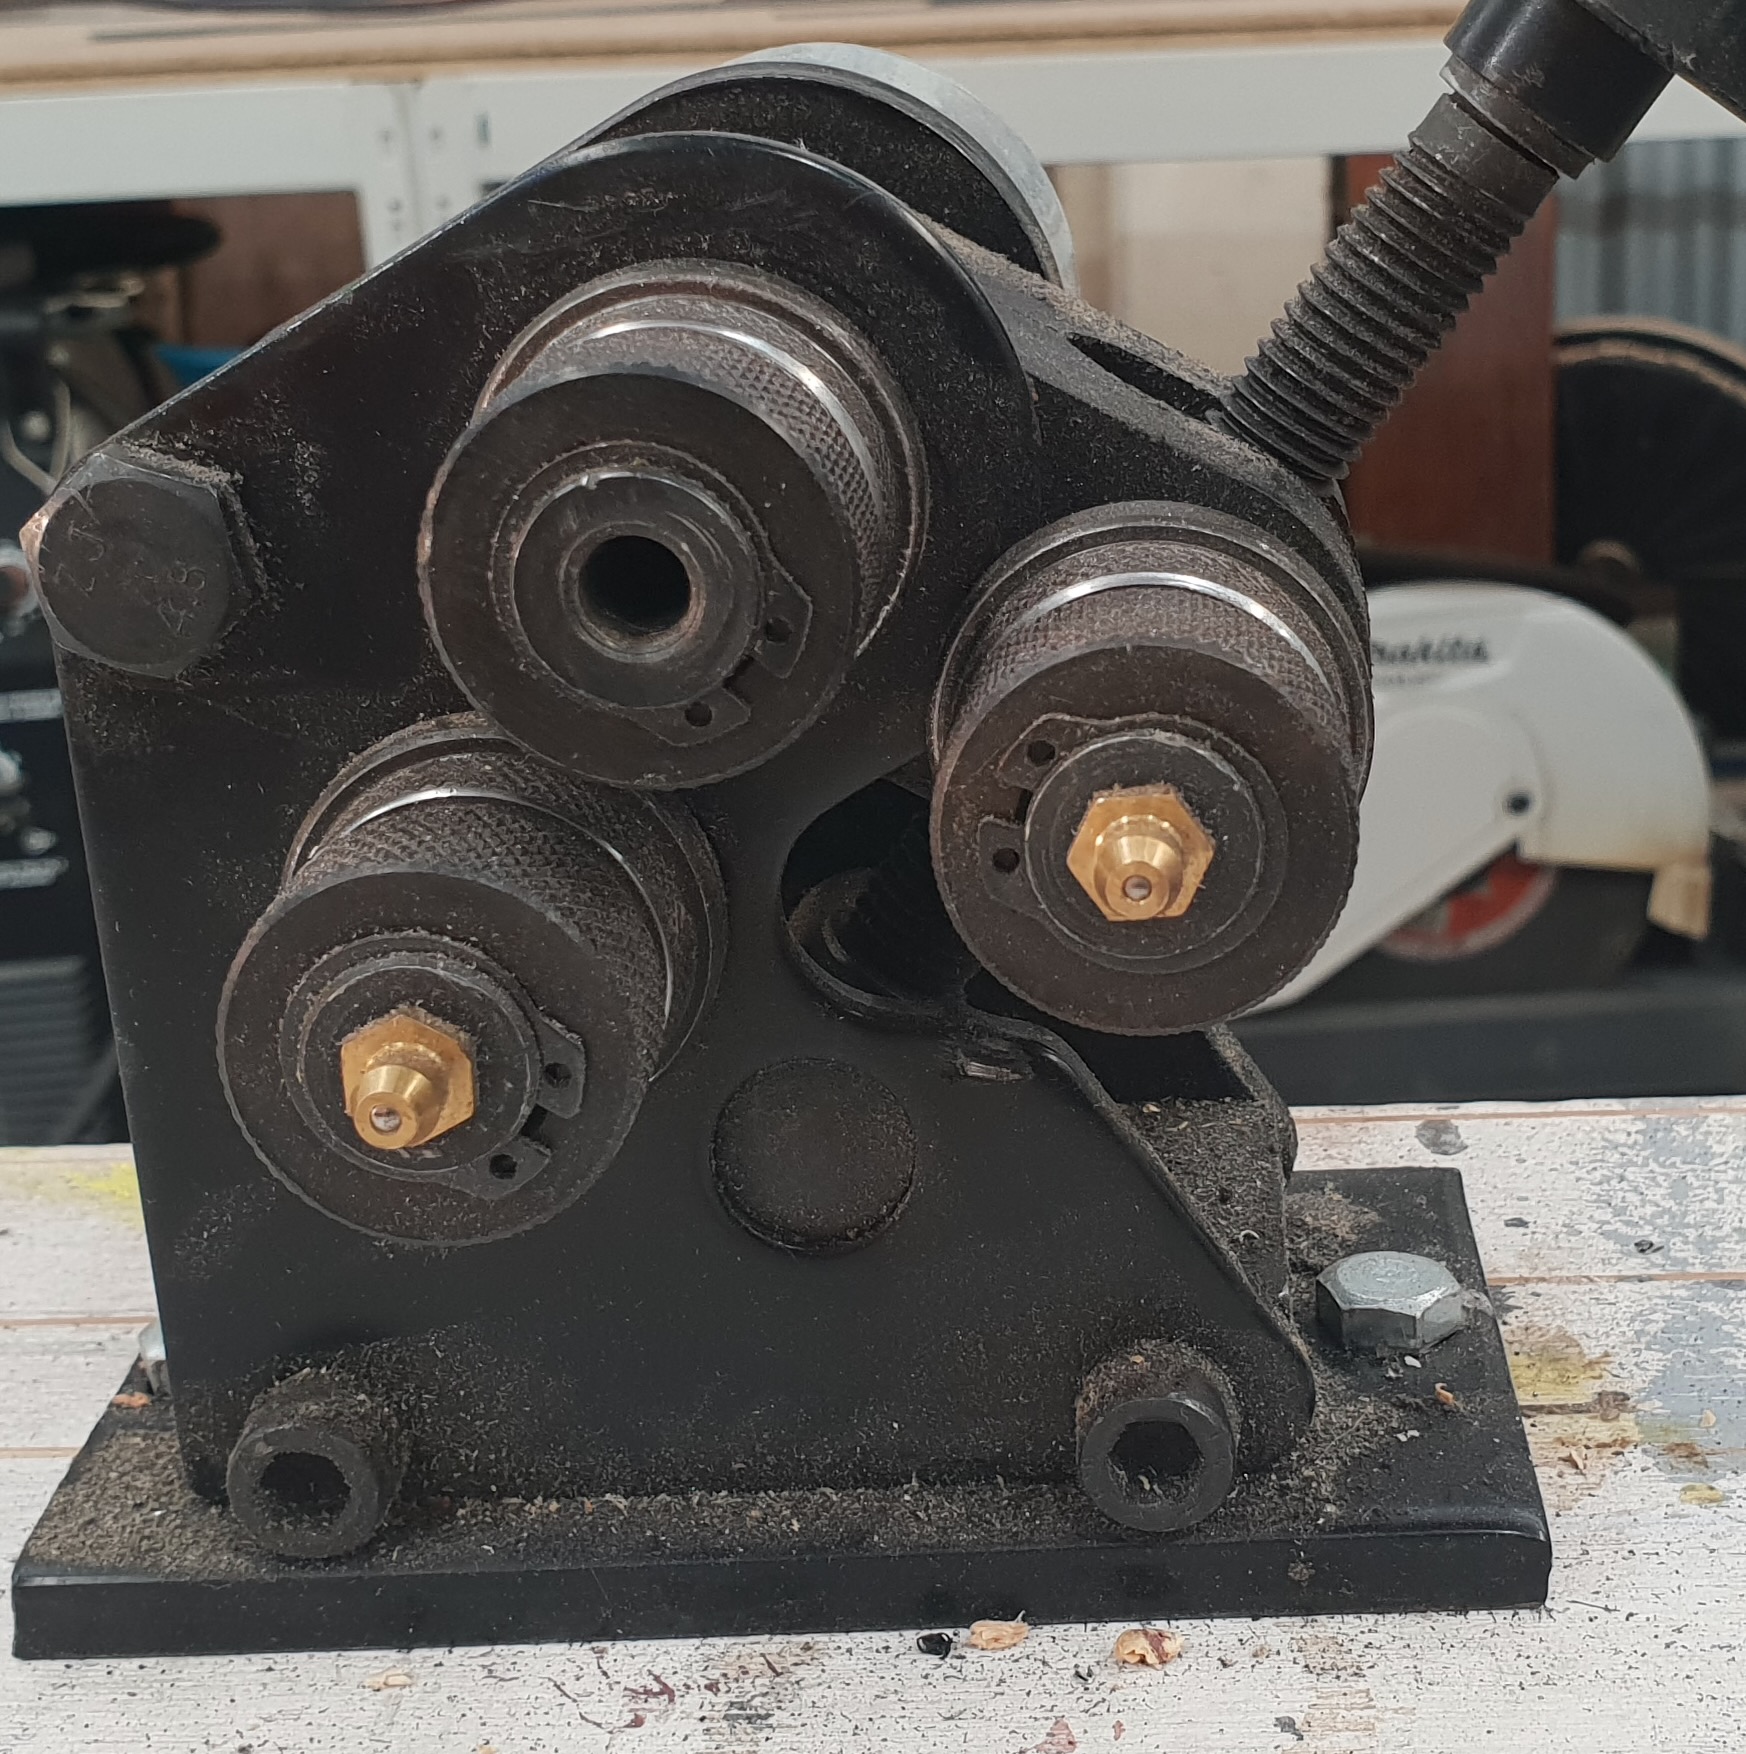
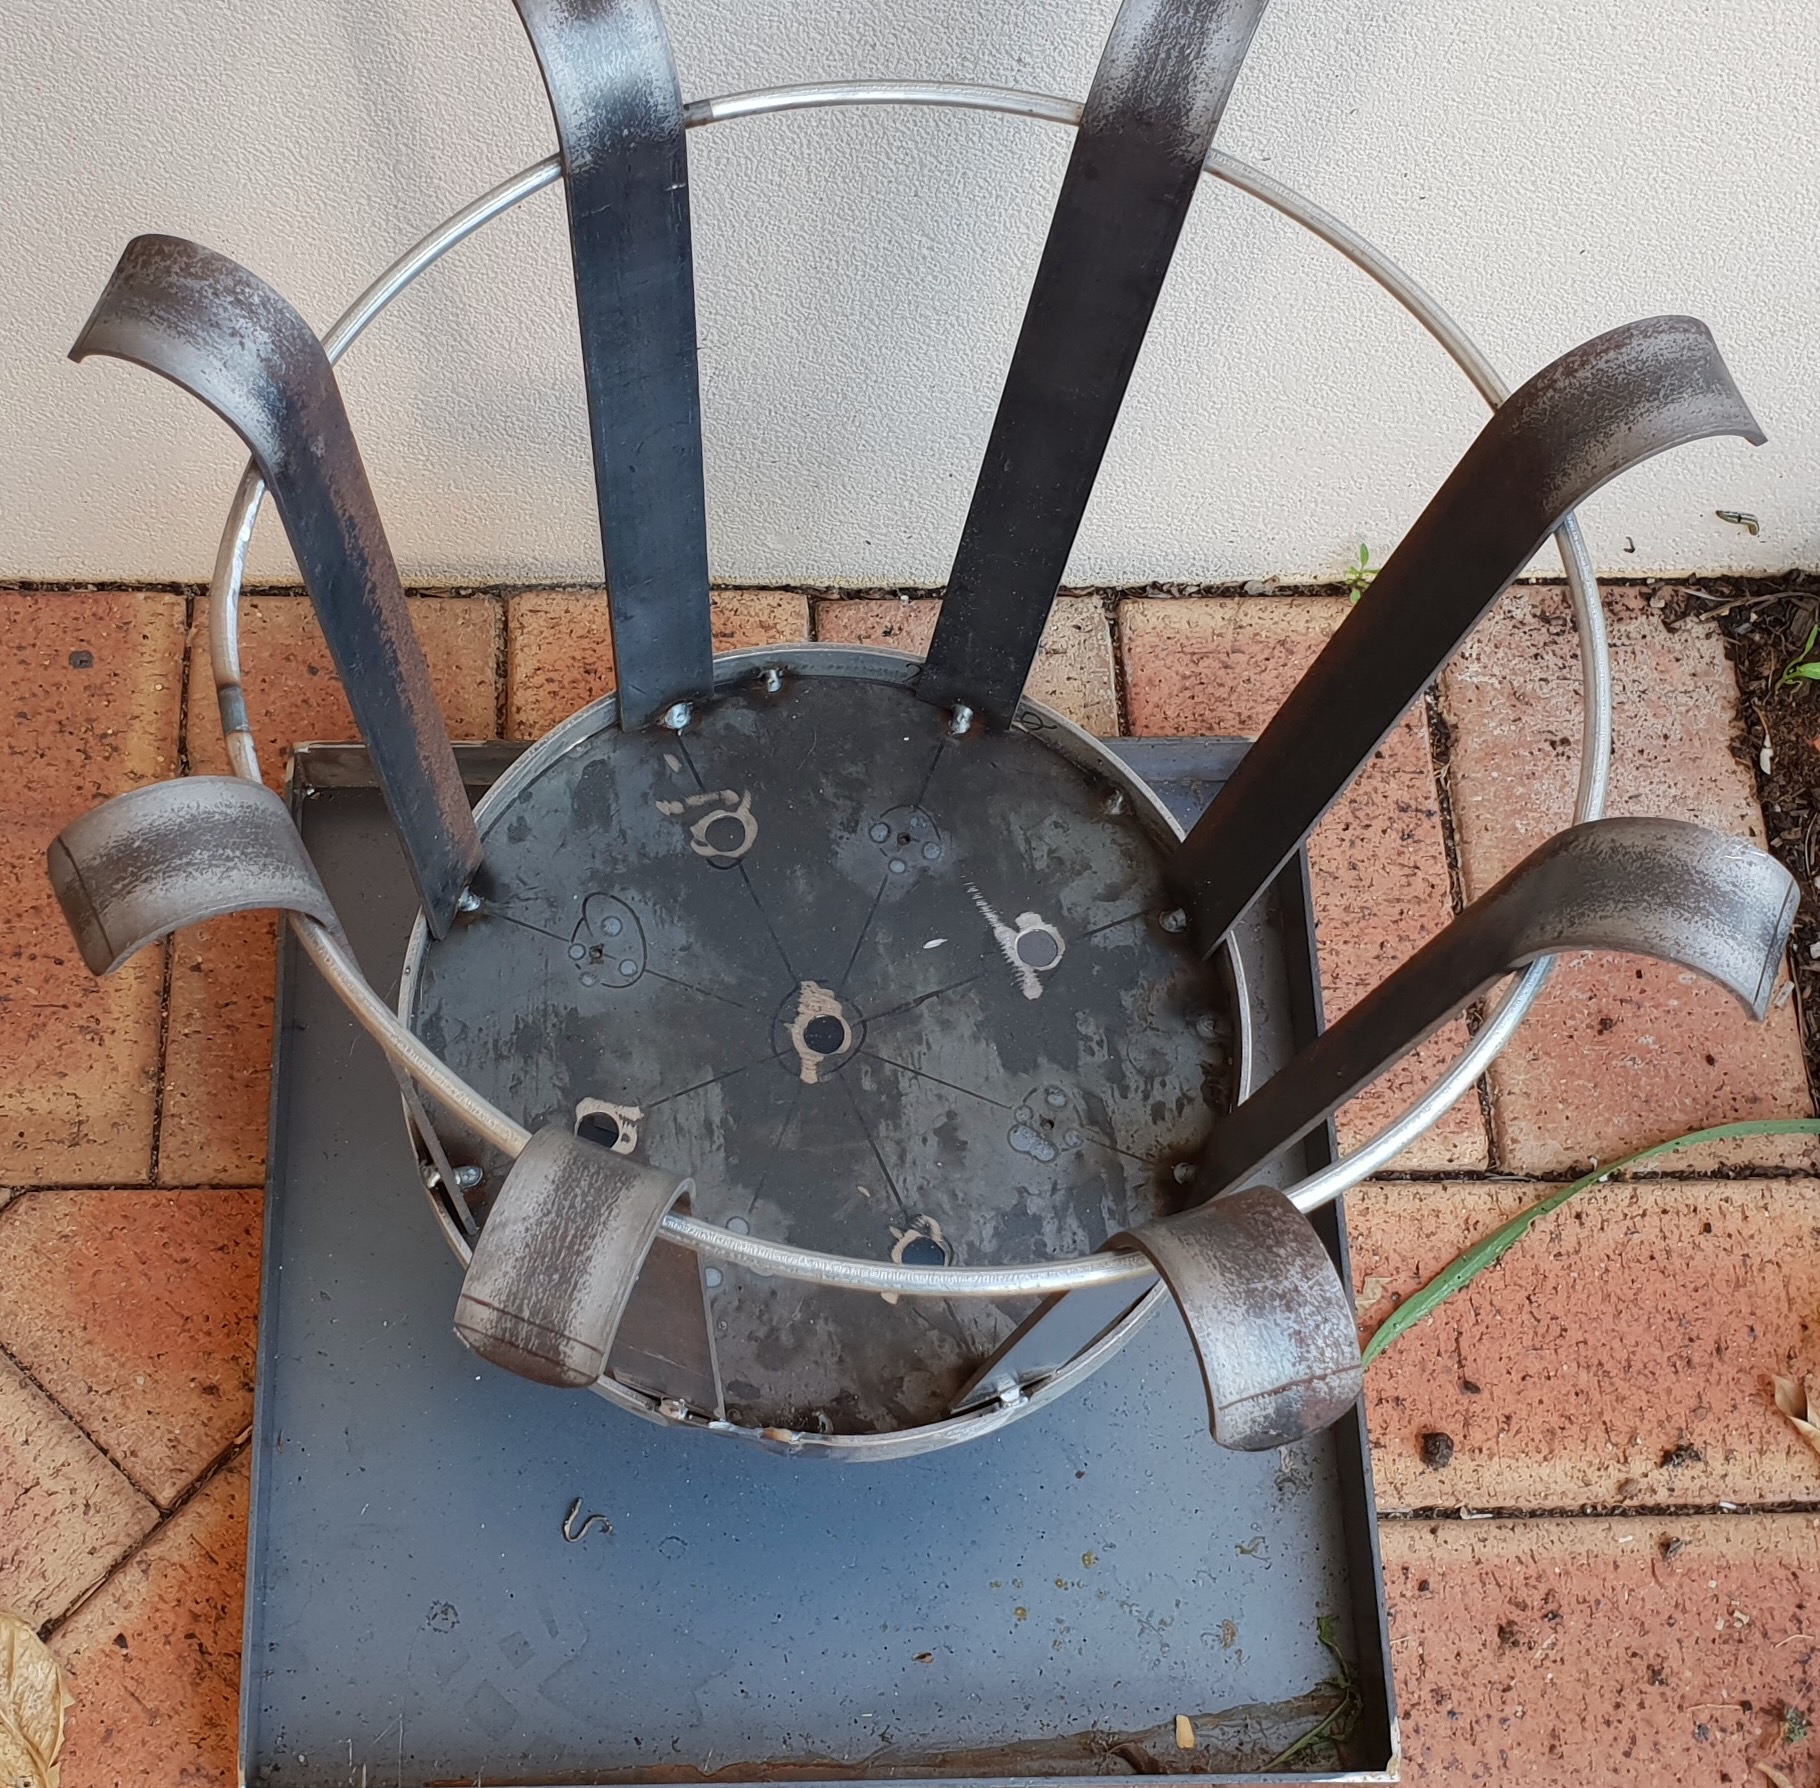
Then it was time to shape the pieces that would not be straight. We used a roller to bend both flat steel and rounded steel into circles. It’s a slow process requiring many passes through the roller, being careful not to twist it and to roll it through evenly.
Roller used to bend metal strips and wire into circles
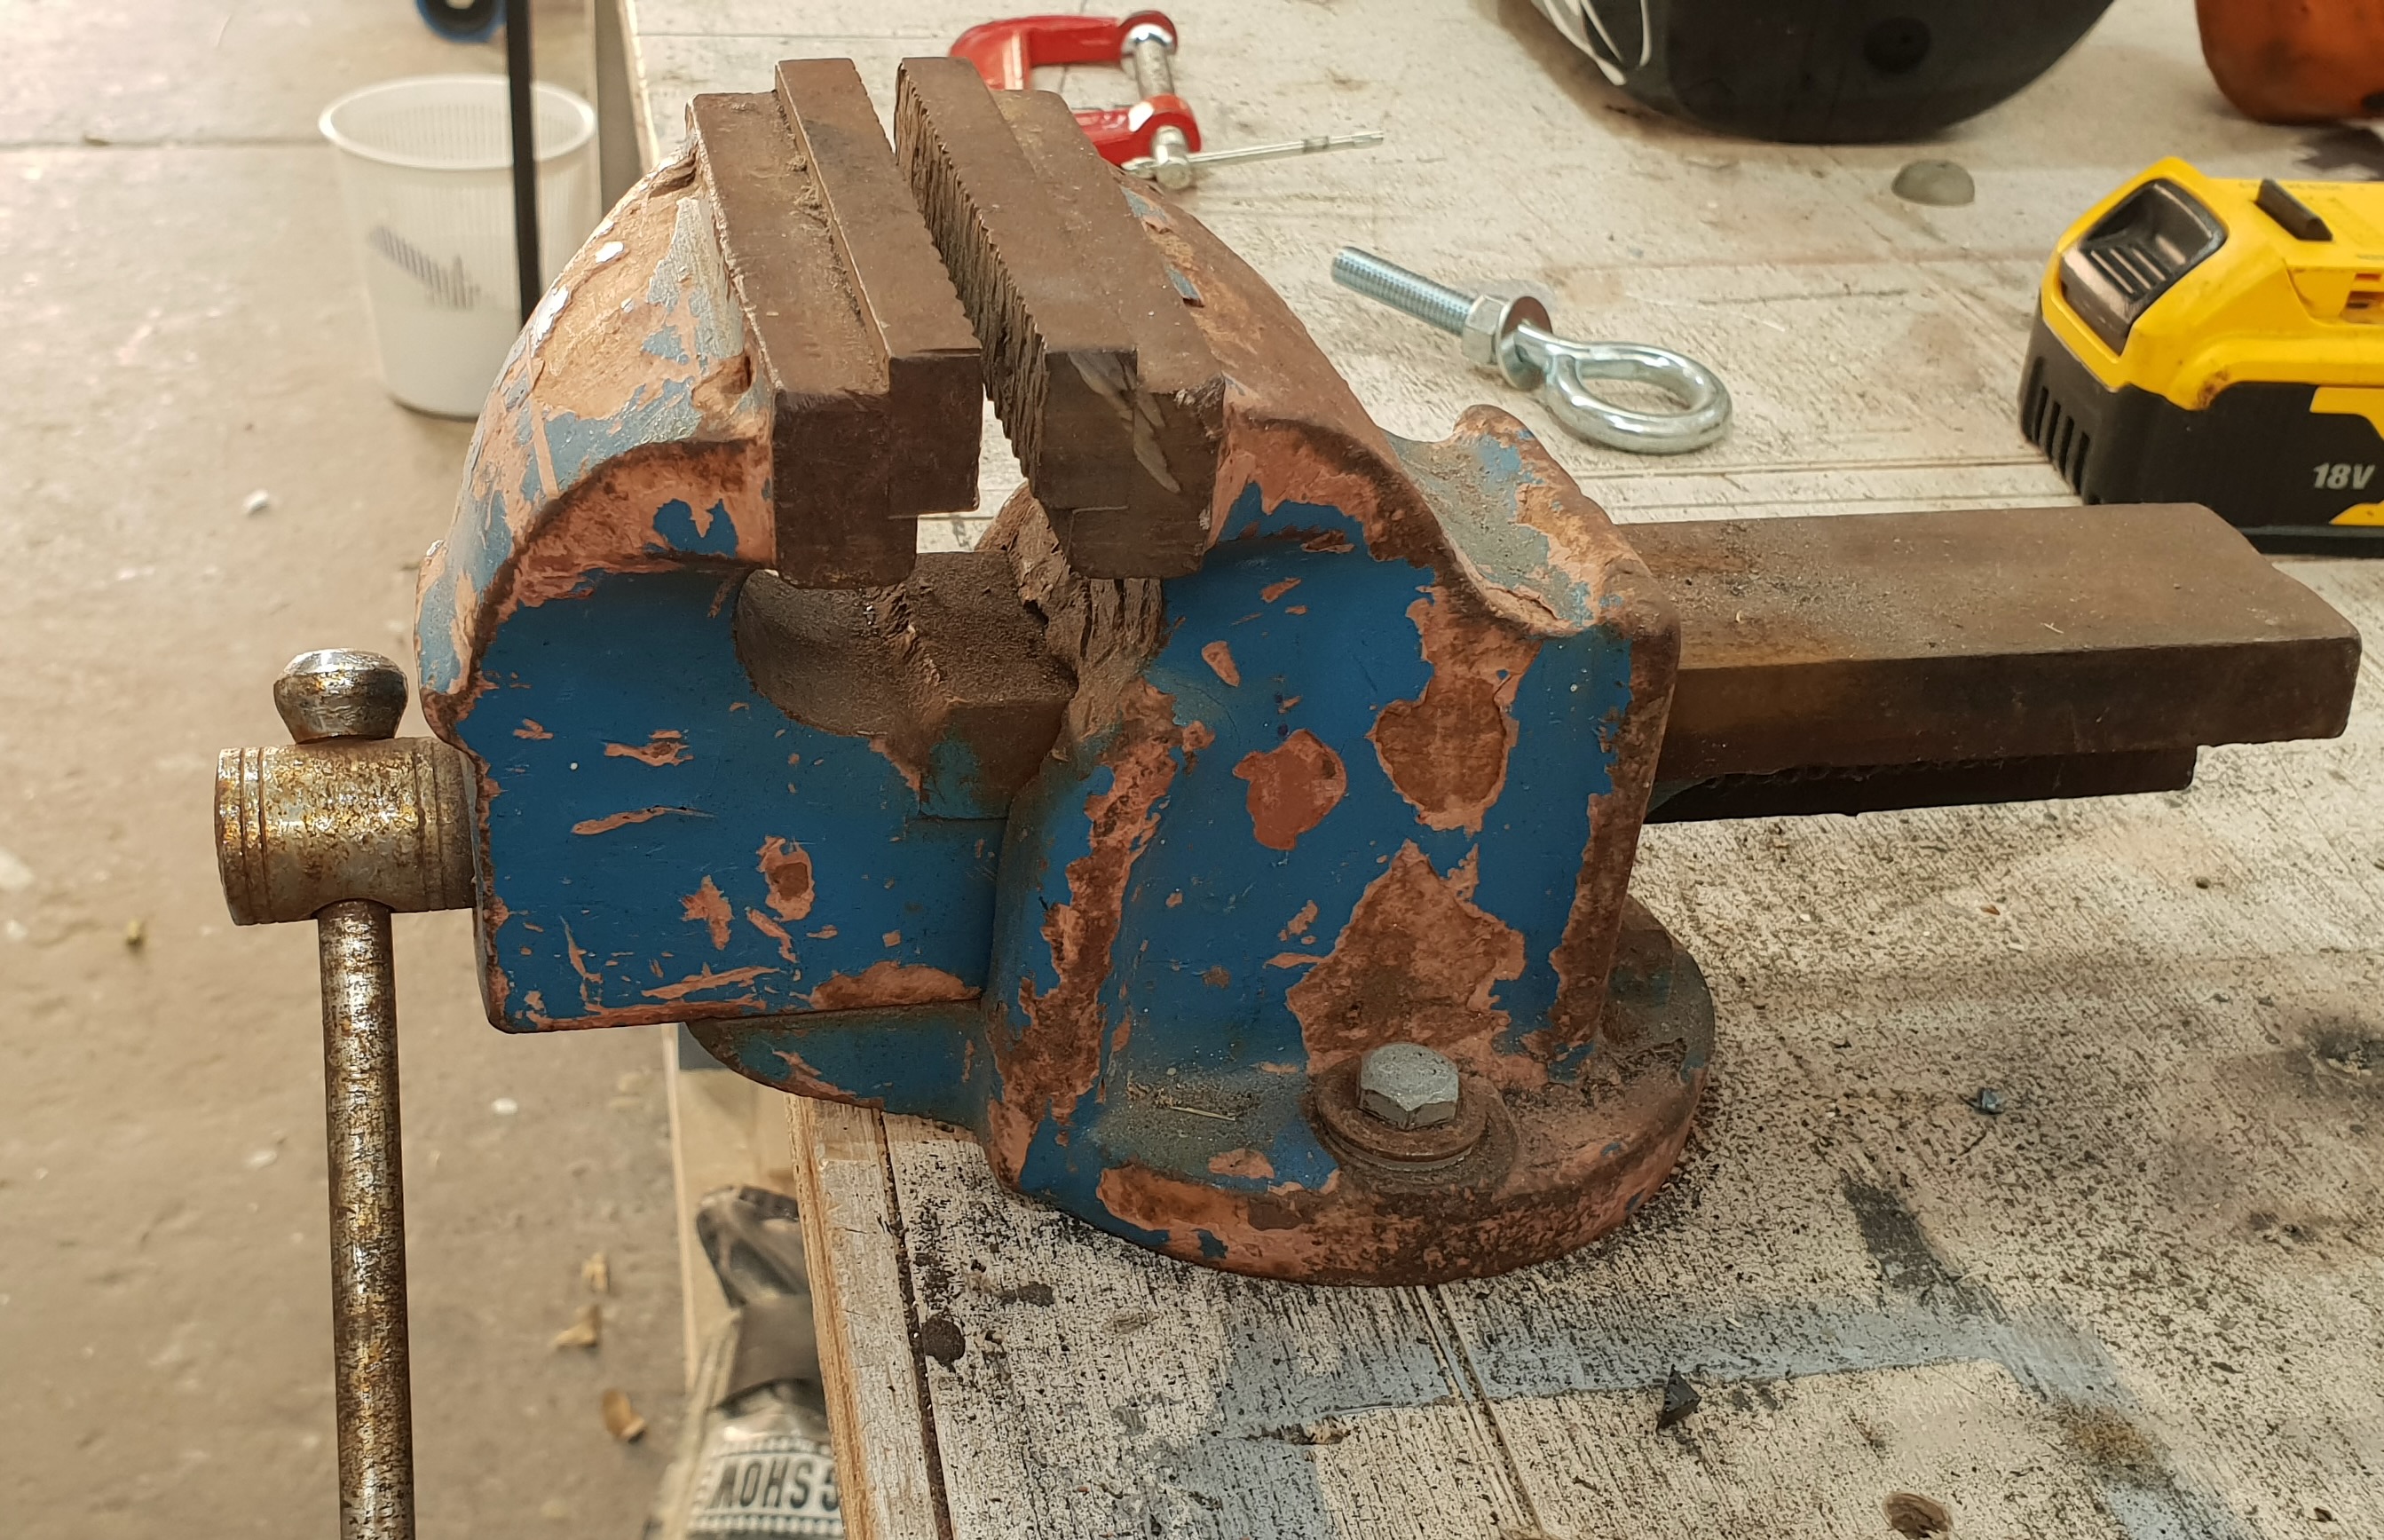
The tops of the brazier’s main posts were also bent, but using a jig in a vice.
Lovely vintage vice
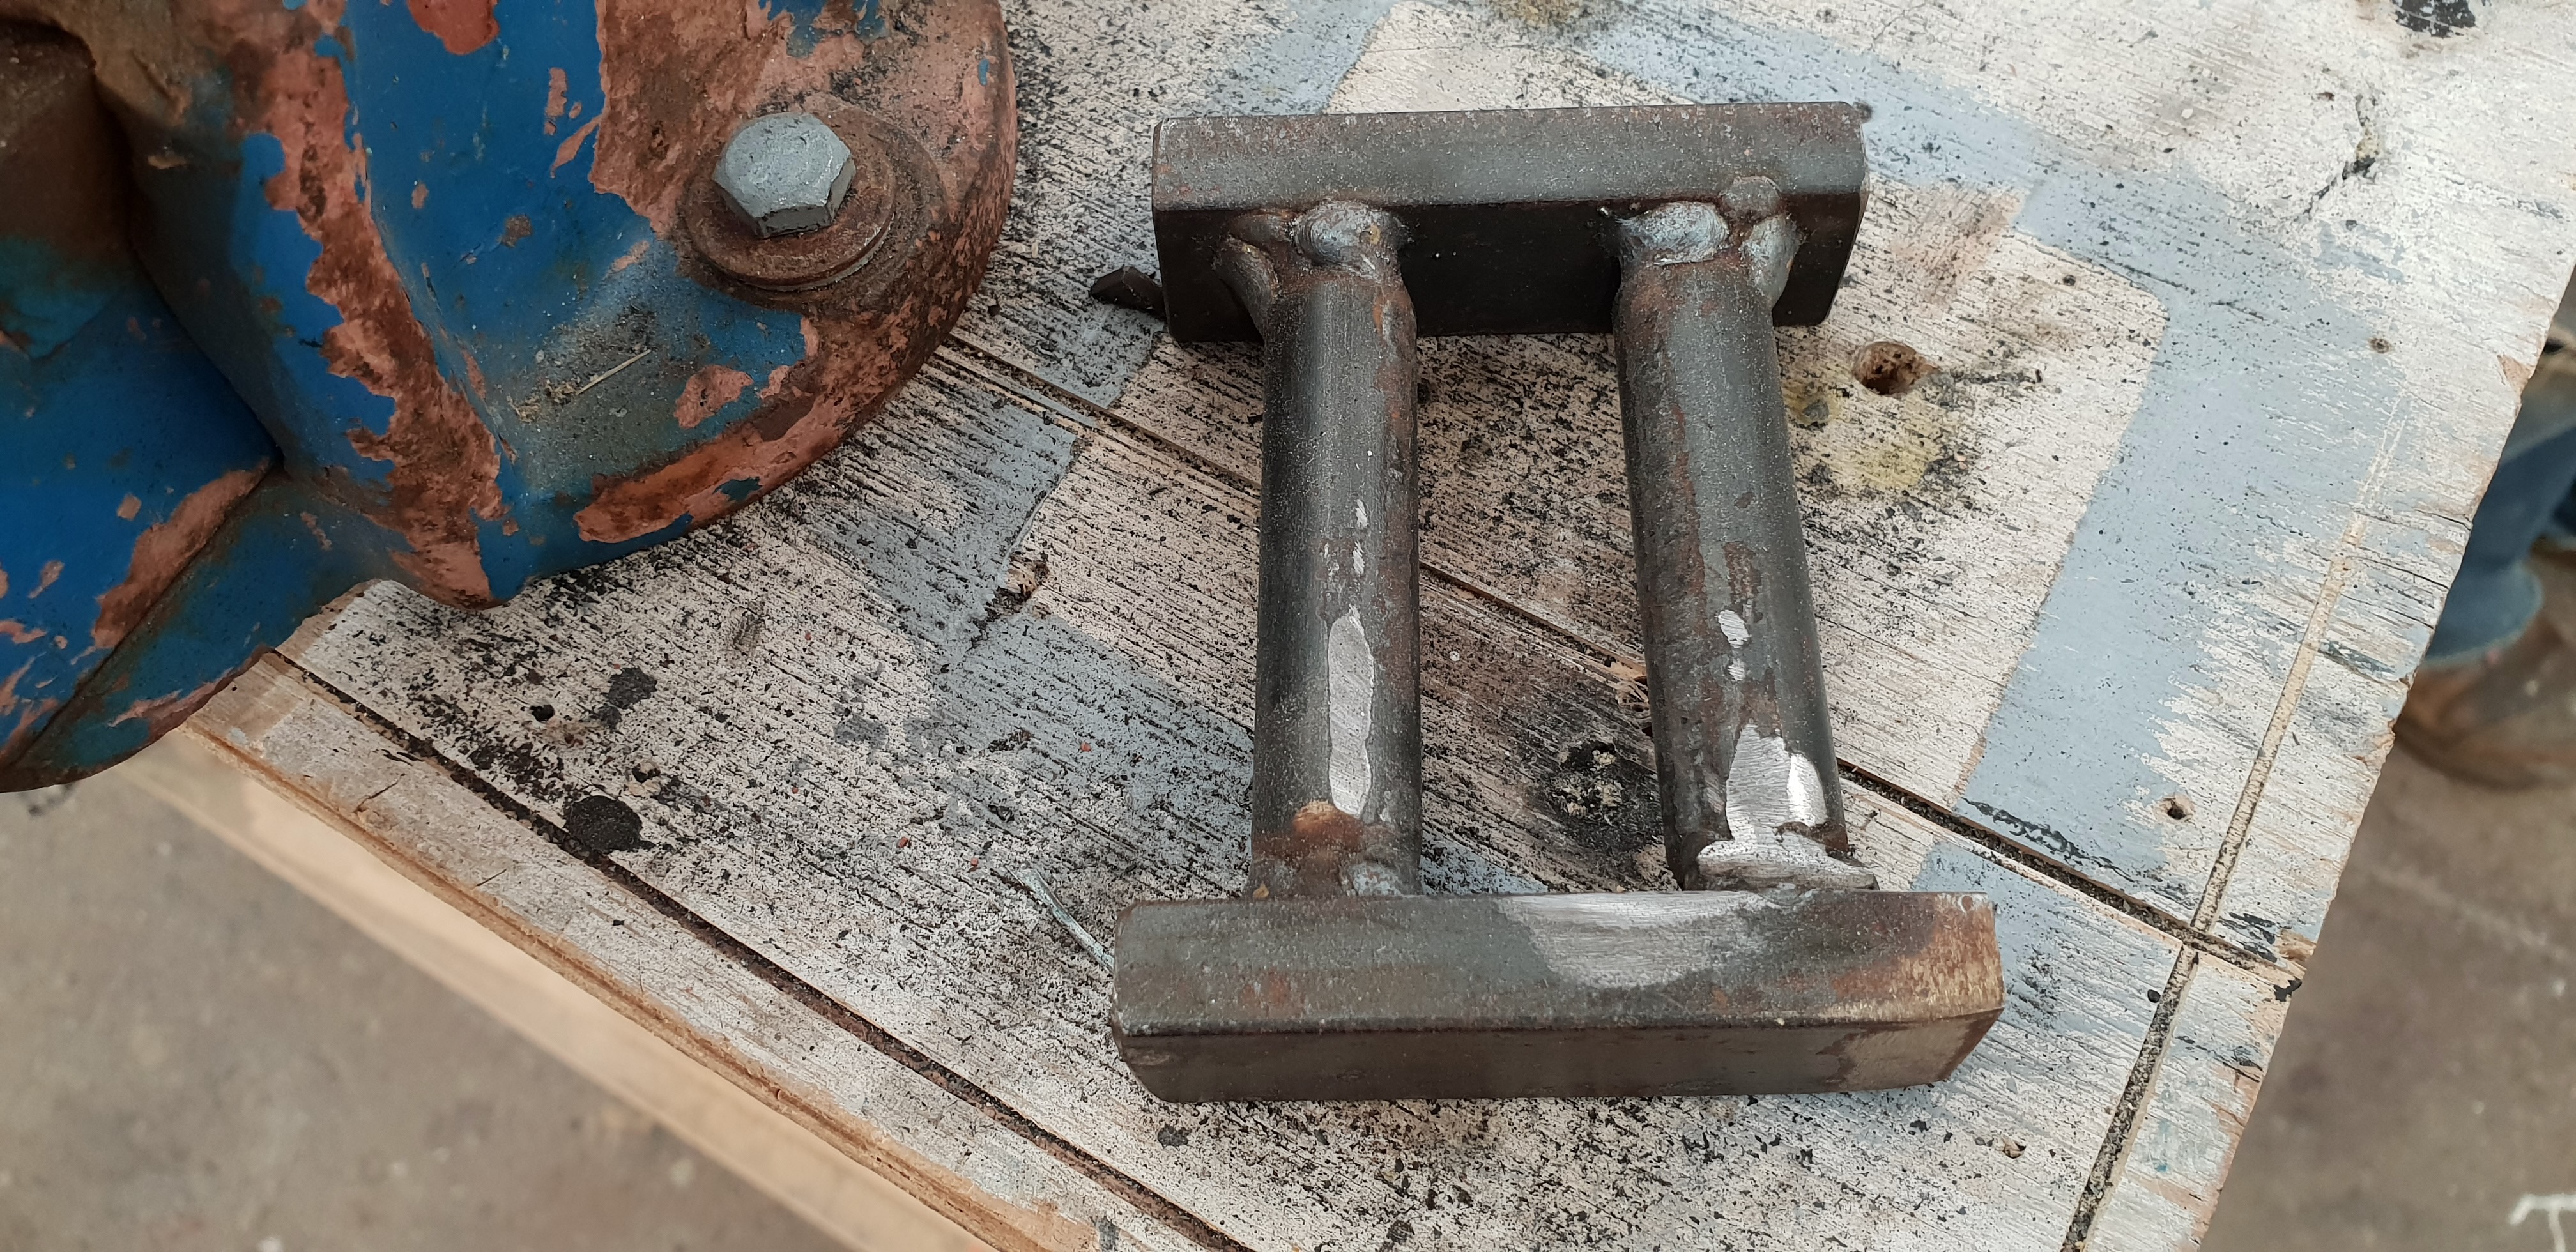
The jig I used to bend the struts of the brazier
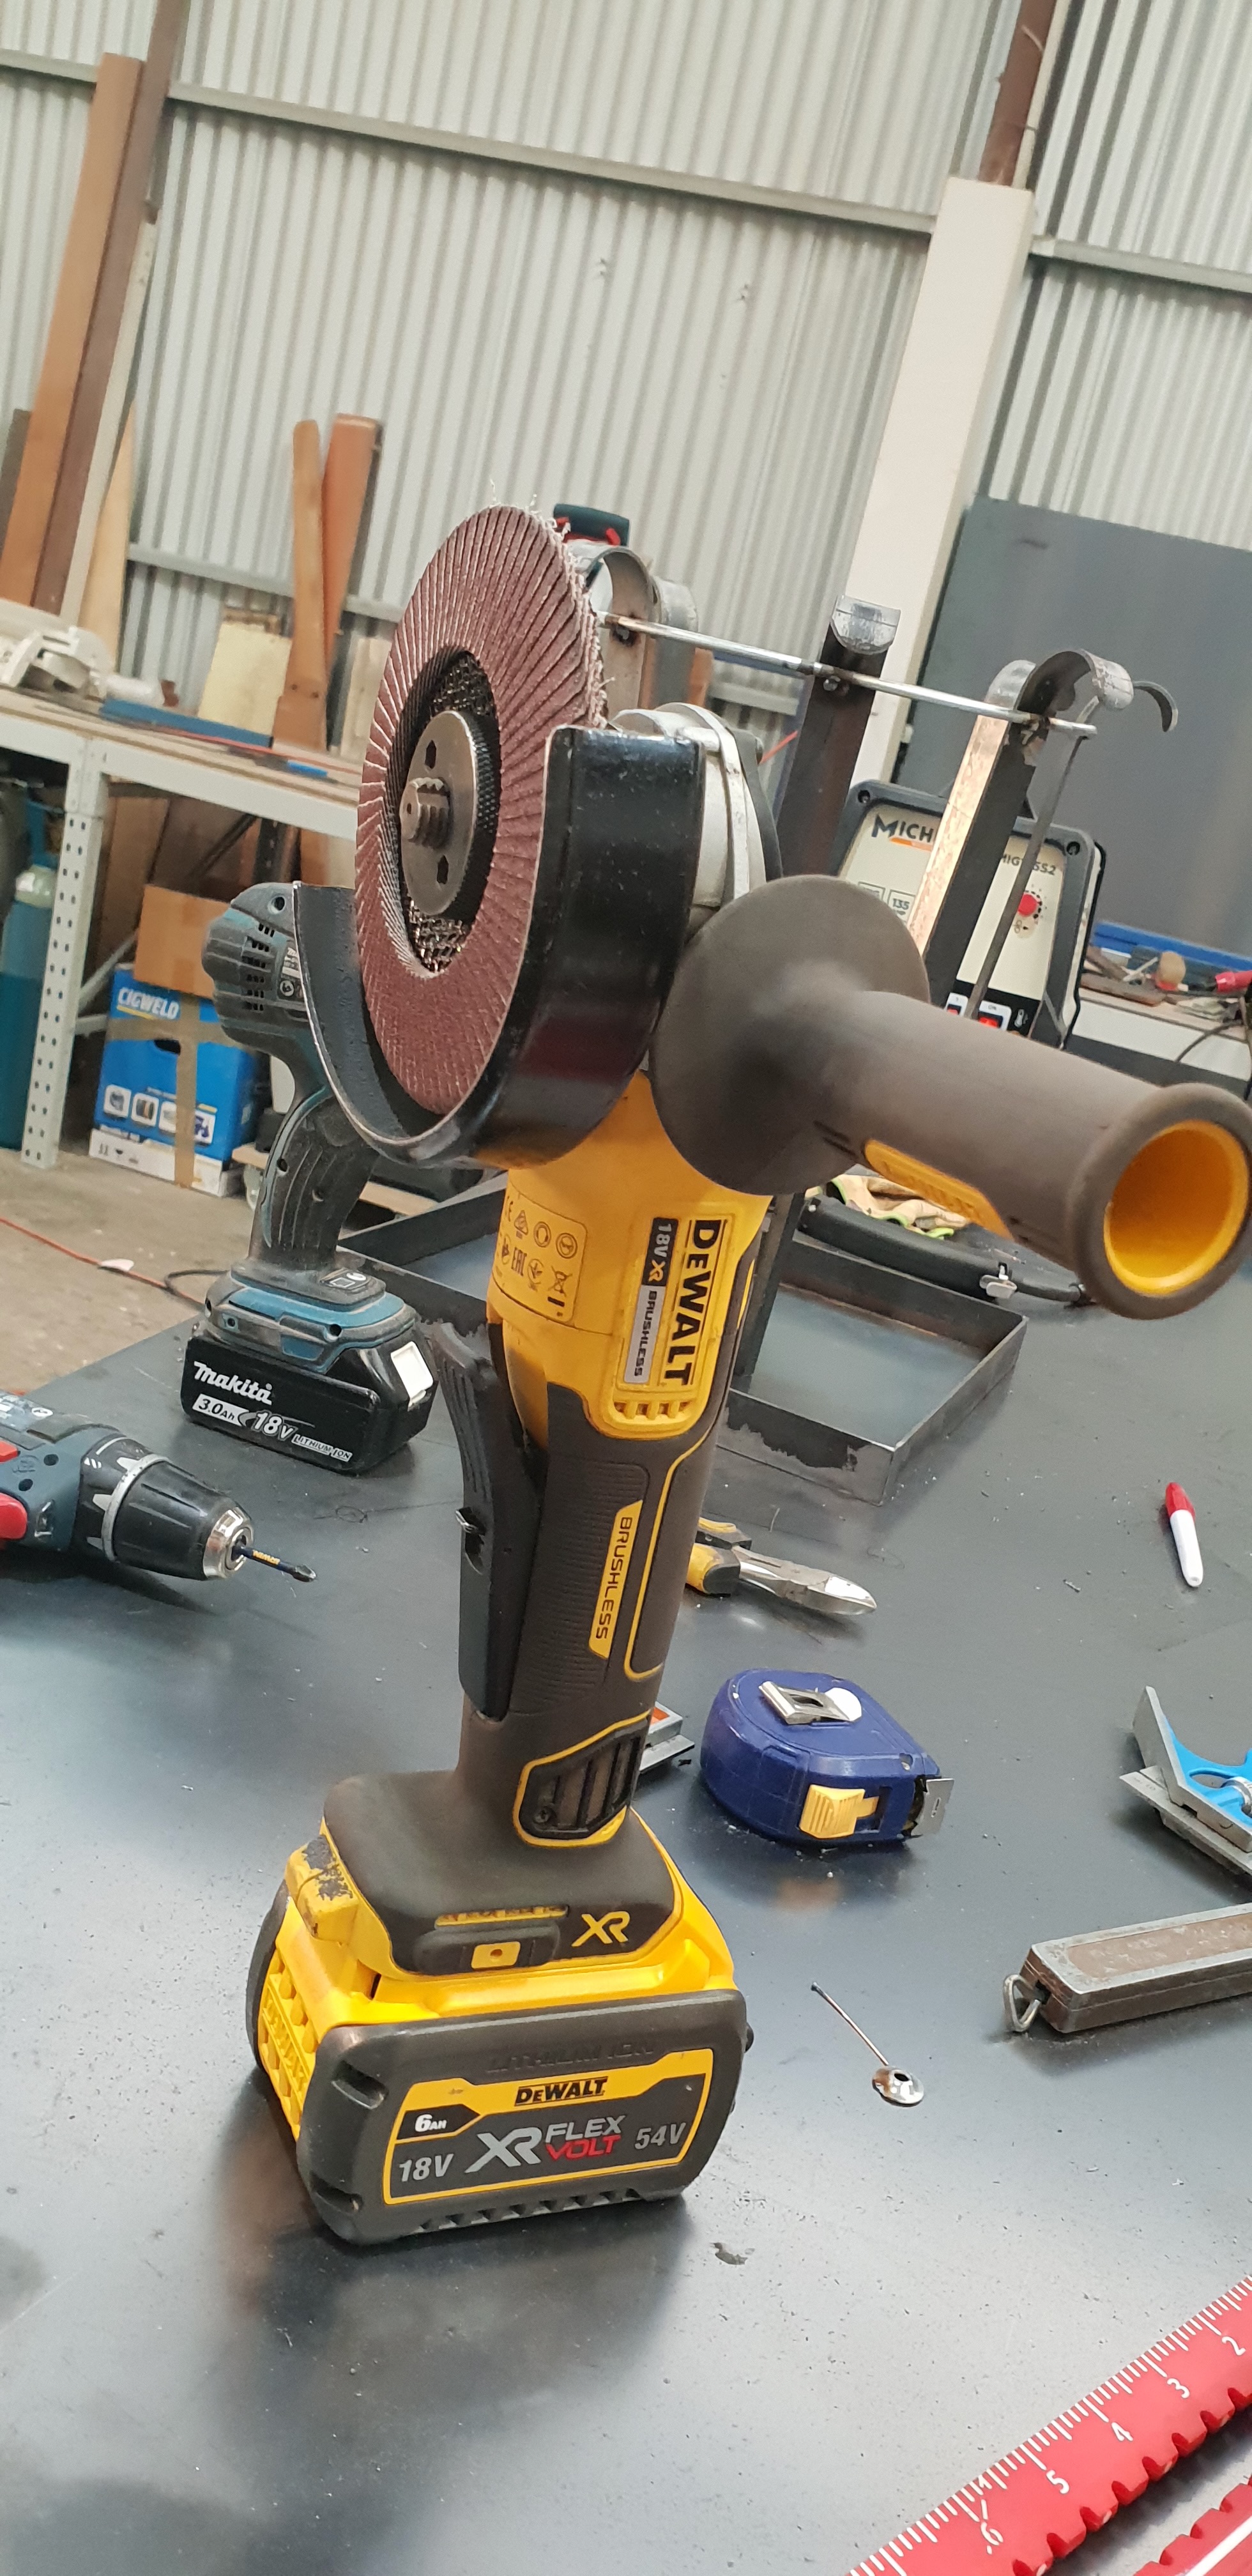
Once bent, the straight ends needed to be evened up and cut into a curved shape. We did this with cutting discs then grinding discs.
A cutter or a grinder depending on the disc used
The base of the brazier needed to be cut into a circle. I confess I chickened out of trying to do this and JC did it overnight for me! Our rationale for allowing this indiscipline was that I don’t ever expect to want to cut flat circular discs of metal in my work!
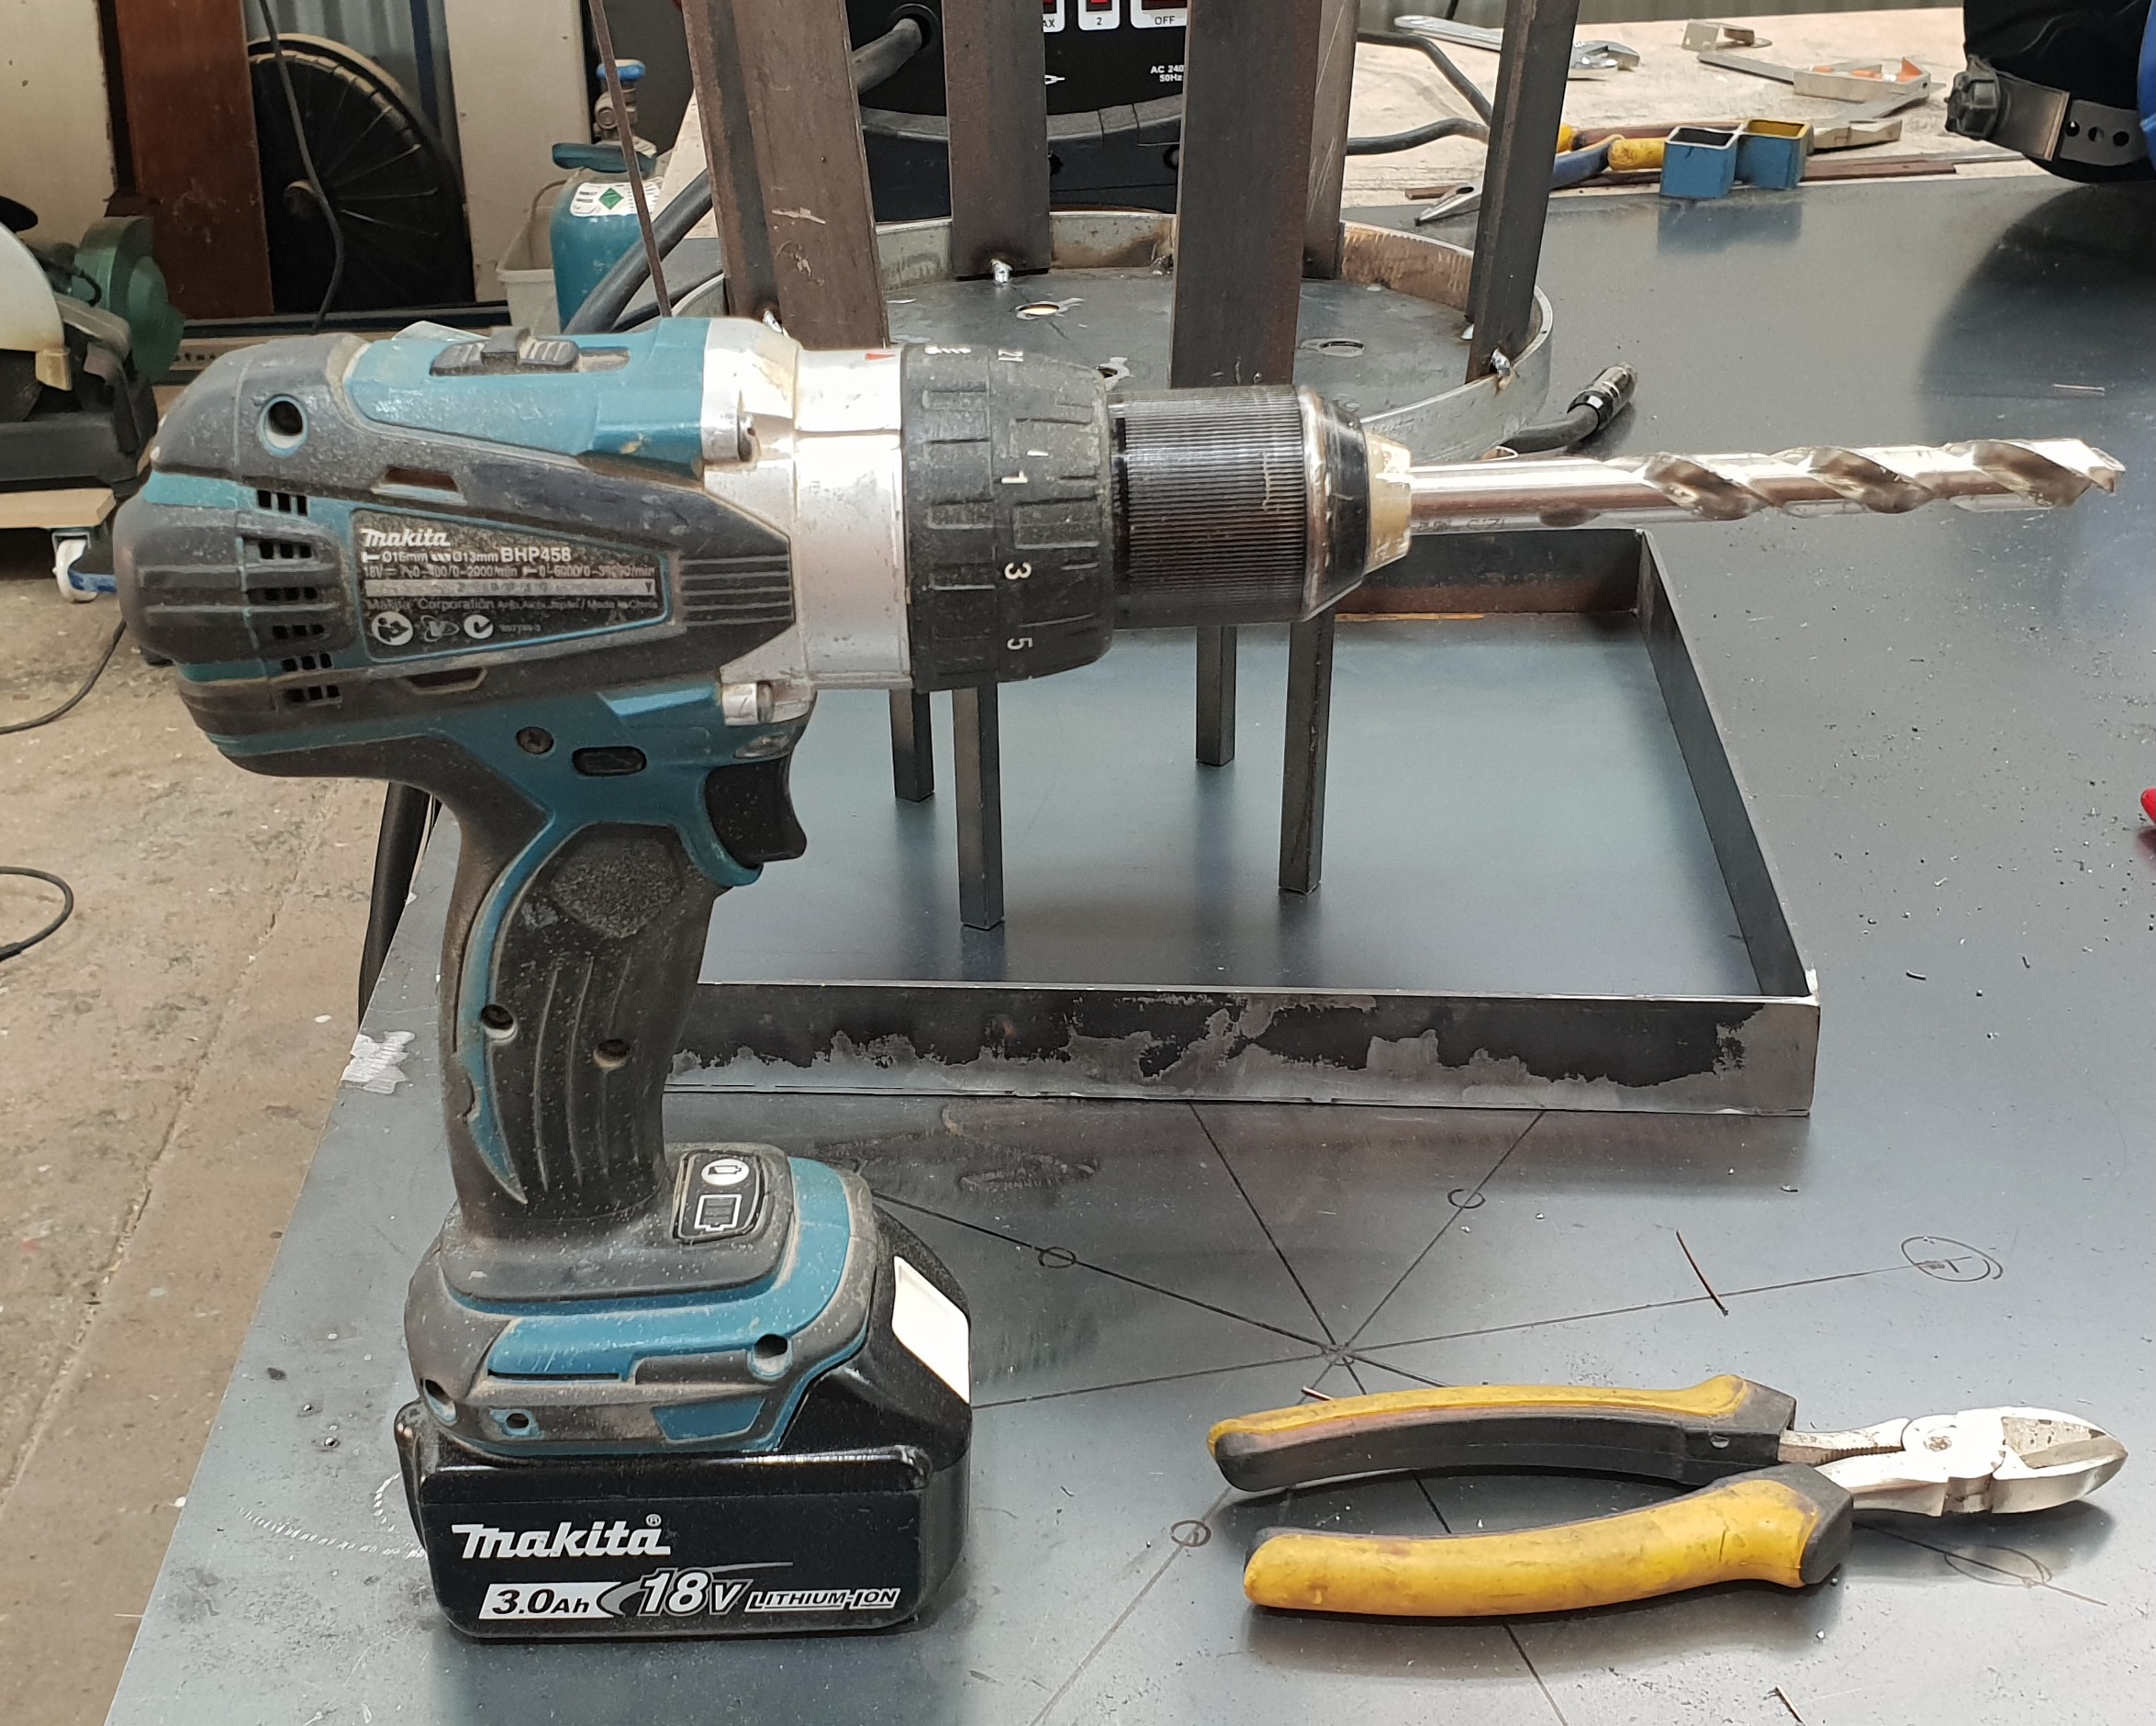
I did, however, drill the drainage holes into this circular base and also drilled smaller holes to mark where the legs would go.
Drill with 12mm bit used to make drainage holes in base
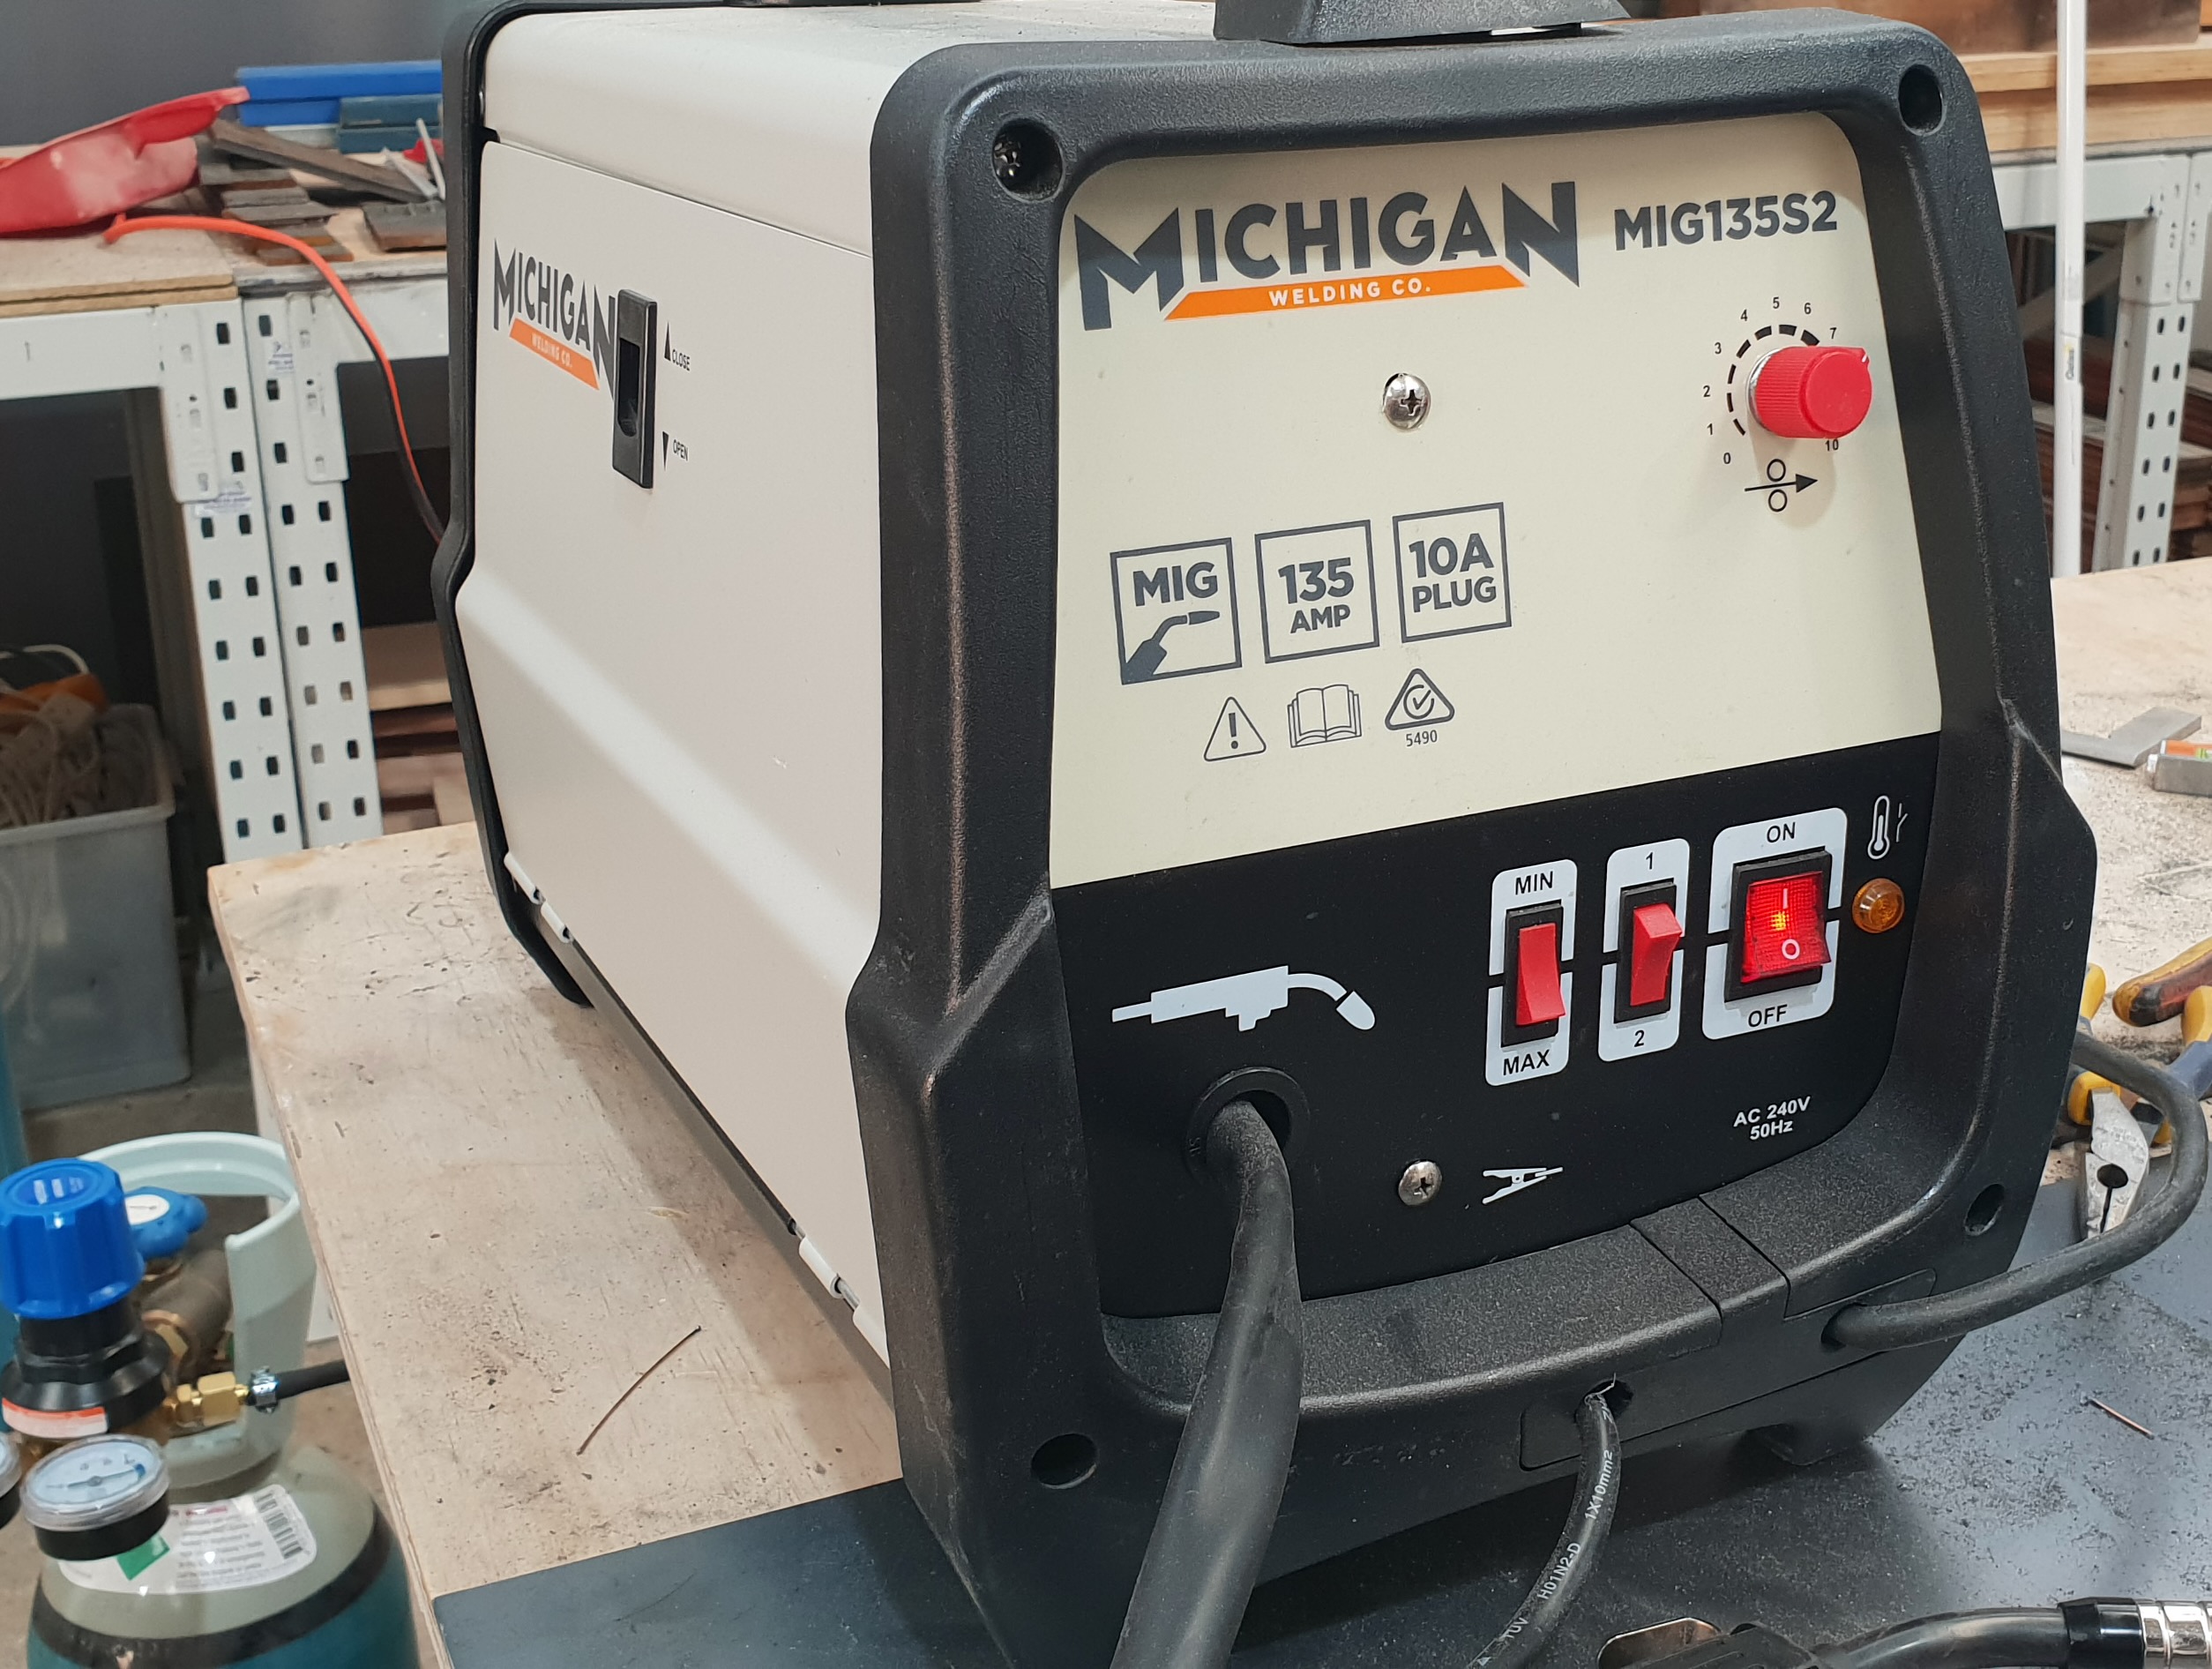
Having cut, shaped and marked all the components, it was finally time to put them firmly together. This involved learning to use the welder. We talked about how it worked; and the importance of getting the gas flow, the voltage and the wire speed right. We were doing MIG welding where MIG stands for metal inert gas. In this case the gas was 90% argon and 10% carbon dioxide.
The 135 amp welding machine
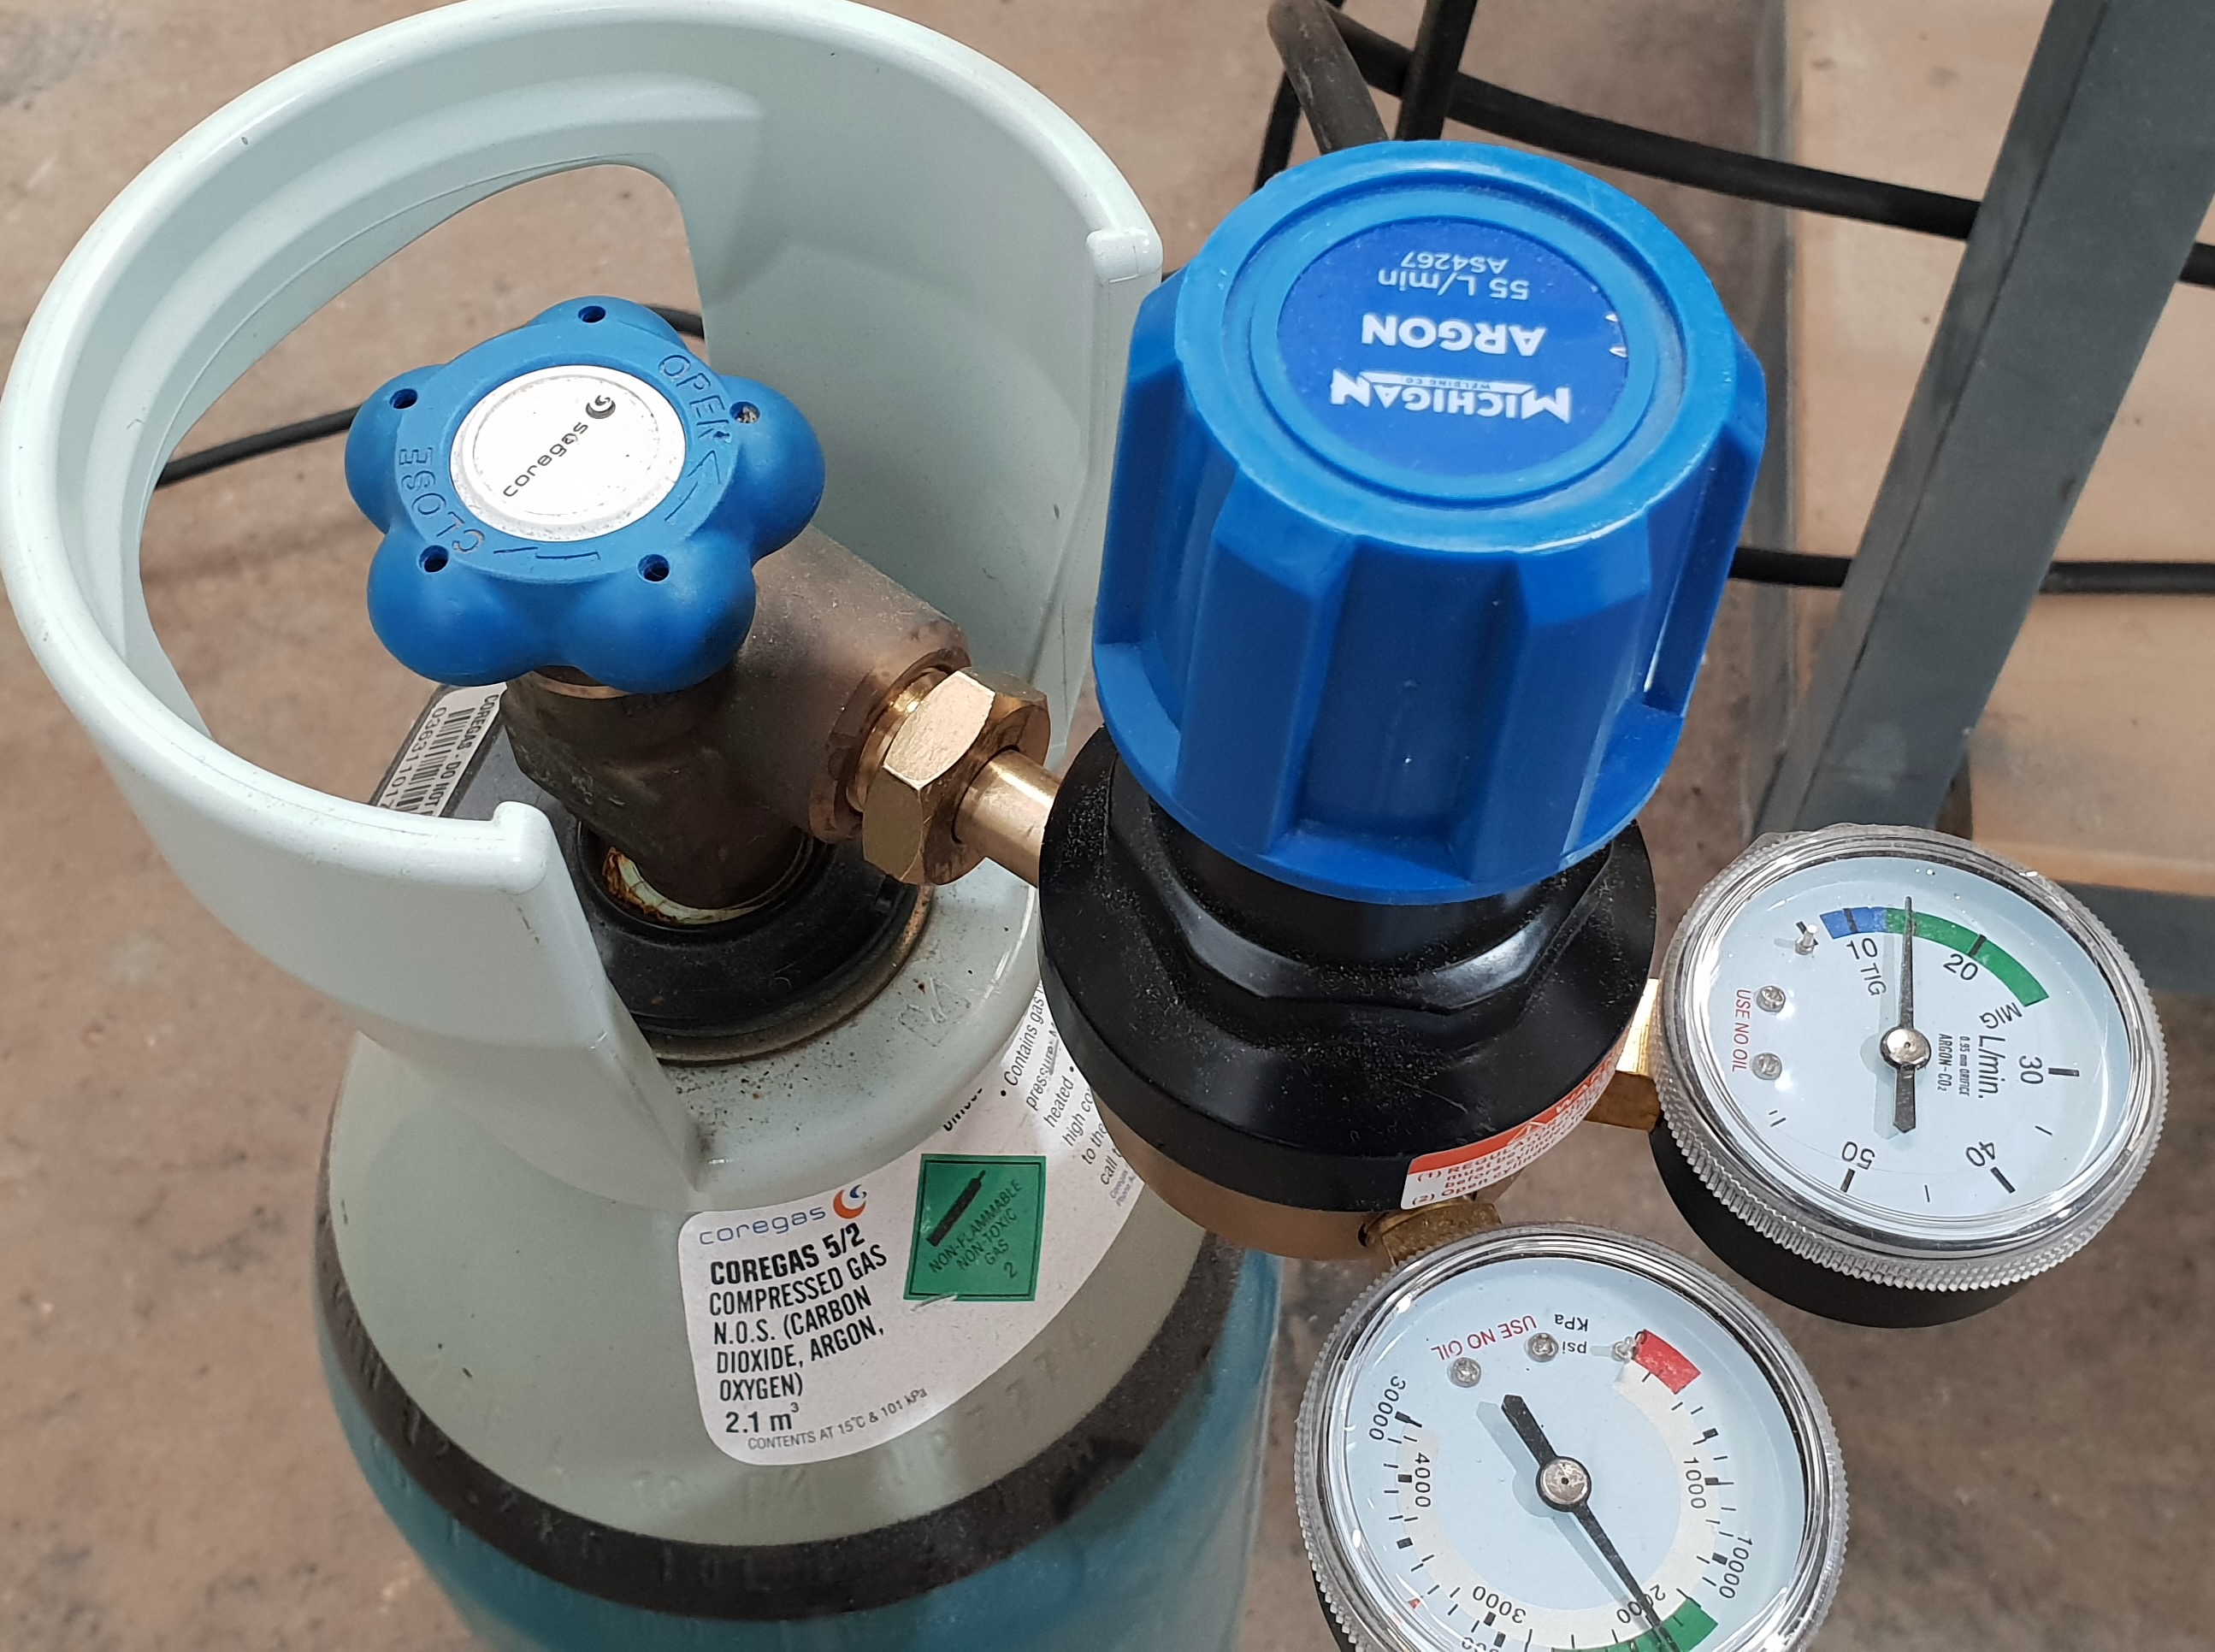
The gas in the bottle has a regulator that shows both the volume of gas remaining and the pressure/flow rate.
Regulator for gas bottle
I tried to master two welding techniques. The first, called tacking, involves applying the “point” of the welder into the join of the two metals. I found it very hard to see this point, even when it was cut to an extra length. My guess is that I was 50% accurate. JC tidied up non-joints with the grinder the rest of the time and I had another go.Then I was 50% successful again. Repeat JC tidying… etc.etc. In my case practice did not make perfect. It just reduced the non-joints a bit each time…With that technique I secured a good part of the bottom to its base.
Having achieved about 50% success rate at tacking, I embarked on real welding, ie, a seam for joining two metal edges…
Nothing to see here. No success. JC completed all of the welded seams required of the project. Again, we rationalised that I’m mostly going to want to spot weld rather than run long metal edges together….so my inability to weld seams is not necessarily a handicap.
I took home a brazier. Yes, JC nursed me through it and actually did a lot of it. However, I learned a great deal in a very short time. I might not be proficient but I’m now trained to use the tools properly and safely.
JC is happy to have me back when I develop a design I want to make. We will confer on whether I’m able to do it. If not I can always commission her to do so. My preference, of course, is to design something that I can make myself with a bit of advice. I can use her tools on a pay as you go basis for power and other consumables and that means I don’t drive my suburban neighbours mad with the noise.
In the meantime I will apply primer and paint and use it as a pot plant container. The leafiness of said plant will conceal any flaws not masked by the paint! I’ll post an image then.
I’m so glad I live in Perth, Western Australia where Women on The Tools is there to correct the results of historic deficits in women’s skill development. Thank you, Janet Carter aka JC!!
When I posted on 7 Sept 2022 about my work in a WAFTA (Western Australian Fibre and Textile Association) members’ exhibition in 2020 I said that I was thrilled to have been juried into a special 25th anniversary exhibition by members of WAFTA in the same gallery: the Holmes A’Court Gallery at 10 Douglas Street, West Perth owned by art connoisseur Janet Holmes A ‘Court. [https://www.holmesacourtgallery.com.au/]
The names of the artists selected reads like a list of the elite textile artists of Western Australia, minus a few for whatever reason. I was surprised but very pleased to have been selected in that company.
As befits a juried exhibition, there was a brief. We were limited to a maximum of three techniques. We had to “crossover” in some way by using non-conventional techniques or materials or both. Phrases like “purity of design” and “clarity of intention” obviously conveyed what the jurors would be looking for.
I began with an ambitious design. A 3D twisted wire armature holding crochet and knitted and knotted “fabric” in shape but allowing light to cast shadows through the “fabric”. Design to be bold from a distance; more detailed from about a metre out; and micro-detailed close-up.
I assembled yarn.
The whites and creams…
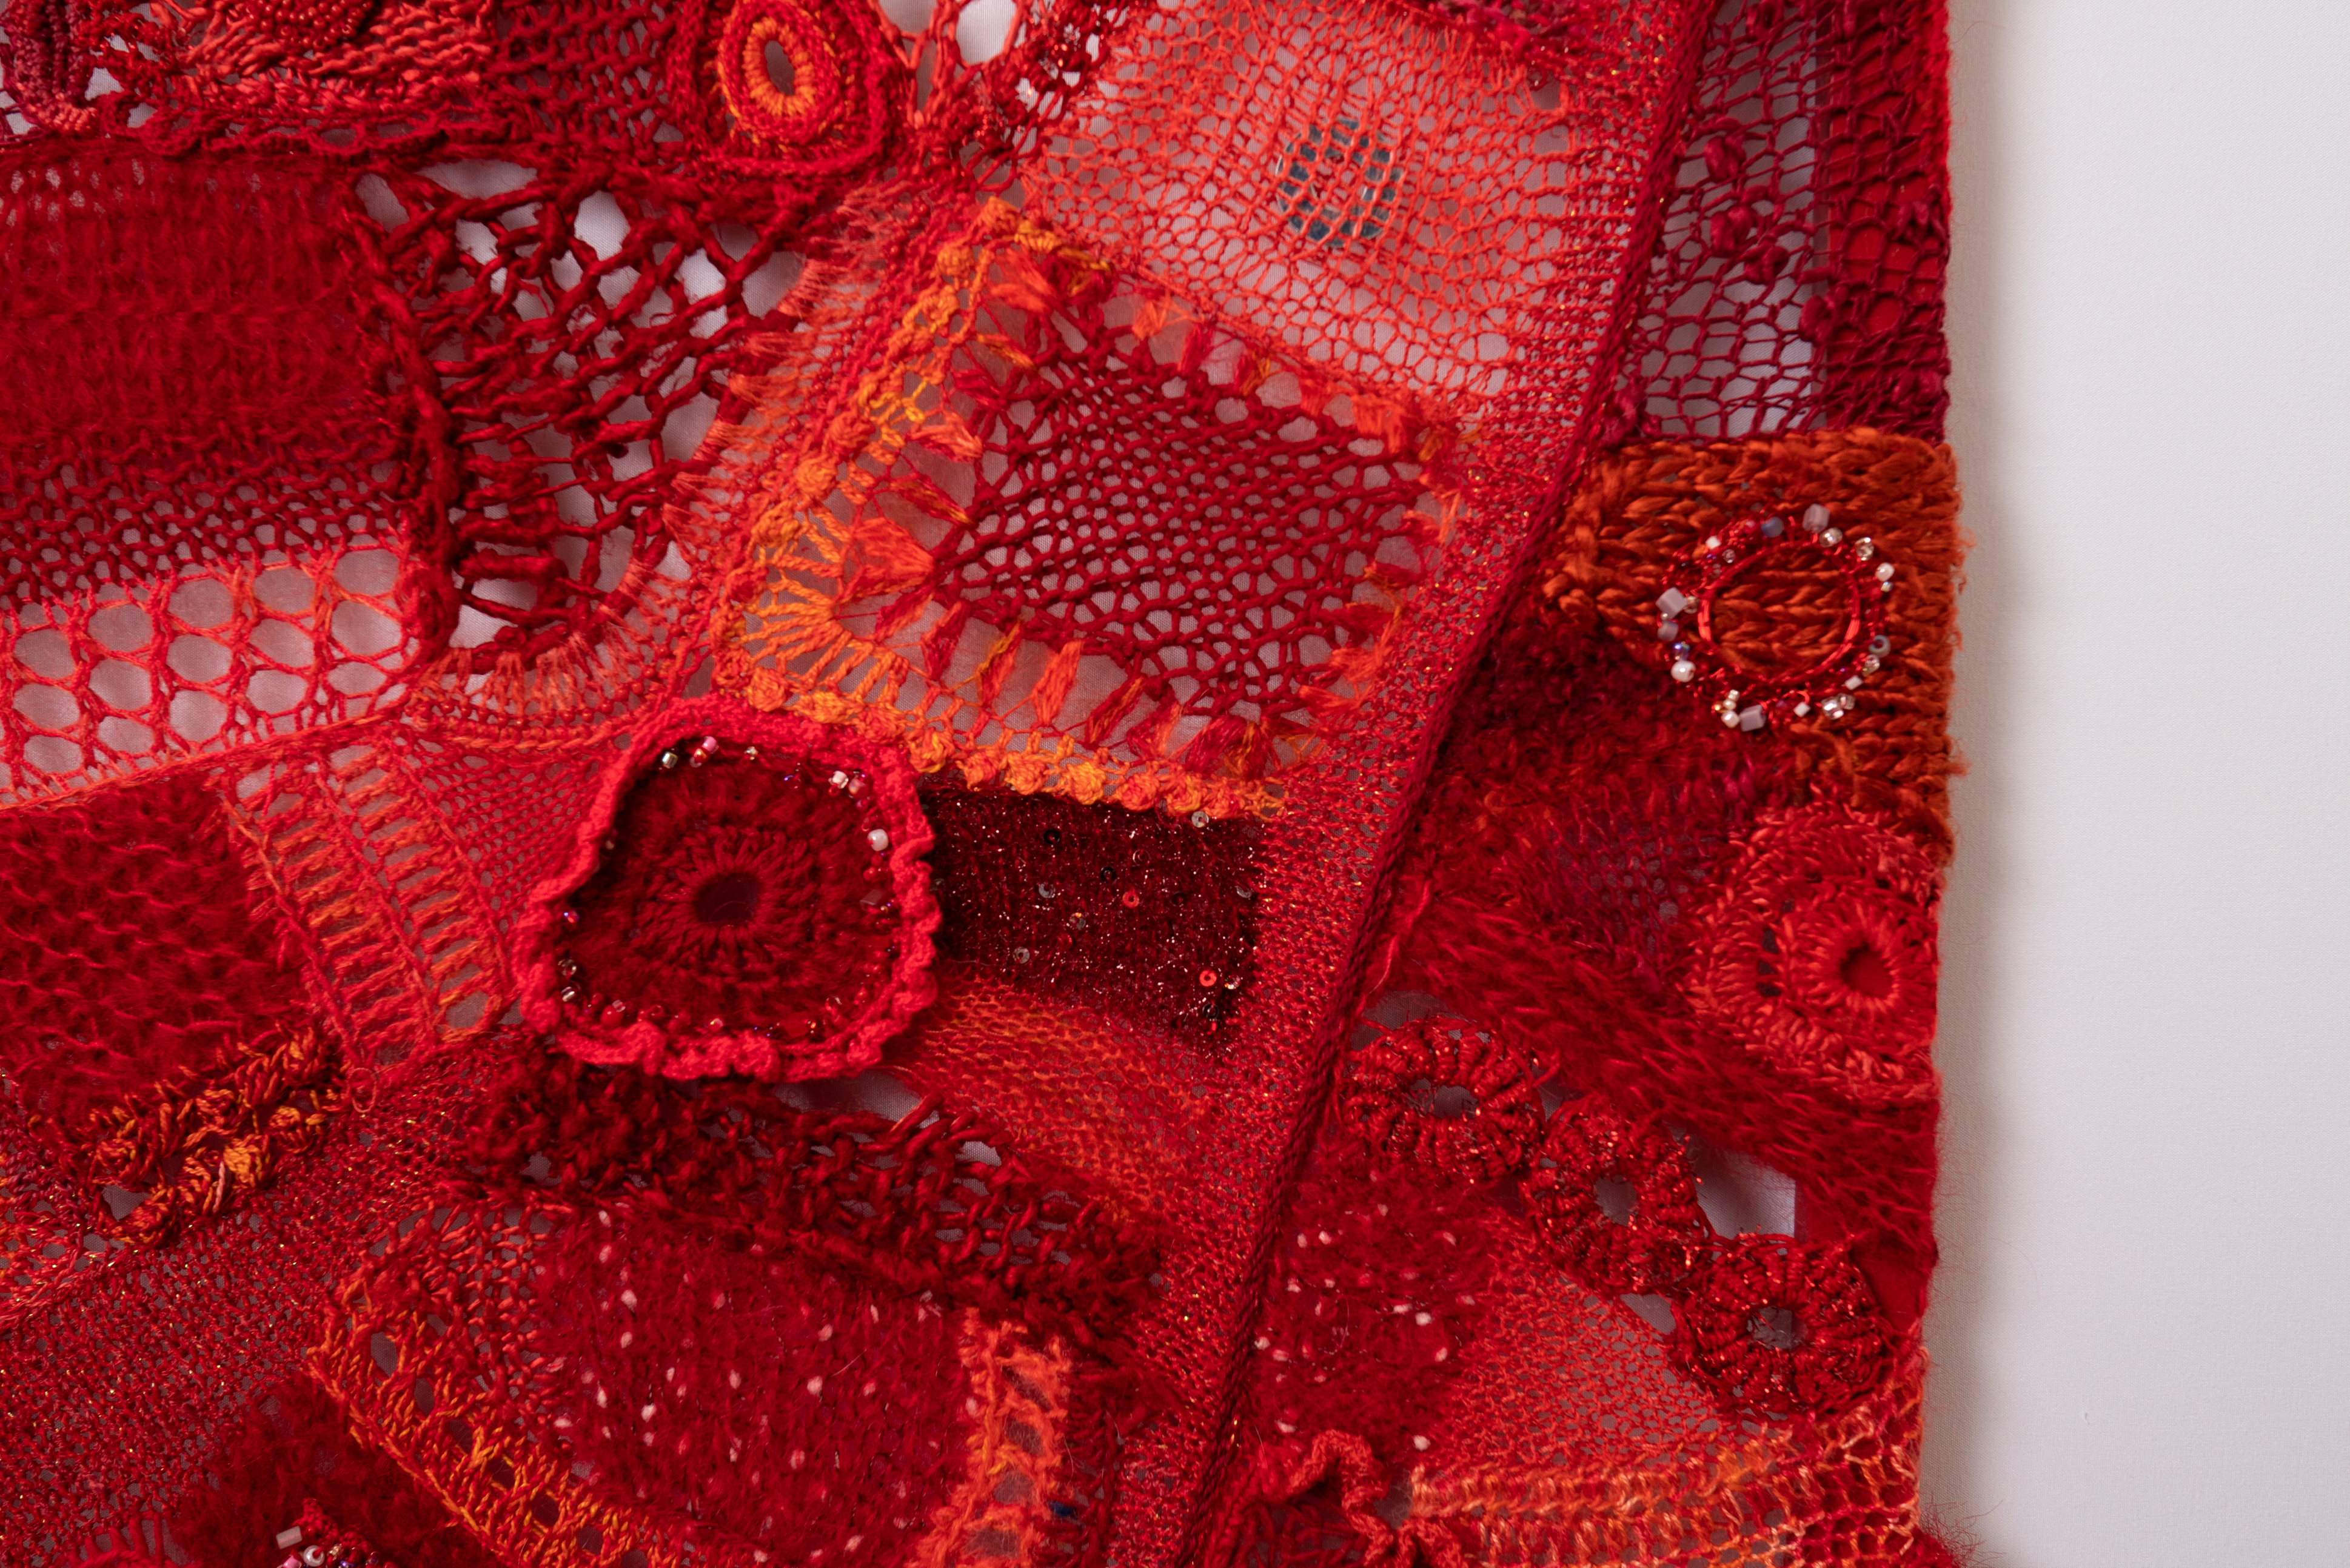
Having also selected black/grey and red/orange as my other colours, I began to crochet.
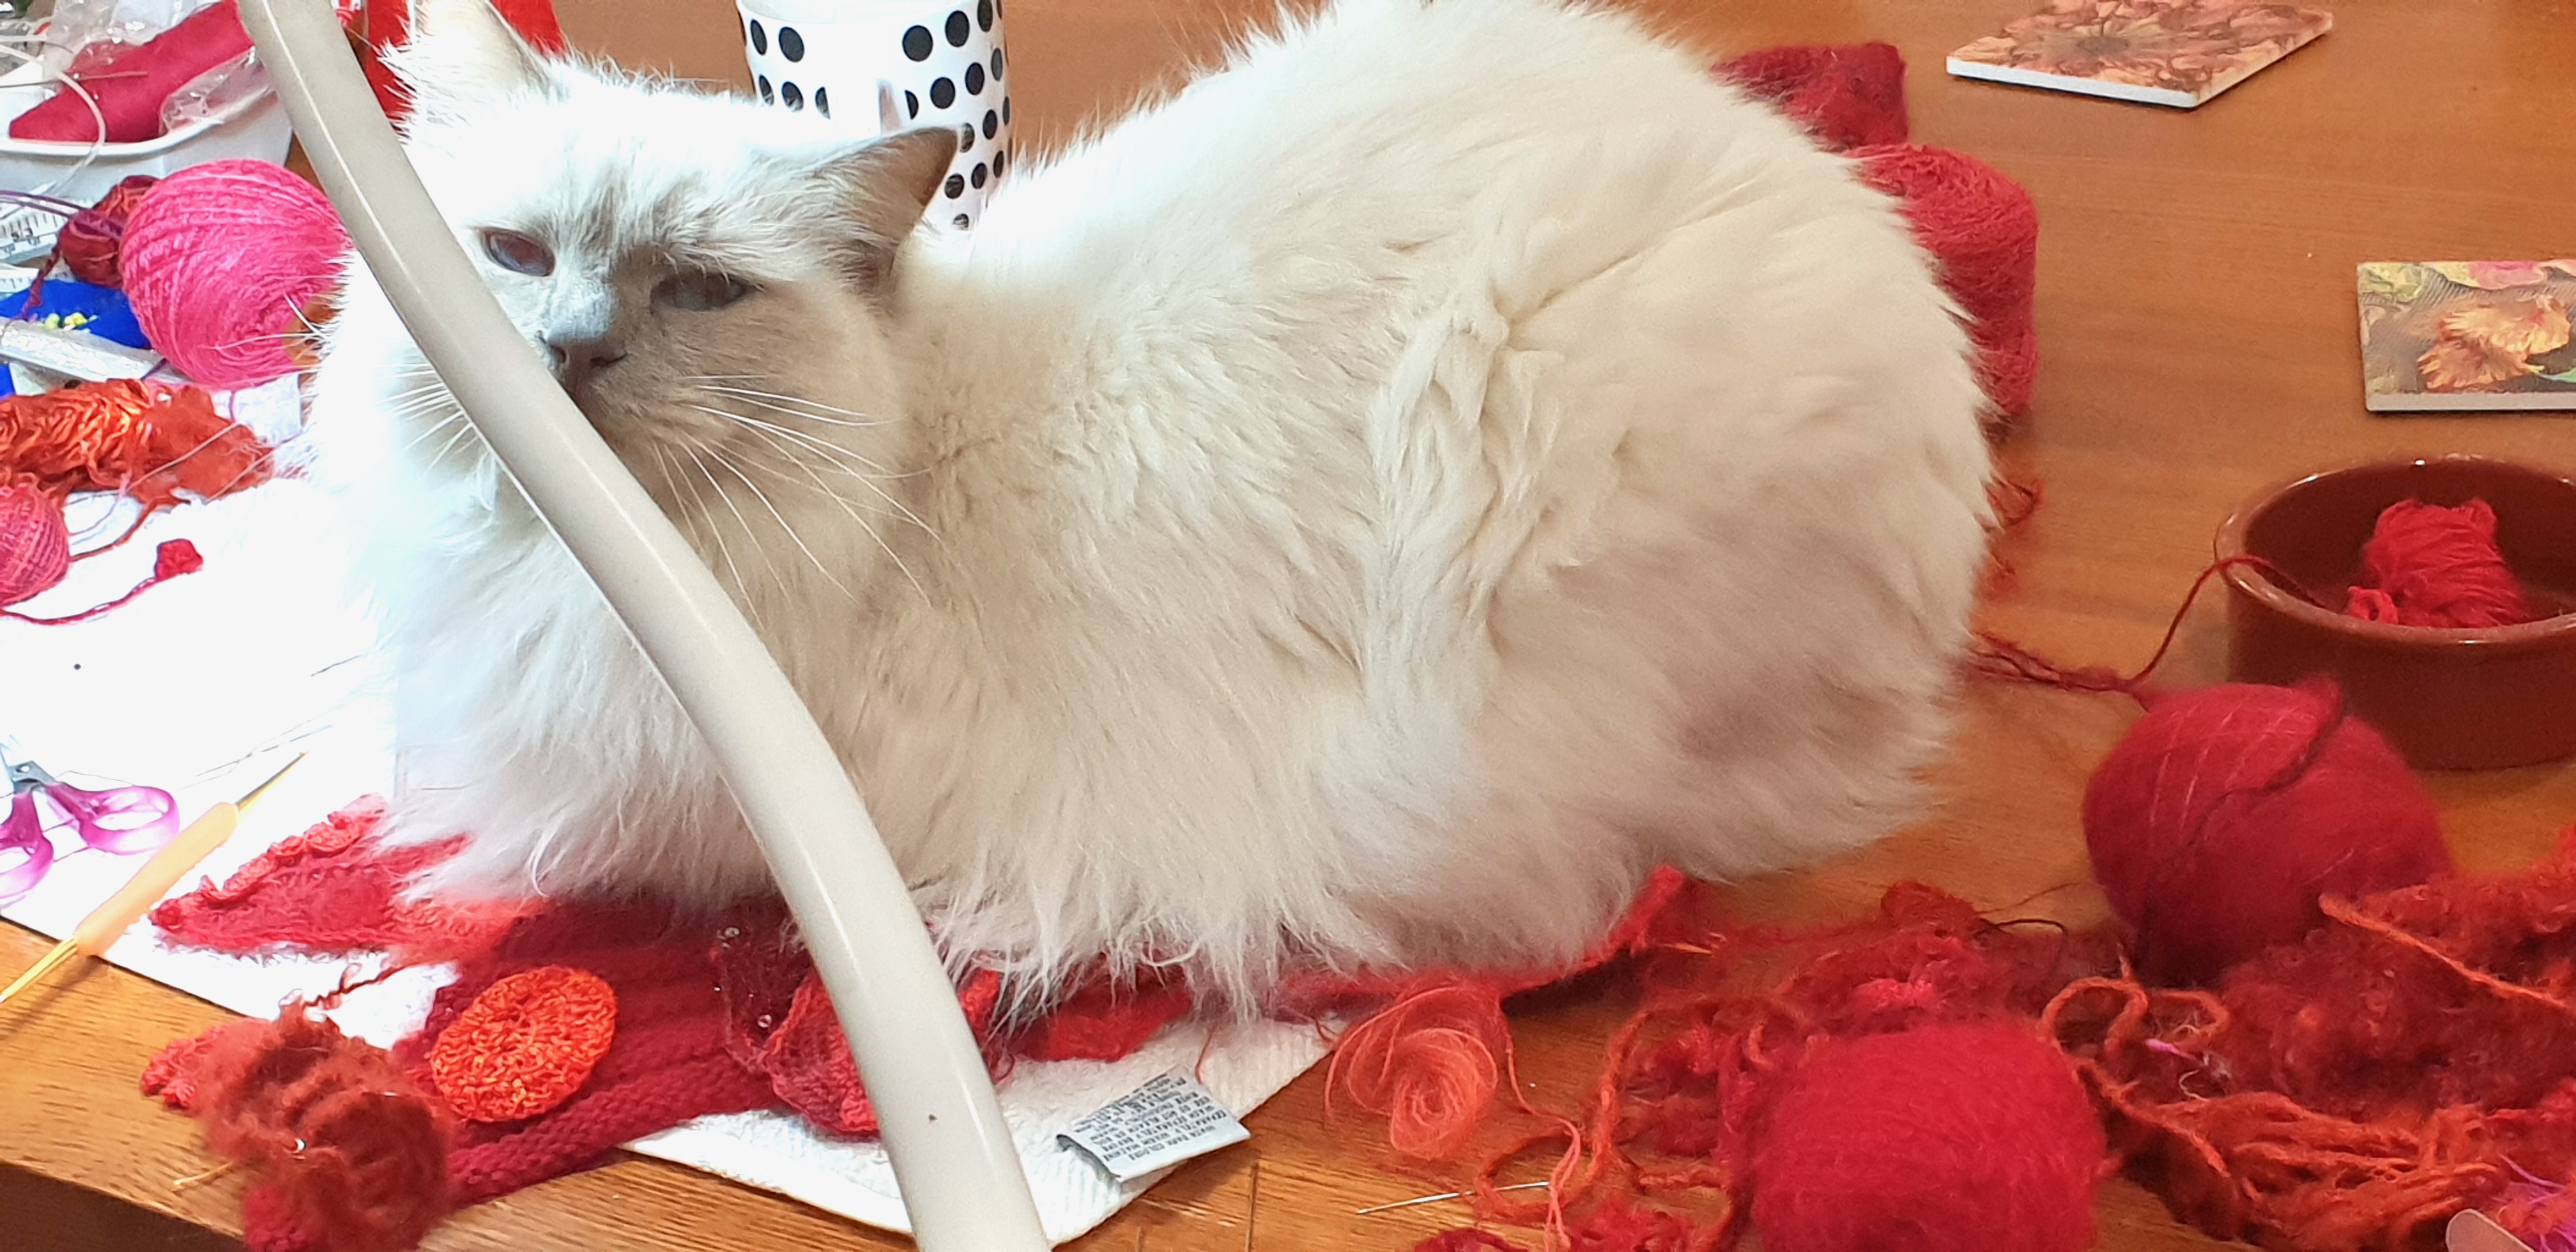
And now for some colour: the beginnings of the red pieceRag-doll Cat Samson liked to sit on the red piece in progress
I joked that if my entry did not make the jurors’ cut I’d give this to Sam as a little mat. Then I thought, maybe I’m on the wrong track and I should felt said cat for a nice creamy white padded and stitched piece! [RSPCA to note: Samson is still alive and meowing, demandingly, as I write this]
My generation of the fabric for a triptych in black/grey; red/orange and white/cream went well. I just couldn’t confidently settle on the construction of the supportive armature.
I tried heavy felt and pool noodles. No good as they blocked out the possibility of shadows.. .and they were hard to shape. I tried wire but was not confident that the joins I made in the wire would survive manipulation.
Finally as the submission date drew close, I retreated to a conventional mounting of said “fabric” on wooden frames. My wonderful brother-in-law made up the frames. I bought three spray cans of enamel paint and proceeded to spray the three frames black, red, and white. 24 hours before the date I’d booked for photography, I worked all night, finally putting the last staple in the last wooden frame 10 minutes before my scheduled photographic appointment.
In the session with Josh Wells Photography [https://joshwellsphotography.com/], in which he took numerous images and put them on a memory stick for me, I tried to stretch out my back in a good supportive chair and enjoyed a long overdue cup of tea….
Then I went home to bed, waking 14 hours later with my little memory stick of images still in my hand.
The work as pinned on the photographer’s wall
I submitted the work. Not because I thought it met the brief. I felt it was not sufficiently “crossover” for that. I submitted it because I thought it was OK technically and had a good story to tell. I felt, however, that it would not be selected because of its conventionalism.
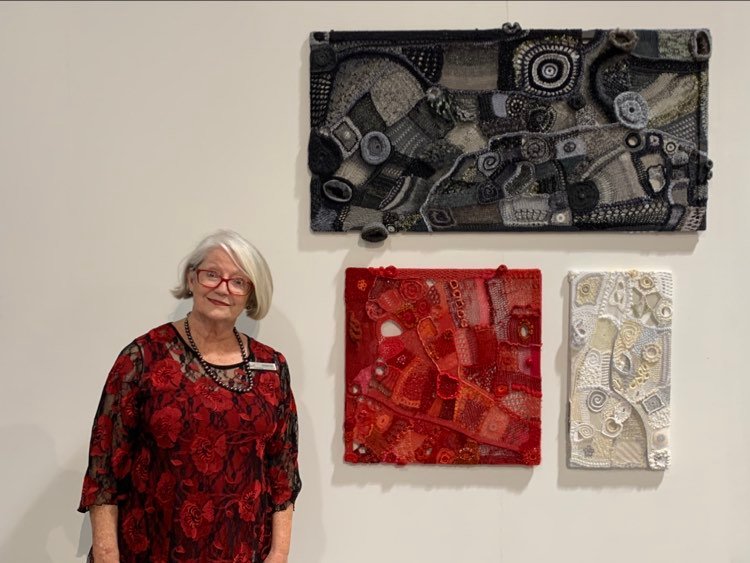
Last Friday, 21 October 2022 there was a beautiful opening of the exhibition.
The jurors were a highly qualified trio of art specialists; the curator was sensitive and responsive to artists’ intent; the speeches were relevant but short; the volunteer bar tenders were charming and attentive; and the catering was yummy. Sales were brisk and expertly handled either manually or by QR code links. The catalogue is VERY professional (see https://waftatwentyfiveplus.com.au/).
My work is called Tempo; Tune; Tale; A Musical Analogy for Textile Design.
My submitted artist’s statement reads:
A musician begins to play in a distant room. The feel of the beat reaches you clear and strong. Drawing closer, you begin to hear the melody flowing harmoniously with and above the beat. Invited to go even closer, your brain appreciates and is stimulated by the lyrics embellishing and amplifying his story.
I have worked to convey these remote, medium and close-up perspectives in Tempo; Tune ;Tale; A Musical Analogy for Textile Design.
The work includes found objects such as metal and rubber washers; beads; stainless steel, iron ad plastic wires; buttons; and bangles. They support and shape both natural fibres (alpaca, cotton, mohair, possum, silk and wool) and acrylic, lurex, nylon and polyamide yarns.
I have used three techniques: crocheting, knitting and hand-stitching. These traditional but marvellously adaptable tools enabled me to mix and blend colours in the way a painter does; to layer and place materials as a quilt maker does; to build shapes as a sculptor does; and to add surface embellishment as embroiderers do..
The resulting three units can be installed to suit the spaces available, as a vertical or horizontal triptych or within a notional square of around 128cm in size.
Opening night of 25+ crossover: me and Tempo; Tune and Tale. Photographer: Steve Wells
After a thoughtful presentation to us all about the defining characteristics of a contemporary art quilt, Virginia O’Keeffe urged us all to make a quilt that made a statement about something important to each of us. She also specified that it was to be a good sized quilt, “at least 48 inches square”.
Gosh, I thought, that’s a challenge but I can’t think of anything to comment on….
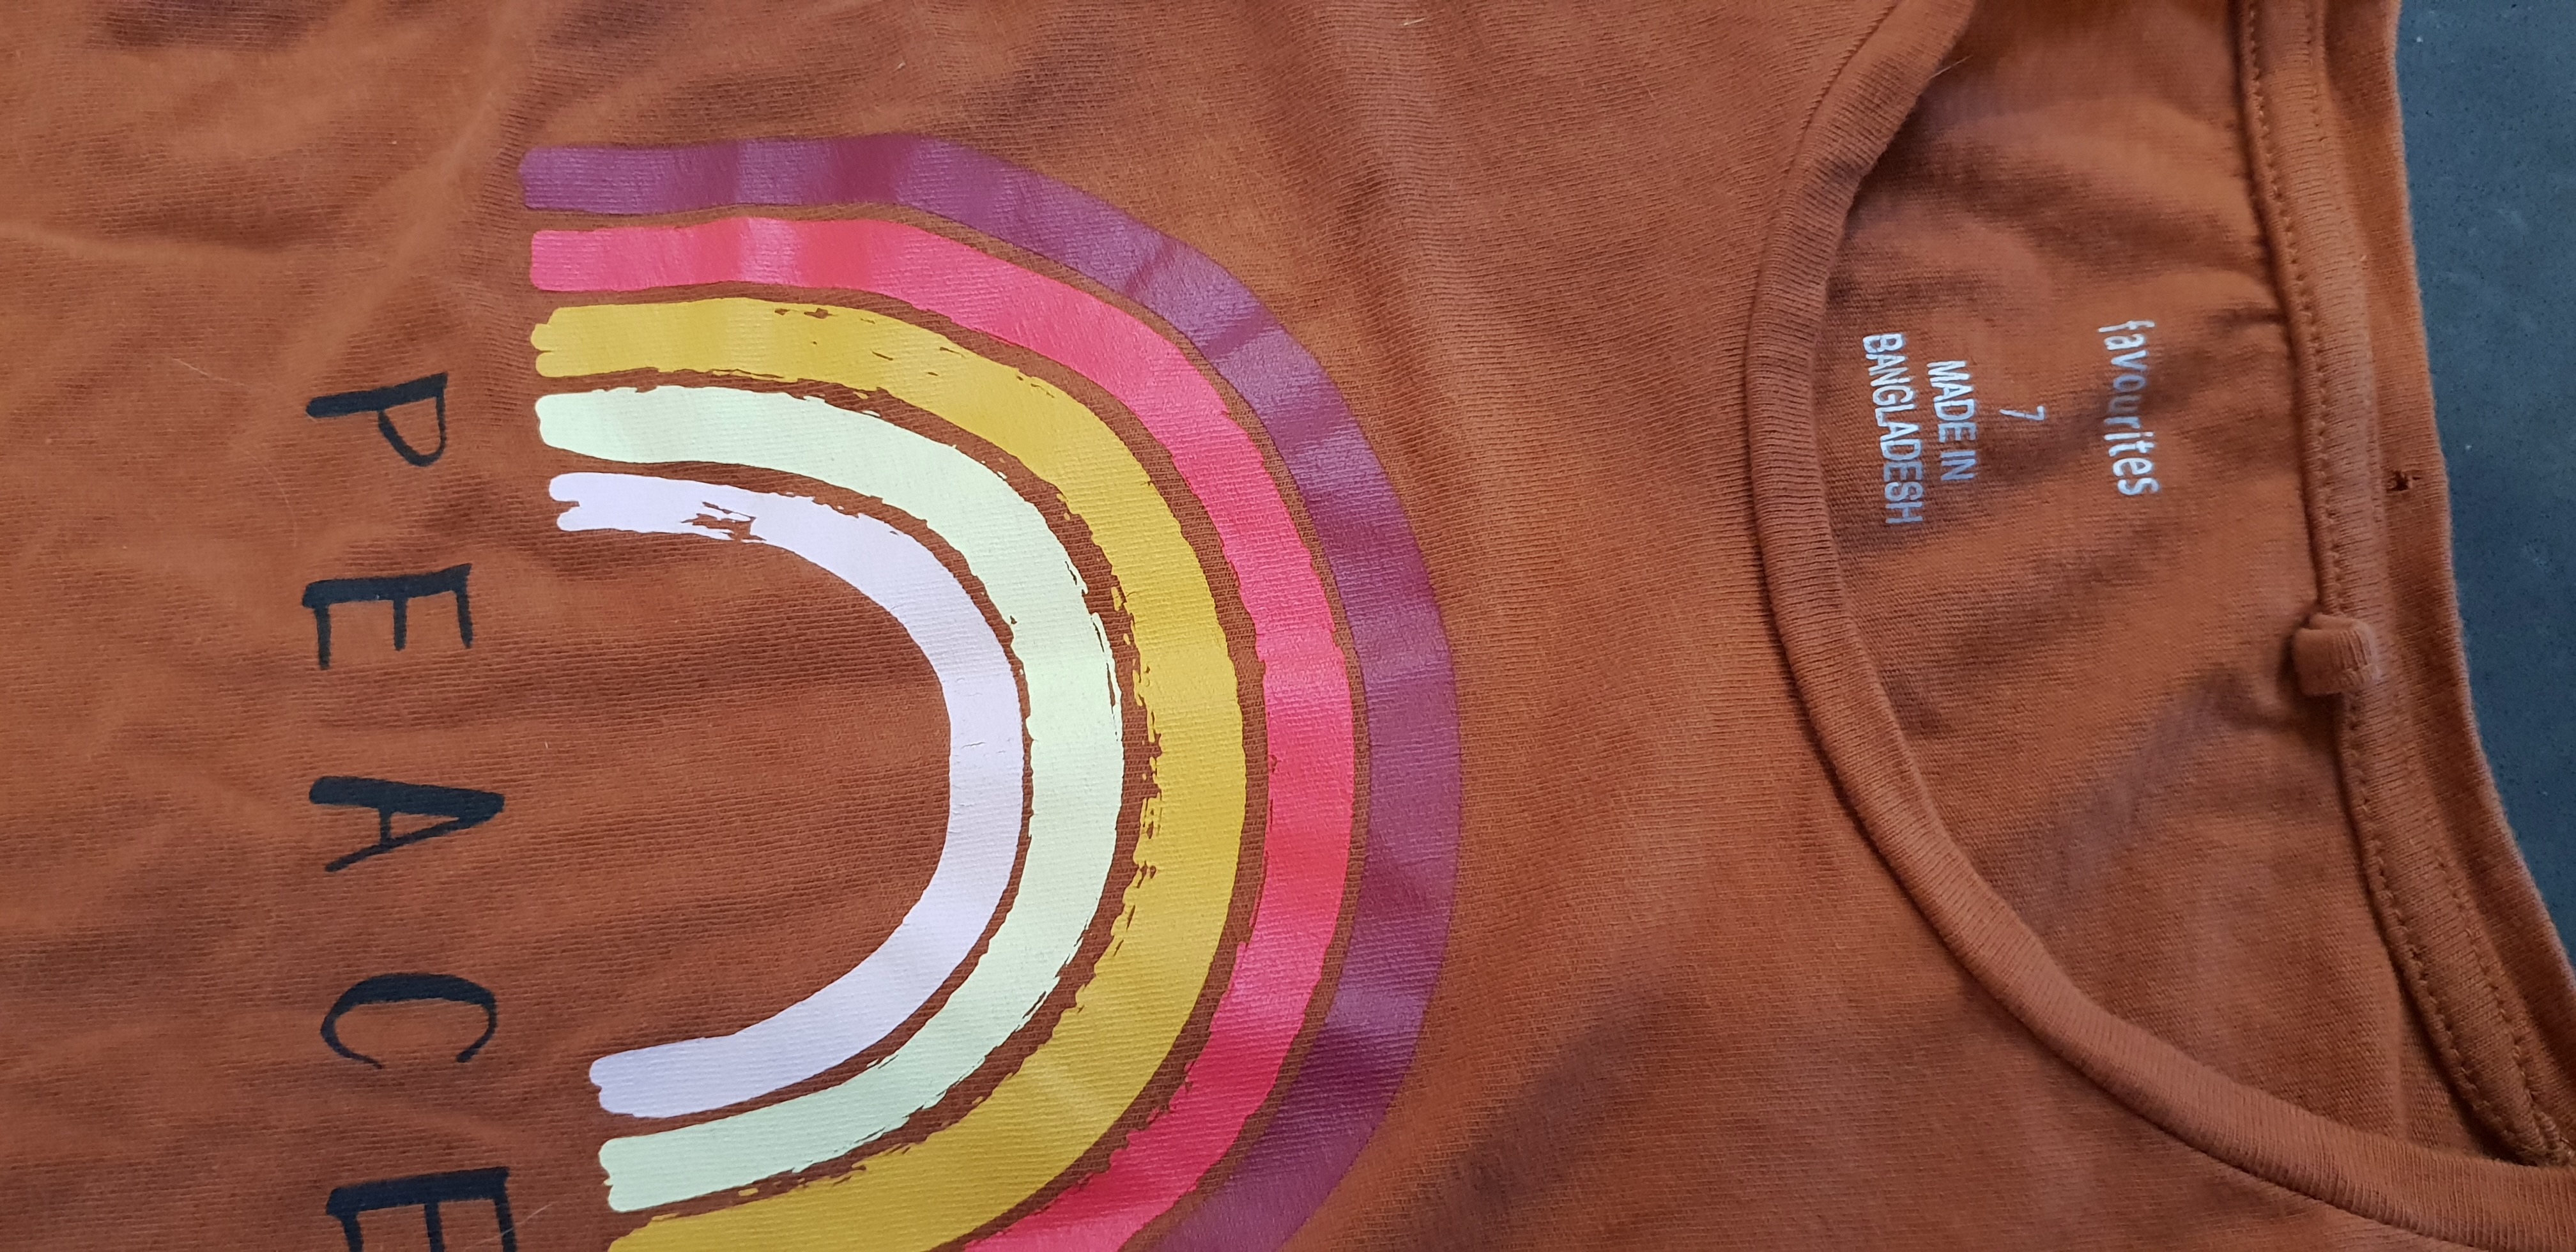
Then Virginia produced a large sack. In it were “lucky dip” bags each containing a t-shirt she’d bought at an ‘op shop’. I drew mine out and at first thought “that’s hideous and it isn’t speaking to me”.
Then I looked inside the neck at the top.
Voilà! I immediately saw what I could talk about in the quilt. I have previously blogged about the book “Fashionopolis”. See blog dated 11 July 2021.
My “point” or message was going to be about the terrible conditions (building disasters resulting in death; appalling OHS conditions; as well as less than living wages) under which people, mainly women, work in the clothing sweatshops of Bangladesh. The toll on the global environment of so-called fast fashion in terms of water use and the non-biodegradable synthetic fabrics often used need also to be called out. Not many of us are innocent in this appalling scenario. If we buy the products then we are complicit. It’s a hard thing to swallow.
So I designed a small quilt that would showcase the terrible statistics in “Fashionopolis“. I decided I’d make it in my own plant-dyed recycled fabric to ensure the medium reflected the message. Everyone knows I have enough!
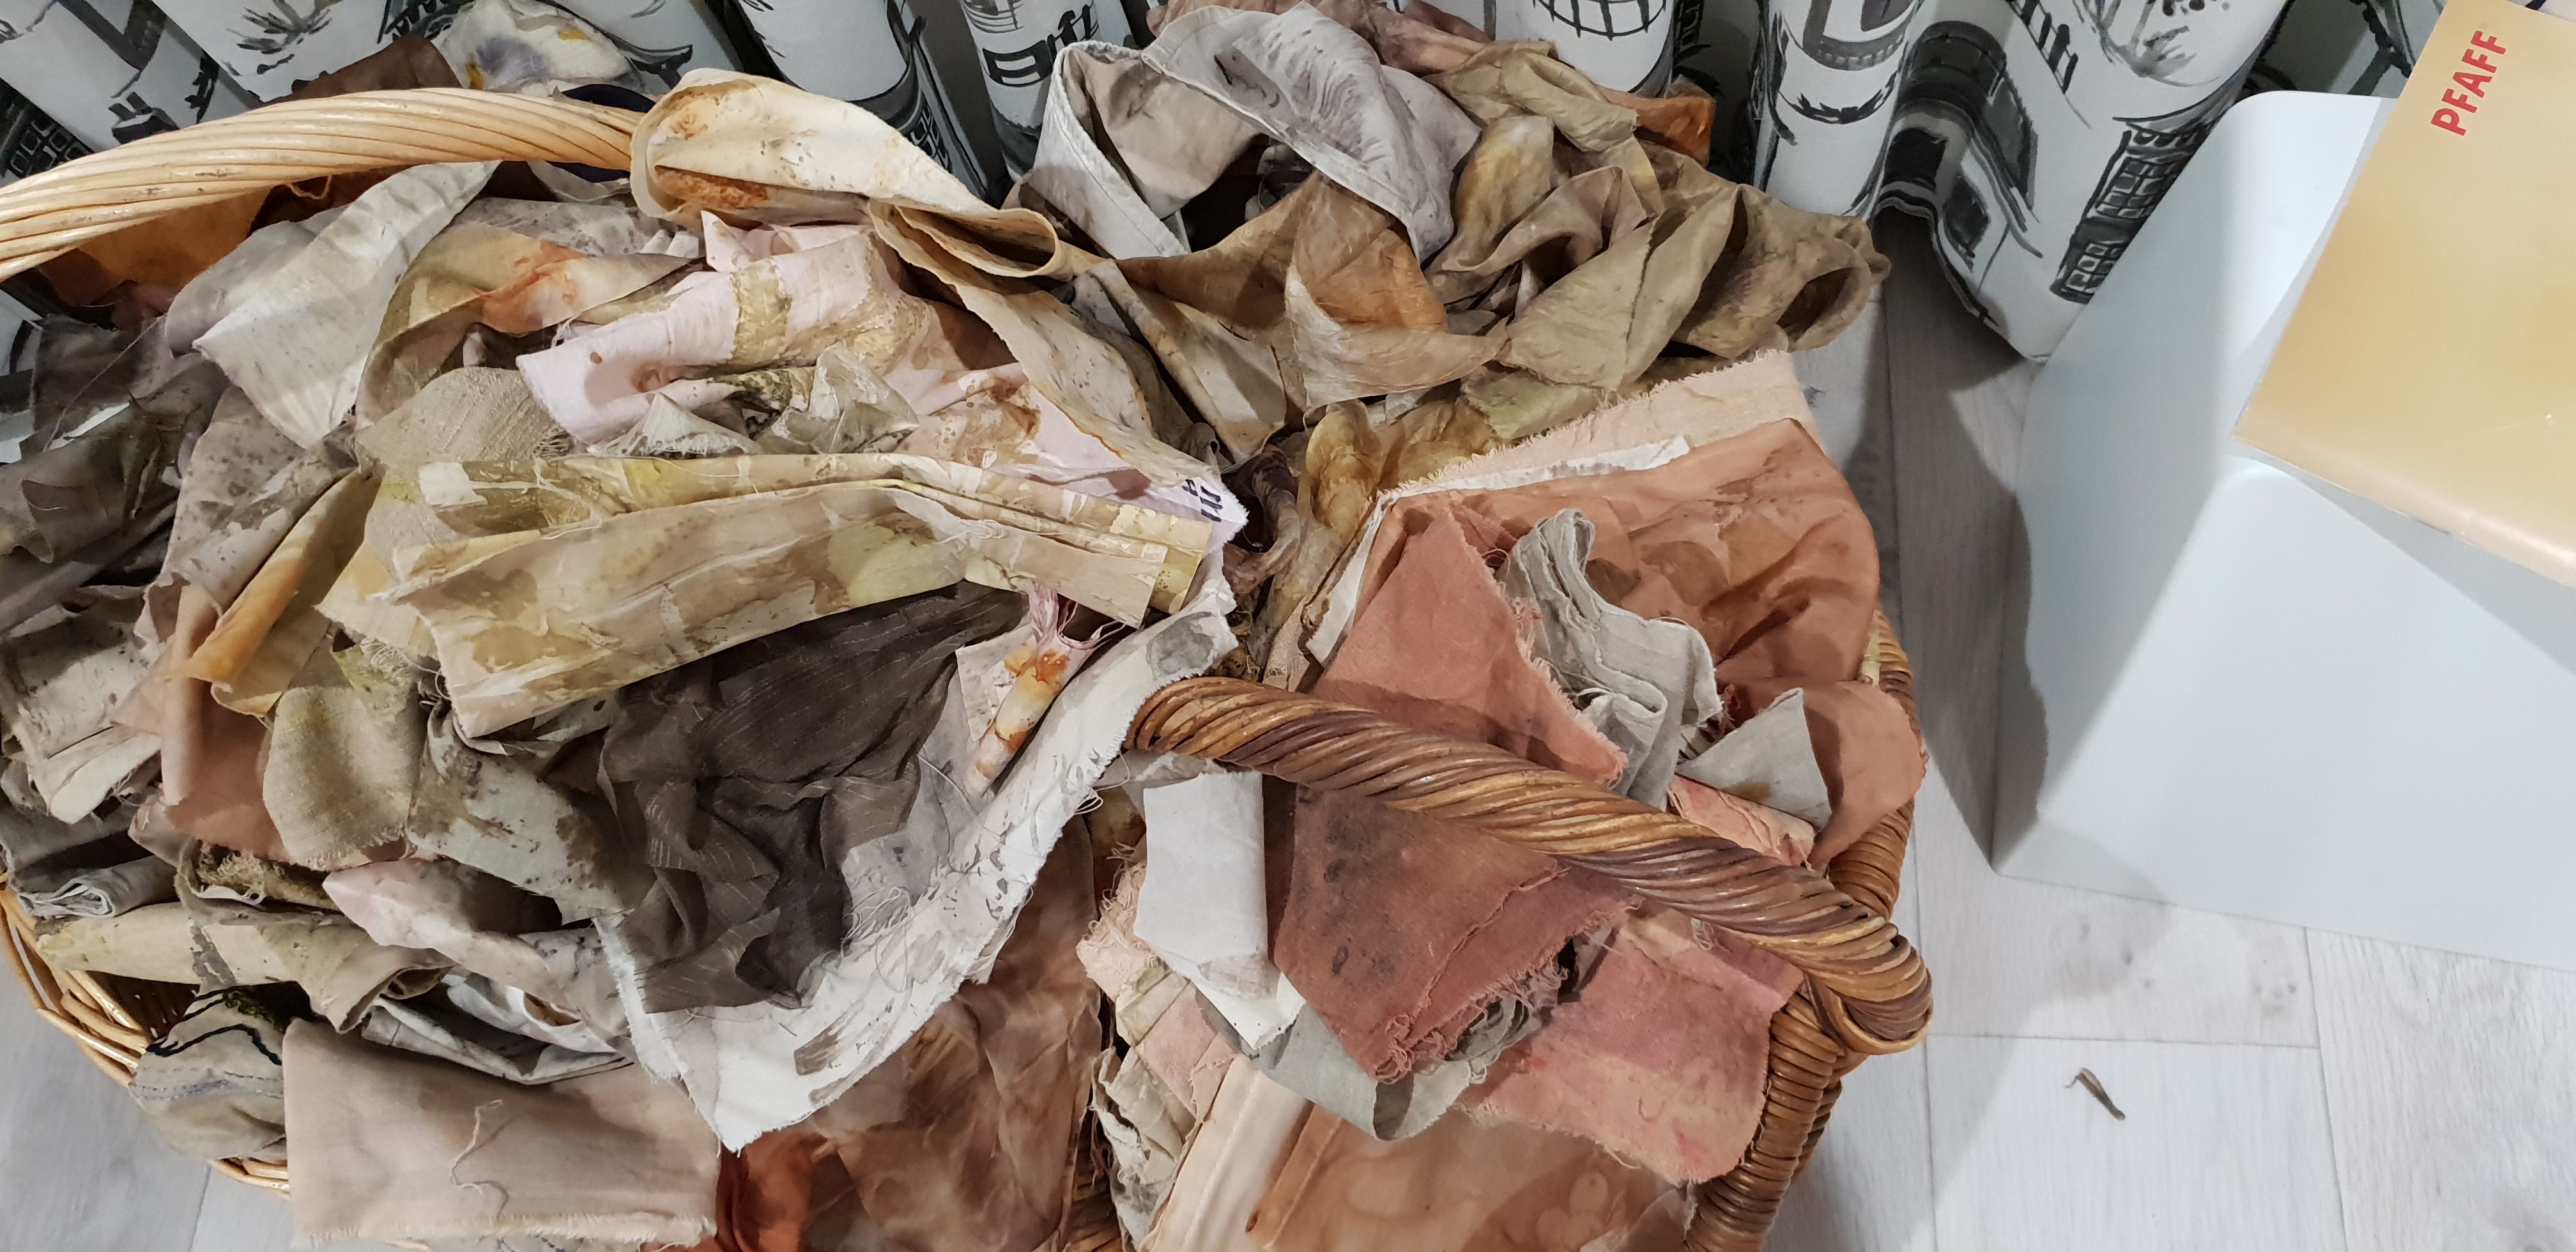
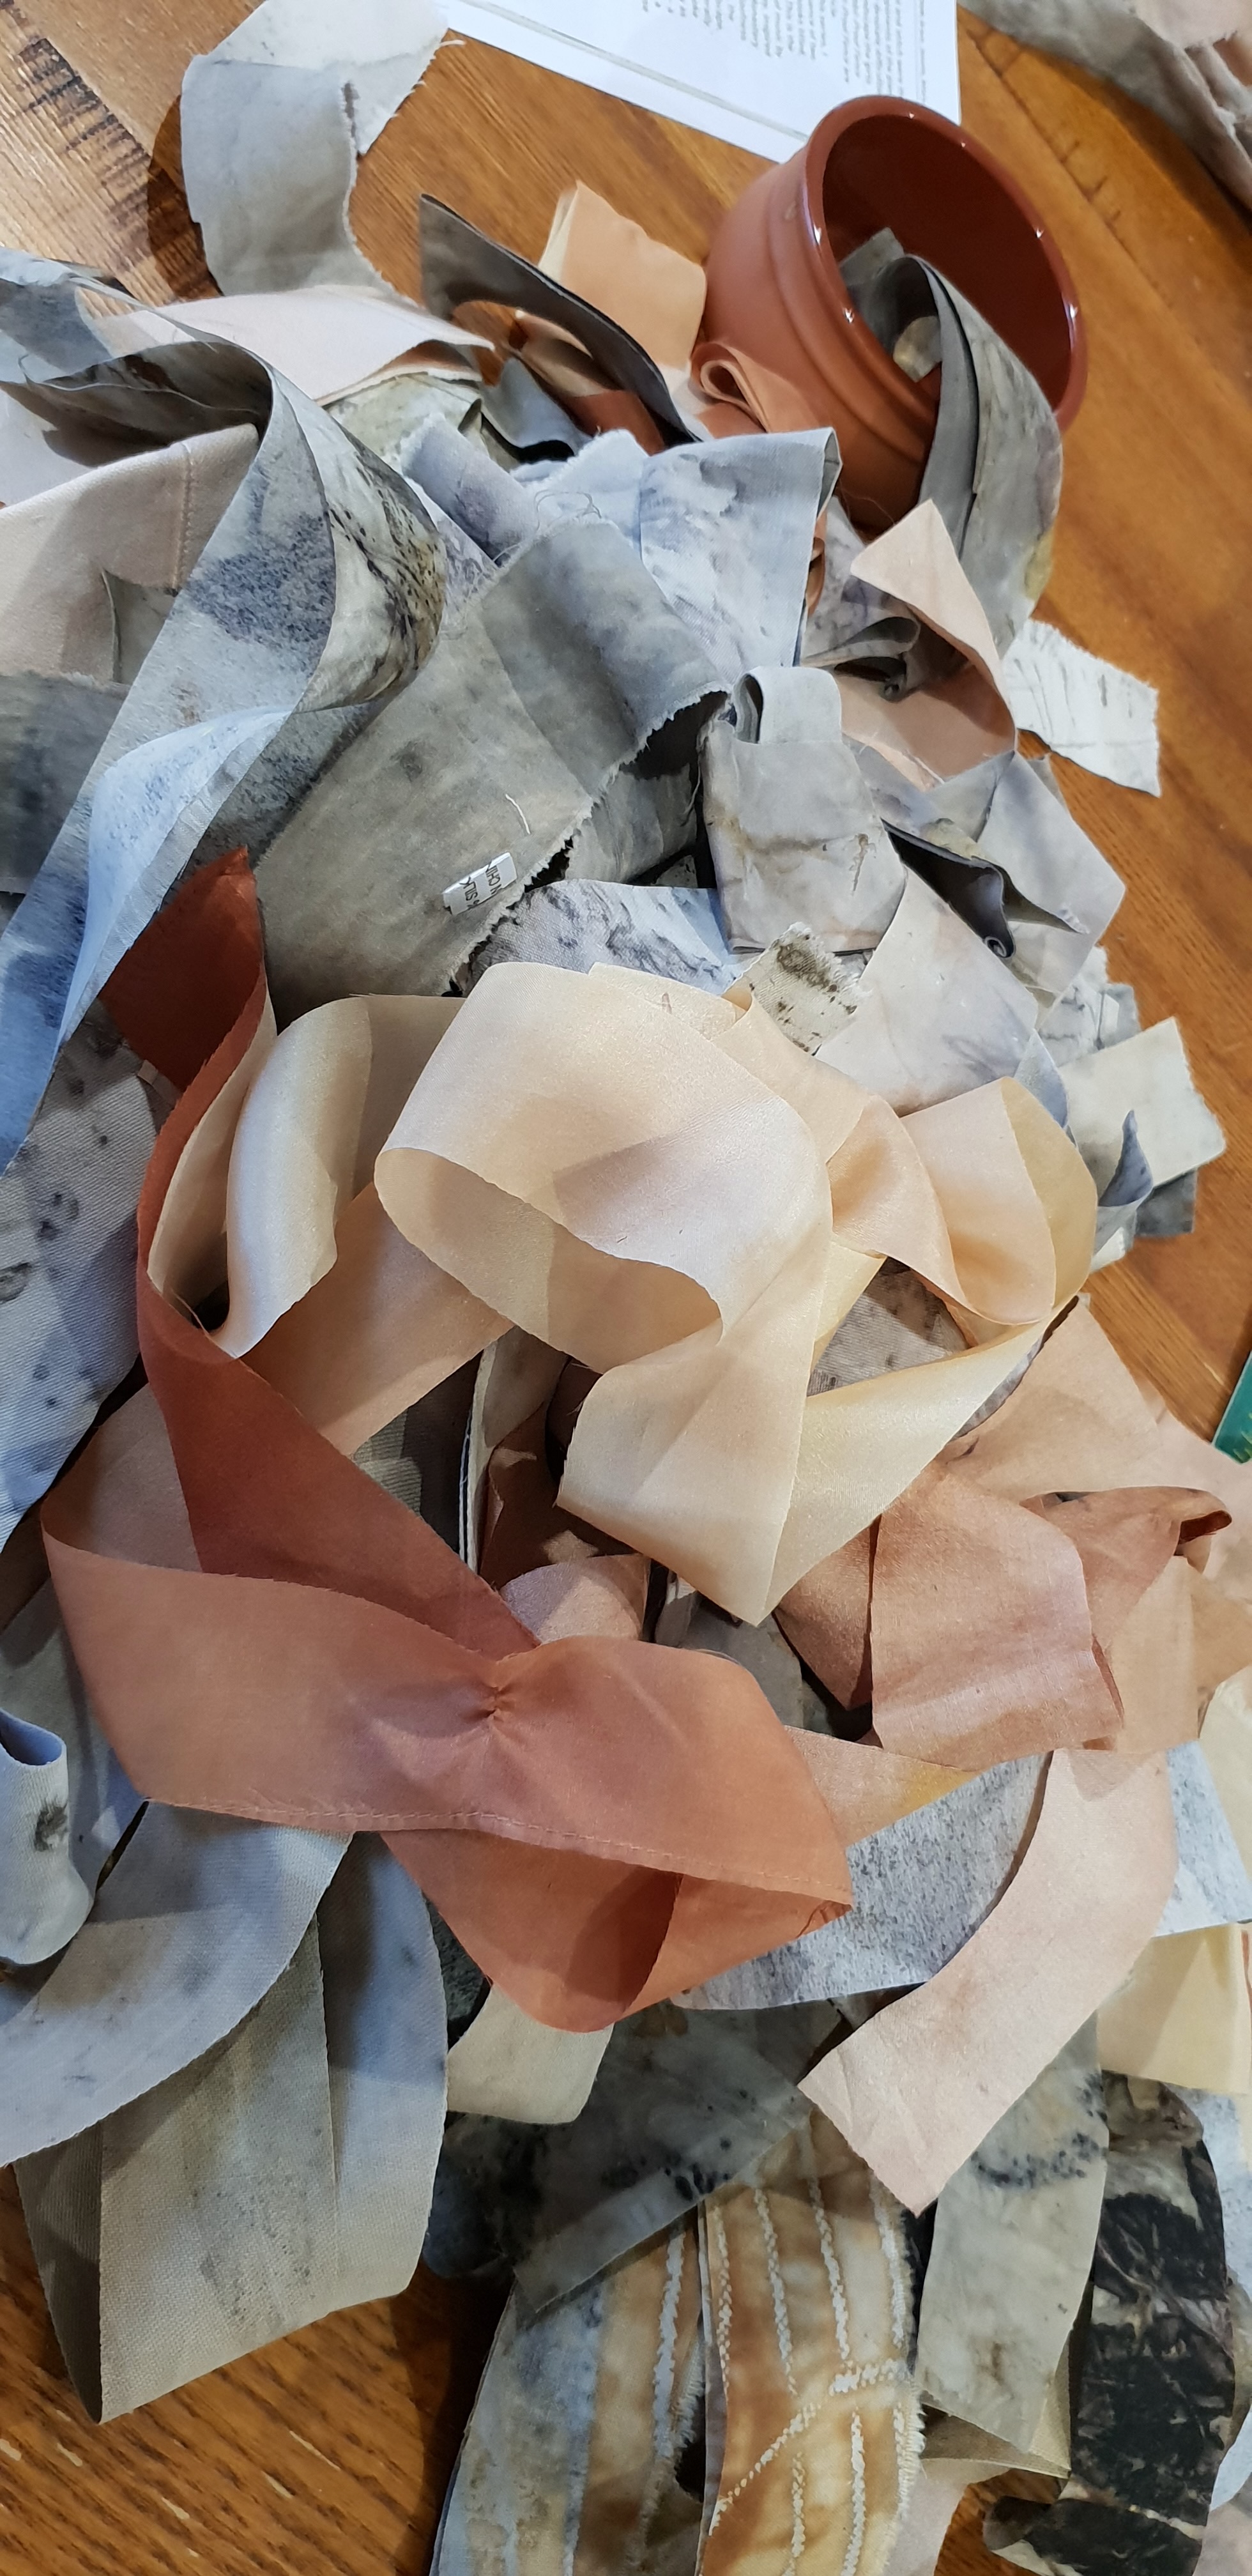
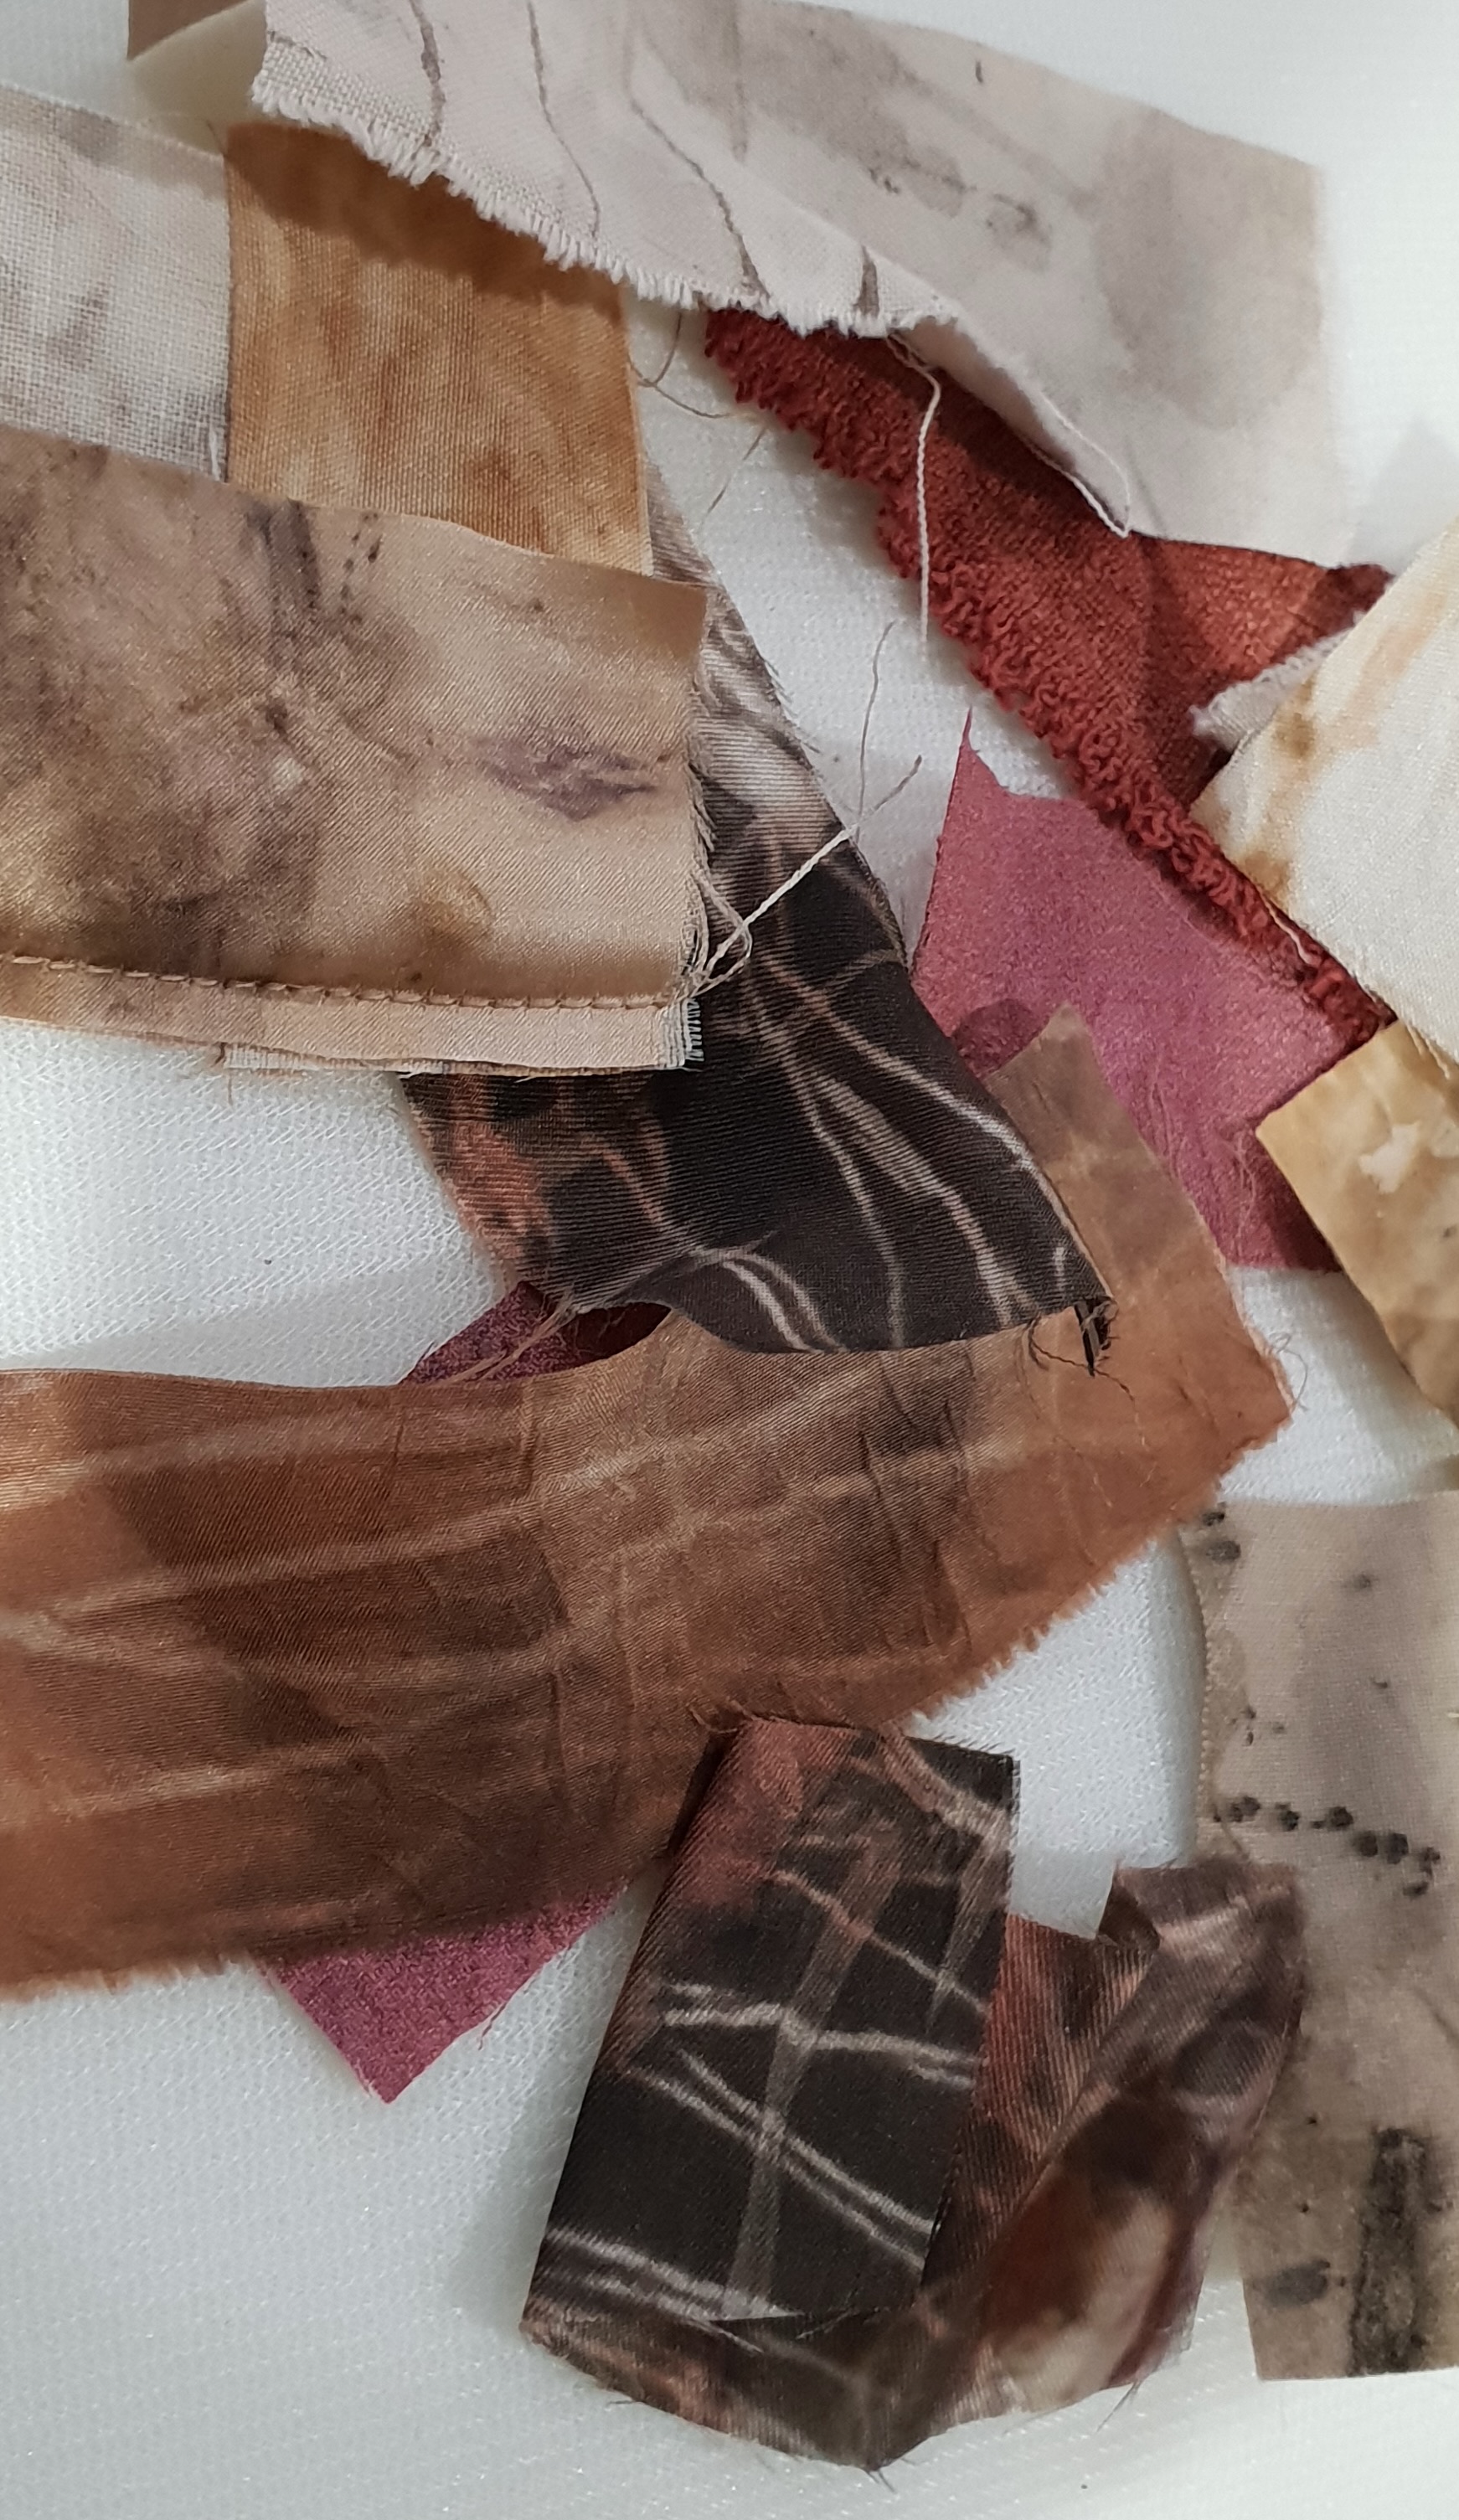
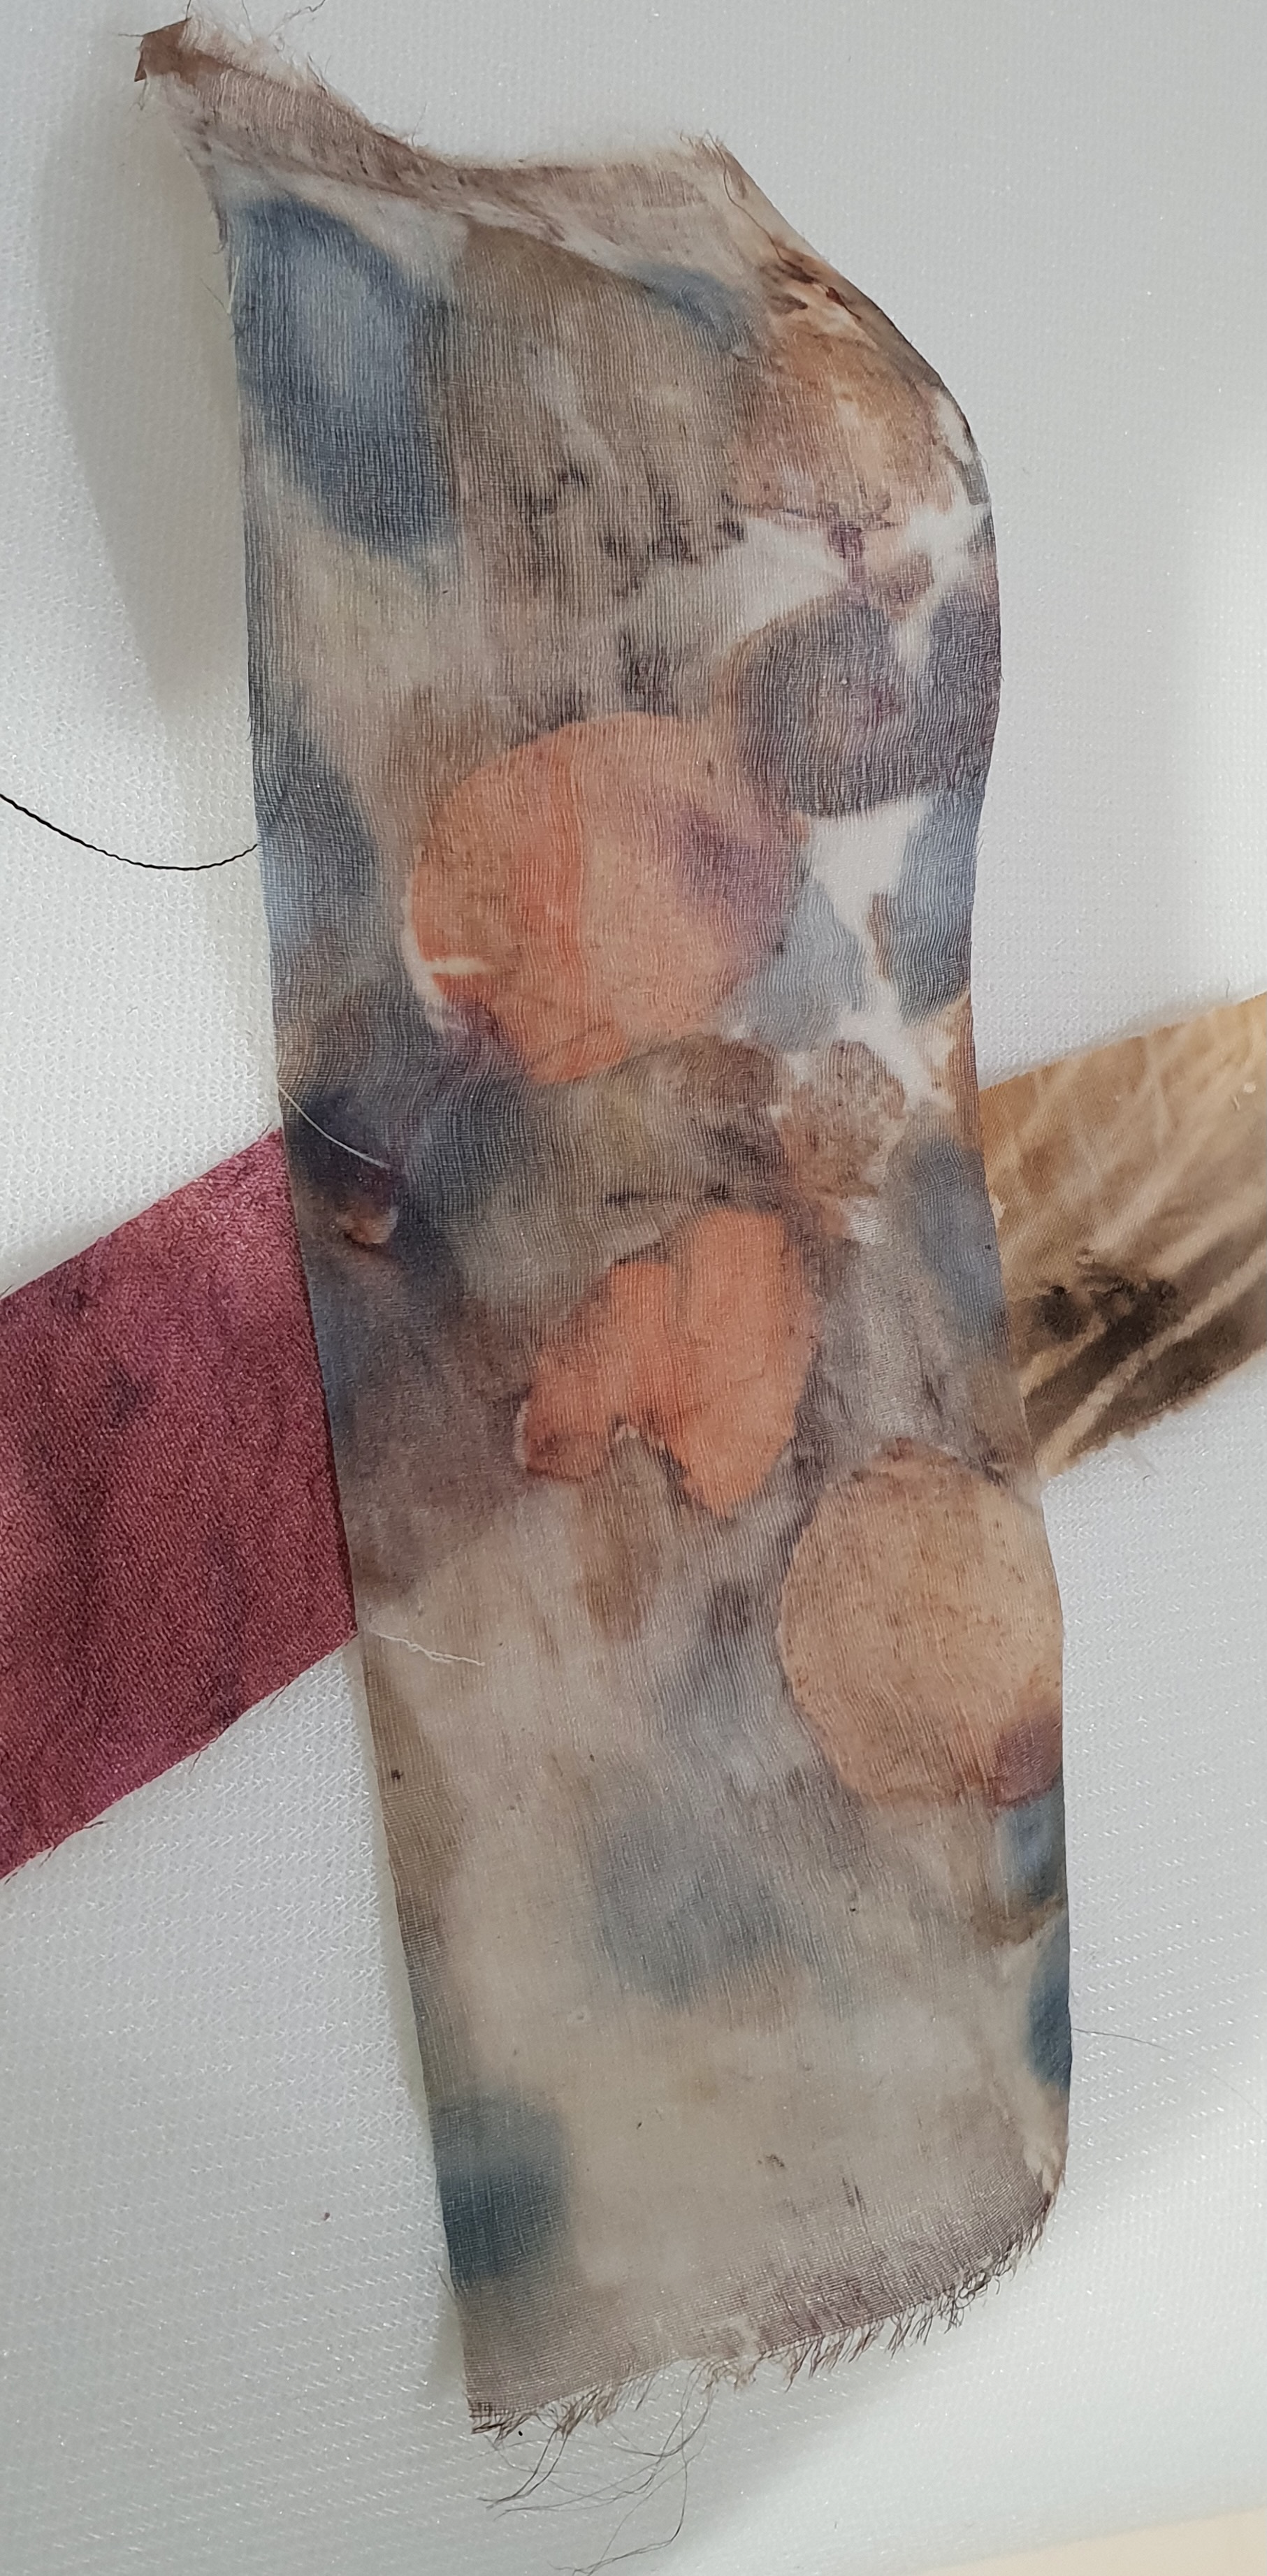
I have several baskets of recycled plant-printed cotton and silk fabrics.
I decided to use a traditional patchwork block (log cabin) to contrast the slow-making patchwork tradition with the fast fashion process. In the former, waste is virtually eliminated because even small scraps can be used. In the latter “efficiency” mitigates against careful husbandry of inputs. This results in waste on a large scale.
I cut strips of cotton and silk and some wool, all plant -printed.
Then of course each strip had to be cut into pieces of varying lengths so that the colour variations of the strips could be distributed throughout the blocks.
Because my design involved highlighting the real effect on people and the environment of fast fashion, I chose the magnifying glass as a motif. That would have to be a larger scale log cabin block. so I used wider strips for this section of the quilt and I hand embroidered quotations from “Fashionopolis” onto some of the strips.
As many people know, making log cabin blocks is tedious and piecing them together is tricky as there are so many seams to match perfectly. So many times I thought that fast fashion/making was preferable to this slow and painstaking exercise!
My design wall in the earliest stages of assembly. The newspaper is the template for the “magnifier”. Many blocks to go!Still a pile of work to go. At this point I nearly gave up but mentoring friends encouraged me to keep going…The almost* finished work titled “Who Made Your Clothes?”, 44″x44″.
I quilted the paler log cabin blocks with free motion writing of environmentally and health positive messages such as “fair wages” and “safe working places”. The it got to the point where I wanted to stitch in the ditch of the dark blocks representing a T-shirt. My machine’s shank failed so I could no longer attach feet securely.
What is the problem?
Well, none, if time is of no relevance. I could have the shank exchanged for a new one. However, I’d made another commitment involving this piece.
A few weeks ago I’d been asked by colleagues to advertise the York [Western Australia] Arts and Crafts Show to makers The reason? It’s one of the few regional art shows that still has a separate category for textiles. Support it with entries or see it potentially disappear! Having encouraged friends who are textile artists to submit an entry, I felt obliged to do so myself. I’d identified the “Who Made Your Clothes?” piece as a possible (aka the only possible) piece I could enter.
So…..it was Sunday morning ..and, while unfinished to my satisfaction, I hastily inserted a wooden baton into the pocket, secured some D-rings and a wire hanging mechanism in accordance with the requirements of the York Arts and Crafts Society and drove it to York.
Fast forward to Friday night, late, very late. An SMS came in from the boss of the show. I’d won an award and would I be available tomorrow morning for the presentation? York is about 120km east of my home so it was possible, but was this a hoax? The reply indicated that it was no hoax and so, still not knowing what award I could possibly be eligible for, I drove to York next morning.
I’m glad I made the trip because I’d won the Textile and Fibre Art category. More importantly, I got to meet the two judges who were both very committed to the idea of art which engaged/informed and told a story. So “Who Made Your Clothes?” had resonated with them both and I’d won the blue ribbon for the textile category.
As I warned at the beginning, this is an indulgent and lengthy blog. The image of the “completed” work is one I took at the gallery at the opening (after removing an errant pin!). I have no other images.
I cannot help thinking, however, that there are lessons for me in this whole episode.
When inspiration/ideas occur, go with them. Create art that means something to you.
You can never predict what the judges will value; celebrate the wins but don’t grieve over the “non awards”
Technique is important but in some settings it may be secondary to the story your work is telling.
If you are into blogging , take photos BEFORE your deliver the work
Note that this particular Award did not require, or permit, an artist’s statement so the clarity of the message needed to be VERY clear from the work itself.
Anyway, the York Arts and Crafts Show is on until next Sunday 16th October for those of you who fancy a day out in an historic town with great galleries, cafes, and numerous boutique stores….
I love making fabric out of yarn using knitting and crochet plus hand stitch.
A recent request, in the context of an upcoming exhibition, to provide some background images of my work and perhaps some work in progress, prompted me to drag out a half- baked piece from the cupboard…
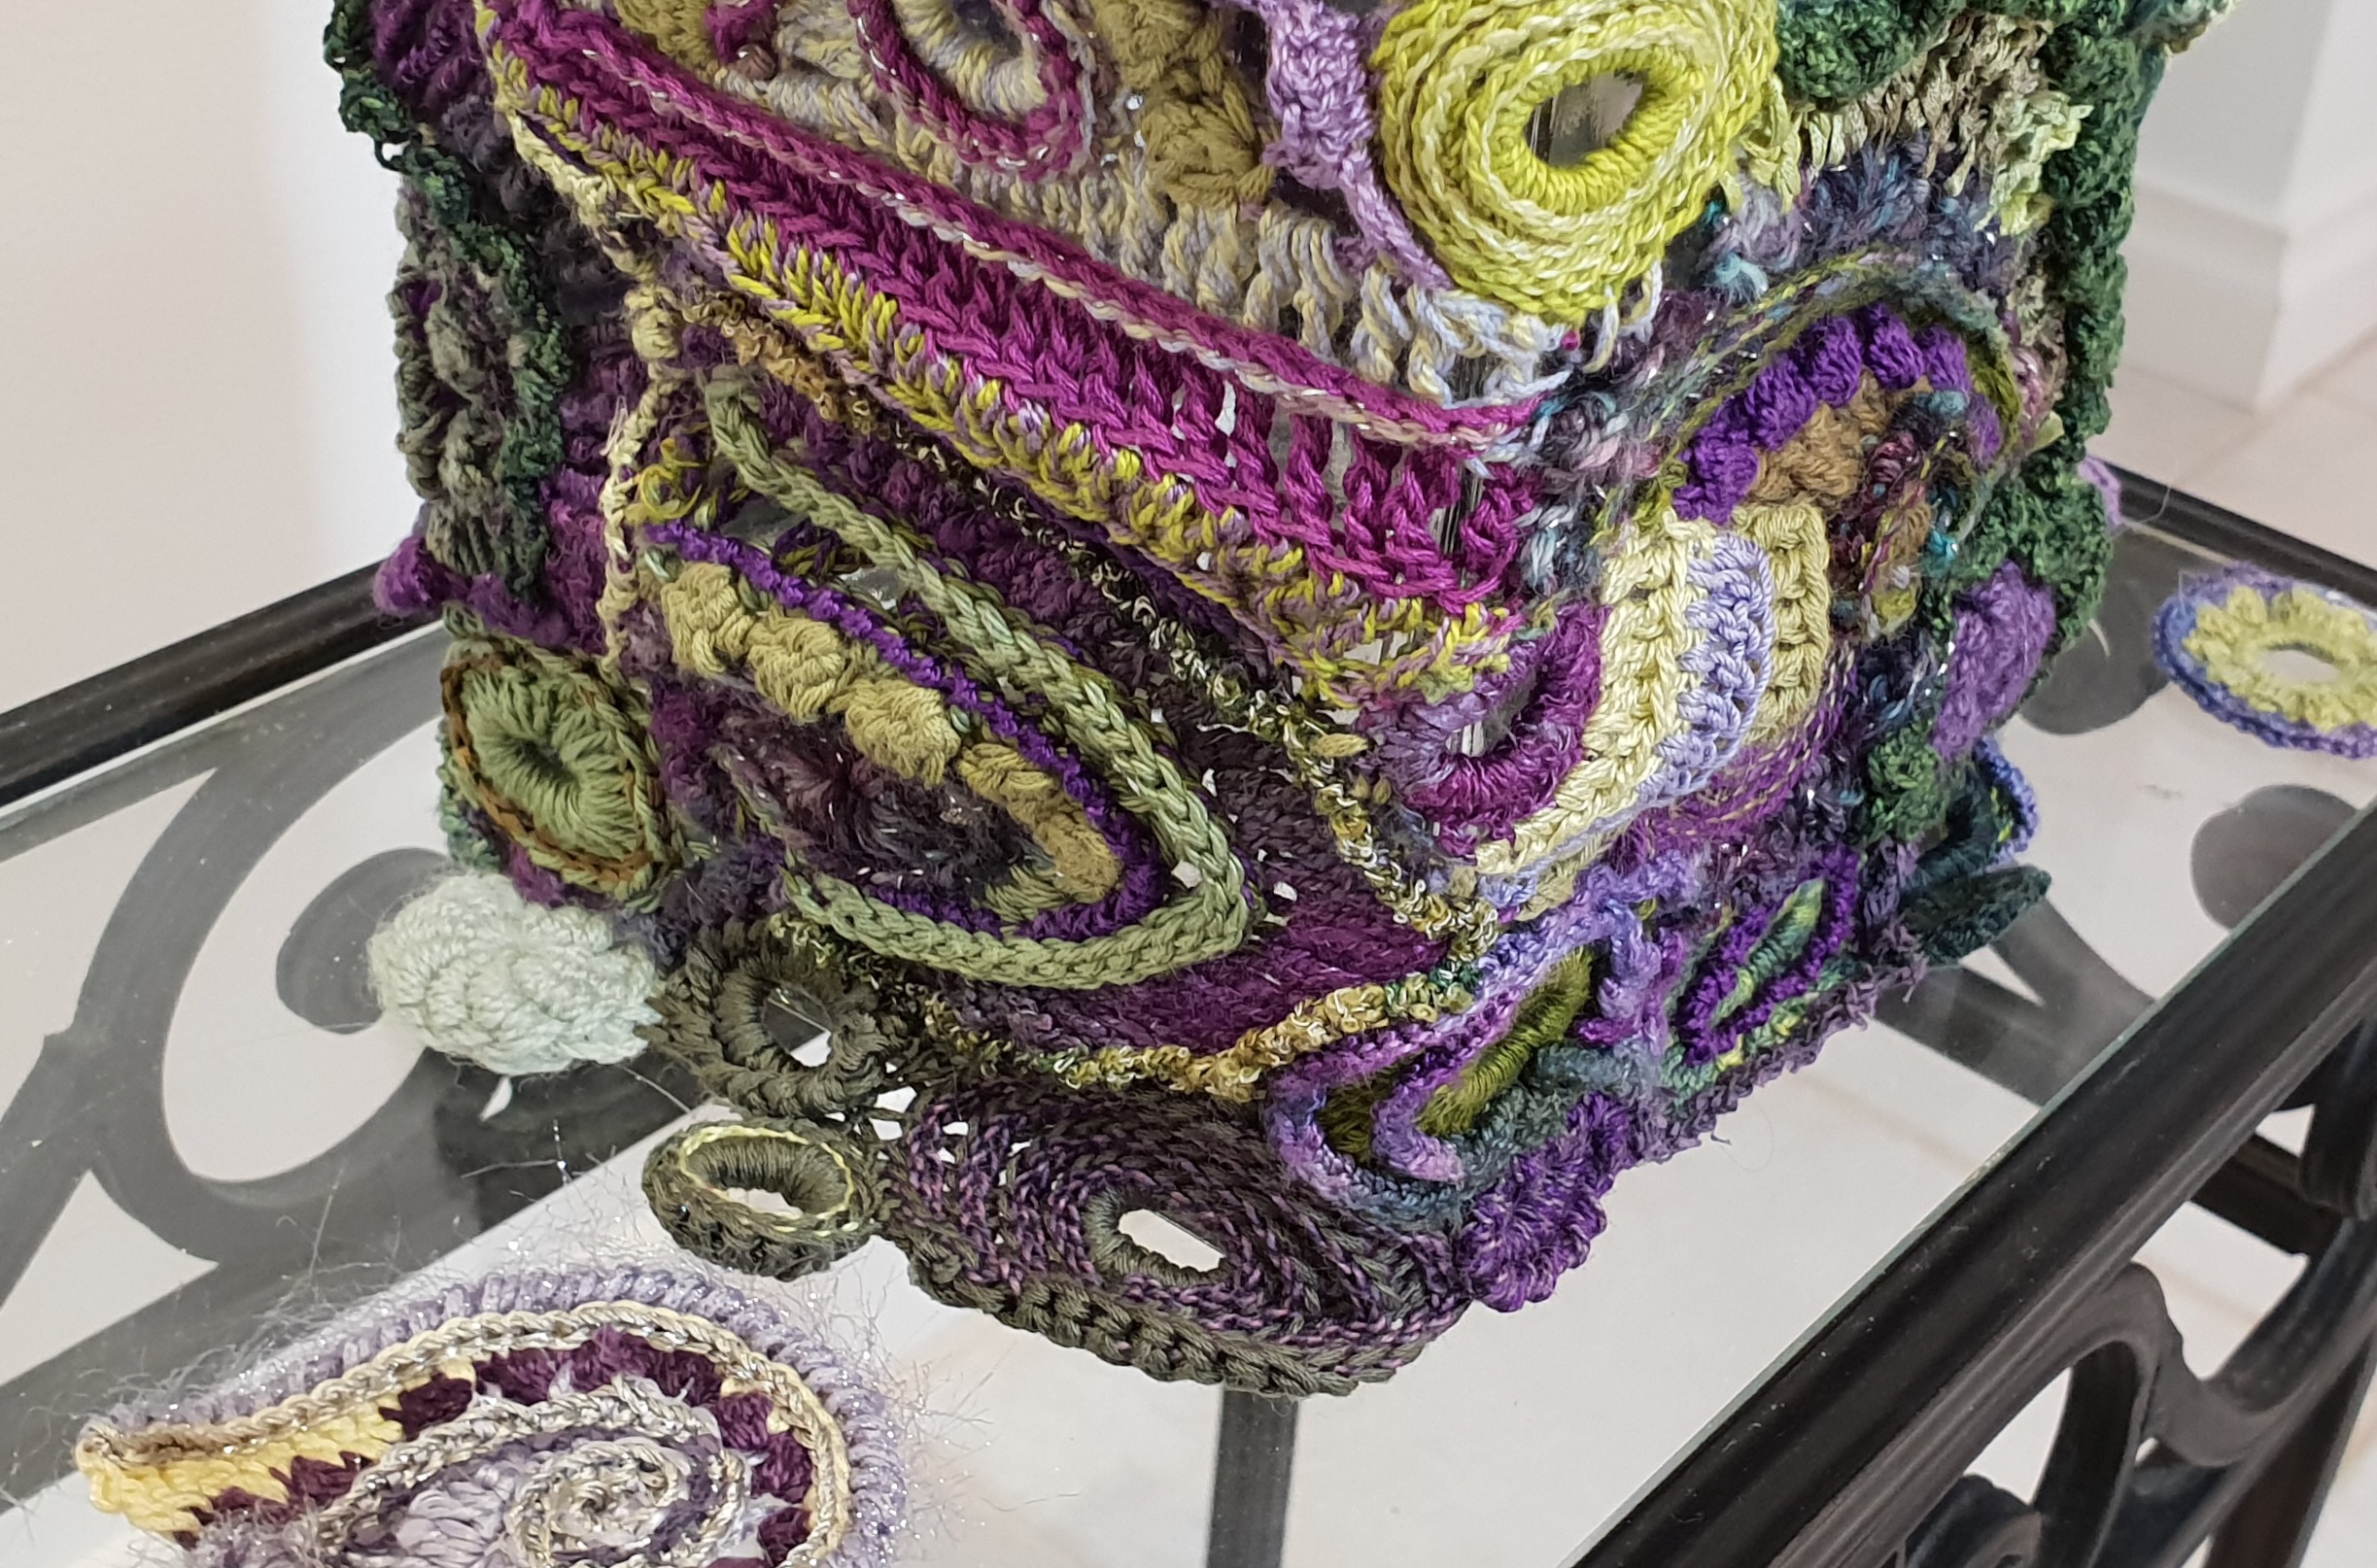
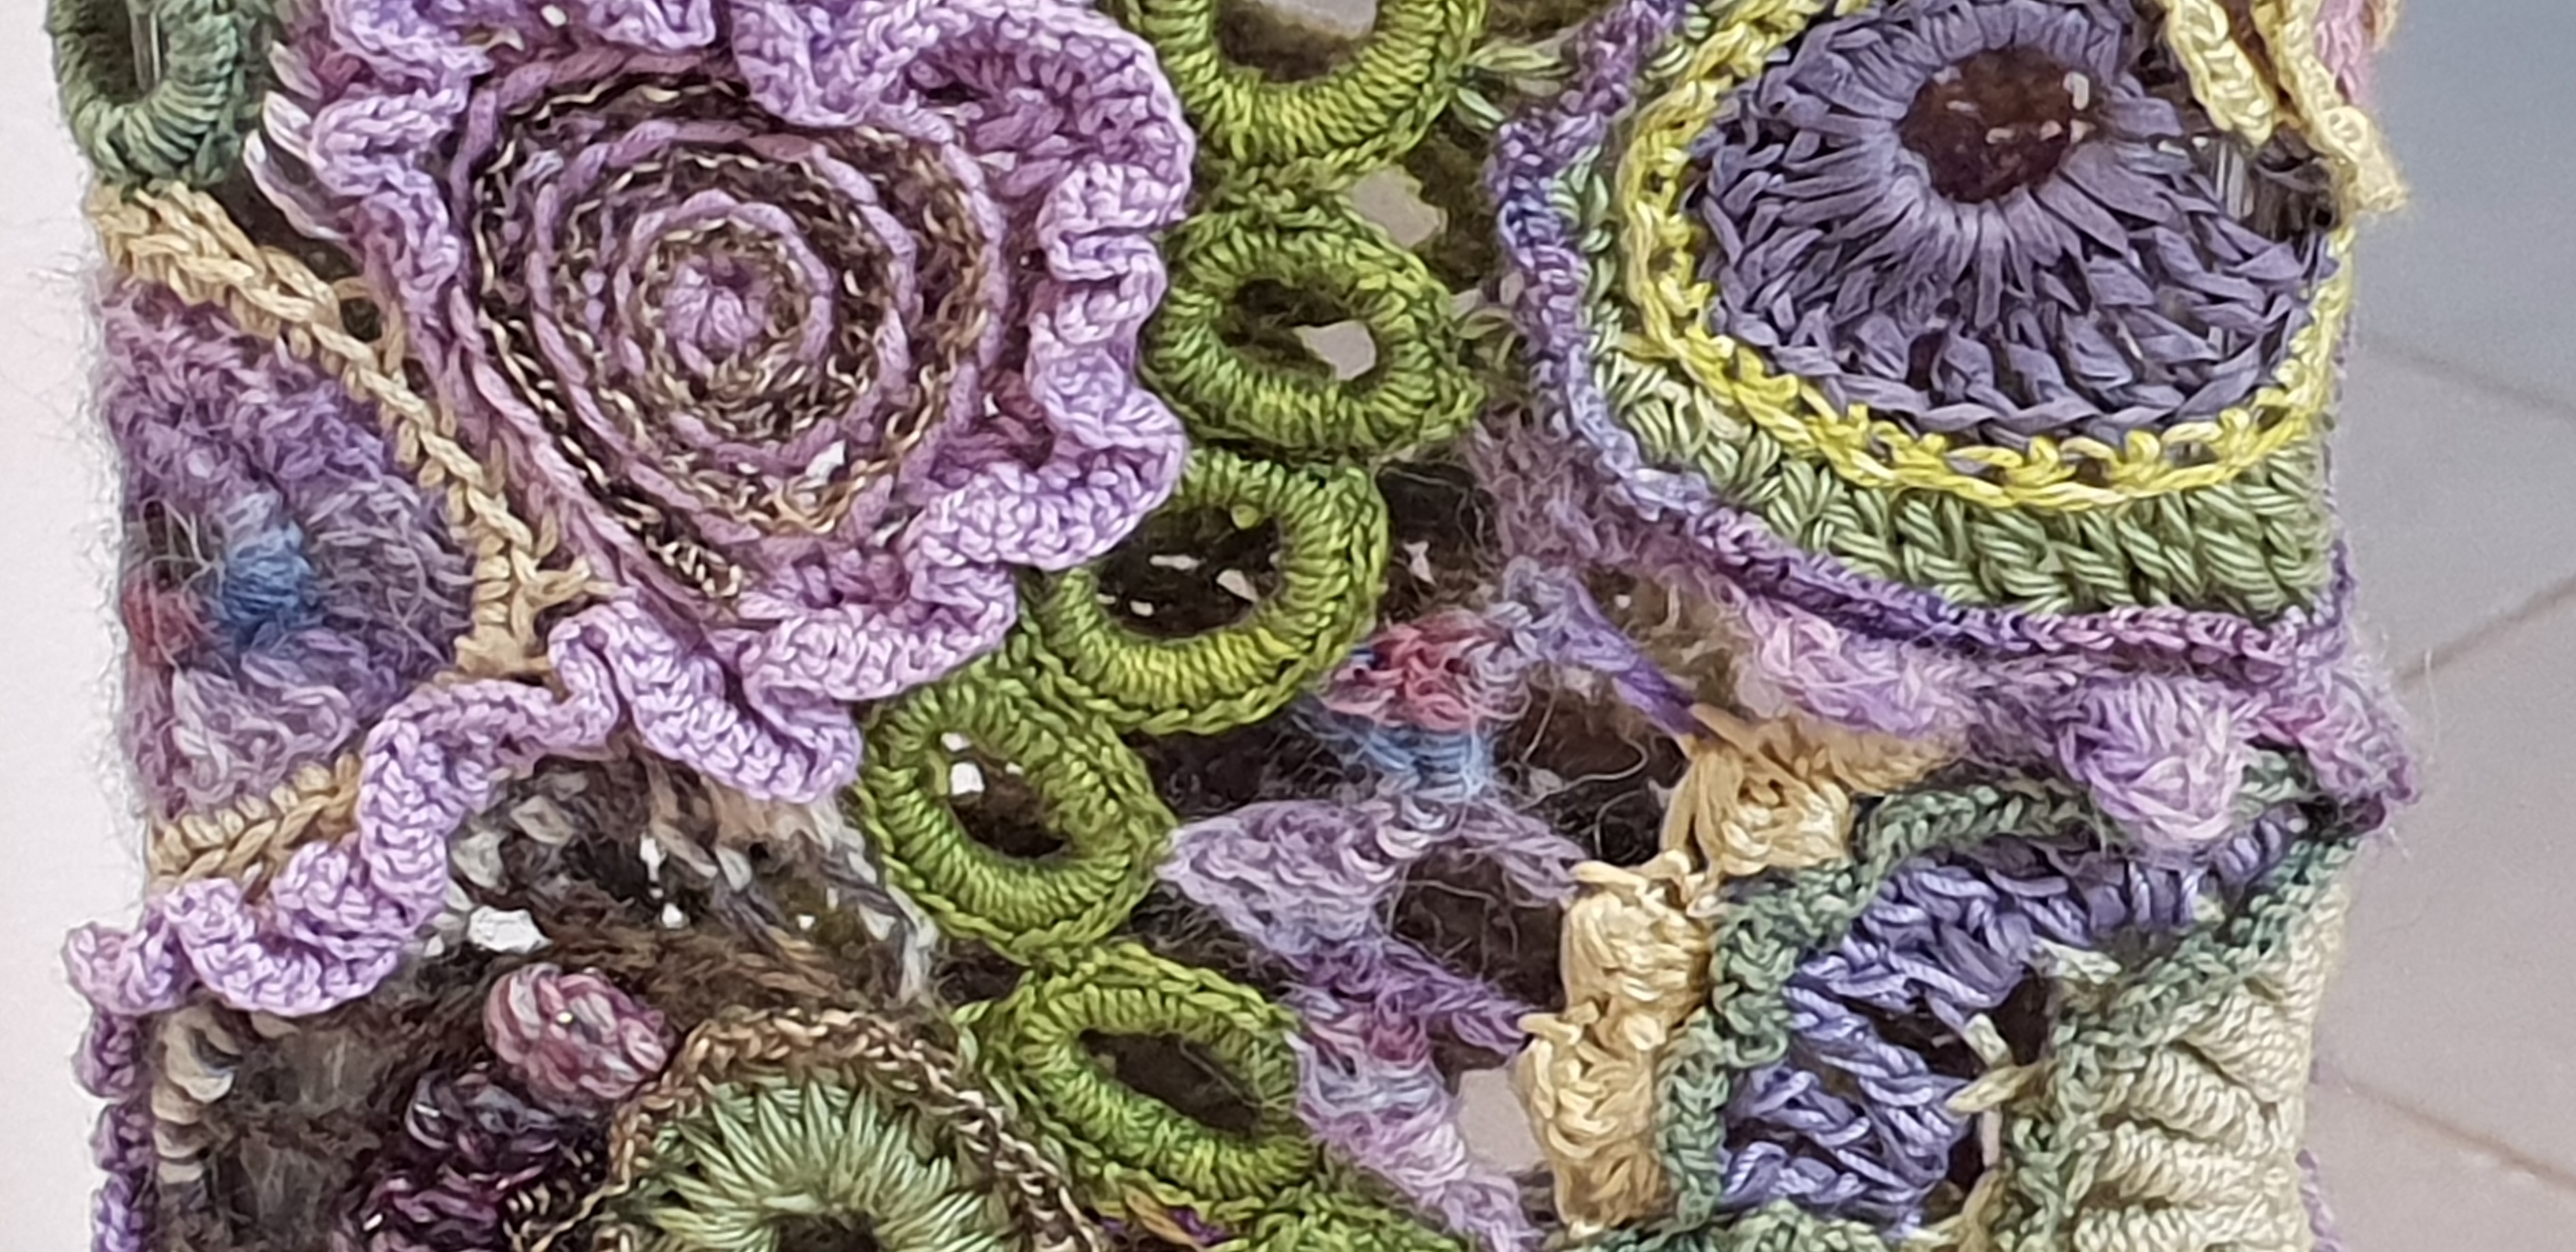
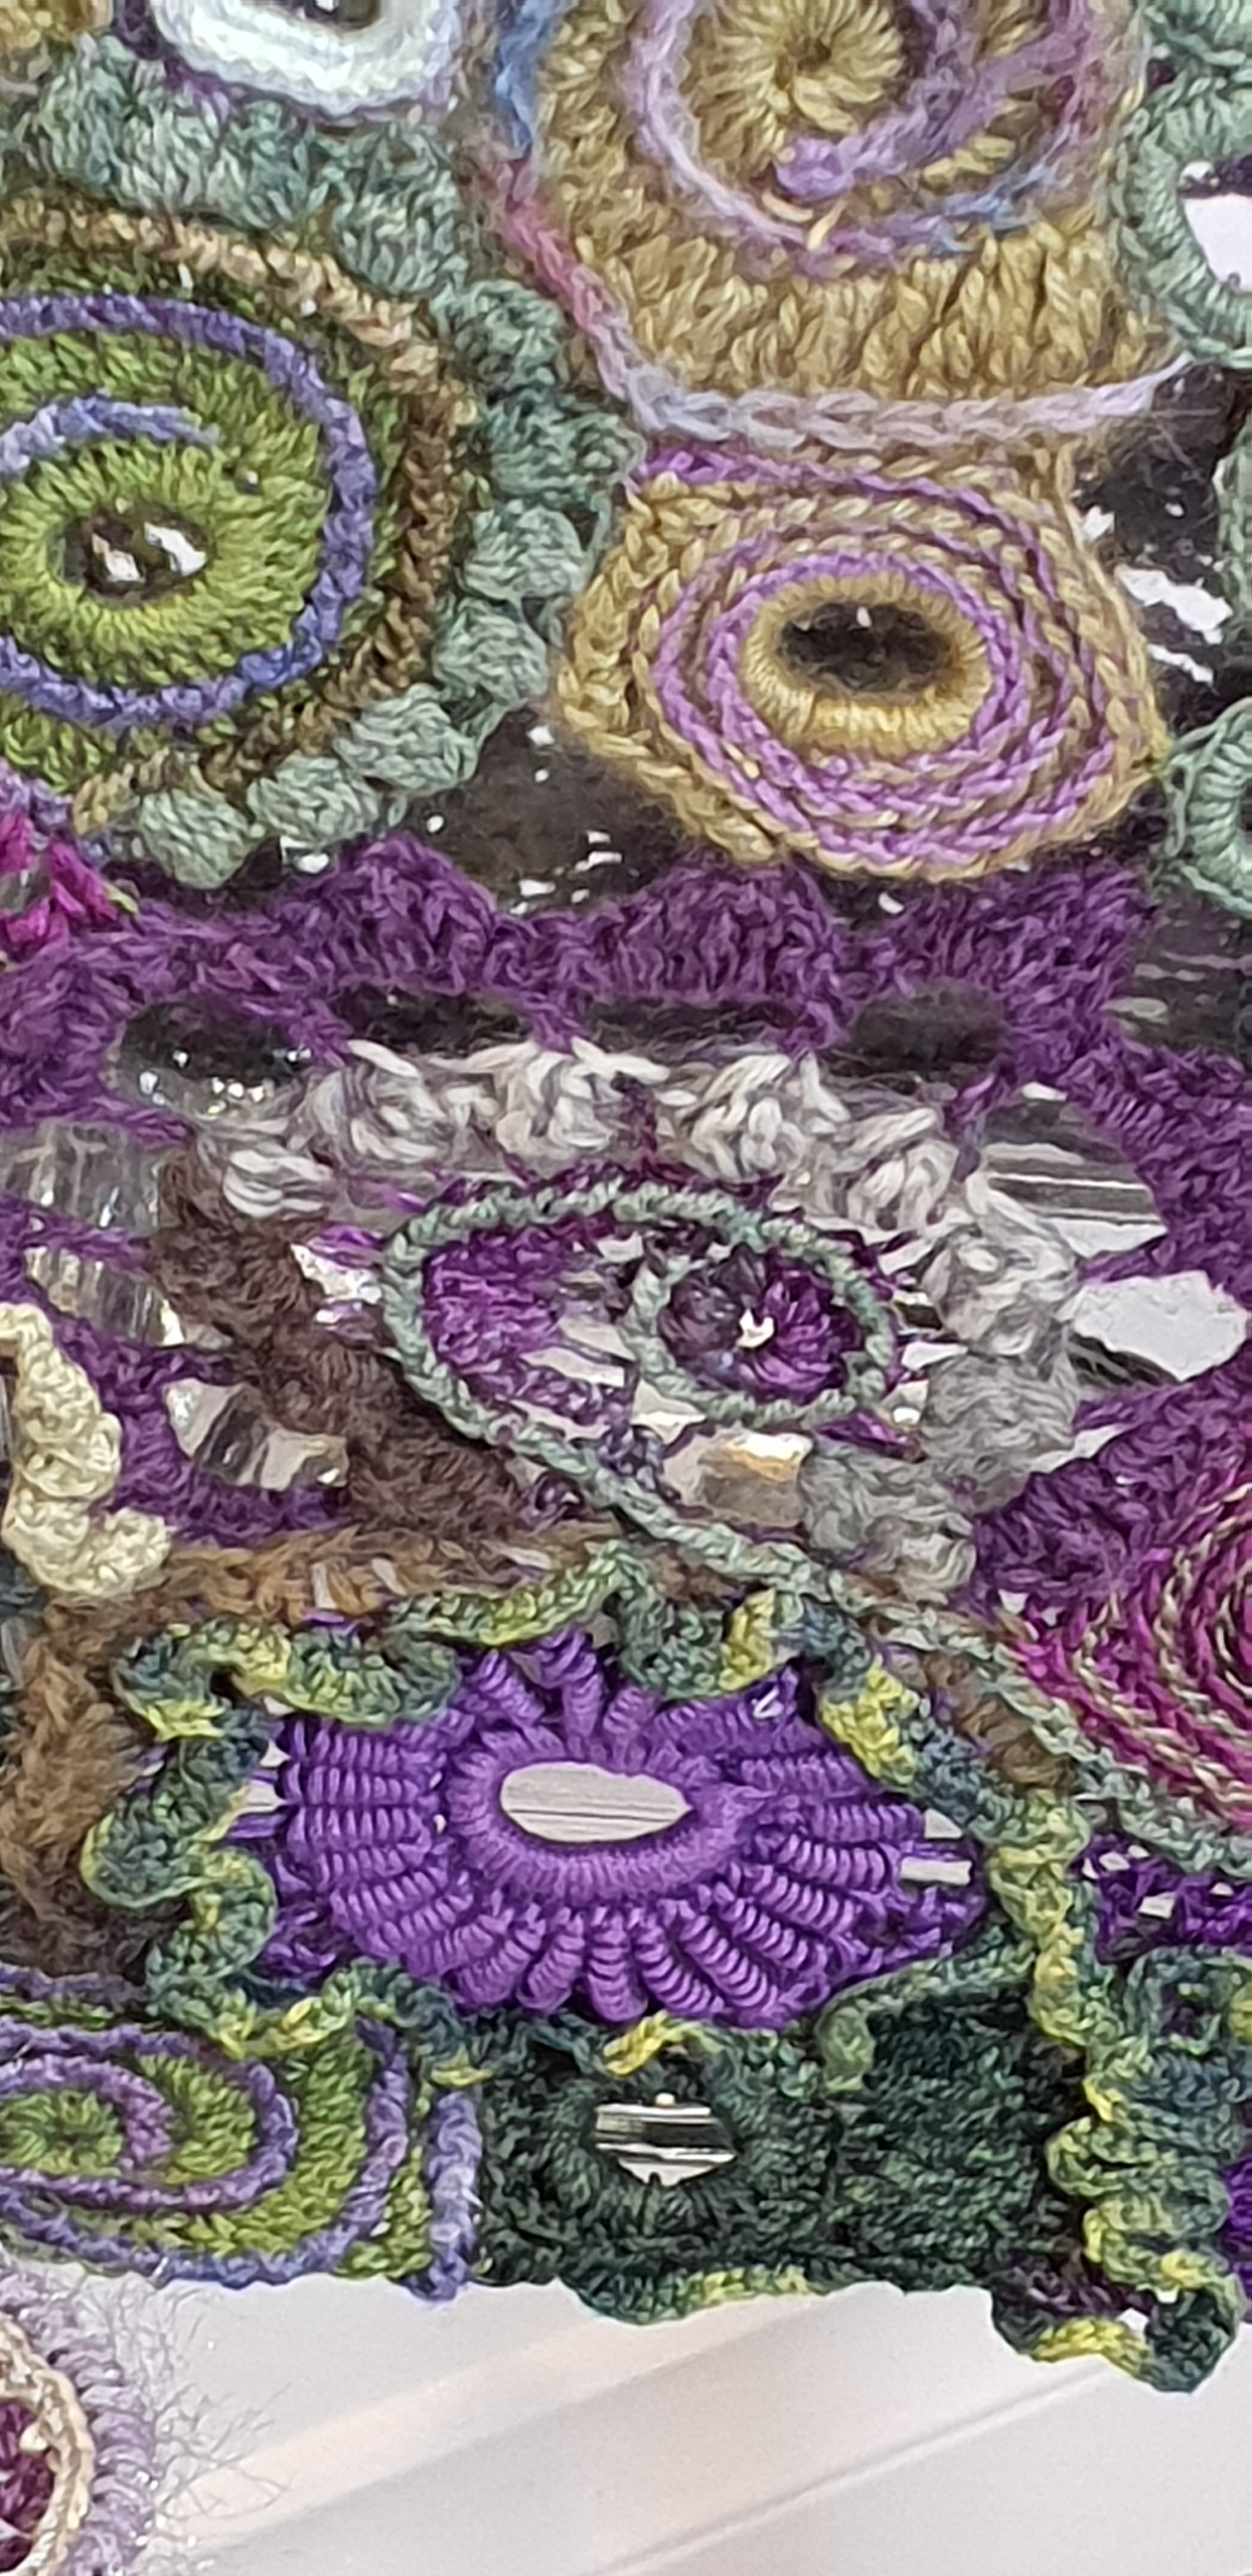
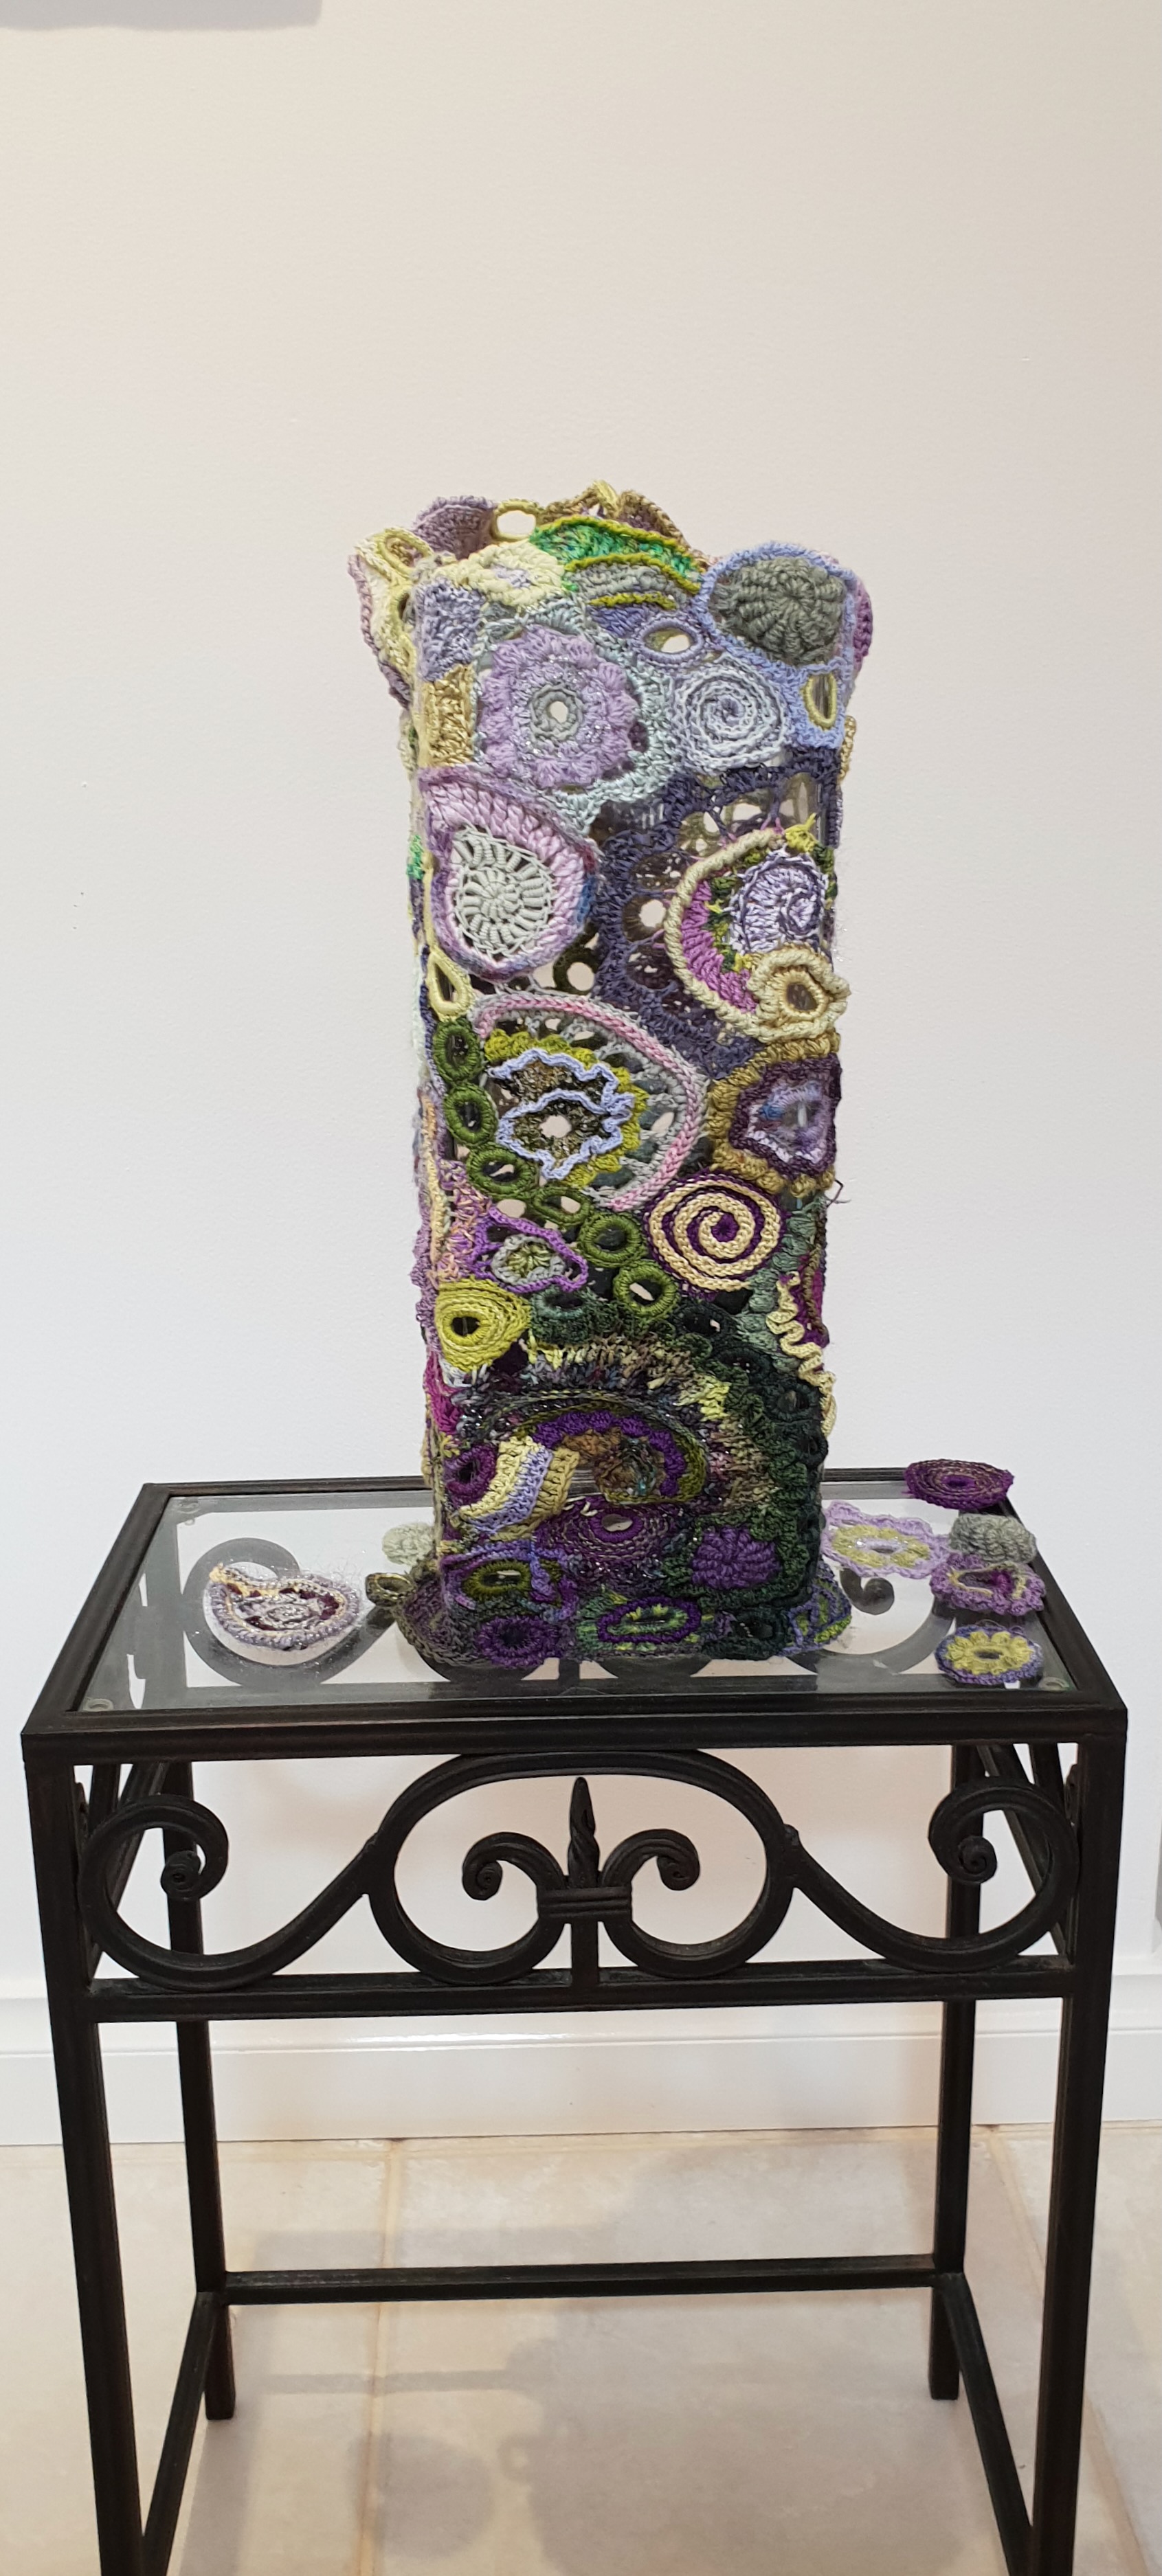
I stretched it over a square glass vase and rather liked the effect, especially when I added some loose motifs at the base.
Shaded freeform crochet and knitting motifs moulded over square glass vase with additional motifs at bottom.The bottom of the created “vase” where the thread is darkestA detail of the bottom of the darkest section of the vaseThe medium section of the vase in detailAnother detail of the “vase”.The vase as it’s displayed…
I’m going to continue with this series. I’ll start with the WIP in the same bag as the above material.
I have no idea what this will turn itself into. But it will be fun!
I’m not hoarding, promise. But I must admit I am probably a bit ambitious when I go to the green grocer. For example, I bought a large eggplant six days ago and it’s still in the crisper. I would have been thinking of curried eggplant with fish and/or naan. Or eggplant and minced lamb with cous cous.
None of the options materialised during the week so tonight I turned the eggplant into baba ganoush. That way, it’s an option in coming days for serving with lamb kofta, or with naan as a nibble/meal with olives and a green such as rocket, Warragul greens (in the garden) or lettuce. It could be a canapé option for a Friday night sundowner and would even make a great sauce for black bean rissoles I reckon. Worst case (?) it can be lunch with rice crackers. Maybe two lunches if I’m restrained. Oh, and it can be frozen….
So…..
Put an eggplant on the gas burner for a few minutes
2. When I hear a sizzle or see smoke, I turn it on the burner. I keep turning in this fashion until it seems to be fully blistered and I can smell some smokiness. I might add that I try not to peer at it too closely as I suspect that there is a potential for the insides to explode with the development of steam from internal heat pressure. It’s never happened but….
3. When it’s fully blistered, put it in an ovenproof container in an oven pre-heated to at least 180 deg celsius.
4. If it’s a large, dense eggplant it might need 30-40 minutes of baking but check it occasionally to ensure it becomes soft but not burnt.
When soft right through, pull out of the oven and cool. If there are bits stuck on the bottom of the container , pour in a little wine (don’t fret; whatever you’re drinking will be fine) to soften and make a lovely additive liquor
When cool, peel it and put the peel in the compost. Put the cooked eggplant into the food processor.
Add a quarter of a cup of tahini, two or three cloves of garlic (depending on taste and your assessment of how large your eggplant is), half a cup of lime juice, one tsp of ground cumin; and a small handful of parsley into the food processor (I use a Thermomix} and process.
5. Turn out and either put in an airtight container for tomorrow or serve and garnish for later tonight. The image below is pretty bald; it’s what I would seal and put in the fridge. If serving, I’d sprinkle with herbs and serve with supporting bowls of carrot sticks; celery sticks; interesting crackers and olives. For colour, and particularly if you have not persevered with your smoking of the eggplant, a sprinkling of smoked paprika is a good idea.
6. If this is part of a larger scale catering effort, this recipe qualifies as vegetarian, vegan and gluten free. Of course, you need to offer appropriate things to scoop it with to enable patrons to maintain that status!
7. Finally, I recommend you cook this on your gas point a day before your cleaner is due!
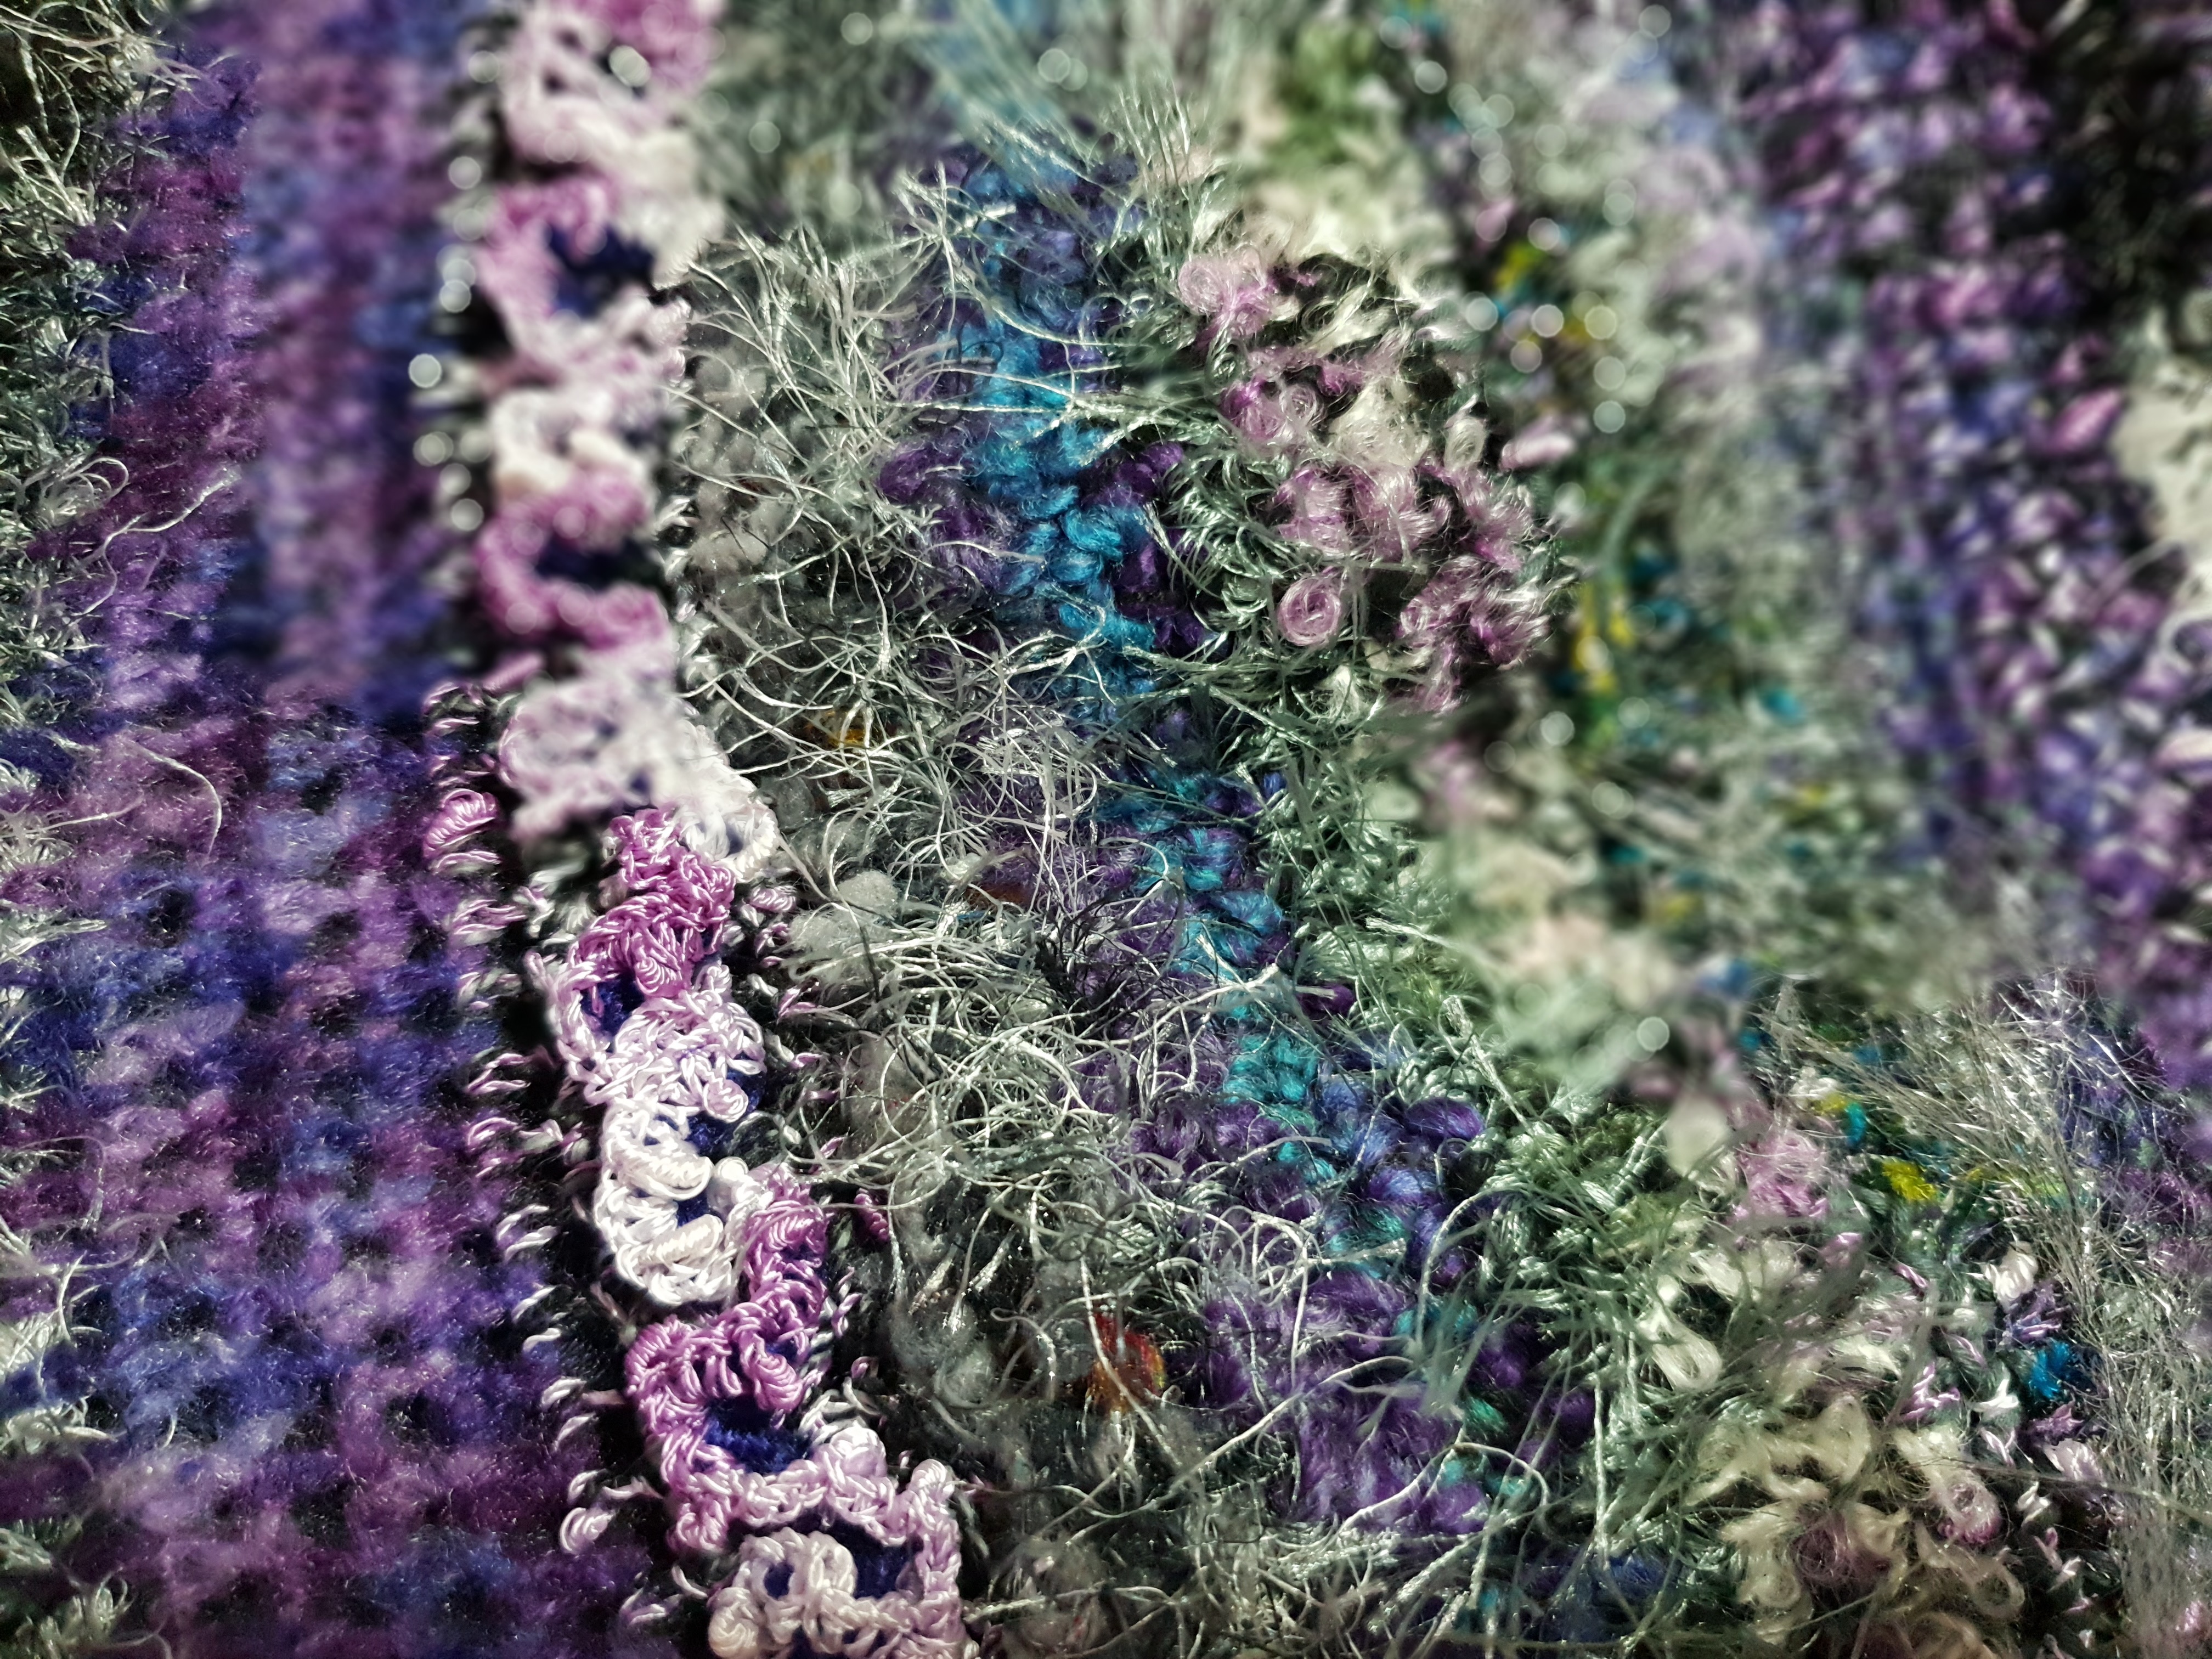
I’m probably not alone in having accumulated lots of the “novelty” yarns of the nineties and noughties. You know the kind: hairy, glitzy, chunky, loopy and often all these in the same ball!
Time, I thought, to get rid of them. How? I doubt anyone would want them as they are very “yesterday”.
I no longer use thick yarns myself, preferring to crochet finer threads that give good stitch definition.
Yet the thought of simply throwing them away didn’t appeal. What a waste.
Sooooooo…….why not crochet some bags of various sizes that I can use for shopping as well as for storage?
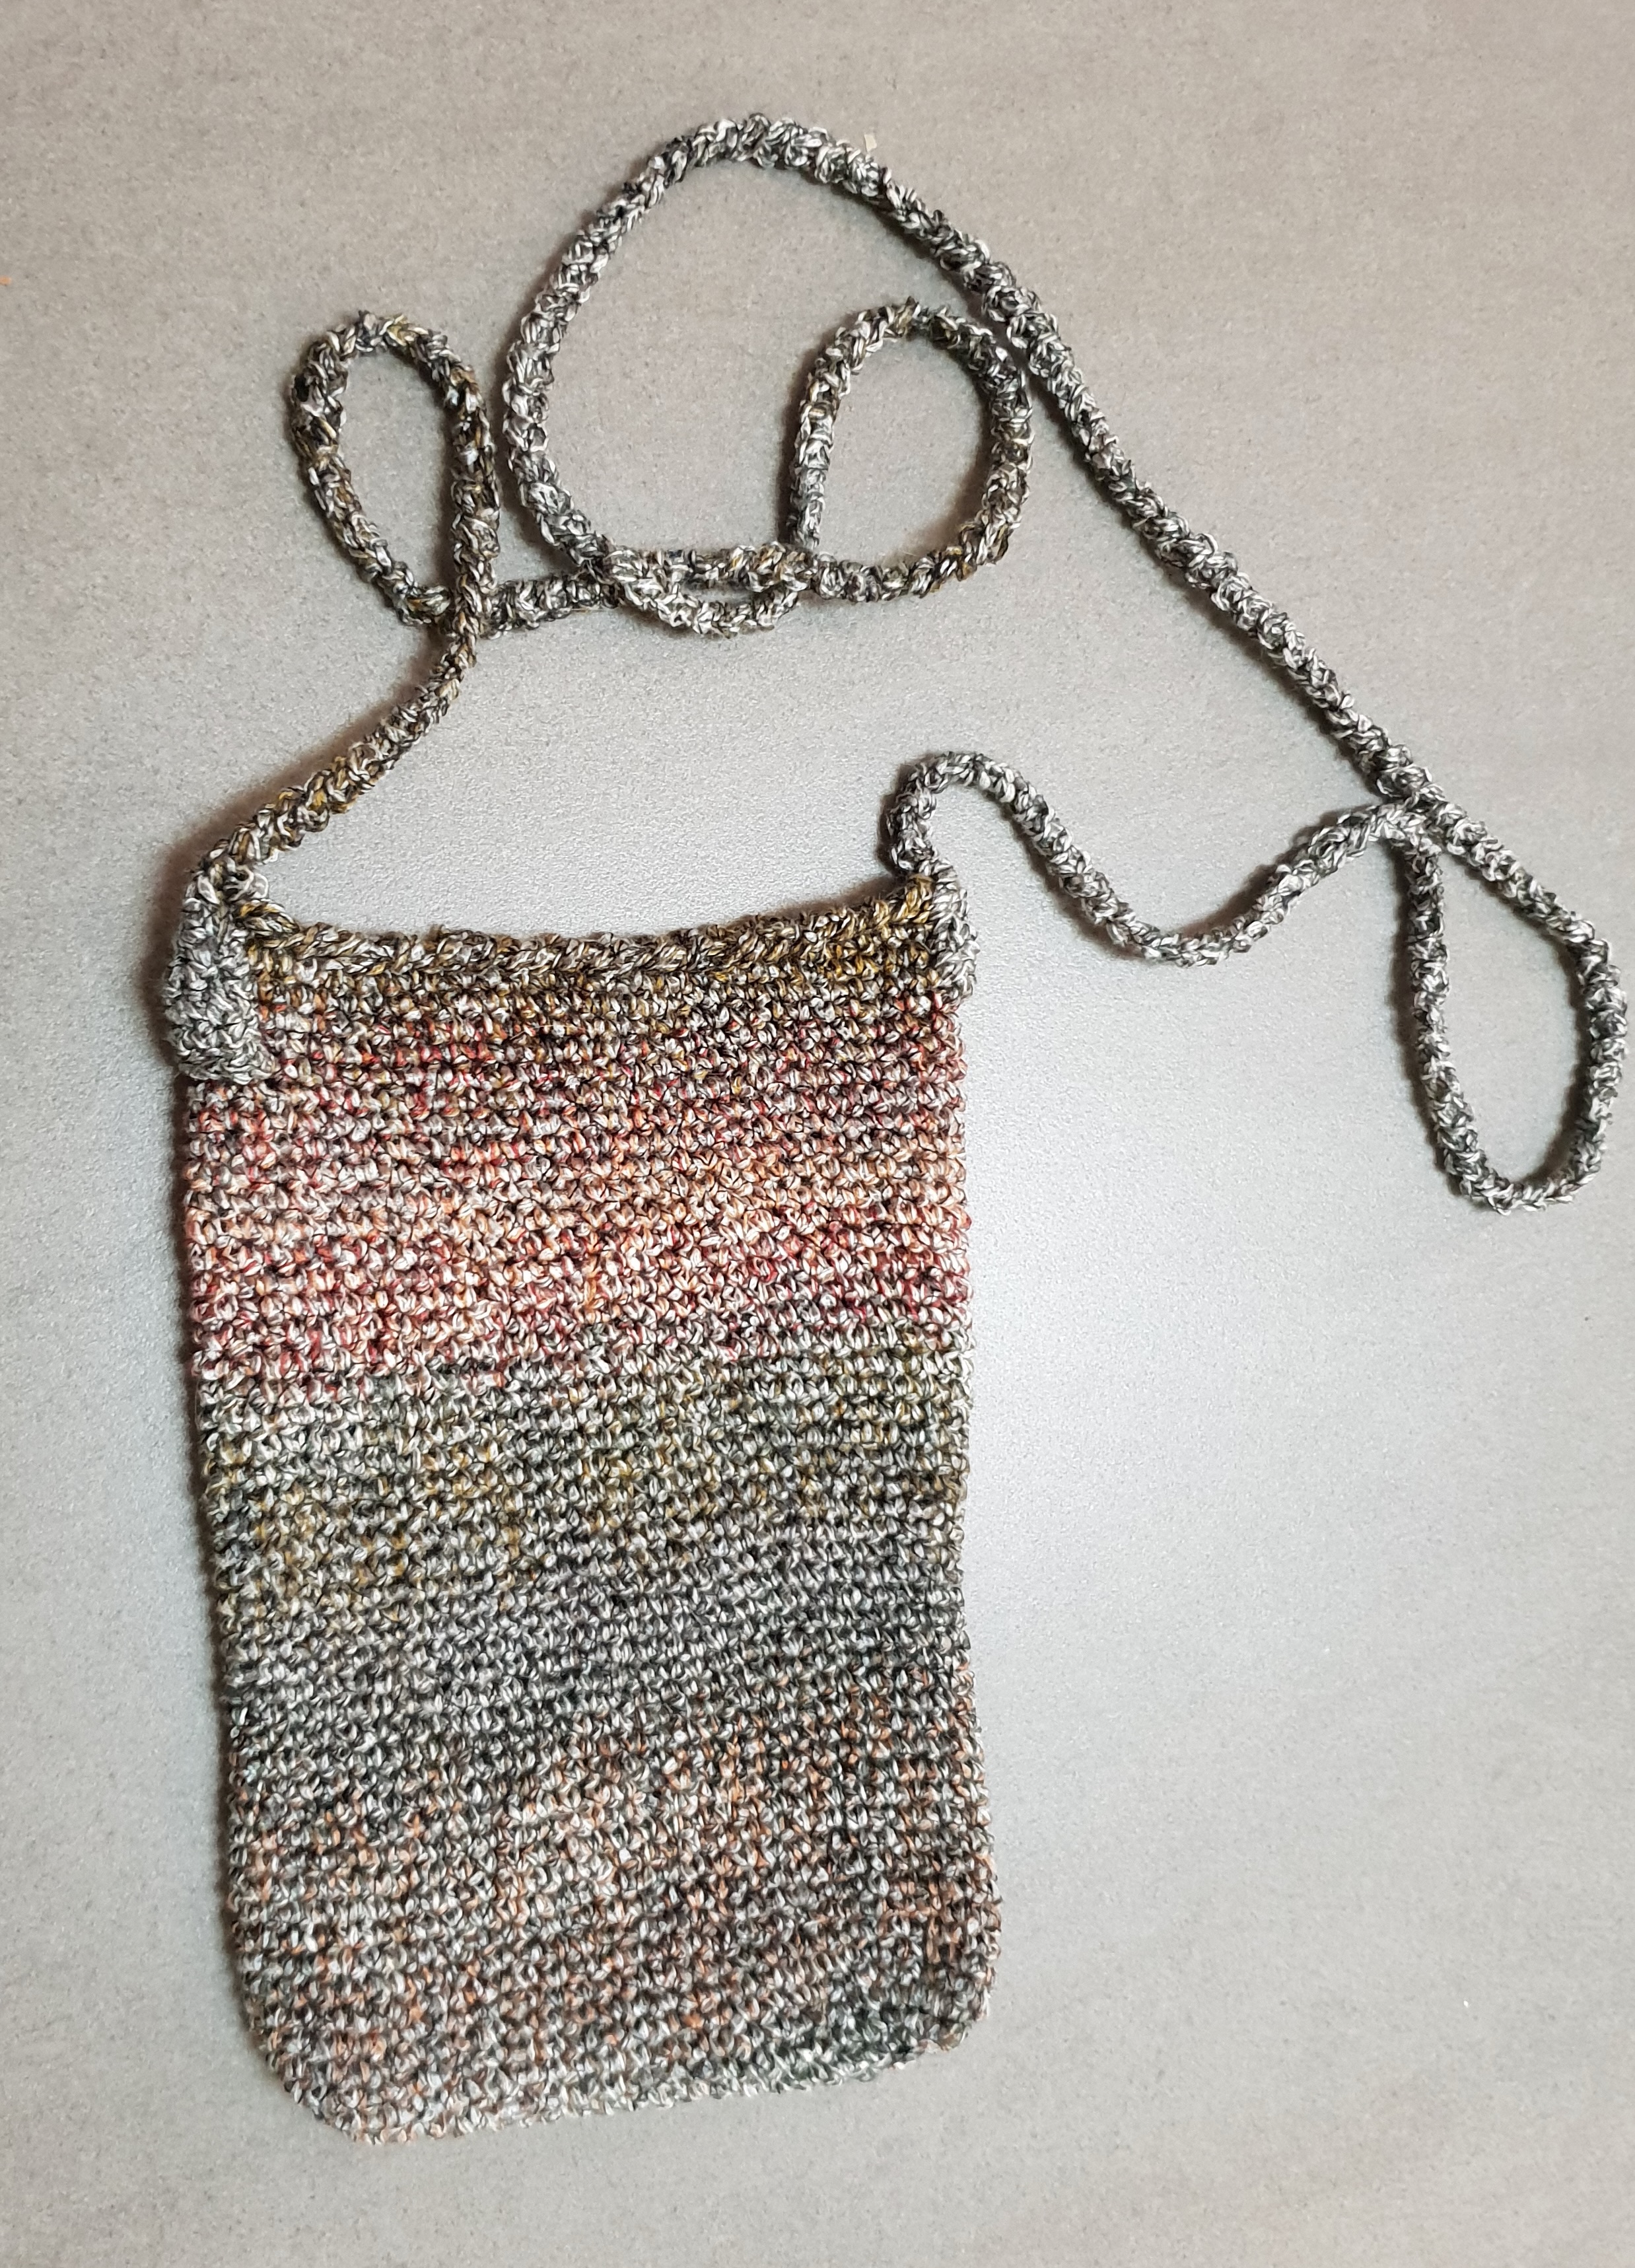
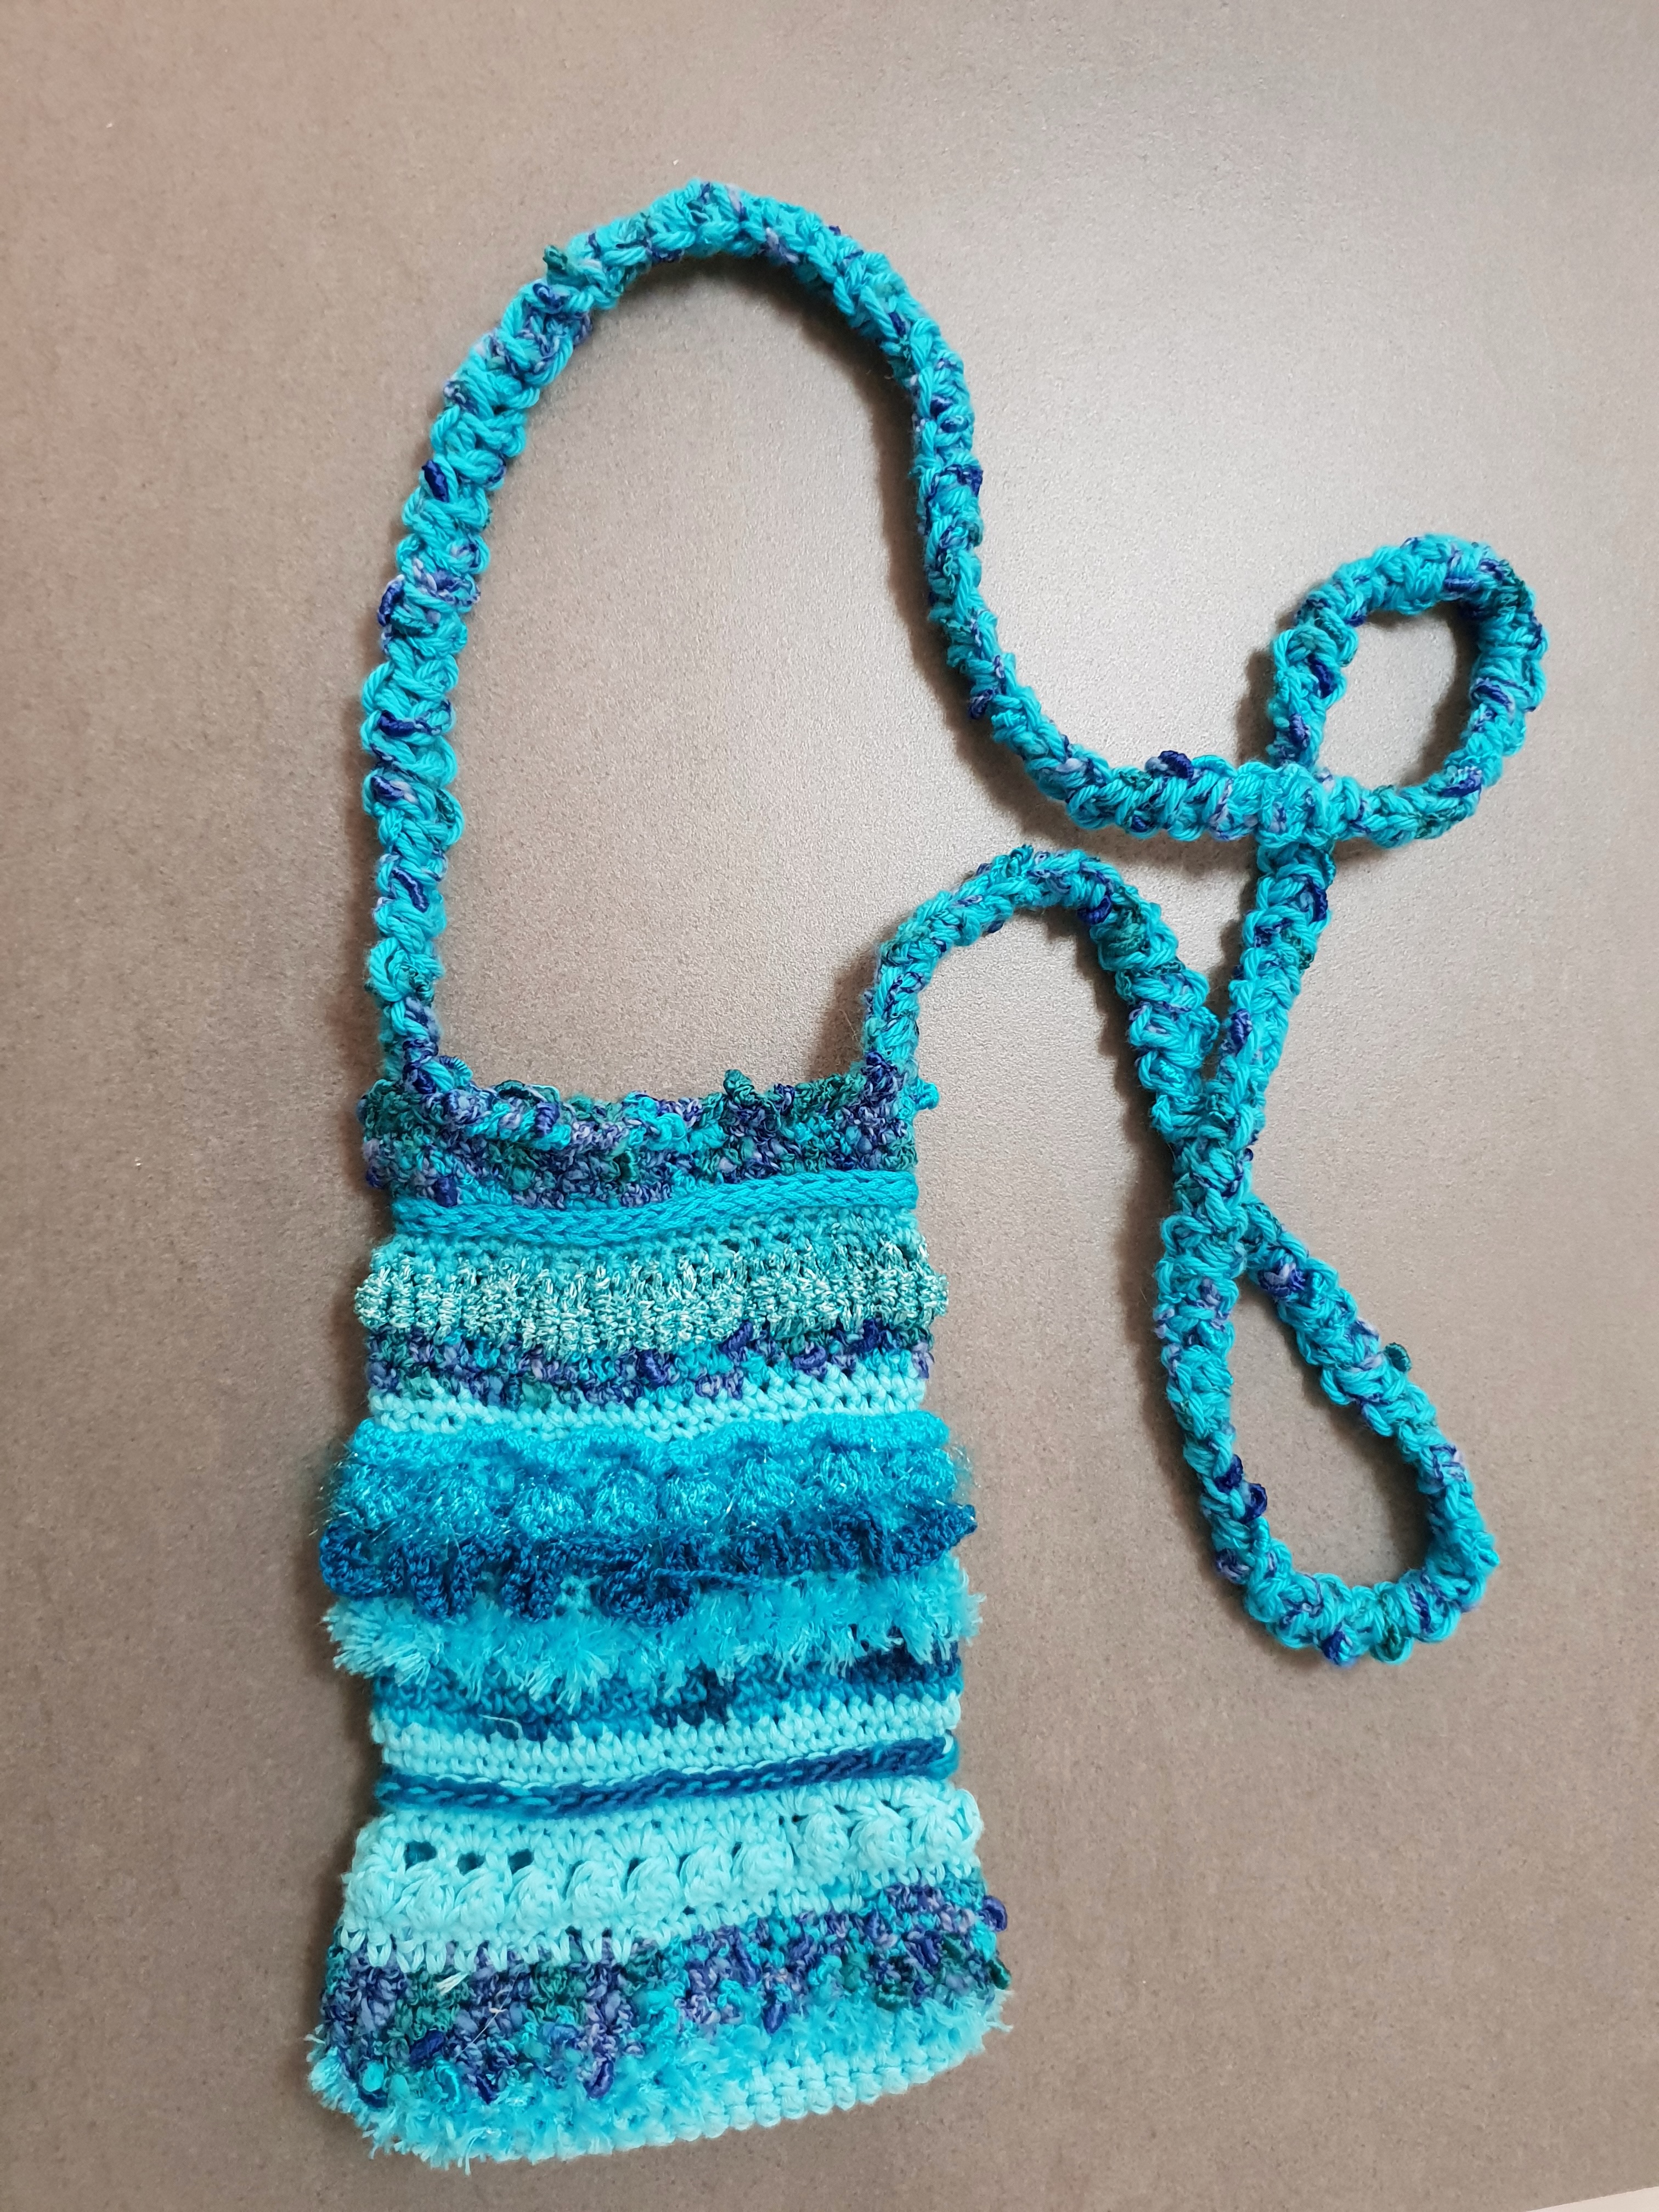
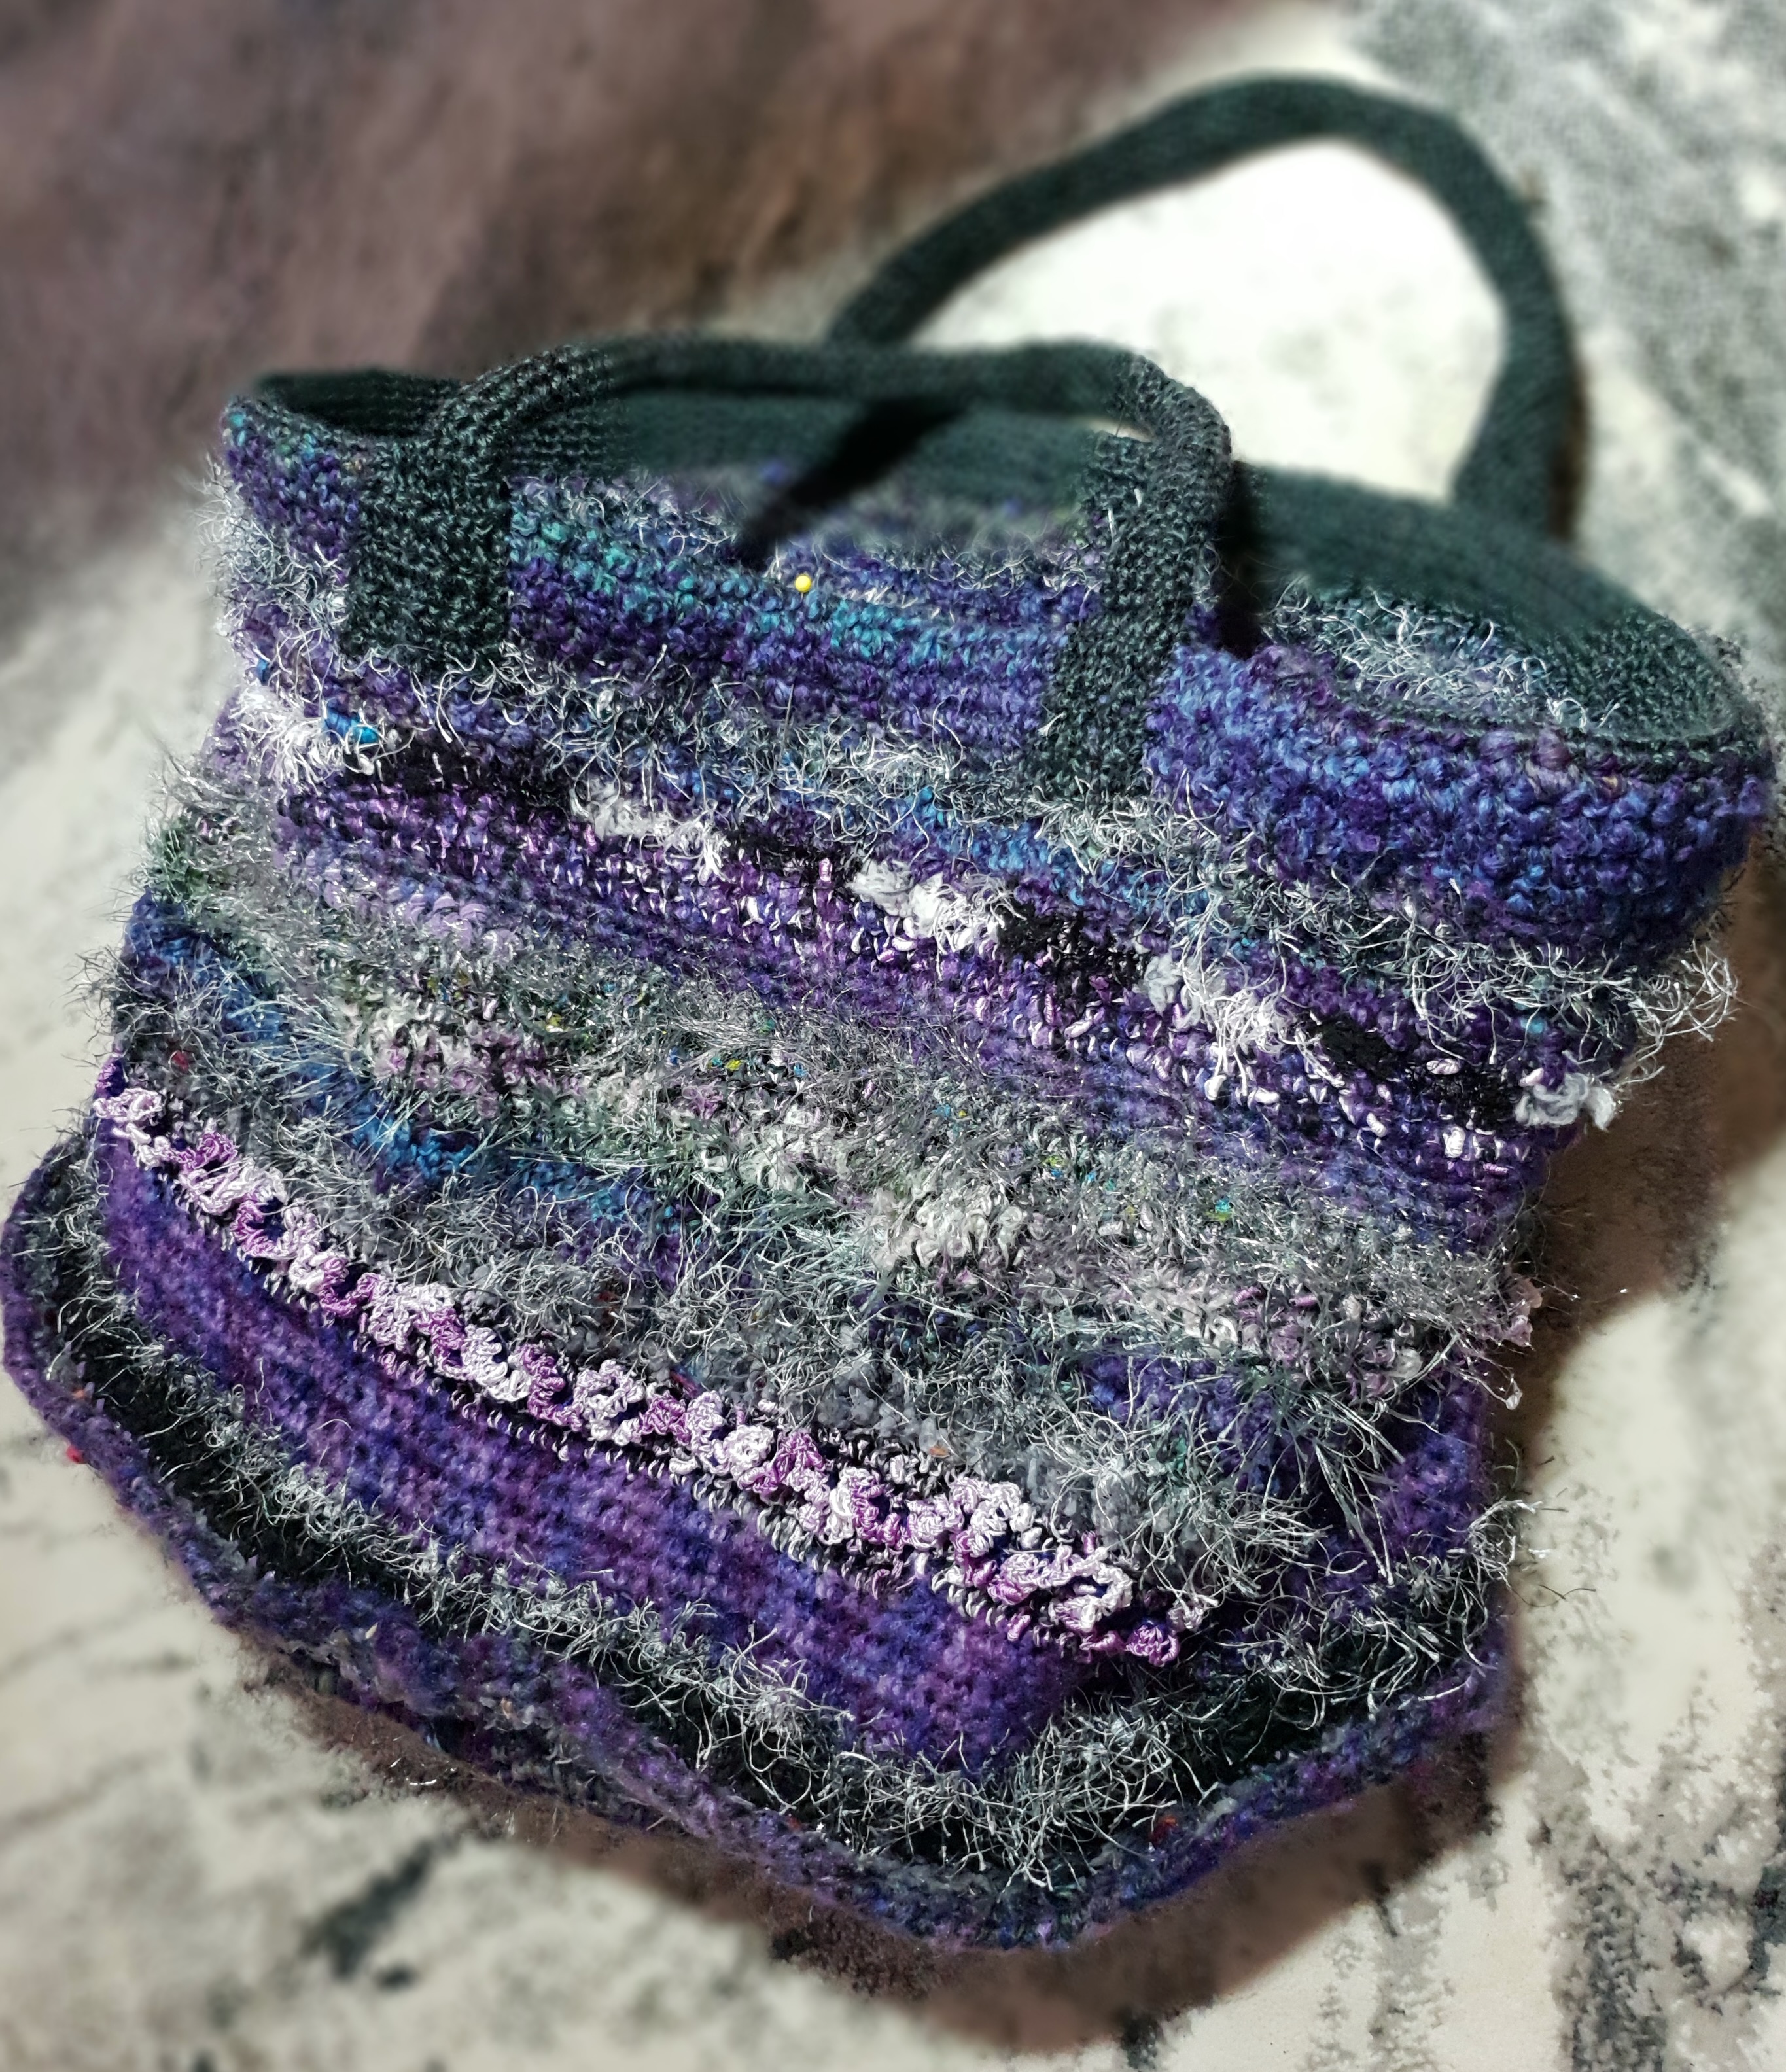
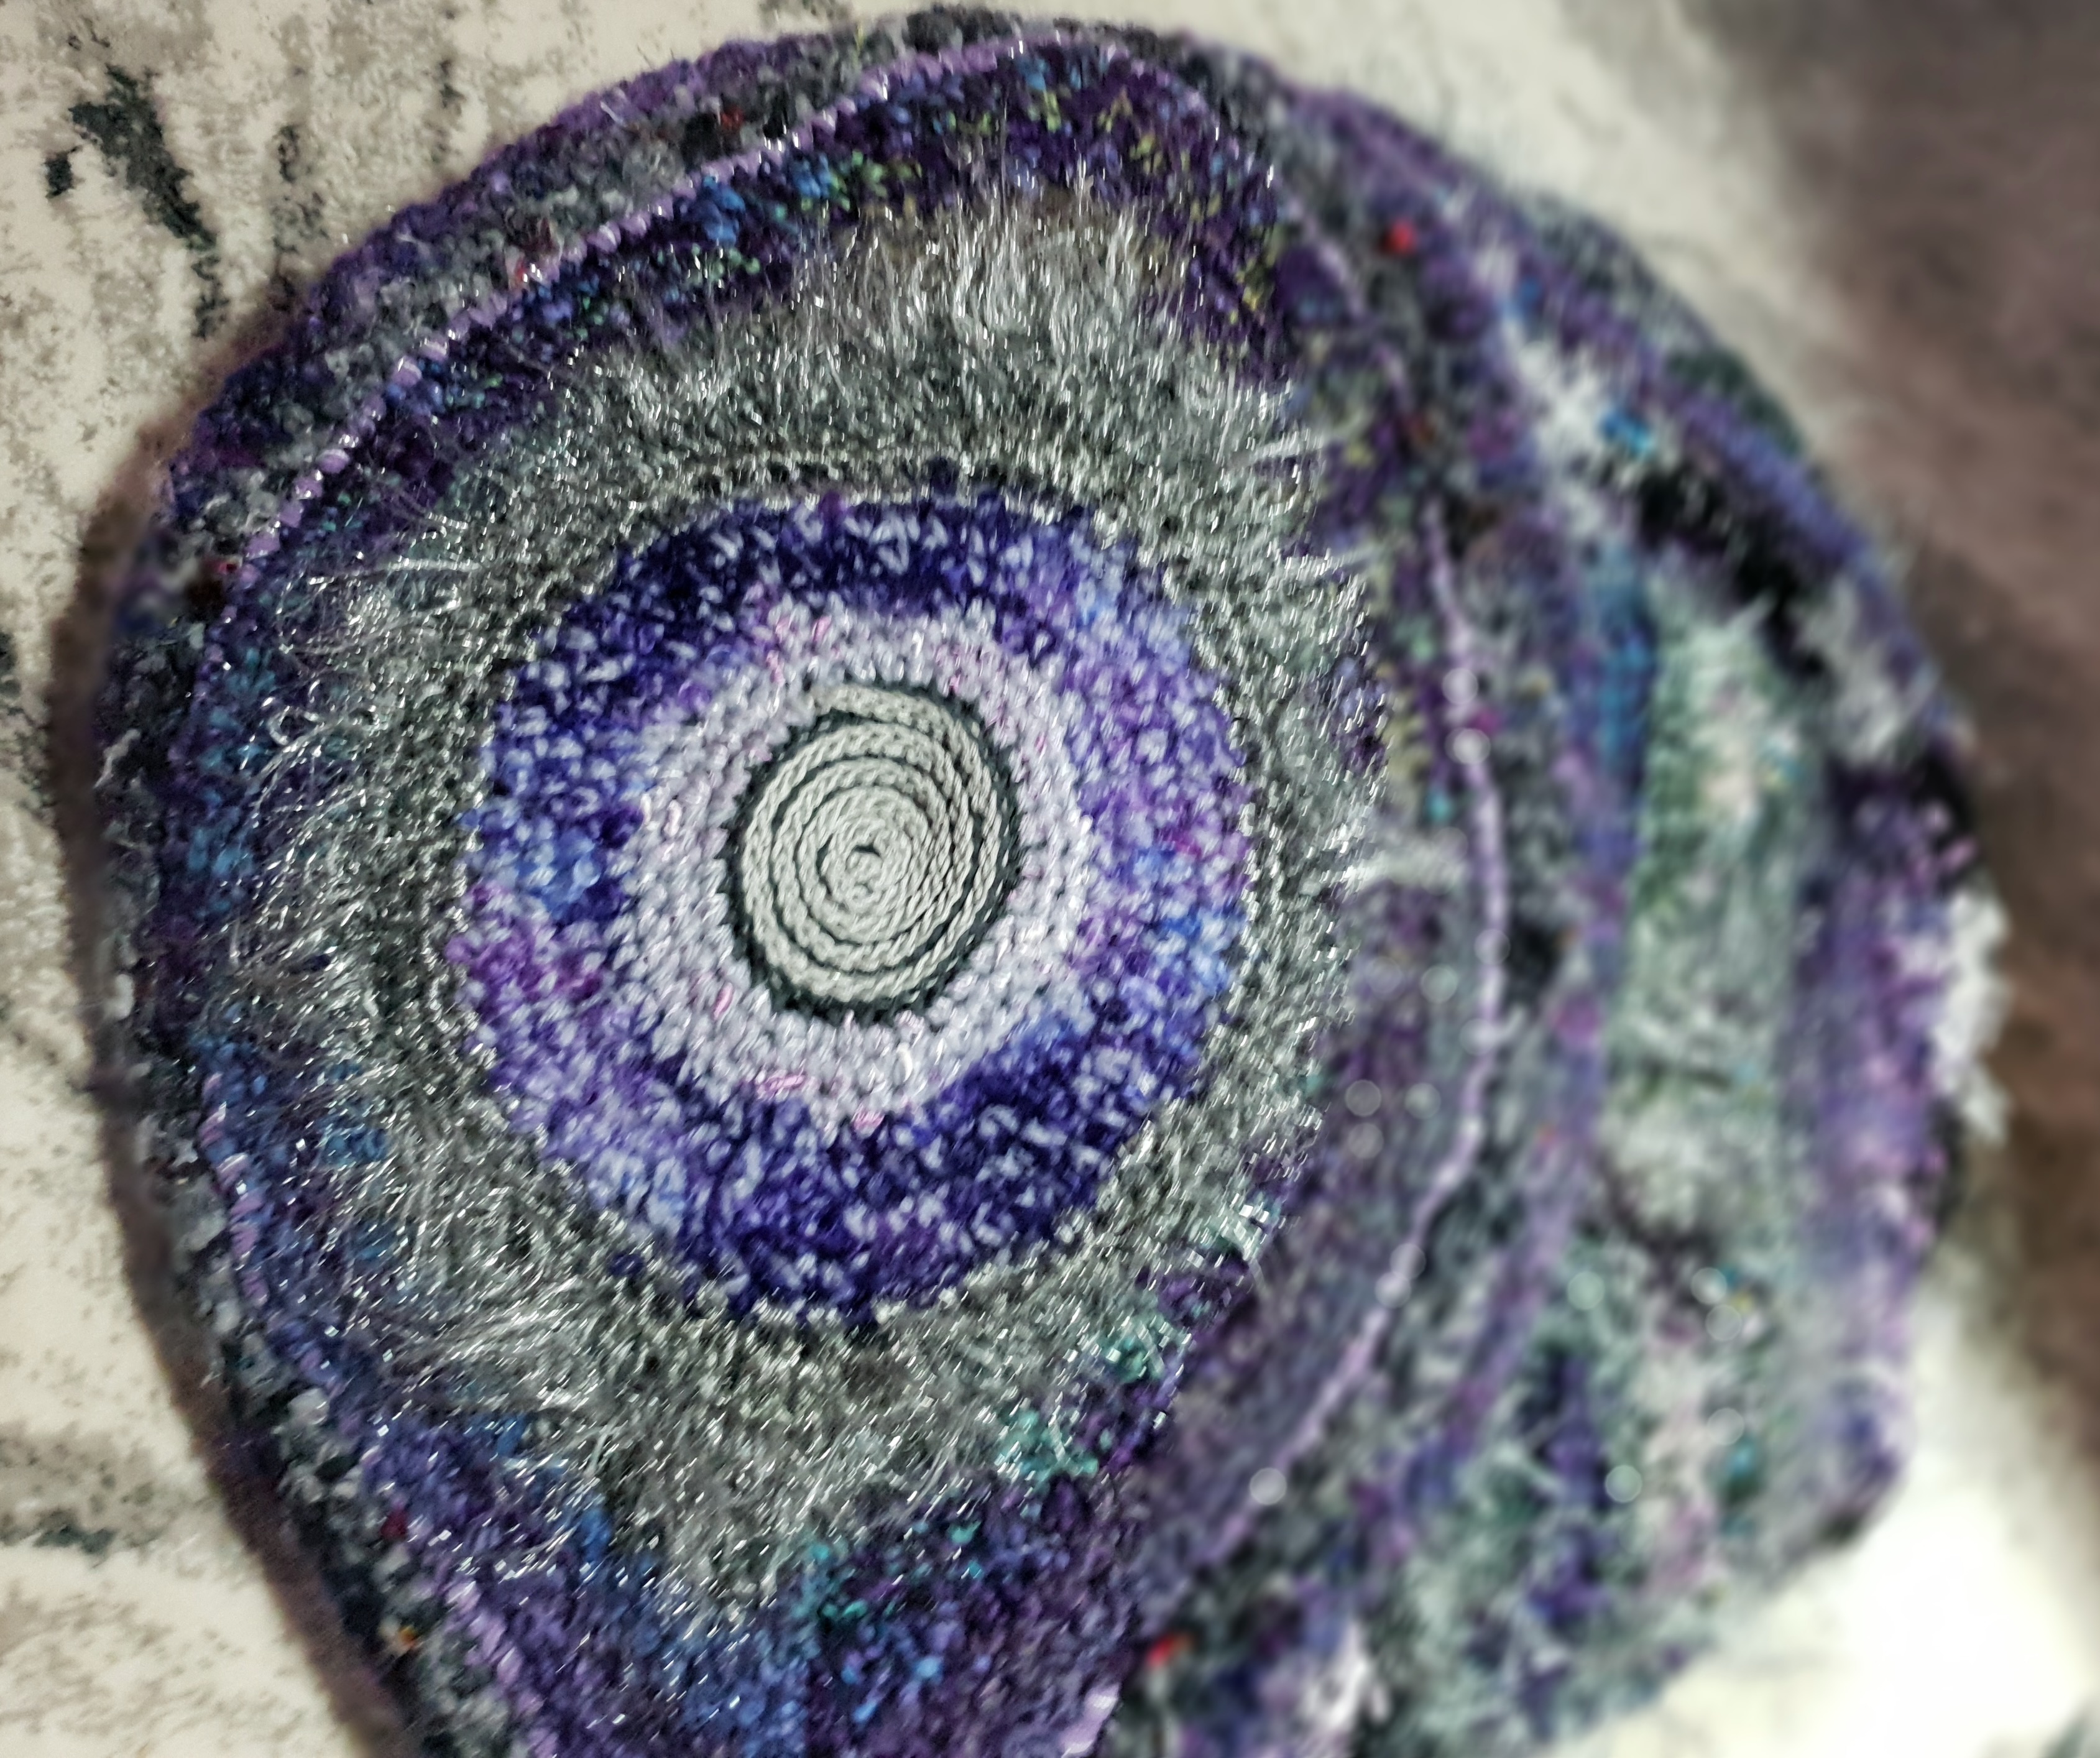
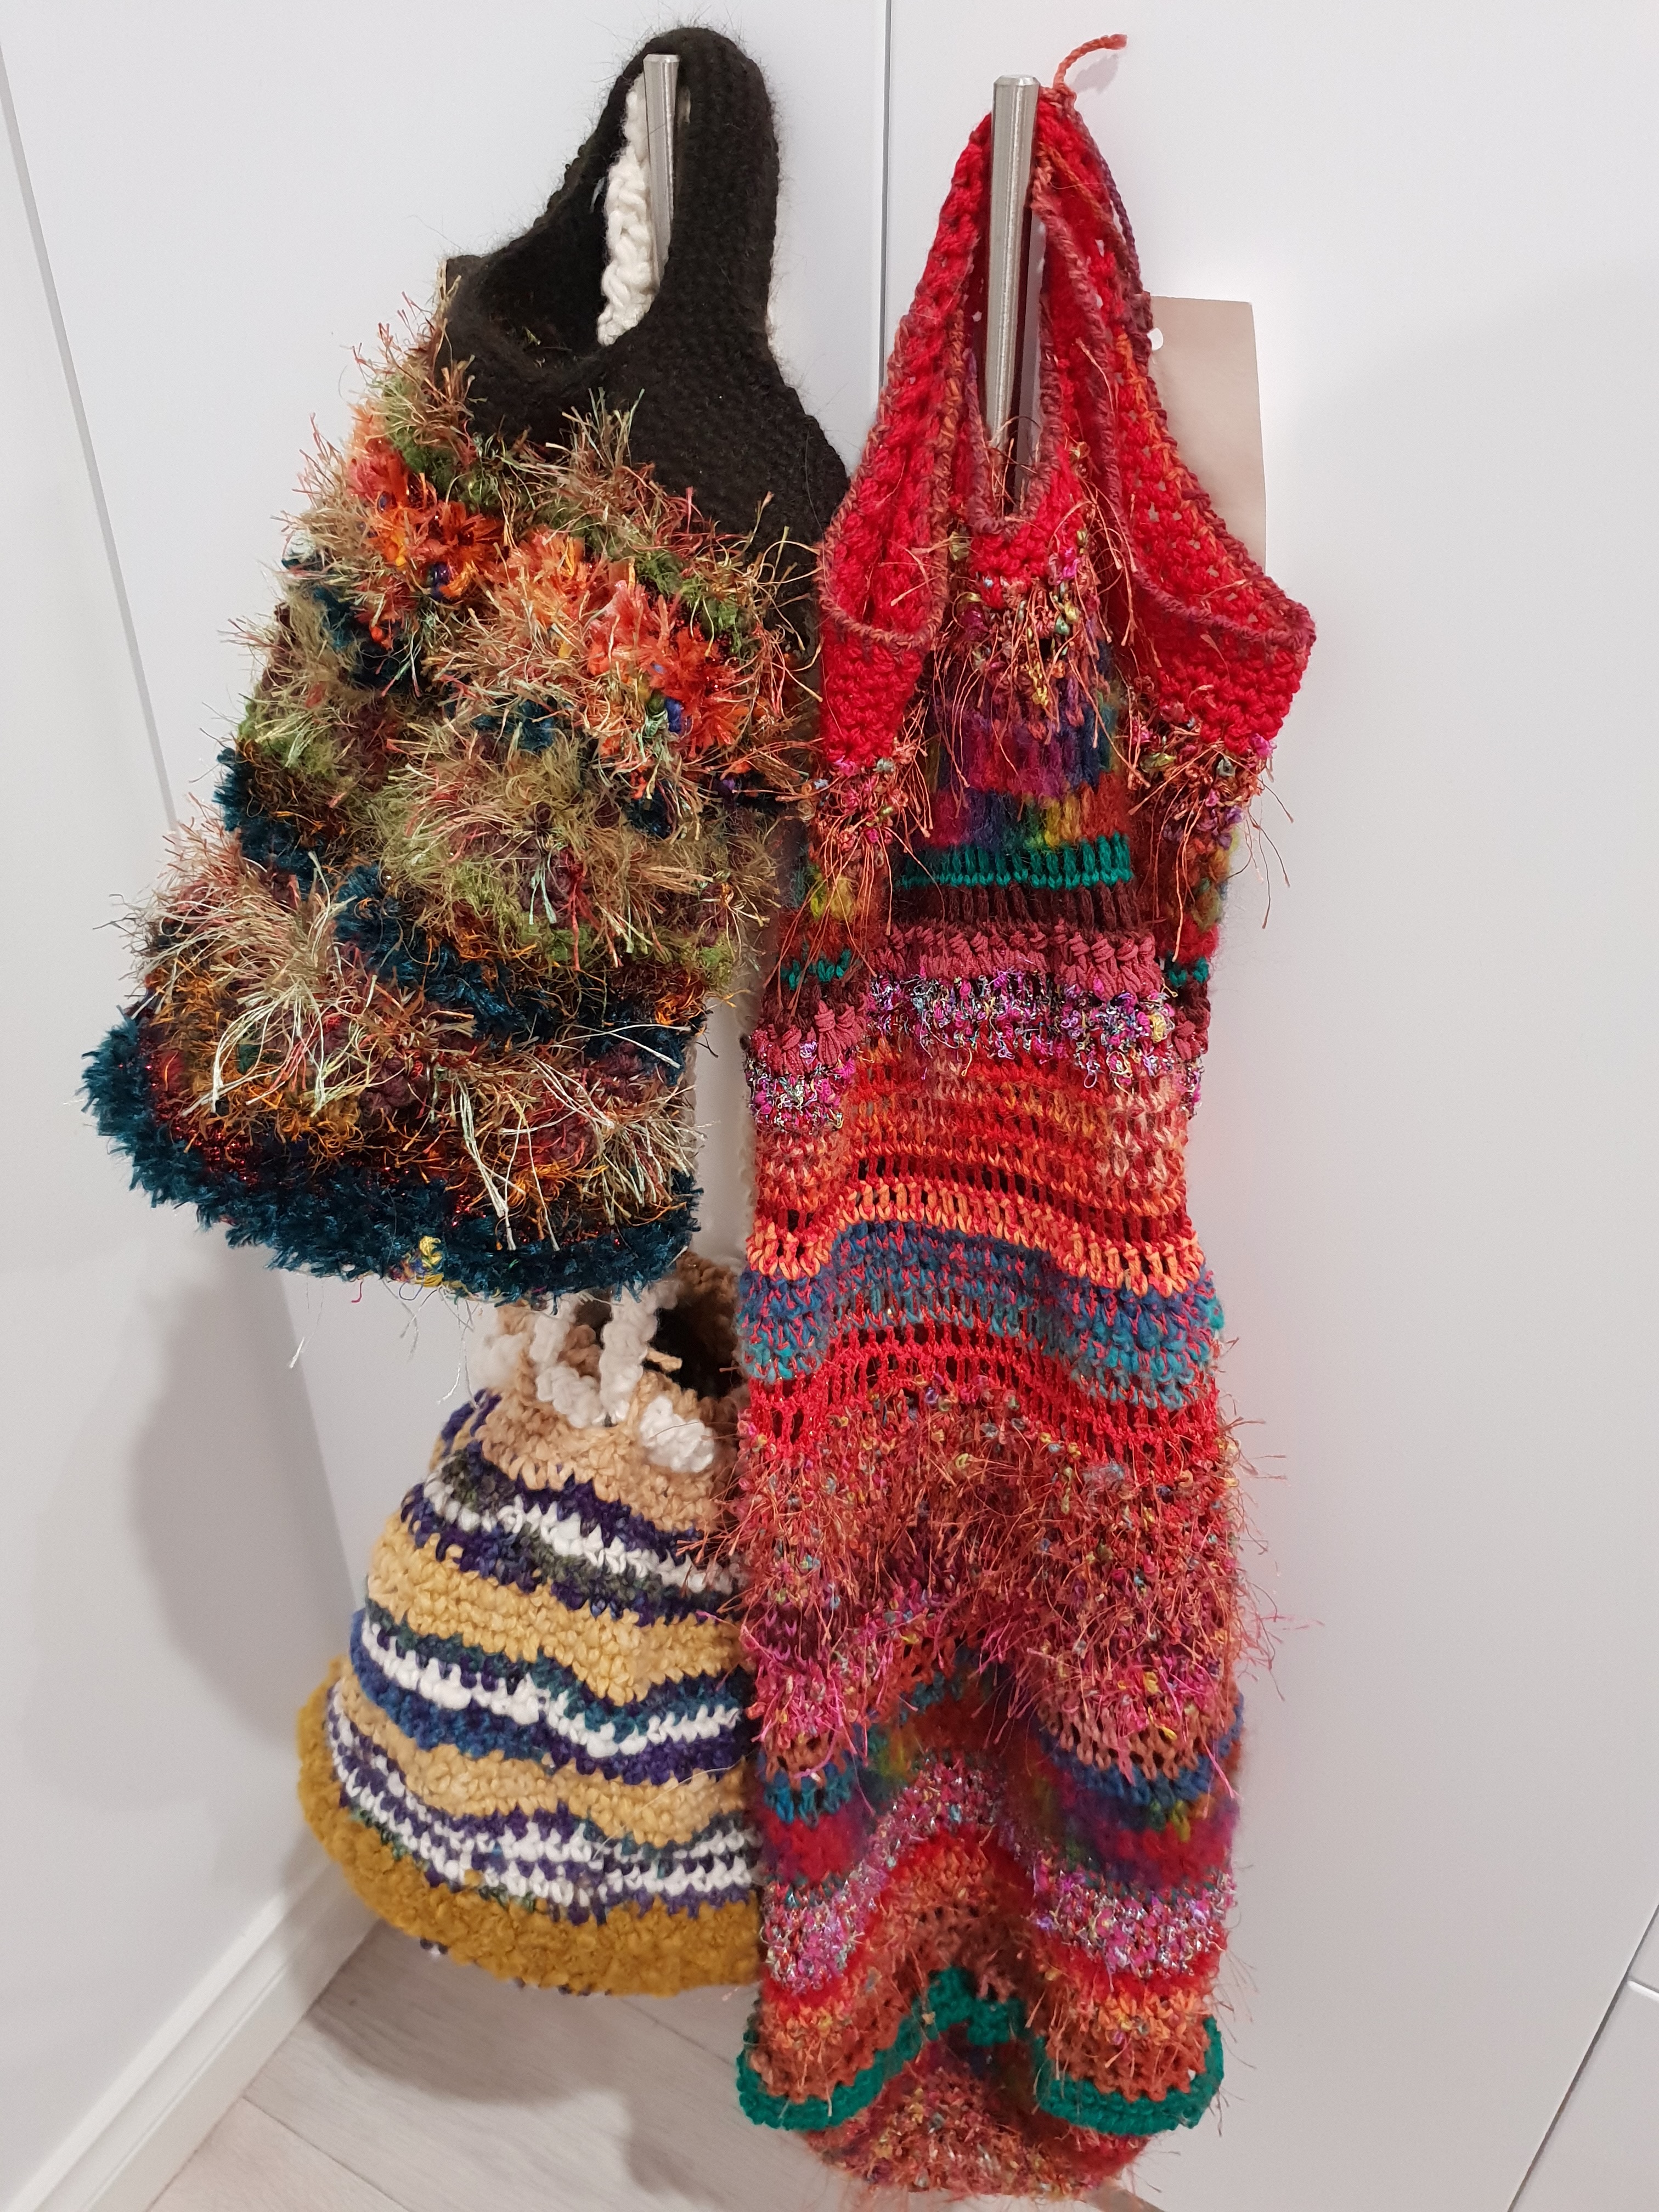
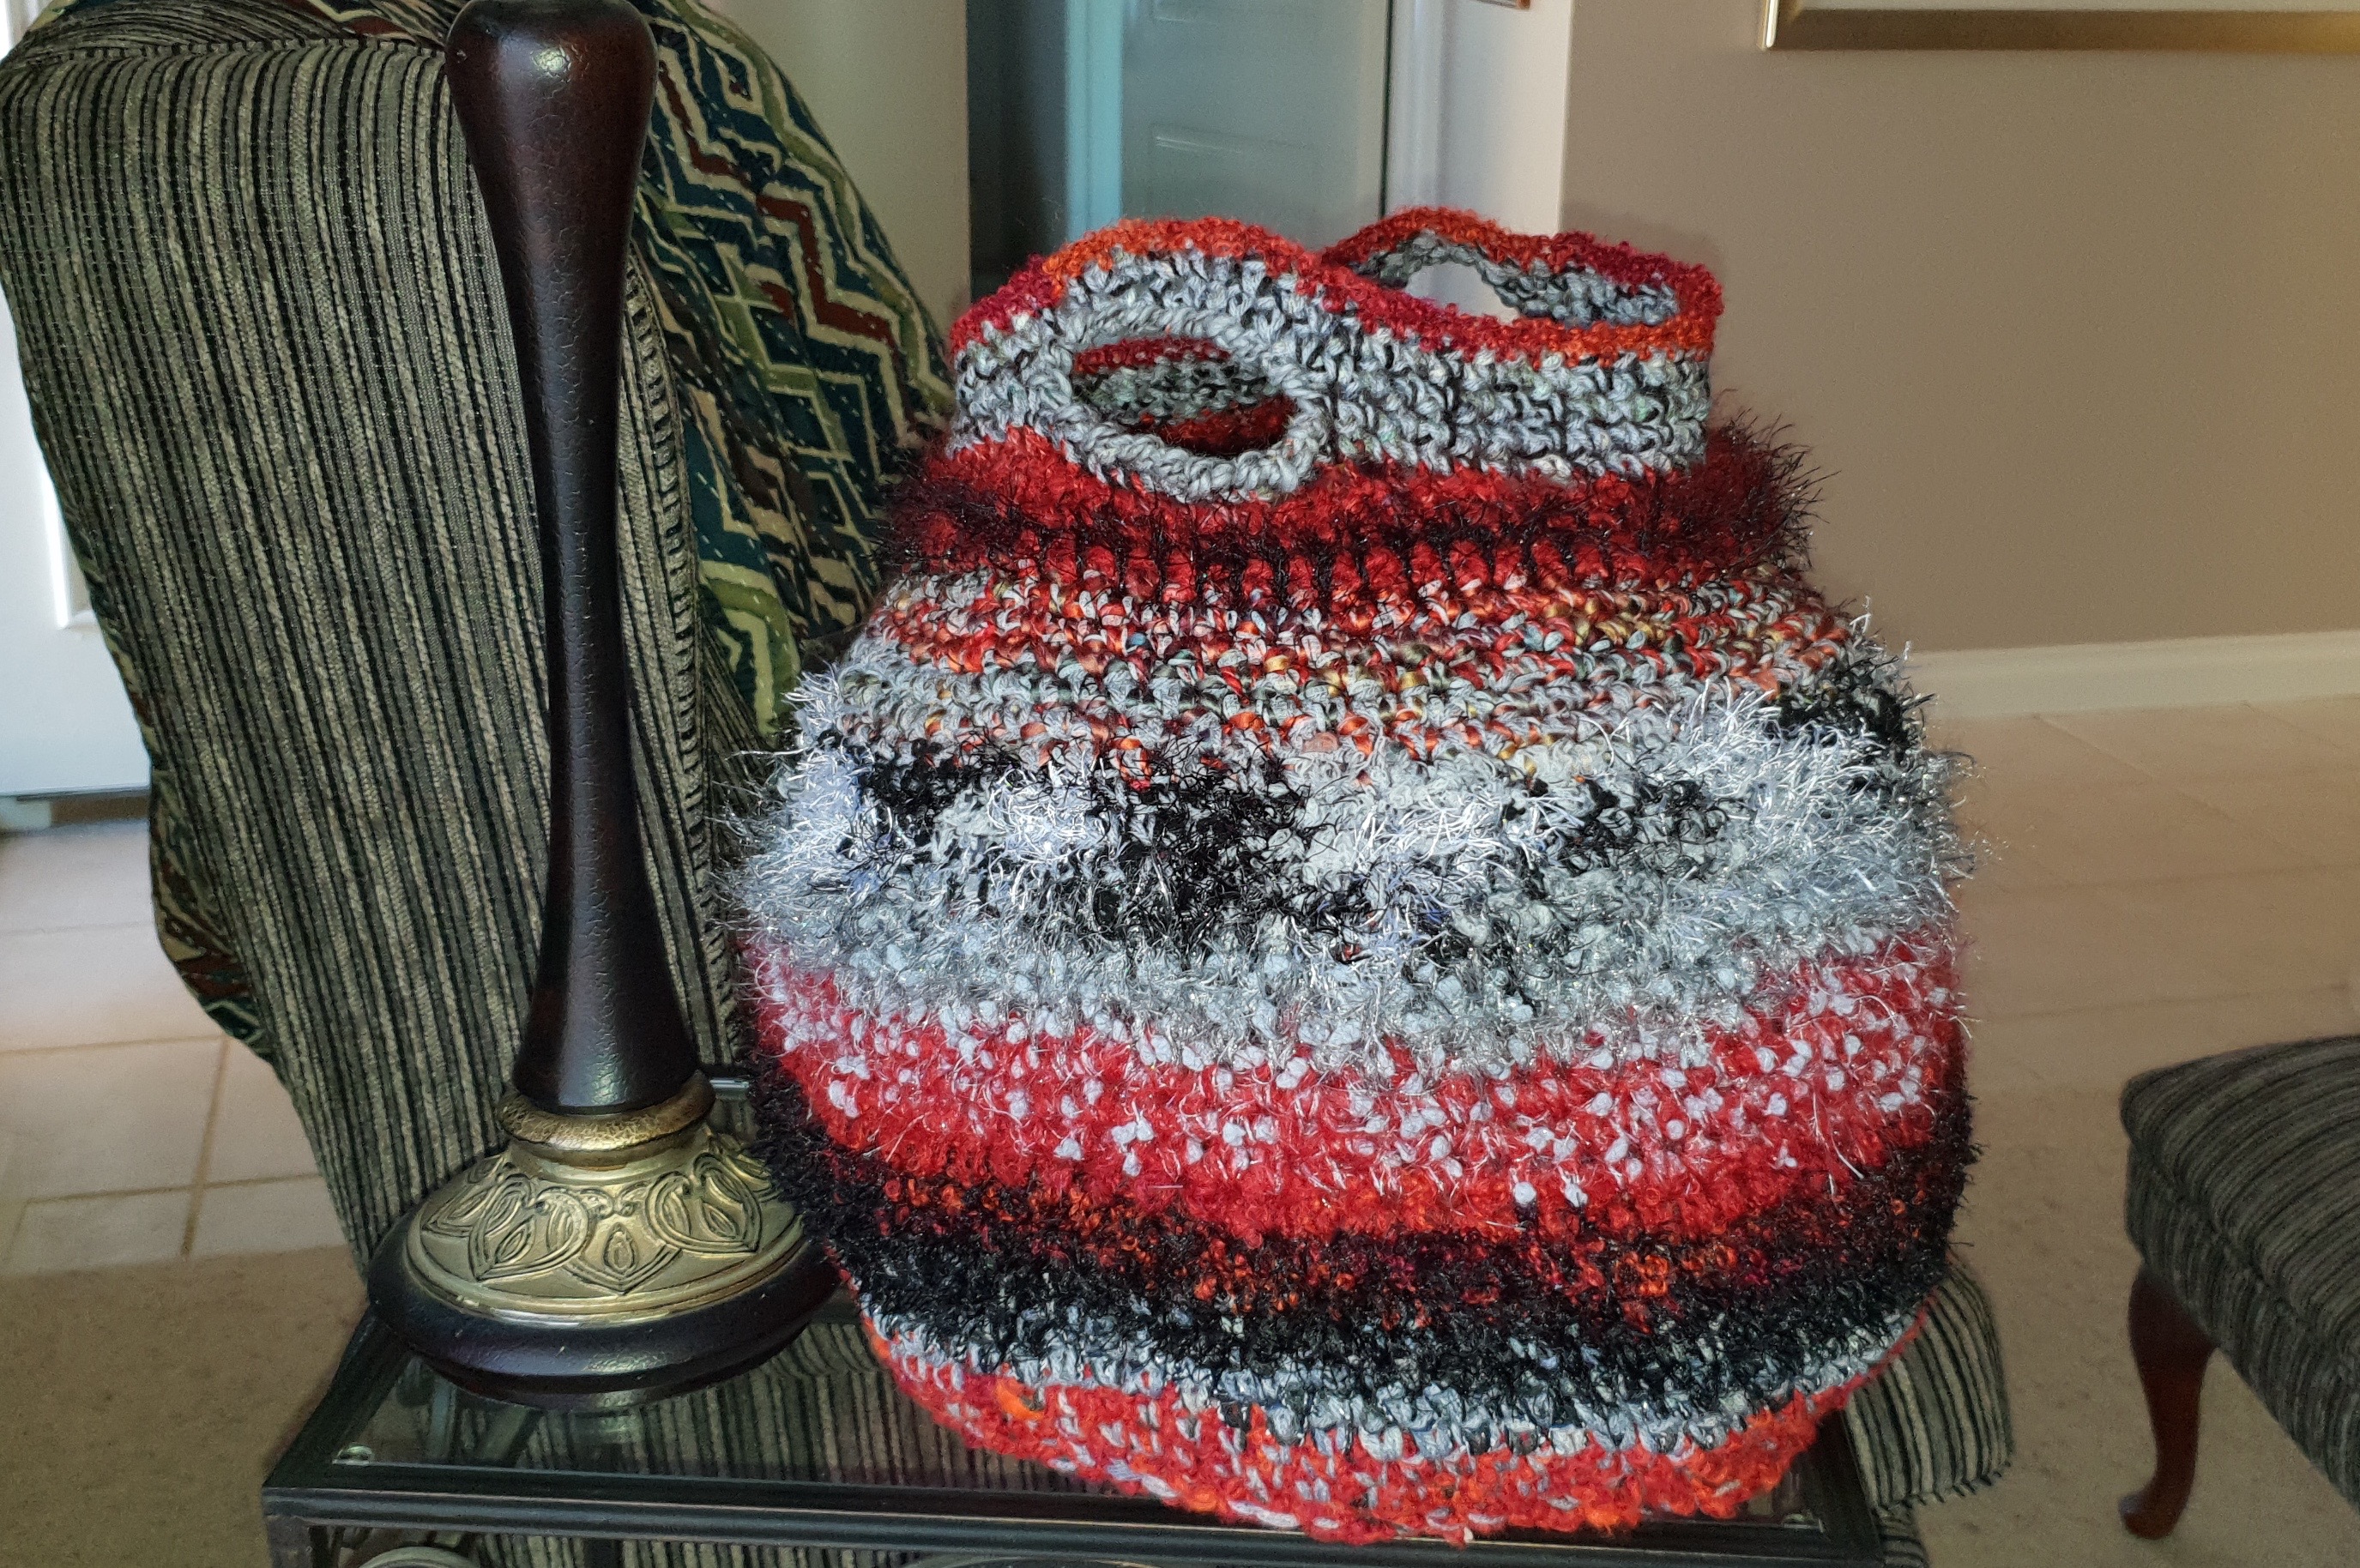
This was one of the first. A large bag that actually informed the colour scheme for a refurbished family room! All double crochet (US single crochet) with yarns combined when necessary to maintain the weight As a switch from chunky to fine, I plied some very fine hand-dyed weft threads bought in weaving villages in West Timor with commercial embroidery threads to make a pouch for the mobile phone and the credit card when walking….the cord is a Romanian lace braid.This phone bag was sheer indulgence in using colour. I haven’t ever used it because it’s so lairy.! Again, the cord is a Romanian lace braidI strengthened the base of this larger bag by cutting thick cardboard from a box of wine and covering it with plastic wrap so it wouldn’t absorb water if any was around. Then I encased the base in black fabric and inserted it into the bottom of the bag. The bag handles are lovely. The consist of a spiral crocheted cord with a flange on each end. This makes it easy to sew the handle neatly onto the bag. Instructions? See this youtube video: youtube.com/watch?v=7dKQ-gP2U6A&t=31sThe bottom of the bag above.Detail of the bag above.A cute little bag made for a Secret Santa in one of my textile groups.There is REALLY thick yarn in this one. Spot the hair of my Rag Doll cat!A bag trio. The one on the right looks very sad. It once had a purpose which was to hold lots of yarn but since I put more cupboards in it hasn’t had a real job.Sometimes bags become vessels! How? When the one in the first image on this post is stuffed! Quite sculptural.


 Then I rearranged the balls into my desired shading order:
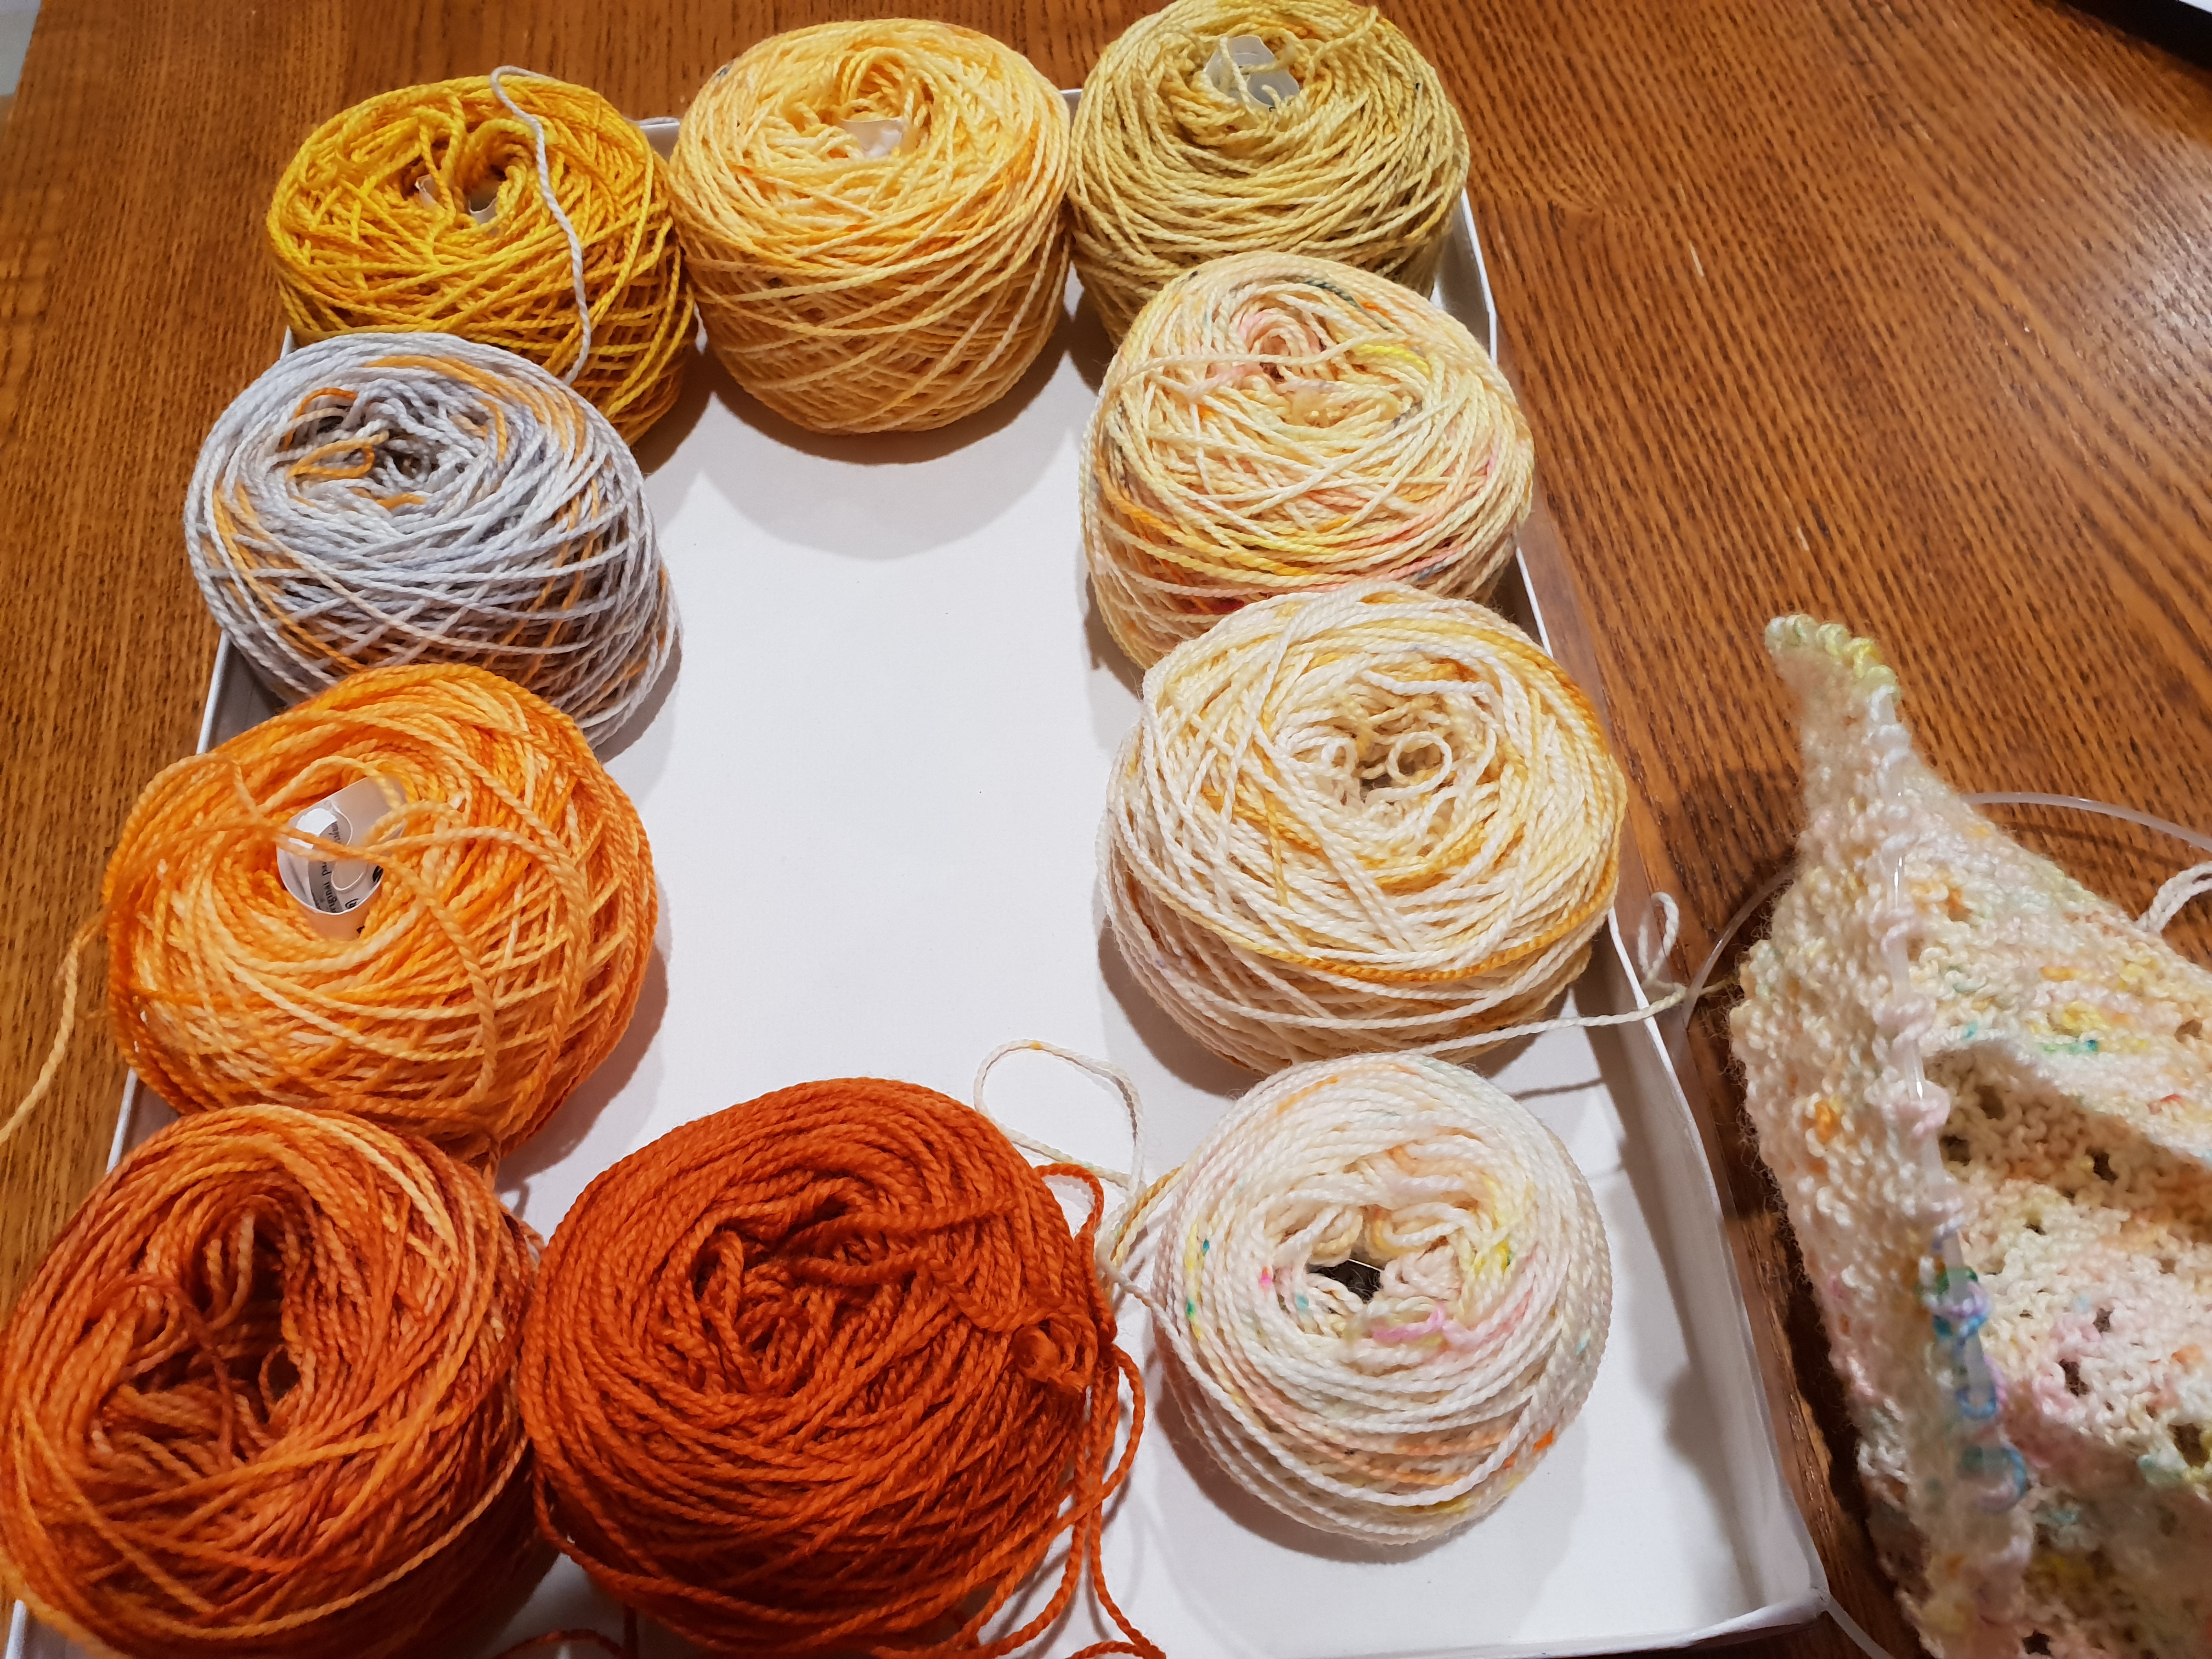 I am a relatively loose knitter so I decided to use a circular 3.5mm needle rather than the recommended 3.75mm needle. I did not do a tension test as I rely on my own judgement and, besides, a wrap’s dimensions are not as critical as those of a worn garment.